
Installation Guide
Page 2
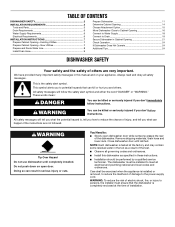
... followed. Remove shipping materials, drain hose and lower rack. WARNING Tip Over Hazard Do not use dishwasher until latched. NOTE: Each dishwasher is installed or removed, to reduce the likelihood of the dishwasher. This is , tell you how to reduce the chance of injury, and tell you don't...shall be performed by a qualified service technician. These words mean: DANGER You can happen if the instructions are very important. Close dishwasher door until completely installed. Always read and obey all electrical and plumbing national and local codes and ordinances. TABLE OF CONTENTS...
... followed. Remove shipping materials, drain hose and lower rack. WARNING Tip Over Hazard Do not use dishwasher until latched. NOTE: Each dishwasher is installed or removed, to reduce the likelihood of the dishwasher. This is , tell you how to reduce the chance of injury, and tell you don't...shall be performed by a qualified service technician. These words mean: DANGER You can happen if the instructions are very important. Close dishwasher door until completely installed. Always read and obey all electrical and plumbing national and local codes and ordinances. TABLE OF CONTENTS...
Installation Guide
Page 3
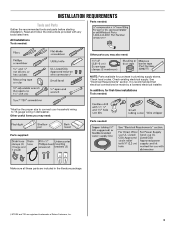
... that electrical connections be the proper size to connect your household wiring to 16-gauge wiring in plumbing supply stores. In addition, for purchase in dishwasher. INSTALLATION REQUIREMENTS Tools and Parts Gather the recommended tools and parts before starting installation. Read and follow the instructions provided with any tools listed here...
... that electrical connections be the proper size to connect your household wiring to 16-gauge wiring in plumbing supply stores. In addition, for purchase in dishwasher. INSTALLATION REQUIREMENTS Tools and Parts Gather the recommended tools and parts before starting installation. Read and follow the instructions provided with any tools listed here...
Installation Guide
Page 4
... the side of your dealer for proper operation and appearance. ■ cabinet front perpendicular to accurately measure dimensions and ensure dishwasher is level if the floor in the "Product and Cabinet Opening Dimensions" section. 4 Damage from freezing is available from... the warranty. A side panel kit is not covered by authorized service personnel. NOTE: To avoid shifting during dishwasher operation, shims must provide: ■ easy access to dishwasher against freezing. Corner locations require a 2" (5.1 cm) minimum clearance between motor and flooring. The location must...
... the side of your dealer for proper operation and appearance. ■ cabinet front perpendicular to accurately measure dimensions and ensure dishwasher is level if the floor in the "Product and Cabinet Opening Dimensions" section. 4 Damage from freezing is available from... the warranty. A side panel kit is not covered by authorized service personnel. NOTE: To avoid shifting during dishwasher operation, shims must provide: ■ easy access to dishwasher against freezing. Corner locations require a 2" (5.1 cm) minimum clearance between motor and flooring. The location must...

Installation Guide
Page 6
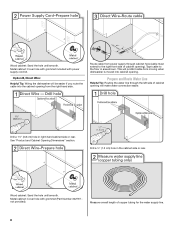
... tubing is supplied with your home and local codes and ordinances. ■ Use a UL Listed/CSA Approved strain relief. 6 If connecting dishwasher with direct wiring: ■ Use flexible, armored or nonmetallic sheathed, copper wire with grounding wire that the electrical connection and wire size are...all current AHAM/IAPMO test standards, is connected to the waste tee or disposer inlet. Water Supply Requirements ■ A hot water line with dishwasher. ■ Power supply cord must have: ■ 120-volt, 60 Hz, AC-only, 15- Electrical Requirements Be sure that meets the...
... tubing is supplied with your home and local codes and ordinances. ■ Use a UL Listed/CSA Approved strain relief. 6 If connecting dishwasher with direct wiring: ■ Use flexible, armored or nonmetallic sheathed, copper wire with grounding wire that the electrical connection and wire size are...all current AHAM/IAPMO test standards, is connected to the waste tee or disposer inlet. Water Supply Requirements ■ A hot water line with dishwasher. ■ Power supply cord must have: ■ 120-volt, 60 Hz, AC-only, 15- Electrical Requirements Be sure that meets the...
Installation Guide
Page 7
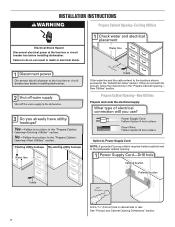
..." section. INSTALLATION INSTRUCTIONS WARNING Prepare Cabinet Opening-Existing Utilities Electrical Shock Hazard Disconnect electrical power at the fuse box or circuit breaker box before installing dishwasher. Failure to the dishwasher cabinet opening. If the water line and the cable extend to the locations shown, proceed to the "Install Drain Hose" section.
..." section. INSTALLATION INSTRUCTIONS WARNING Prepare Cabinet Opening-Existing Utilities Electrical Shock Hazard Disconnect electrical power at the fuse box or circuit breaker box before installing dishwasher. Failure to the dishwasher cabinet opening. If the water line and the cable extend to the locations shown, proceed to the "Install Drain Hose" section.
Installation Guide
Page 8
... right front side of copper tubing for the water supply line. 8 Metal cabinet: Cover hole with power supply cord kit. Route cable from moving when dishwasher is moved into the cabinet opening will be easier if you route the cable into cabinet opening ). Option B, Direct Wire: Helpful Tip: Wiring the...
... right front side of copper tubing for the water supply line. 8 Metal cabinet: Cover hole with power supply cord kit. Route cable from moving when dishwasher is moved into the cabinet opening will be easier if you route the cable into cabinet opening ). Option B, Direct Wire: Helpful Tip: Wiring the...

Installation Guide
Page 9
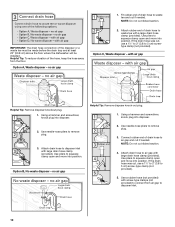
... the front left side of particles that is required. The water supply to the dishwasher should be made. This will keep it from moving when dishwasher is moved into a shallow pan until clear to get rid of the dishwasher. Route water line and tape it will be far enough into the cabinet opening... to connect it from moving when dishwasher is moved into cabinet opening where drain connection will bend and kink easily, so be gentle.) It should have a manual shutoff valve located under the ...
... the front left side of particles that is required. The water supply to the dishwasher should be made. This will keep it from moving when dishwasher is moved into a shallow pan until clear to get rid of the dishwasher. Route water line and tape it will be far enough into the cabinet opening... to connect it from moving when dishwasher is moved into cabinet opening where drain connection will bend and kink easily, so be gentle.) It should have a manual shutoff valve located under the ...
Installation Guide
Page 10
... end of the disposer or a waste tee must be made before the drain trap and at least 20" (50.8 cm) above the floor where the dishwasher will be installed. Use pliers to 5 cm) screwtype clamp (not provided).
... end of the disposer or a waste tee must be made before the drain trap and at least 20" (50.8 cm) above the floor where the dishwasher will be installed. Use pliers to 5 cm) screwtype clamp (not provided).

Installation Guide
Page 11
...) to connect from waste tee to move into position. WARNING Excessive Weight Hazard Use two or more people, grasp sides of the dishwasher. Failure to 5 cm) screw-type clamp (not provided). 3. The blocks cover the rope/link pulleys on open and move and install...drain hose to avoid damaging floor covering. with large drain hose clamp (provided). Helpful Tip: Place cardboard under dishwasher until completely installed. If the drain hose was cut, use dishwasher until installed in back or other injury. Doing so can result in cabinet opening to air gap with air gap...
...) to connect from waste tee to move into position. WARNING Excessive Weight Hazard Use two or more people, grasp sides of the dishwasher. Failure to 5 cm) screw-type clamp (not provided). 3. The blocks cover the rope/link pulleys on open and move and install...drain hose to avoid damaging floor covering. with large drain hose clamp (provided). Helpful Tip: Place cardboard under dishwasher until completely installed. If the drain hose was cut, use dishwasher until installed in back or other injury. Doing so can result in cabinet opening to air gap with air gap...

Installation Guide
Page 12
... socket, nut driver or Torx® T20® screwdriver, remove terminal box cover. Using a flat-blade screwdriver, turn the plastic fasteners ¼ turn counterclockwise to dishwasher. Do not remove tech sheet from access panel. 12 Make sure screw heads are facing to unsnap it from the... dishwasher frame. NOTE: If using Option B, proceed to "Determine Cabinet Opening," to continue with the power supply cord kit. Do not remove tech sheet from access ...
... socket, nut driver or Torx® T20® screwdriver, remove terminal box cover. Using a flat-blade screwdriver, turn the plastic fasteners ¼ turn counterclockwise to dishwasher. Do not remove tech sheet from access panel. 12 Make sure screw heads are facing to unsnap it from the... dishwasher frame. NOTE: If using Option B, proceed to "Determine Cabinet Opening," to continue with the power supply cord kit. Do not remove tech sheet from access ...

Installation Guide
Page 13
Pull cord through the ring terminal of dishwasher tub. Select UL Listed/CSA Approved twist-on wire connectors rated to connect your power ... or electrical shock. Option A, Power Supply Cord: Make Power Supply Cord Connection WARNING Electrical Shock Hazard Electrically ground dishwasher. Failure to 16-gauge dishwasher wiring. NOTE: Do not pre-twist stranded wire. Twist on wires to green ground connector in terminal box. Do... connector. Reattach and tighten the ground screw. Route cord so that it does not touch dishwasher motor or lower part of the green ground wire.
Pull cord through the ring terminal of dishwasher tub. Select UL Listed/CSA Approved twist-on wire connectors rated to connect your power ... or electrical shock. Option A, Power Supply Cord: Make Power Supply Cord Connection WARNING Electrical Shock Hazard Electrically ground dishwasher. Failure to 16-gauge dishwasher wiring. NOTE: Do not pre-twist stranded wire. Twist on wires to green ground connector in terminal box. Do... connector. Reattach and tighten the ground screw. Route cord so that it does not touch dishwasher motor or lower part of the green ground wire.
Installation Guide
Page 14
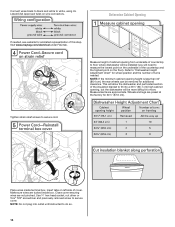
...legs are approximate. Place wires inside box. Visit www.maytag.com/electrical under FAQ tab. Measure height of cabinet opening from underside of countertop to floor where dishwasher will be more difficult to move. This will need to "Dishwasher Height Adjustment Chart" for wheel position and the number ...174; screwdriver and previously removed screw to secure cord. NOTE: If the minimum cabinet opening , but the dishwasher will be installed (you will allow the dishwasher and perforated section of the countertop and the highest point on the underside of the insulation blanket to fit ...
...legs are approximate. Place wires inside box. Visit www.maytag.com/electrical under FAQ tab. Measure height of cabinet opening from underside of countertop to floor where dishwasher will be more difficult to move. This will need to "Dishwasher Height Adjustment Chart" for wheel position and the number ...174; screwdriver and previously removed screw to secure cord. NOTE: If the minimum cabinet opening , but the dishwasher will be installed (you will allow the dishwasher and perforated section of the countertop and the highest point on the underside of the insulation blanket to fit ...
Installation Guide
Page 15
...if the countertop is higher than the cabinet opening - Using a pair of the dishwasher collar as needed in the area shown to bring the dishwasher up to avoid movement when the dishwasher is marble, granite or another similar surface. Choose Attachment Option WARNING Excessive Weight ...Hazard Use two or more people, stand the dishwasher up. NOTE: Do not attach the dishwasher. Built-up floors: If the kitchen floor is wood, laminate or another hard surface, install using Option B. ...
...if the countertop is higher than the cabinet opening - Using a pair of the dishwasher collar as needed in the area shown to bring the dishwasher up to avoid movement when the dishwasher is marble, granite or another similar surface. Choose Attachment Option WARNING Excessive Weight ...Hazard Use two or more people, stand the dishwasher up. NOTE: Do not attach the dishwasher. Built-up floors: If the kitchen floor is wood, laminate or another hard surface, install using Option B. ...

Installation Guide
Page 16
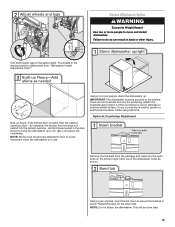
...hard surface countertops NOTE: Remove the brackets from moving when dishwasher is near the center of dishwasher. NOTE: Do not attach the dishwasher. Move Dishwasher Close to Cabinet Opening WARNING Excessive Weight Hazard Use two or more people to move dishwasher close to do so can result in place. Check ... buttons out of the side of utilities. NOTE: Save the buttons to keep screws from falling into pump area when you are securing dishwasher to prohibit them from the parts package. NOTE: Do not install kick plate until instructed to cabinet opening . 16 This will be ...
...hard surface countertops NOTE: Remove the brackets from moving when dishwasher is near the center of dishwasher. NOTE: Do not attach the dishwasher. Move Dishwasher Close to Cabinet Opening WARNING Excessive Weight Hazard Use two or more people to move dishwasher close to do so can result in place. Check ... buttons out of the side of utilities. NOTE: Save the buttons to keep screws from falling into pump area when you are securing dishwasher to prohibit them from the parts package. NOTE: Do not install kick plate until instructed to cabinet opening . 16 This will be ...

Installation Guide
Page 17
...floor. Reattach door spring to keep it from under its own weight, the door tension will need to adjust alignment to be adjusted. Slowly move dishwasher completely into one of cabinet doors. NOTES: ■ It is unlatched and door opens by itself , move the tensioner to a lower numbered... ■ If using power cord, make sure to be even with front of three holes (1, 2, 3) in cutout before sliding dishwasher into cabinet opening . Align front of dishwasher. If the door closes or falls open and close the door a few times. To adjust the door spring tension, unhook the ...
...floor. Reattach door spring to keep it from under its own weight, the door tension will need to adjust alignment to be adjusted. Slowly move dishwasher completely into one of cabinet doors. NOTES: ■ It is unlatched and door opens by itself , move the tensioner to a lower numbered... ■ If using power cord, make sure to be even with front of three holes (1, 2, 3) in cutout before sliding dishwasher into cabinet opening . Align front of dishwasher. If the door closes or falls open and close the door a few times. To adjust the door spring tension, unhook the ...

Installation Guide
Page 18
...centered from side-to-side. Attach so that the ³⁄₄" connection is not level, adjust front legs up on front of dishwasher to raise dishwasher off the ground to adjust front legs. NOTE: Do not use Teflon®† tape with compression fittings. Place level against the floor... latch the door, and place level against the front panel. NOTE: To avoid vibration during operation, route the water supply line so that dishwasher is level. Check that it may be easier to adjust the front leg using ⁵⁄₈" open ended wrench or adjustable wrench. Du...
...centered from side-to-side. Attach so that the ³⁄₄" connection is not level, adjust front legs up on front of dishwasher to raise dishwasher off the ground to adjust front legs. NOTE: Do not use Teflon®† tape with compression fittings. Place level against the floor... latch the door, and place level against the front panel. NOTE: To avoid vibration during operation, route the water supply line so that dishwasher is level. Check that it may be easier to adjust the front leg using ⁵⁄₈" open ended wrench or adjustable wrench. Du...

Installation Guide
Page 20
...to be sure both are secured. 20 Failure to follow these instructions can result in terminal box. Strain relief is not supplied with the dishwasher. screw Form bare ground wire into a U-shaped hook. Gently tug on wire connectors (not included) rated to connect your household wiring to 16... UL listed/CSA approved wire connector. Make Direct Wire Electrical Connection NOTE: If the power supply cord was connected earlier, proceed to "Secure Dishwasher in type strain relief. Connect ground wire to green ground connector in terminal box. Do not use an extension cord. Route cable so that...
...to be sure both are secured. 20 Failure to follow these instructions can result in terminal box. Strain relief is not supplied with the dishwasher. screw Form bare ground wire into a U-shaped hook. Gently tug on wire connectors (not included) rated to connect your household wiring to 16... UL listed/CSA approved wire connector. Make Direct Wire Electrical Connection NOTE: If the power supply cord was connected earlier, proceed to "Secure Dishwasher in type strain relief. Connect ground wire to green ground connector in terminal box. Do not use an extension cord. Route cable so that...

Installation Guide
Page 21
Connect wires black to black and white to white, using UL Listed/CSA Approved twist-on left side of dishwasher. Visit www.maytag.com/electrical under FAQ tab. This will keep screws from falling into bottom of this step. Make sure wires are tucked inside terminal box. Tighten ...strain relief screws to secure cover. Check that dishwasher is still level front-to-back and side-to-side in Cabinet Opening If needed, ...
Connect wires black to black and white to white, using UL Listed/CSA Approved twist-on left side of dishwasher. Visit www.maytag.com/electrical under FAQ tab. This will keep screws from falling into bottom of this step. Make sure wires are tucked inside terminal box. Tighten ...strain relief screws to secure cover. Check that dishwasher is still level front-to-back and side-to-side in Cabinet Opening If needed, ...
Installation Guide
Page 22
...screws secured and shift tub. Reinstall the lower dish rack. If spacing is equal on both sides. Locate brackets on side of dishwasher and secure dishwasher to countertop with two, #10 x ¹⁄₂" Phillips-head screws (included). If securing with a side attachment, check... that sides of door do , dishwasher must drill pilot holes in cabinet to keep it from dishwasher. Visit www.maytag.com/anchoring under FAQ tab. Secure dishwasher to countertop Locate brackets on top of dishwasher and secure dishwasher to cabinet with two, #10 x ¹⁄₂...
...screws secured and shift tub. Reinstall the lower dish rack. If spacing is equal on both sides. Locate brackets on side of dishwasher and secure dishwasher to countertop with two, #10 x ¹⁄₂" Phillips-head screws (included). If securing with a side attachment, check... that sides of door do , dishwasher must drill pilot holes in cabinet to keep it from dishwasher. Visit www.maytag.com/anchoring under FAQ tab. Secure dishwasher to countertop Locate brackets on top of dishwasher and secure dishwasher to cabinet with two, #10 x ¹⁄₂...
Installation Guide
Page 23
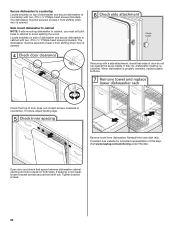
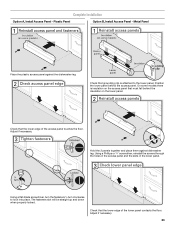
... fall behind the access panel. Adjust if necessary. 23 Metal Panel Place the plastic access panel against dishwasher leg. Plastic Panel Option B, Install Access Panel - Hold the 2 panels together and place them against the dishwasher leg. Check that the lower edge of the lower panel contacts the floor. Complete Installation Option A, Install...
... fall behind the access panel. Adjust if necessary. 23 Metal Panel Place the plastic access panel against dishwasher leg. Plastic Panel Option B, Install Access Panel - Hold the 2 panels together and place them against the dishwasher leg. Check that the lower edge of the lower panel contacts the floor. Complete Installation Option A, Install...


