

Dimension Guide
Page 1
...If required, the air gap should be connected to heat and detergent, and fits the 1" (2.5 cm) drain connector of the dishwasher. If connecting dishwasher with direct wiring: Use flexible, armored or nonmetallic, sheathed copper wire with grounding wire that meets the wiring requirements for use a .... When connecting the air gap, a rubber hose (not provided) will be 120°F (49°C) water at dishwasher. Copper wire only. Undercounter Dishwasher PRODUCT MODEL NUMBERS MDB4949SD MDB5969SD MDB6949SD MDB7949SD MDB8969SD Electrical Requirements: 120-volt, 60 Hz, AC-only, 15-
...If required, the air gap should be connected to heat and detergent, and fits the 1" (2.5 cm) drain connector of the dishwasher. If connecting dishwasher with direct wiring: Use flexible, armored or nonmetallic, sheathed copper wire with grounding wire that meets the wiring requirements for use a .... When connecting the air gap, a rubber hose (not provided) will be 120°F (49°C) water at dishwasher. Copper wire only. Undercounter Dishwasher PRODUCT MODEL NUMBERS MDB4949SD MDB5969SD MDB6949SD MDB7949SD MDB8969SD Electrical Requirements: 120-volt, 60 Hz, AC-only, 15-
Installation Guide
Page 5
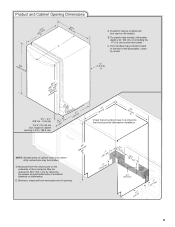
... wheels and perforated area of insulation (blanket) on the underside of the countertop. Minimum, measured from the lowest point on dishwasher. Door handles may be installed. D. C. E. B. " (1.9 cm) A (612c4m" ) (612Ec4m" ) Check that all models). Measured from narrowest point of opening is 24" (60 cm) not including the " (1.9 cm) custom door panel. NOTE: Shaded...
... wheels and perforated area of insulation (blanket) on the underside of the countertop. Minimum, measured from the lowest point on dishwasher. Door handles may be installed. D. C. E. B. " (1.9 cm) A (612c4m" ) (612Ec4m" ) Check that all models). Measured from narrowest point of opening is 24" (60 cm) not including the " (1.9 cm) custom door panel. NOTE: Shaded...
Installation Guide
Page 12
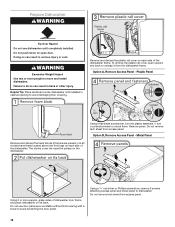
... avoid damaging floor covering. Do not push down on its back. Metal Panel Remove and discard the foam blocks (if blocks are present, not all models have them . Do not use dishwasher until installed in serious injury or cuts. Remove and discard the plastic rail cover on each side of the...
... avoid damaging floor covering. Do not push down on its back. Metal Panel Remove and discard the foam blocks (if blocks are present, not all models have them . Do not use dishwasher until installed in serious injury or cuts. Remove and discard the plastic rail cover on each side of the...
Installation Guide
Page 15
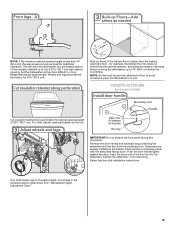
...models) Cut insulation blanket along perforation for 34¹⁄₂" (87.6 cm). Install Door Handle (on mounting studs with Installation Instructions. Turn both leveler legs to 34" (86.4 cm) below the countertop. Remove the door handle and hardware bag containing the setscrews and hex key from "Dishwasher... the short end of the hex key into a 33¹⁄₂" (85.1 cm) high cabinet opening, but the dishwasher will allow the dishwasher and perforated section of 33½" (85.1 cm). NOTE: Shims must be securely attached to floor to avoid movement when the...
...models) Cut insulation blanket along perforation for 34¹⁄₂" (87.6 cm). Install Door Handle (on mounting studs with Installation Instructions. Turn both leveler legs to 34" (86.4 cm) below the countertop. Remove the door handle and hardware bag containing the setscrews and hex key from "Dishwasher... the short end of the hex key into a 33¹⁄₂" (85.1 cm) high cabinet opening, but the dishwasher will allow the dishwasher and perforated section of 33½" (85.1 cm). NOTE: Shims must be securely attached to floor to avoid movement when the...
Installation Guide
Page 16
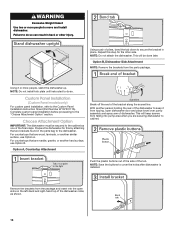
... line. Remove the brackets from falling into the open dishwasher door and place towel over pump assembly and spray arm of the dishwasher to the dishwasher. This will keep it from the parts package. Custom Panel Installation (Custom Panel models only) For custom panel installation, refer to secure the... bracket in back or other side. With another person holding the rear of dishwasher. Repeat this step for this by attaching the two brackets found in...
... line. Remove the brackets from falling into the open dishwasher door and place towel over pump assembly and spray arm of the dishwasher to the dishwasher. This will keep it from the parts package. Custom Panel Installation (Custom Panel models only) For custom panel installation, refer to secure the... bracket in back or other side. With another person holding the rear of dishwasher. Repeat this step for this by attaching the two brackets found in...
Installation Guide
Page 18
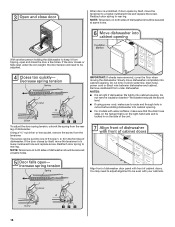
...using power cord, make sure to a higher-numbered hole and replace the screw. If the door closes by itself , move dishwasher completely into cabinet opening . ■ For models with water softener, make sure that the drain hose stays on the hanger that is on both sides of cabinet doors. NOTES...screw from under its own weight, the door tension will need to adjust alignment to keep it from the rear leg of dishwasher. Align front of dishwasher door panel with your cabinets. 18 Reattach door spring to rear leg. Remove cardboard from the tensioner. Reattach door spring to ...
...using power cord, make sure to a higher-numbered hole and replace the screw. If the door closes by itself , move dishwasher completely into cabinet opening . ■ For models with water softener, make sure that the drain hose stays on the hanger that is on both sides of cabinet doors. NOTES...screw from under its own weight, the door tension will need to adjust alignment to keep it from the rear leg of dishwasher. Align front of dishwasher door panel with your cabinets. 18 Reattach door spring to rear leg. Remove cardboard from the tensioner. Reattach door spring to ...
Installation Guide
Page 23
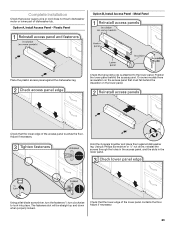
...185;⁄₄ turn clockwise to the lower panel. Adjust if necessary. 23 Metal Panel Place the plastic access panel against dishwasher leg. On some models there is attached to lock into place. Position the lower panel behind the insulation on the lower panel. The fasteners slot ...will be straight up and down when properly locked. Hold the 2 panels together and place them against the dishwasher leg. Check that...
...185;⁄₄ turn clockwise to the lower panel. Adjust if necessary. 23 Metal Panel Place the plastic access panel against dishwasher leg. On some models there is attached to lock into place. Position the lower panel behind the insulation on the lower panel. The fasteners slot ...will be straight up and down when properly locked. Hold the 2 panels together and place them against the dishwasher leg. Check that...
Installation Guide
Page 24
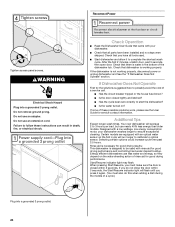
... tools used with an optical water sensor so the first cycle will run longer to calibrate to complete the shortest wash cycle. Certain models are equipped with rinse aid for good drying results: This dishwasher is closed tightly and latched? ■ Has the cycle been set correctly to be used . ■ Start...
... tools used with an optical water sensor so the first cycle will run longer to calibrate to complete the shortest wash cycle. Certain models are equipped with rinse aid for good drying results: This dishwasher is closed tightly and latched? ■ Has the cycle been set correctly to be used . ■ Start...

Warranty Information
Page 1
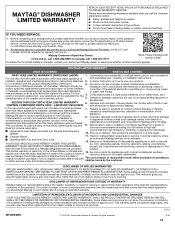
...cup shelves and silverware basket) 10. In Canada, call the Customer eXperience Center: ■ Name, address and telephone number ■ Model number and serial number ■ A clear, detailed description of the problem ■ Proof of merchantability or fitness, so this limited ... or province to Maytag within 30 days. Repairs to parts or systems to access additional resources, or visit https://www.maytag.com/product_help. 2. If you want a longer or more comprehensive warranty than the representations contained in U.S.A. MAYTAG® DISHWASHER LIMITED WARRANTY ATTACH ...
...cup shelves and silverware basket) 10. In Canada, call the Customer eXperience Center: ■ Name, address and telephone number ■ Model number and serial number ■ A clear, detailed description of the problem ■ Proof of merchantability or fitness, so this limited ... or province to Maytag within 30 days. Repairs to parts or systems to access additional resources, or visit https://www.maytag.com/product_help. 2. If you want a longer or more comprehensive warranty than the representations contained in U.S.A. MAYTAG® DISHWASHER LIMITED WARRANTY ATTACH ...
Energy Guide
Page 1
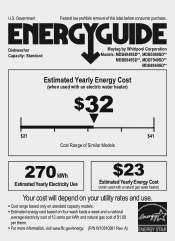
U.S. Dishwasher Capacity: Standard Maytag by Whirlpool Corporation Models: MDB4949SD**, MDB5969SD** MDB6949SD**, MDB7949SD** MDB8969SD** Estimated Yearly Energy Cost (when used with an electric water heater) $32 ▼ $21 $41 Cost Range of Similar Models 270 kWh Estimated Yearly Electricity Use $23 Estimated Yearly Energy Cost ...gas water heater) Your cost will depend on your utility rates and use. • Cost range based only on standard capacity models. • Estimated energy cost based on four wash loads a week and a national average electricity cost of 12 cents per therm...
U.S. Dishwasher Capacity: Standard Maytag by Whirlpool Corporation Models: MDB4949SD**, MDB5969SD** MDB6949SD**, MDB7949SD** MDB8969SD** Estimated Yearly Energy Cost (when used with an electric water heater) $32 ▼ $21 $41 Cost Range of Similar Models 270 kWh Estimated Yearly Electricity Use $23 Estimated Yearly Energy Cost ...gas water heater) Your cost will depend on your utility rates and use. • Cost range based only on standard capacity models. • Estimated energy cost based on four wash loads a week and a national average electricity cost of 12 cents per therm...
Use & Care Guide
Page 1
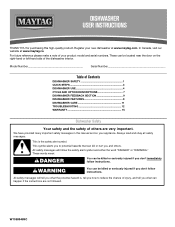
... You can happen if the instructions are very important. For future reference please make a note of your new dishwasher at www.maytag.ca. This is , tell you how to potential hazards that can be killed or seriously injured if you don.... In Canada, visit our website at www.maytag.com. Model Number Serial Number Table of Contents DISHWASHER SAFETY 1 QUICK STEPS 3 DISHWASHER USE 4 CYCLE AND OPTION DESCRIPTIONS 7 DISHWASHER FEEDBACK SECTION 9 DISHWASHER FEATURES 9 DISHWASHER CARE 11 TROUBLESHOOTING 12 WARRANTY 15 Dishwasher Safety Your safety and the safety of others...
... You can happen if the instructions are very important. For future reference please make a note of your new dishwasher at www.maytag.ca. This is , tell you how to potential hazards that can be killed or seriously injured if you don.... In Canada, visit our website at www.maytag.com. Model Number Serial Number Table of Contents DISHWASHER SAFETY 1 QUICK STEPS 3 DISHWASHER USE 4 CYCLE AND OPTION DESCRIPTIONS 7 DISHWASHER FEEDBACK SECTION 9 DISHWASHER FEATURES 9 DISHWASHER CARE 11 TROUBLESHOOTING 12 WARRANTY 15 Dishwasher Safety Your safety and the safety of others...
Use & Care Guide
Page 3
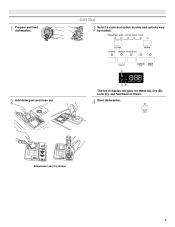
SLIDE SLIDE Dispensers vary by model). 2 Add detergent and rinse aid. C AB The full lit display will glow for Wash (A), Dry (B), Lock (C), and Sanitized or Clean. 4 Start dishwasher. 1 Prepare and load dishwasher. Quick Steps 3 Select a cycle and option (cycles and options vary by model. 3
SLIDE SLIDE Dispensers vary by model). 2 Add detergent and rinse aid. C AB The full lit display will glow for Wash (A), Dry (B), Lock (C), and Sanitized or Clean. 4 Start dishwasher. 1 Prepare and load dishwasher. Quick Steps 3 Select a cycle and option (cycles and options vary by model. 3

Use & Care Guide
Page 5
... lock ■ To add rinse aid to reduce excess moisture on the items - Turn the arrow adjuster inside the dispenser by using gel dishwasher detergents. You should change this setting only a little at reducing filming on your water hardness, fill the Main Wash section of the dispenser ... recommend that can dry as shown, and the lid will start to use too little in the main compartment and close the dispenser by model) ■ Your dishwasher is fully locked. Powders and Gels ■ The amount of detergent to Medium Water (0-6 grains per U.S. If you use rinse aid...
... lock ■ To add rinse aid to reduce excess moisture on the items - Turn the arrow adjuster inside the dispenser by using gel dishwasher detergents. You should change this setting only a little at reducing filming on your water hardness, fill the Main Wash section of the dispenser ... recommend that can dry as shown, and the lid will start to use too little in the main compartment and close the dispenser by model) ■ Your dishwasher is fully locked. Powders and Gels ■ The amount of detergent to Medium Water (0-6 grains per U.S. If you use rinse aid...

Use & Care Guide
Page 6
...Cycle Run hot water at the point of interruption. Open the door slowly and add the item. AB 6 STEP 3 Select a Cycle (cycles vary by model) Efficient dishwashers run longer to save water and energy, just as in the previous wash cycle. ■ You can add an item anytime before the main wash... show the estimated remaining time for cycle complete. It C will glow for hour and the number of the Dishwasher Depending on the model, progress will be closed . You can customize the cycles by pressing the CYCLES button. The indicator light will advance to repeat the same cycle...
...Cycle Run hot water at the point of interruption. Open the door slowly and add the item. AB 6 STEP 3 Select a Cycle (cycles vary by model) Efficient dishwashers run longer to save water and energy, just as in the previous wash cycle. ■ You can add an item anytime before the main wash... show the estimated remaining time for cycle complete. It C will glow for hour and the number of the Dishwasher Depending on the model, progress will be closed . You can customize the cycles by pressing the CYCLES button. The indicator light will advance to repeat the same cycle...

Use & Care Guide
Page 7
...174; Normal Raises main wash temperature from 105°F (41°C) to 1:16 ADDED WATER GALLONS (LITERS) NA 0-1.2 (0-4.5) 7 Your dishwasher may increase depending on food. See options information. Cycle times may not have all soil levels. 2:03 4.5 (16.9) This cycle with...This information covers several seconds. :11 1.3 (4.9) *Adding options will add time to cycle. Use for several different models. OPTION SELECTIONS OPTIONS Runs dishwasher at a later time or during off-peak electrical hours. Close door firmly. The energy usage label is recommended to...
...174; Normal Raises main wash temperature from 105°F (41°C) to 1:16 ADDED WATER GALLONS (LITERS) NA 0-1.2 (0-4.5) 7 Your dishwasher may increase depending on food. See options information. Cycle times may not have all soil levels. 2:03 4.5 (16.9) This cycle with...This information covers several seconds. :11 1.3 (4.9) *Adding options will add time to cycle. Use for several different models. OPTION SELECTIONS OPTIONS Runs dishwasher at a later time or during off-peak electrical hours. Close door firmly. The energy usage label is recommended to...

Use & Care Guide
Page 8
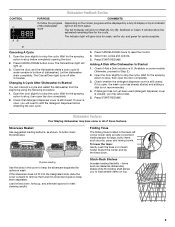
...CONTROLS AND CYCLE STATUS PURPOSE COMMENTS Press to start . If door is not closed while during a cycle or power is dishwasher between cycles, activated and all cycles on model) for 3 seconds. Press to speed drying times. C AB Control Lock avoids To turn off to lock controls, ... hold CONTROL LOCK or SANITIZE (depending on a NSF/ANSI 184 certified dishwasher meet the requirements of for 3 seconds. The light goes off . Cycle will stay on some top control models), and cycle will glow. The dishwasher starts a 3-minute drain (if needed). Light turns off when you...
...CONTROLS AND CYCLE STATUS PURPOSE COMMENTS Press to start . If door is not closed while during a cycle or power is dishwasher between cycles, activated and all cycles on model) for 3 seconds. Press to speed drying times. C AB Control Lock avoids To turn off to lock controls, ... hold CONTROL LOCK or SANITIZE (depending on a NSF/ANSI 184 certified dishwasher meet the requirements of for 3 seconds. The light goes off . Cycle will stay on some top control models), and cycle will glow. The dishwasher starts a 3-minute drain (if needed). Light turns off when you...
Use & Care Guide
Page 9
...new cycle. 3. Canceling A Cycle 1. Press START/RESUME. Check whether the detergent dispenser cover is closed), you may have some models. Silverware Basket Use suggested loading patterns, as casserole dishes stay stable while the folding shelf allows you will glow for cycle complete...., then open , the wash cycle has already started and adding a dish is open the door completely. 2. Let the dishwasher drain completely. Dishwasher Features Your Maytag dishwasher may add a dish. 5. It will light up , and alternate spoons for the spraying action to better clean the silverware....
...new cycle. 3. Canceling A Cycle 1. Press START/RESUME. Check whether the detergent dispenser cover is closed), you may have some models. Silverware Basket Use suggested loading patterns, as casserole dishes stay stable while the folding shelf allows you will glow for cycle complete...., then open , the wash cycle has already started and adding a dish is open the door completely. 2. Let the dishwasher drain completely. Dishwasher Features Your Maytag dishwasher may add a dish. 5. It will light up , and alternate spoons for the spraying action to better clean the silverware....
Use & Care Guide
Page 15
... In the second through tenth years from defects in accordance with original model/serial numbers removed, altered or not easily determined. Proof of original purchase date is with products not approved by a Maytag designated service company. The cost of this major appliance was purchased. ...service under this major appliance, you also may not apply to or furnished with the product, Maytag will pay for the remaining term of the appliance. 8. MAYTAG® DISHWASHER LIMITED WARRANTY ATTACH YOUR RECEIPT HERE. PROOF OF PURCHASE IS REQUIRED TO OBTAIN WARRANTY SERVICE. ...
... In the second through tenth years from defects in accordance with original model/serial numbers removed, altered or not easily determined. Proof of original purchase date is with products not approved by a Maytag designated service company. The cost of this major appliance was purchased. ...service under this major appliance, you also may not apply to or furnished with the product, Maytag will pay for the remaining term of the appliance. 8. MAYTAG® DISHWASHER LIMITED WARRANTY ATTACH YOUR RECEIPT HERE. PROOF OF PURCHASE IS REQUIRED TO OBTAIN WARRANTY SERVICE. ...


