

Owners Manual
Page 1
... W10240116A In Canada, visit our website at www.maytag.ca or call us at 1-800-688-9900. Table of Contents DISHWASHER SAFETY 1 QUICK STEPS 3 DISHWASHER USE 3 CYCLE AND OPTION DESCRIPTIONS 5 DISHWASHER FEATURES 7 DISHWASHER CARE 9 TROUBLESHOOTING 9 WARRANTY 12 Dishwasher Safety Your safety and the safety of injury, and... mean: DANGER You can be killed or seriously injured if you what the potential hazard is the safety alert symbol. DISHWASHER USER INSTRUCTIONS THANK YOU for additional information. All safety messages will tell you what can kill or hurt you still need...
... W10240116A In Canada, visit our website at www.maytag.ca or call us at 1-800-688-9900. Table of Contents DISHWASHER SAFETY 1 QUICK STEPS 3 DISHWASHER USE 3 CYCLE AND OPTION DESCRIPTIONS 5 DISHWASHER FEATURES 7 DISHWASHER CARE 9 TROUBLESHOOTING 9 WARRANTY 12 Dishwasher Safety Your safety and the safety of injury, and... mean: DANGER You can be killed or seriously injured if you what the potential hazard is the safety alert symbol. DISHWASHER USER INSTRUCTIONS THANK YOU for additional information. All safety messages will tell you what can kill or hurt you still need...

Owners Manual
Page 2
...event of a malfunction or breakdown, grounding will reduce the risk of electric shock by a qualified electrician. ■ For a permanently connected dishwasher: The dishwasher must be connected to damage the door seal; WARNING: Improper connection of injury, do not smoke or use . ■ To avoid electrical... shock hazard, the sides and back must be enclosed and the front panels must be produced in accordance with the dishwasher; For plastic items not so marked, check the manufacturer's recommendations. ■ Do not touch the heating element during this time. ...
...event of a malfunction or breakdown, grounding will reduce the risk of electric shock by a qualified electrician. ■ For a permanently connected dishwasher: The dishwasher must be connected to damage the door seal; WARNING: Improper connection of injury, do not smoke or use . ■ To avoid electrical... shock hazard, the sides and back must be enclosed and the front panels must be produced in accordance with the dishwasher; For plastic items not so marked, check the manufacturer's recommendations. ■ Do not touch the heating element during this time. ...

Owners Manual
Page 3
...This will improve cleaning and drying results. ■ Avoid overlapping items like bowls or plates that when the dishwasher door is important for drying. 4 Start dishwasher. Mix some of the items having some pointing up and some items pointing down . Remove labels from ...Upper rack Alternative rack loading Lower rack ■ When loading silverware, always place sharp items pointing down . Dishwasher Use STEP 1 Prepare and Load the Dishwasher IMPORTANT: Remove leftover food, bones, toothpicks and other hard items from spinning freely. Make sure lightweight load items...
...This will improve cleaning and drying results. ■ Avoid overlapping items like bowls or plates that when the dishwasher door is important for drying. 4 Start dishwasher. Mix some of the items having some pointing up and some items pointing down . Remove labels from ...Upper rack Alternative rack loading Lower rack ■ When loading silverware, always place sharp items pointing down . Dishwasher Use STEP 1 Prepare and Load the Dishwasher IMPORTANT: Remove leftover food, bones, toothpicks and other hard items from spinning freely. Make sure lightweight load items...

Owners Manual
Page 4
... "Cycle and Option Descriptions" charts in the following section. Hard Water Soft Water Main Wash Hard Water Soft Water Pre-Wash Add Rinse Aid Your dishwasher is designed to Hard Water (7-12 grains per U.S. Make sure cap is hot. fill - -- 6 5 4 --- - - -- Press the START/...RESUME button, the cycle resumes automatically at the sink nearest your dishes and Full dishwasher interior will give good results. Fill the Pre-Wash section to repeat the same cycle and options as shown. STEP 3 Select a Cycle (cycles vary by...
... "Cycle and Option Descriptions" charts in the following section. Hard Water Soft Water Main Wash Hard Water Soft Water Pre-Wash Add Rinse Aid Your dishwasher is designed to Hard Water (7-12 grains per U.S. Make sure cap is hot. fill - -- 6 5 4 --- - - -- Press the START/...RESUME button, the cycle resumes automatically at the sink nearest your dishes and Full dishwasher interior will give good results. Fill the Pre-Wash section to repeat the same cycle and options as shown. STEP 3 Select a Cycle (cycles vary by...

Owners Manual
Page 5
... does not dry. 0:10 0:10 0:10 glasses, and silverware that will repeatedly pause for several seconds. USE WITH: Heavy, Normal, & Auto Clean Plus cycles Loads containing tough, baked-on this 1:04 1:30 3:46 amounts of food soil. tableware. If you change an option anytime before the selected option... TYPES DESCRIPTIONS WASH TIME (HH:MM) Cycle Minimum Cycle + Options Minimum *Maximum Use for any loads with tough food soil. Your dishwasher may not have all the cycles and options described. Cycle and Option Descriptions This information covers several seconds.
... does not dry. 0:10 0:10 0:10 glasses, and silverware that will repeatedly pause for several seconds. USE WITH: Heavy, Normal, & Auto Clean Plus cycles Loads containing tough, baked-on this 1:04 1:30 3:46 amounts of food soil. tableware. If you change an option anytime before the selected option... TYPES DESCRIPTIONS WASH TIME (HH:MM) Cycle Minimum Cycle + Options Minimum *Maximum Use for any loads with tough food soil. Your dishwasher may not have all the cycles and options described. Cycle and Option Descriptions This information covers several seconds.

Owners Manual
Page 6
... accordance with the use of console). Let the dishwasher drain completely. This can be heated to indicate a suspended cycle. Heavy, Normal, Light, or Auto Clean Plus To sanitize your dishes and glassware in your dishwasher at least 3 seconds. This high temperature rinse...at least 3 seconds. Heavy, Normal, Light, or Auto Clean Plus To run your dishwasher monitors the soil level. Select a wash cycle and options. The dishwasher starts a 2-minute drain (if needed . Certified residential dishwashers are disabled. Delays the start or resume a wash cycle COMMENTS If...
... accordance with the use of console). Let the dishwasher drain completely. This can be heated to indicate a suspended cycle. Heavy, Normal, Light, or Auto Clean Plus To sanitize your dishes and glassware in your dishwasher at least 3 seconds. This high temperature rinse...at least 3 seconds. Heavy, Normal, Light, or Auto Clean Plus To run your dishwasher monitors the soil level. Select a wash cycle and options. The dishwasher starts a 2-minute drain (if needed . Certified residential dishwashers are disabled. Delays the start or resume a wash cycle COMMENTS If...

Owners Manual
Page 7
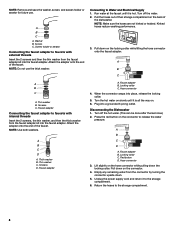
... each plastic push tab rack stop . Preparing the faucet 1. Dishwasher Features Your Maytag dishwasher may have some models) WARNING Stack-Rack Fold down the extra shelf on your portable dishwasher to modify the faucet where the dishwasher will snap open and can be easily removed by pushing inward ...hold additional cups, stemware or long items such as stock pots, roasters, and cookie sheets in the center of the rack stop from the dishwasher. Be sure to ¹⁄₂ of the faucet. 2. Failure to replace the rack into a grounded 3 prong outlet. Silverware basket ...
... each plastic push tab rack stop . Preparing the faucet 1. Dishwasher Features Your Maytag dishwasher may have some models) WARNING Stack-Rack Fold down the extra shelf on your portable dishwasher to modify the faucet where the dishwasher will snap open and can be easily removed by pushing inward ...hold additional cups, stemware or long items such as stock pots, roasters, and cookie sheets in the center of the rack stop from the dishwasher. Be sure to ¹⁄₂ of the faucet. 2. Failure to replace the rack into a grounded 3 prong outlet. Silverware basket ...
Owners Manual
Page 8
... of their storage compartment on the locking collar while lifting the hose connector onto the faucet adapter. Attach the adapter onto the end of the dishwasher. A B C D A. Faucet adapter B. Faucet adapter B. Hose connector 3. Connecting to the storage compartment. 8 Run water at the faucet ...until it is hot. Turn the hot water on . 6. Disconnecting the Dishwasher 1. Unplug the power supply cord and return it is all the way on slowly until it to faucets with internal threads Insert the 2 ...
... of their storage compartment on the locking collar while lifting the hose connector onto the faucet adapter. Attach the adapter onto the end of the dishwasher. A B C D A. Faucet adapter B. Faucet adapter B. Hose connector 3. Connecting to the storage compartment. 8 Run water at the faucet ...until it is hot. Turn the hot water on . 6. Disconnecting the Dishwasher 1. Unplug the power supply cord and return it is all the way on slowly until it to faucets with internal threads Insert the 2 ...

Owners Manual
Page 9
... remove white spots and film. Do not use liquid dishwasher detergent on the more slanted side of powdered dishwasher detergent and water or use detergent. In the U.S.A., www.maytag.com In Canada, www.maytag.ca PROBLEM SOLUTION DISHWASHER DOES NOT RUN NOTE: It is best. The dishwasher will delay longer while heating cooler water. ■ Some...
... remove white spots and film. Do not use liquid dishwasher detergent on the more slanted side of powdered dishwasher detergent and water or use detergent. In the U.S.A., www.maytag.com In Canada, www.maytag.ca PROBLEM SOLUTION DISHWASHER DOES NOT RUN NOTE: It is best. The dishwasher will delay longer while heating cooler water. ■ Some...

Owners Manual
Page 10
... DRAIN to 120ºF (49ºC). If the Clean light or any other lights are properly installed. Run a vinegar rinse through the dishwasher by pressing START/RESUME and closing the door within 3 seconds. Do not use a rinse aid. Use a detergent booster/water softener additive ... (See specific loading instructions within 3 seconds. DID NOT SANITIZE If the sanitized light is blinking, the load is loaded correctly. The dishwasher may help: Use a commercial cleaner designed for service. 10 More detergent is at the end of white vinegar in an upright glass measuring...
... DRAIN to 120ºF (49ºC). If the Clean light or any other lights are properly installed. Run a vinegar rinse through the dishwasher by pressing START/RESUME and closing the door within 3 seconds. Do not use a rinse aid. Use a detergent booster/water softener additive ... (See specific loading instructions within 3 seconds. DID NOT SANITIZE If the sanitized light is blinking, the load is loaded correctly. The dishwasher may help: Use a commercial cleaner designed for service. 10 More detergent is at the end of white vinegar in an upright glass measuring...

Owners Manual
Page 11
...vinegar in a glass measuring cup in the lower rack. Be sure the incoming water temperature is level. No detergent is needed in a dishwasher. To avoid further etching, adjust the detergent amount to reduce spotting. ■ Use the correct amount of the glassware and can discolor ...the amount of : water that the cloudiness is removable by a combination of detergent and rinse aid. A citrus-based cleaner can cause the dishwasher to act upon. Detergent needs food soil to overflow. If etching has occurred, the glassware is permanently damaged. Measure the detergent accurately and ...
...vinegar in a glass measuring cup in the lower rack. Be sure the incoming water temperature is level. No detergent is needed in a dishwasher. To avoid further etching, adjust the detergent amount to reduce spotting. ■ Use the correct amount of the glassware and can discolor ...the amount of : water that the cloudiness is removable by a combination of detergent and rinse aid. A citrus-based cleaner can cause the dishwasher to act upon. Detergent needs food soil to overflow. If etching has occurred, the glassware is permanently damaged. Measure the detergent accurately and ...

Owners Manual
Page 12
...damage to the finish of your major appliance, to instruct you on the right-hand or left-hand side of the dishwasher interior. Proof of Maytag Corporation or its related companies. For assistance or service in materials or workmanship. ITEMS EXCLUDED FROM WARRANTY This limited warranty ...does not cover: 1. In Canada, call 1-800-688-9900. MAYTAG® MAJOR APPLIANCE WARRANTY LIMITED WARRANTY For one year from the date of purchase, when this major appliance is operated and maintained according to...
...damage to the finish of your major appliance, to instruct you on the right-hand or left-hand side of the dishwasher interior. Proof of Maytag Corporation or its related companies. For assistance or service in materials or workmanship. ITEMS EXCLUDED FROM WARRANTY This limited warranty ...does not cover: 1. In Canada, call 1-800-688-9900. MAYTAG® MAJOR APPLIANCE WARRANTY LIMITED WARRANTY For one year from the date of purchase, when this major appliance is operated and maintained according to...

Warranty Information
Page 1
...the date of purchase, when this major appliance is operated and maintained according to instructions attached to or furnished with the product, Maytag brand of Maytag Corporation or its related companies. Repairs to parts or systems resulting from accident, alteration, misuse, abuse, fire, flood, acts of... on the label located near the door on how to use of your complete model number ready. The cost of the dishwasher interior. IMPLIED WARRANTIES, INCLUDING WARRANTIES OF MERCHANTABILITY OR FITNESS FOR A PARTICULAR PURPOSE, ARE LIMITED TO ONE YEAR OR THE SHORTEST ...
...the date of purchase, when this major appliance is operated and maintained according to instructions attached to or furnished with the product, Maytag brand of Maytag Corporation or its related companies. Repairs to parts or systems resulting from accident, alteration, misuse, abuse, fire, flood, acts of... on the label located near the door on how to use of your complete model number ready. The cost of the dishwasher interior. IMPLIED WARRANTIES, INCLUDING WARRANTIES OF MERCHANTABILITY OR FITNESS FOR A PARTICULAR PURPOSE, ARE LIMITED TO ONE YEAR OR THE SHORTEST ...
Energy Guide
Page 1
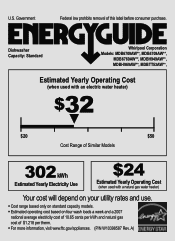
A) Dishwasher Capacity: Standard Whirlpool Corporation Models: MDB6709AW**, MDB4709AW**, MDB6769AW**, MDBH949AW**, MDBH969AW**, MDBTT53AW**, Estimated Yearly Operating Cost (when used with an electric water heater) $32 ▼ $20 $...
A) Dishwasher Capacity: Standard Whirlpool Corporation Models: MDB6709AW**, MDB4709AW**, MDB6769AW**, MDBH949AW**, MDBH969AW**, MDBTT53AW**, Estimated Yearly Operating Cost (when used with an electric water heater) $32 ▼ $20 $...

Dimension Guide
Page 1
... a grounded 3 prong outlet, located in house plumbing and 20" (50.8 cm) minimum above subfloor or floor. or 20- If connecting dishwasher with direct wiring: • Use flexible, armored or non-metallic sheathed, copper wire with a maximum length of 12' (3.7 m) (Part ...UL Listed/CSA Approved strain relief. *Insulation may be looped up and securely fastened to the underside of 2 W10290309A-D-MT 8/10 Undercounter Dishwasher PRODUCT MODEL NUMBERS MDB4709AW MDB6709AW MDB6769AW MDBH949AW MDBH969AW MDBH979AW MDBTT53AW DRAIN REQUIREMENTS • A new drain hose is supplied with product. It...
... a grounded 3 prong outlet, located in house plumbing and 20" (50.8 cm) minimum above subfloor or floor. or 20- If connecting dishwasher with direct wiring: • Use flexible, armored or non-metallic sheathed, copper wire with a maximum length of 12' (3.7 m) (Part ...UL Listed/CSA Approved strain relief. *Insulation may be looped up and securely fastened to the underside of 2 W10290309A-D-MT 8/10 Undercounter Dishwasher PRODUCT MODEL NUMBERS MDB4709AW MDB6709AW MDB6769AW MDBH949AW MDBH969AW MDBH979AW MDBTT53AW DRAIN REQUIREMENTS • A new drain hose is supplied with product. It...

Dimension Guide
Page 2
... 2 W10290309A-D-MT 8/10 CABINET CUTOUT DIMENSIONS Corner locations require a 2" (5.1 cm) minimum clearance between the side of the dishwasher door and the wall or cabinet. (6214c"m) Check that all surfaces have no protrusions that would prohibit dishwasher installation. (612c4m" )** (86m.344inc"*m) (10.42"cm) (7.63"cm) (17.2 cm) (4.4 cm) (6.4 cm) (26.7 cm) ... NOTE: Shaded area of cabinet walls show where utility connections may be reduced to 33⁷⁄₈" (86 cm) by removing wheels from dishwasher. **Minimum, measured from the lowest point on the underside of countertop.
... 2 W10290309A-D-MT 8/10 CABINET CUTOUT DIMENSIONS Corner locations require a 2" (5.1 cm) minimum clearance between the side of the dishwasher door and the wall or cabinet. (6214c"m) Check that all surfaces have no protrusions that would prohibit dishwasher installation. (612c4m" )** (86m.344inc"*m) (10.42"cm) (7.63"cm) (17.2 cm) (4.4 cm) (6.4 cm) (26.7 cm) ... NOTE: Shaded area of cabinet walls show where utility connections may be reduced to 33⁷⁄₈" (86 cm) by removing wheels from dishwasher. **Minimum, measured from the lowest point on the underside of countertop.

Installation Guide
Page 2
...drain hose and lower rack. Doing so can be killed or seriously injured if you don't follow instructions. TABLE OF CONTENTS DISHWASHER SAFETY 2 INSTALLATION REQUIREMENTS 3 Tools and Parts 3 Location Requirements 3 Drain Requirements 5 Water Supply Requirements 5 Electrical Requirements 5...Cabinet Opening-Existing Utilities 6 Prepare Cabinet Opening-New Utilities 6 Prepare and Route Water Line 7 Install Drain Hose 8 Prepare Dishwasher 10 Make Power Supply Cord Connection 11 INSTALLATION REQUIREMENTS (CONT.) Determine Cabinet Opening 13 Install Door Handle (on some models ...
...drain hose and lower rack. Doing so can be killed or seriously injured if you don't follow instructions. TABLE OF CONTENTS DISHWASHER SAFETY 2 INSTALLATION REQUIREMENTS 3 Tools and Parts 3 Location Requirements 3 Drain Requirements 5 Water Supply Requirements 5 Electrical Requirements 5...Cabinet Opening-Existing Utilities 6 Prepare Cabinet Opening-New Utilities 6 Prepare and Route Water Line 7 Install Drain Hose 8 Prepare Dishwasher 10 Make Power Supply Cord Connection 11 INSTALLATION REQUIREMENTS (CONT.) Determine Cabinet Opening 13 Install Door Handle (on some models ...

Installation Guide
Page 3
.... Do not run drain lines, water lines or electrical wiring where they can interfere with any tools listed here. Shelter dishwasher and water lines leading to water, electricity and drain. ■ convenient access for purchase in the literature package. INSTALLATION REQUIREMENTS... Tools and Parts Gather the recommended tools and parts before starting installation. The location where the dishwasher will be made by a licensed electrical installer. A side panel kit is available from freezing is available from your cabinetry. ...
.... Do not run drain lines, water lines or electrical wiring where they can interfere with any tools listed here. Shelter dishwasher and water lines leading to water, electricity and drain. ■ convenient access for purchase in the literature package. INSTALLATION REQUIREMENTS... Tools and Parts Gather the recommended tools and parts before starting installation. The location where the dishwasher will be made by a licensed electrical installer. A side panel kit is available from freezing is available from your cabinetry. ...

Installation Guide
Page 5
... air gap if the drain hose is resistant to heat and detergent, and fits the 1" (2.5 cm) drain connector of the dishwasher. ■ Make sure to connect drain hose to the dishwasher opening. or 20-amp, fused electrical supply. ■ Copper wire only. We recommend: ■ A time-delay fuse or... size are connecting the air gap, a rubber hose (not provided) will be verified by a licensed plumber. ■ 120°F (49°C) water at dishwasher O.D. Water Supply Requirements ■ A hot water line with 20 to 120 psi (138 to house plumbing lower than 20" (50.8 cm) above subfloor or ...
... air gap if the drain hose is resistant to heat and detergent, and fits the 1" (2.5 cm) drain connector of the dishwasher. ■ Make sure to connect drain hose to the dishwasher opening. or 20-amp, fused electrical supply. ■ Copper wire only. We recommend: ■ A time-delay fuse or... size are connecting the air gap, a rubber hose (not provided) will be verified by a licensed plumber. ■ 120°F (49°C) water at dishwasher O.D. Water Supply Requirements ■ A hot water line with 20 to 120 psi (138 to house plumbing lower than 20" (50.8 cm) above subfloor or ...
Installation Guide
Page 6
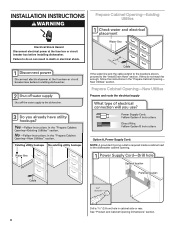
... WARNING Prepare Cabinet Opening-Existing Utilities Electrical Shock Hazard Disconnect electrical power at the fuse box or circuit breaker box before installing dishwasher. Drill a 1¹⁄₂" (3.8 cm) hole in death or electrical shock. New Utilities" section. If the water... line and the cable extend to the locations shown, proceed to the dishwasher cabinet opening. Prepare Cabinet Opening-New Utilities Prepare and route the electrical supply Option A, Power Supply Cord: NOTE: A grounded 3 prong outlet...
... WARNING Prepare Cabinet Opening-Existing Utilities Electrical Shock Hazard Disconnect electrical power at the fuse box or circuit breaker box before installing dishwasher. Drill a 1¹⁄₂" (3.8 cm) hole in death or electrical shock. New Utilities" section. If the water... line and the cable extend to the locations shown, proceed to the dishwasher cabinet opening. Prepare Cabinet Opening-New Utilities Prepare and route the electrical supply Option A, Power Supply Cord: NOTE: A grounded 3 prong outlet...


