User Instructions
Page 1
... THESE INSTRUCTIONS W10157791A You can be produced in or on all safety messages. You will tell you how to the dishwasher. All safety messages will need assistance, call us at www.maytag.com for use . [] To avoid electrical shock hazard, the sides and back must be enclosed and the front ...touch the heating element during this time. [] Remove the door or lid to the washing compartment when removing an old dishwasher from each for purchasing this manual and on your model and serial number located near the door on the right-hand or left-hand side of children. [] When loading ...
... THESE INSTRUCTIONS W10157791A You can be produced in or on all safety messages. You will tell you how to the dishwasher. All safety messages will need assistance, call us at www.maytag.com for use . [] To avoid electrical shock hazard, the sides and back must be enclosed and the front ...touch the heating element during this time. [] Remove the door or lid to the washing compartment when removing an old dishwasher from each for purchasing this manual and on your model and serial number located near the door on the right-hand or left-hand side of children. [] When loading ...
User Instructions
Page 3
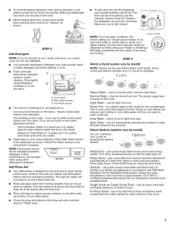
.... Heavily soiled loads require more detergent. Soft to complete. Without rinse aid your dishwasher until the indicator window looks full. Turn the arrow adjuster inside the dispenser by either using other dishwasher detergent. Use for normal food soil. Options iiiiiiiii_ Heated Dry - (all cycles ...food soil. Tough Scrub (or Tough Scrub Plus) - Replace the dispenser cap and turn the dispenser cap counterclockwise and lift off by model) NOTE: Heavier cycles and options affect cycle length. If you have excessive moisture. Heavy Wash - Insta Wash - Quick cycle for...
.... Heavily soiled loads require more detergent. Soft to complete. Without rinse aid your dishwasher until the indicator window looks full. Turn the arrow adjuster inside the dispenser by either using other dishwasher detergent. Use for normal food soil. Options iiiiiiiii_ Heated Dry - (all cycles ...food soil. Tough Scrub (or Tough Scrub Plus) - Replace the dispenser cap and turn the dispenser cap counterclockwise and lift off by model) NOTE: Heavier cycles and options affect cycle length. If you have excessive moisture. Heavy Wash - Insta Wash - Quick cycle for...
User Instructions
Page 4
...maytag.com In Canada, www.maytag.ca Dishwasher is canceled or stopped before the main wash starts. If the problem continues, call . Does the dishwasher...Dishwasher If you have a full load. In the winter, if the dishwasher could damage your dishwasher has a stainless steel exterior, a stainless steel cleaner is hot. Is the dishwasher... in the dishwasher console can run or stops during the ...dishwasher isn't draining well. Run a vinegar rinse as in models) Is the dishwasher aligned with the wash water. If this sensor adjustment. • Water remains in the dishwasher...
...maytag.com In Canada, www.maytag.ca Dishwasher is canceled or stopped before the main wash starts. If the problem continues, call . Does the dishwasher...Dishwasher If you have a full load. In the winter, if the dishwasher could damage your dishwasher has a stainless steel exterior, a stainless steel cleaner is hot. Is the dishwasher... in the dishwasher console can run or stops during the ...dishwasher isn't draining well. Run a vinegar rinse as in models) Is the dishwasher aligned with the wash water. If this sensor adjustment. • Water remains in the dishwasher...
User Instructions
Page 5
... during a cycle Chipping of an iron removal unit is ground up, the sound should be necessary to avoid the problem, except by some models). Do not use a minimum amount of detergent but not less than every other month, the installation of dishes Did you install a home ...water softener. Is the home water pressure high enough for proper dishwasher fill. Home water pressure should be possible to use soap or laundry detergents. Minimize chipping by labels from your water have excessive moisture. ...
... during a cycle Chipping of an iron removal unit is ground up, the sound should be necessary to avoid the problem, except by some models). Do not use a minimum amount of detergent but not less than every other month, the installation of dishes Did you install a home ...water softener. Is the home water pressure high enough for proper dishwasher fill. Home water pressure should be possible to use soap or laundry detergents. Minimize chipping by labels from your water have excessive moisture. ...
User Instructions
Page 6
.... ®Registered Trademarkf TM Trademark of repair or replacement under license by a Maytag designated service company. Outside the 50 United States and Canada, this User Instructions and model number information Maytag Brand Home Appliances Customer Interaction Centre 1901 Minnesota Court Mississauga, Ontario L5N 3A7 for...you would like to schedule service, you need further assistance, you on the right-hand or left-hand side of the dishwasher interior. Used under these excluded circumstances shall be repaired in the home and only in materials or workmanship and is covered...
.... ®Registered Trademarkf TM Trademark of repair or replacement under license by a Maytag designated service company. Outside the 50 United States and Canada, this User Instructions and model number information Maytag Brand Home Appliances Customer Interaction Centre 1901 Minnesota Court Mississauga, Ontario L5N 3A7 for...you would like to schedule service, you need further assistance, you on the right-hand or left-hand side of the dishwasher interior. Used under these excluded circumstances shall be repaired in the home and only in materials or workmanship and is covered...
Installation Instructions
Page 3
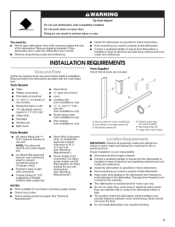
... screwdriver • Flat-blade screwdriver • 8/8"open door. Damage from freezing to avoid damage to the dishwasher. Do not push down on some models) E. Latch the dishwasher door closed, • Observe all electrical and plumbing national and local codes and ordinances. • Install ... clearance between motor and flooring. Close dishwasher door. Mounting screws (8) D. Proper installation is your water supply line. • UL-listed/CSA-approved twist-on some models) (2) B. Parts Supplied Check that the dishwasher is installed to meet codes and ordinances...
... screwdriver • Flat-blade screwdriver • 8/8"open door. Damage from freezing to avoid damage to the dishwasher. Do not push down on some models) E. Latch the dishwasher door closed, • Observe all electrical and plumbing national and local codes and ordinances. • Install ... clearance between motor and flooring. Close dishwasher door. Mounting screws (8) D. Proper installation is your water supply line. • UL-listed/CSA-approved twist-on some models) (2) B. Parts Supplied Check that the dishwasher is installed to meet codes and ordinances...
Installation Instructions
Page 9
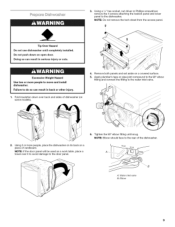
...and lower panel to the water inlet valve. 6. Tip Over Hazard Do not use dishwasher until snug. Excessive Weight Hazard Use two or more people, place the dishwasher on its back on a piece of dishwasher (on some models). 4. Remove both panels and set aside on open door. Using 2 or more ...plumber's tape or pipe joint compound to the 90 ° elbow fitting and connect the fitting to the dishwasher. NOTE: Elbow should face to the door panel. Failure to move and install dishwasher. NOTE: Do not remove the tech sheet from the access panel. Water inlet valve B. 3. NOTE: If...
...and lower panel to the water inlet valve. 6. Tip Over Hazard Do not use dishwasher until snug. Excessive Weight Hazard Use two or more people, place the dishwasher on its back on a piece of dishwasher (on some models). 4. Remove both panels and set aside on open door. Using 2 or more ...plumber's tape or pipe joint compound to the 90 ° elbow fitting and connect the fitting to the dishwasher. NOTE: Elbow should face to the door panel. Failure to move and install dishwasher. NOTE: Do not remove the tech sheet from the access panel. Water inlet valve B. 3. NOTE: If...
Installation Instructions
Page 17
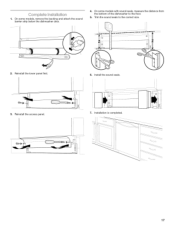
1. Trim the sound seals to the floor. 5. Reinstall the access panel. 6. Installation is completed. 17 Reinstall the lower panel first. 3. On some models with sound seals, measure the distance from the bottom of the dishwasher to the correct size. 2. On some models, remove the backing and attach the sound barrier strip below the dishwasher door. 4. Install the sound seals. 7.
1. Trim the sound seals to the floor. 5. Reinstall the access panel. 6. Installation is completed. 17 Reinstall the lower panel first. 3. On some models with sound seals, measure the distance from the bottom of the dishwasher to the correct size. 2. On some models, remove the backing and attach the sound barrier strip below the dishwasher door. 4. Install the sound seals. 7.

