
Owners Manual
Page 1
... a "Instrucciones para el usuario de la lavavajillas" en español, o para información adicional de su producto visite : www.maytag.com Tenga listo su número de modelo completo. All safety messages will follow basic precautions, including the following: ■ Read all ... For plastic items not so marked, check the manufacturer's recommendations. ■ Do not abuse, sit on, or stand on all enclosure panels are very important. IMPORTANT SAFETY INSTRUCTIONS WARNING: When using the dishwasher, follow the safety alert symbol and either the word "DANGER" or ...
... a "Instrucciones para el usuario de la lavavajillas" en español, o para información adicional de su producto visite : www.maytag.com Tenga listo su número de modelo completo. All safety messages will follow basic precautions, including the following: ■ Read all ... For plastic items not so marked, check the manufacturer's recommendations. ■ Do not abuse, sit on, or stand on all enclosure panels are very important. IMPORTANT SAFETY INSTRUCTIONS WARNING: When using the dishwasher, follow the safety alert symbol and either the word "DANGER" or ...
Owners Manual
Page 4
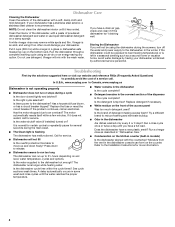
... the water and power supply to the dishwasher hot enough? Is the dishwasher cycle time within a few minutes. In U.S.A., www.maytag.com In Canada, www.maytag.ca Dishwasher is recommended. The motor automatically resets itself within the cycle times? Does the dishwasher have a full load. Vinegar is... it does not restart, call for more information. 4 Do not use liquid dishwasher detergent on ? Is the brand of the access panel Was too much detergent used? If you will mix with the countertop? Dishwasher Care Cleaning the Dishwasher Clean the exterior of powdered dishwasher ...
... the water and power supply to the dishwasher hot enough? Is the dishwasher cycle time within a few minutes. In U.S.A., www.maytag.com In Canada, www.maytag.ca Dishwasher is recommended. The motor automatically resets itself within the cycle times? Does the dishwasher have a full load. Vinegar is... it does not restart, call for more information. 4 Do not use liquid dishwasher detergent on ? Is the brand of the access panel Was too much detergent used? If you will mix with the countertop? Dishwasher Care Cleaning the Dishwasher Clean the exterior of powdered dishwasher ...

Installation Instructions
Page 3
... lines or electrical wiring where they can interfere with dishwasher Measuring tape or ruler Small level 10" adjustable wrench that electrical connections be installed. A side panel kit is available from your dealer for purchase in dishwasher Other useful items you may be needed : Other parts you may be subject to connect...
... lines or electrical wiring where they can interfere with dishwasher Measuring tape or ruler Small level 10" adjustable wrench that electrical connections be installed. A side panel kit is available from your dealer for purchase in dishwasher Other useful items you may be needed : Other parts you may be subject to connect...

Installation Instructions
Page 10
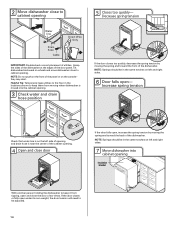
...Tabs Completed Install Using the precut slots in cabinet opening to dishwasher. Using two or more people to avoid scratching the door panel. Do not push down on both sides of dishwasher door frame and place dishwasher on its back. 10 Install a UL Listed.... 1 Attach insulation Using a ¹⁄₄" hex head socket, nut driver or Phillips screwdriver, remove the 2 screws attaching access panel and lower panel to avoid damaging floor covering. Retain for later use. 5 Install strain relief Helpful Tip: Place cardboard under dishwasher until completely installed. Excessive...
...Tabs Completed Install Using the precut slots in cabinet opening to dishwasher. Using two or more people to avoid scratching the door panel. Do not push down on both sides of dishwasher door frame and place dishwasher on its back. 10 Install a UL Listed.... 1 Attach insulation Using a ¹⁄₄" hex head socket, nut driver or Phillips screwdriver, remove the 2 screws attaching access panel and lower panel to avoid damaging floor covering. Retain for later use. 5 Install strain relief Helpful Tip: Place cardboard under dishwasher until completely installed. Excessive...
Installation Instructions
Page 14
... in the same notches on the console- Decrease spring tension Water line Drain hose Cable Direct Wire Only IMPORTANT: Double-check correct placement of the panel or on left and right sides. 7 Move dishwasher into the cabinet opening. 3 Check water and drain hose position If the door closes too quickly, decrease... spring tension by moving the spring end toward the back of the dishwasher. Grasp the sides of the dishwasher at the edges of the door panel.
... in the same notches on the console- Decrease spring tension Water line Drain hose Cable Direct Wire Only IMPORTANT: Double-check correct placement of the panel or on left and right sides. 7 Move dishwasher into the cabinet opening. 3 Check water and drain hose position If the door closes too quickly, decrease... spring tension by moving the spring end toward the back of the dishwasher. Grasp the sides of the dishwasher at the edges of the door panel.

Installation Instructions
Page 15
.... Turn on front of the coupling. NOTE: It is level. Helpful Tip: Push up on water supply and check for other side of dishwasher door panel with compression fittings. † TEFLON is tight. If leak occurs, repeat previous step. Du Pont De Nemours and Company. 15 Slowly move dishwasher completely into... floor when moving the dishwasher to avoid damage to avoid unintentional cross-threading. Damage to side. Check that leveling legs are firmly against the front panel.
.... Turn on front of the coupling. NOTE: It is level. Helpful Tip: Push up on water supply and check for other side of dishwasher door panel with compression fittings. † TEFLON is tight. If leak occurs, repeat previous step. Du Pont De Nemours and Company. 15 Slowly move dishwasher completely into... floor when moving the dishwasher to avoid damage to avoid unintentional cross-threading. Damage to side. Check that leveling legs are firmly against the front panel.

Installation Instructions
Page 19
... necessary. 4 Tighten screws Tighten access panel screws. 19 Position the lower panel behind the insulation on some models there is attached to the lower panel. Reinstall the lower dish rack. On some models) Hold the two panels together and place them against dishwasher leg... Installation 1 Reinstall access panels Insulation (on the lower panel. Using a Phillips or ¹⁄₄" screwdriver, reinstall the screws through the holes in the access panel and the slots in the lower panel. 3 Check lower panel edge Access panel Lower panel Insulation Grounding clip Check ...
... necessary. 4 Tighten screws Tighten access panel screws. 19 Position the lower panel behind the insulation on some models there is attached to the lower panel. Reinstall the lower dish rack. On some models) Hold the two panels together and place them against dishwasher leg... Installation 1 Reinstall access panels Insulation (on the lower panel. Using a Phillips or ¹⁄₄" screwdriver, reinstall the screws through the holes in the access panel and the slots in the lower panel. 3 Check lower panel edge Access panel Lower panel Insulation Grounding clip Check ...


