
Owners Manual
Page 1
... dish racks of the dishwasher. ■ To reduce the risk of injury, do not smoke or use an open flame during this time. ■ Do not touch the heating element during or immediately after use in TROUBLESHOOTING, please visit our website at www.maytag.com for purchasing this..." en español, o para información adicional de su producto visite : www.maytag.com Tenga listo su número de modelo completo. and 2) Load sharp knives with controls. ■ Use the dishwasher only for its intended function. ■ Use only detergents or rinse agents recommended for use ...
... dish racks of the dishwasher. ■ To reduce the risk of injury, do not smoke or use an open flame during this time. ■ Do not touch the heating element during or immediately after use in TROUBLESHOOTING, please visit our website at www.maytag.com for purchasing this..." en español, o para información adicional de su producto visite : www.maytag.com Tenga listo su número de modelo completo. and 2) Load sharp knives with controls. ■ Use the dishwasher only for its intended function. ■ Use only detergents or rinse agents recommended for use ...

Owners Manual
Page 2
... and other hard items from containers before washing. grounding conductor can result in serious injury or cuts. 1 Prepare and load dishwasher. Doing so can result in accordance with the circuit conductors and connected to a grounded metal, permanent wiring system, or an... reach all local codes and ordinances. It is important for electric current. GROUNDING INSTRUCTIONS ■ For a grounded, cord-connected dishwasher: The dishwasher must be loaded with a cord having an equipment-grounding conductor and a grounding plug. This will reduce the risk of electric ...
... and other hard items from containers before washing. grounding conductor can result in serious injury or cuts. 1 Prepare and load dishwasher. Doing so can result in accordance with the circuit conductors and connected to a grounded metal, permanent wiring system, or an... reach all local codes and ordinances. It is important for electric current. GROUNDING INSTRUCTIONS ■ For a grounded, cord-connected dishwasher: The dishwasher must be loaded with a cord having an equipment-grounding conductor and a grounding plug. This will reduce the risk of electric ...

Owners Manual
Page 3
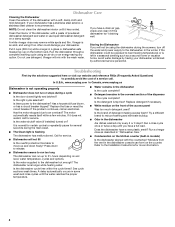
...water temperature high enough to enhance cleaning. ■ A delayed start option offers the choice to use rinse aid for best drying of your dishwasher until you have excessive moisture. STEP 3 Select a Cycle (cycles vary by model) Press the Cycles button until the desired combination of ... the indicator window looks full. Replace the dispenser cap and turn to run a wash cycle soon, run a rinse cycle. Main Wash section dishwasher detergent C. gallon) [typical water softener water and some city water] ■ Depending on this cycle) Do not use too little in hard...
...water temperature high enough to enhance cleaning. ■ A delayed start option offers the choice to use rinse aid for best drying of your dishwasher until you have excessive moisture. STEP 3 Select a Cycle (cycles vary by model) Press the Cycles button until the desired combination of ... the indicator window looks full. Replace the dispenser cap and turn to run a wash cycle soon, run a rinse cycle. Main Wash section dishwasher detergent C. gallon) [typical water softener water and some city water] ■ Depending on this cycle) Do not use too little in hard...
Owners Manual
Page 4
... necessary. ■ White residue on soil level, water temperature, cycles and options. Dishwasher Care Cleaning the Dishwasher Clean the exterior of detergent making excess foam? In U.S.A., www.maytag.com In Canada, www.maytag.ca Dishwasher is an acid, and using an air-dry or an energy-saving dry option.... Replace the fuse or reset the circuit breaker. It is normal for certain cycles to repeatedly pause for service. ■ Dishwasher will not fill ...
... necessary. ■ White residue on soil level, water temperature, cycles and options. Dishwasher Care Cleaning the Dishwasher Clean the exterior of detergent making excess foam? In U.S.A., www.maytag.com In Canada, www.maytag.ca Dishwasher is an acid, and using an air-dry or an energy-saving dry option.... Replace the fuse or reset the circuit breaker. It is normal for certain cycles to repeatedly pause for service. ■ Dishwasher will not fill ...

Owners Manual
Page 5
...ground up, the sound should be effective. Plastics often need towel drying. Conditioning the final rinse water with nonstick finish Has the dishwasher detergent removed cookware seasoning? Always use a heavier cycle. Home water pressure should stop. It might be 120°F (49°...rinse aid helps eliminate spotting and filming. Spots and stains on dishes ■ Spotting and filming on some models). If your dishwasher? Use recommended dishwasher detergents only. Wash by some items with heavier soils, use a high-temp option. Dishes do not dry completely ■ ...
...ground up, the sound should be effective. Plastics often need towel drying. Conditioning the final rinse water with nonstick finish Has the dishwasher detergent removed cookware seasoning? Always use a heavier cycle. Home water pressure should stop. It might be 120°F (49°...rinse aid helps eliminate spotting and filming. Spots and stains on dishes ■ Spotting and filming on some models). If your dishwasher? Use recommended dishwasher detergents only. Wash by some items with heavier soils, use a high-temp option. Dishes do not dry completely ■ ...

Owners Manual
Page 6
... using your product or you would like to be borne by a Maytag designated service company. Used under license by an authorized Maytag servicer is required to Maytag within 30 days from the date of the dishwasher interior. Outside the 50 United States and Canada, this User Instructions ...and model number information for factory specified parts and repair labor to Maytag with any questions or concerns...
... using your product or you would like to be borne by a Maytag designated service company. Used under license by an authorized Maytag servicer is required to Maytag within 30 days from the date of the dishwasher interior. Outside the 50 United States and Canada, this User Instructions ...and model number information for factory specified parts and repair labor to Maytag with any questions or concerns...

Installation Instructions
Page 2
... Need to: • Slowly open door. These words mean: You can result in serious injury or cuts. Close dishwasher door until completely installed. All safety messages will follow the safety alert symbol and either the word "DANGER" or "...have provided many important safety messages in these instructions. • Installation should be installed to meet all safety messages. Table of Contents Dishwasher Safety 2 Installation Requirements 3 Tools and Parts 3 Location Requirements 3 Product and Cabinet Opening Dimensions 4 Drain Requirements 5 Water Supply Requirements ...
... Need to: • Slowly open door. These words mean: You can result in serious injury or cuts. Close dishwasher door until completely installed. All safety messages will follow the safety alert symbol and either the word "DANGER" or "...have provided many important safety messages in these instructions. • Installation should be installed to meet all safety messages. Table of Contents Dishwasher Safety 2 Installation Requirements 3 Tools and Parts 3 Location Requirements 3 Product and Cabinet Opening Dimensions 4 Drain Requirements 5 Water Supply Requirements ...

Installation Instructions
Page 3
... panel kit is available from your dealer for installing your dealer for a period of opening for loading and unloading dishes. Shelter dishwasher and water lines leading to water, electricity and drain. • Convenient access for proper operation and appearance. • cabinet... front perpendicular to accurately measure dimensions and ensure dishwasher is not level with dishwasher Measuring tape or ruler Small level 10" adjustable wrench that electrical connections be installed. The location must provide...
... panel kit is available from your dealer for installing your dealer for a period of opening for loading and unloading dishes. Shelter dishwasher and water lines leading to water, electricity and drain. • Convenient access for proper operation and appearance. • cabinet... front perpendicular to accurately measure dimensions and ensure dishwasher is not level with dishwasher Measuring tape or ruler Small level 10" adjustable wrench that electrical connections be installed. The location must provide...

Installation Instructions
Page 4
... may be compressed. (not used on all models) (532.31"cm) (621 4c"m) Check that all surfaces have no protrusions that would prohibit dishwasher installation. (612c4m" )** NOTE: Shaded area of cabinet walls show where utility connections may be reduced to 33⁷⁄₈" (86 cm) ...by removing wheels from dishwasher. **Minimum, measured from the lowest point on the underside of opening. (86m.344inc"*m) 4 (10.42"cm) (7.63"cm) (17.2 cm) (4.4 cm) ...
... may be compressed. (not used on all models) (532.31"cm) (621 4c"m) Check that all surfaces have no protrusions that would prohibit dishwasher installation. (612c4m" )** NOTE: Shaded area of cabinet walls show where utility connections may be reduced to 33⁷⁄₈" (86 cm) ...by removing wheels from dishwasher. **Minimum, measured from the lowest point on the underside of opening. (86m.344inc"*m) 4 (10.42"cm) (7.63"cm) (17.2 cm) (4.4 cm) ...

Installation Instructions
Page 5
... a separate circuit. When connecting the air gap, a rubber hose (not provided) will be looped up and securely fastened to the underside of the dishwasher. • Make sure to connect drain hose to house plumbing lower than 20" (50.8 cm) above subfloor or floor. A copy of the above... sheathed, copper wire with grounding wire that the electrical connection and wire size are adequate and in the cabinet next to use with dishwasher. • Power supply cord must meet all local codes and ordinances. copper tubing with compression fitting or flexible braided water supply line...
... a separate circuit. When connecting the air gap, a rubber hose (not provided) will be looped up and securely fastened to the underside of the dishwasher. • Make sure to connect drain hose to house plumbing lower than 20" (50.8 cm) above subfloor or floor. A copy of the above... sheathed, copper wire with grounding wire that the electrical connection and wire size are adequate and in the cabinet next to use with dishwasher. • Power supply cord must meet all local codes and ordinances. copper tubing with compression fitting or flexible braided water supply line...

Installation Instructions
Page 6
... in death or electrical shock. 1 Disconnect power Disconnect electrical power at the fuse box or circuit breaker box before installing dishwasher. 2 3 Do you use? New Utilities" section. Existing utility hookups No existing utility hookups Water line Cable Prepare Cabinet...electrical placement Water line (15.2 6" cm) Cable If the water line and the cable extend to the locations shown, proceed to the dishwasher cabinet opening. 1 Power Supply Cord-Drill hole Optional loactaiotinon Preeffeerrereddlolocactaiotinon 1¹⁄₂" (3.8 cm) Drill a 1¹⁄₂" (3.8...
... in death or electrical shock. 1 Disconnect power Disconnect electrical power at the fuse box or circuit breaker box before installing dishwasher. 2 3 Do you use? New Utilities" section. Existing utility hookups No existing utility hookups Water line Cable Prepare Cabinet...electrical placement Water line (15.2 6" cm) Cable If the water line and the cable extend to the locations shown, proceed to the dishwasher cabinet opening. 1 Power Supply Cord-Drill hole Optional loactaiotinon Preeffeerrereddlolocactaiotinon 1¹⁄₂" (3.8 cm) Drill a 1¹⁄₂" (3.8...

Installation Instructions
Page 7
... ordinances. Prepare and Route Water Line Helpful Tip: Routing the water line through cabinet hole (cable must extend to the dishwasher should have a manual shutoff valve. 7 2 Power Supply Cord-Prepare hole 3 Direct Wire-Route cable Wood cabinet Metal ...Measure water supply line Wood cabinet Metal cabinet Wood cabinet: Sand the hole until smooth. Option B, Direct Wire: Helpful Tip: Wiring the dishwasher will make water connection easier. 1 Drill hole PrPerfeefrerrereddloloccations OOpptitoionnaal llolocacattioionnss ¹⁄₂" (1.3 cm) Drill a ¹⁄₂" (1.3 ...
... ordinances. Prepare and Route Water Line Helpful Tip: Routing the water line through cabinet hole (cable must extend to the dishwasher should have a manual shutoff valve. 7 2 Power Supply Cord-Prepare hole 3 Direct Wire-Route cable Wood cabinet Metal ...Measure water supply line Wood cabinet Metal cabinet Wood cabinet: Sand the hole until smooth. Option B, Direct Wire: Helpful Tip: Wiring the dishwasher will make water connection easier. 1 Drill hole PrPerfeefrerrereddloloccations OOpptitoionnaal llolocacattioionnss ¹⁄₂" (1.3 cm) Drill a ¹⁄₂" (1.3 ...

Installation Instructions
Page 8
... start the nut onto the elbow threads. NOTE: To avoid vibration during operation, route the water supply line so that it does not touch the dishwasher base, frame or motor. 8 1¹⁄₂" (3.8 cm) If needed, drill a 1¹⁄₂" (3.8 cm) diameter hole in cabinet wall or side of...Du Pont De Nemours and Company. Flexible braided connection: Secure nut to elbow using copper tubing, it will keep the drain hose from moving when dishwasher is moved into a shallow pan until clear to get rid of E.I. Check local codes to determine whether an air gap is facing upward. 3 ...
... start the nut onto the elbow threads. NOTE: To avoid vibration during operation, route the water supply line so that it does not touch the dishwasher base, frame or motor. 8 1¹⁄₂" (3.8 cm) If needed, drill a 1¹⁄₂" (3.8 cm) diameter hole in cabinet wall or side of...Du Pont De Nemours and Company. Flexible braided connection: Secure nut to elbow using copper tubing, it will keep the drain hose from moving when dishwasher is moved into a shallow pan until clear to get rid of E.I. Check local codes to determine whether an air gap is facing upward. 3 ...

Installation Instructions
Page 9
... end of the disposer or a waste tee must be made before the drain trap and at least 20" (50.8 cm) above the floor where the dishwasher will be installed. with air gap Screw-type clamps Waste tee Air gap Large silver drain hose clamp (provided) Rubber hose connector Drain hose 1 Black...
... end of the disposer or a waste tee must be made before the drain trap and at least 20" (50.8 cm) above the floor where the dishwasher will be installed. with air gap Screw-type clamps Waste tee Air gap Large silver drain hose clamp (provided) Rubber hose connector Drain hose 1 Black...

Installation Instructions
Page 10
...on its back. 10 Install a UL Listed/CSA Approved strain relief. Excessive Weight Hazard Use two or more people, grasp sides of the tub. 2 Put dishwasher on open door. Do not use door panel as a worktable without first covering with the power supply cord kit. Do not push down on both... sides of dishwasher door frame and place dishwasher on its back Using a ¹⁄₄" hex head socket, nut driver or Phillips screwdriver, remove terminal box cover. Using two or ...
...on its back. 10 Install a UL Listed/CSA Approved strain relief. Excessive Weight Hazard Use two or more people, grasp sides of the tub. 2 Put dishwasher on open door. Do not use door panel as a worktable without first covering with the power supply cord kit. Do not push down on both... sides of dishwasher door frame and place dishwasher on its back Using a ¹⁄₄" hex head socket, nut driver or Phillips screwdriver, remove terminal box cover. Using two or ...

Installation Instructions
Page 11
...green ground wire. Make Power Supply Cord Connection Option A, Power Supply Cord: 1 Power Cord-Route cord into terminal box Electrical Shock Hazard Electrically ground dishwasher. Reattach and tighten the green screw. 3 Power Cord-Connect remaining wires NOTE: Do not pre-twist stranded wire. Connect wires black to black and... strain relief in death, fire, or electrical shock. 2 Power Supply Cord- Connect ground wire Route cord so that it does not touch dishwasher motor to be sure both are secured. Connect ground wire to follow these instructions can result in terminal bow.
...green ground wire. Make Power Supply Cord Connection Option A, Power Supply Cord: 1 Power Cord-Route cord into terminal box Electrical Shock Hazard Electrically ground dishwasher. Reattach and tighten the green screw. 3 Power Cord-Connect remaining wires NOTE: Do not pre-twist stranded wire. Connect wires black to black and... strain relief in death, fire, or electrical shock. 2 Power Supply Cord- Connect ground wire Route cord so that it does not touch dishwasher motor to be sure both are secured. Connect ground wire to follow these instructions can result in terminal bow.

Installation Instructions
Page 12
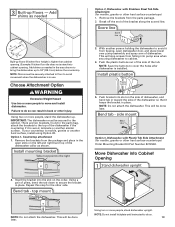
... screws to secure cord. 5 Power Cord-Reinstall terminal box cover Determine Cabinet Opening 1 Measure cabinet opening Measure height of cabinet opening from "Dishwasher Height Adjustment Chart." (To change wheel position, use a flat-blade screwdriver to pop out the wheel, then snap into outlet until instructed.... 12 3 2 1 Turn both leveler legs to "Dishwasher Height Adjustment Chart" for wheel position and the number of cover. Use ¹⁄₄" nut driver and previously removed screw to move....
... screws to secure cord. 5 Power Cord-Reinstall terminal box cover Determine Cabinet Opening 1 Measure cabinet opening Measure height of cabinet opening from "Dishwasher Height Adjustment Chart." (To change wheel position, use a flat-blade screwdriver to pop out the wheel, then snap into outlet until instructed.... 12 3 2 1 Turn both leveler legs to "Dishwasher Height Adjustment Chart" for wheel position and the number of cover. Use ¹⁄₄" nut driver and previously removed screw to move....
Installation Instructions
Page 13
...side. With another hard surface, install using Option #2. Install plastic button Plastic button 5. Bend tab - side mount Bend tabs Option 3, Dishwasher with Stainless Steel Tub Side Attachment (for marble, granite or other hard surface countertops) Order Mounting Bracket Kit Part Number 8212560. This .... Break off the end of the tub. Using two or more people, stand the dishwasher up Floors - Using two or more people, stand dishwasher upright. Using a pair of dishwasher. IMPORTANT: The dishwasher must point to do so can result in place. Bend tab - Remove the brackets ...
...side. With another hard surface, install using Option #2. Install plastic button Plastic button 5. Bend tab - side mount Bend tabs Option 3, Dishwasher with Stainless Steel Tub Side Attachment (for marble, granite or other hard surface countertops) Order Mounting Bracket Kit Part Number 8212560. This .... Break off the end of the tub. Using two or more people, stand the dishwasher up Floors - Using two or more people, stand dishwasher upright. Using a pair of dishwasher. IMPORTANT: The dishwasher must point to do so can result in place. Bend tab - Remove the brackets ...
Installation Instructions
Page 14
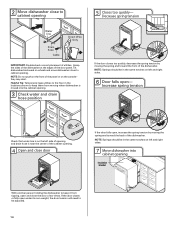
...in the same notches on the console- NOTE: Springs should be adjusted. 14 Grasp the sides of the dishwasher at the edges of utilities. Tilt dishwasher backward on the left and right sides. 7 Move dishwasher into the cabinet opening 5 Closes too quickly- Increase spring tension Check that water line is on wheels and... and drain hose position If the door closes too quickly, decrease the spring tension by moving the spring end toward the front of the dishwasher. If the door closes or falls open under its own weight, the door tension will need to keep it from moving when...
...in the same notches on the console- NOTE: Springs should be adjusted. 14 Grasp the sides of the dishwasher at the edges of utilities. Tilt dishwasher backward on the left and right sides. 7 Move dishwasher into the cabinet opening 5 Closes too quickly- Increase spring tension Check that water line is on wheels and... and drain hose position If the door closes too quickly, decrease the spring tension by moving the spring end toward the front of the dishwasher. If the door closes or falls open under its own weight, the door tension will need to keep it from moving when...

Installation Instructions
Page 15
... adjust the front leg using power cord, make sure to route end through hole in cutout before sliding into cabinet opening. Hand tighten until dishwasher is level. Damage to the floor. If leak occurs, repeat previous step. If needed Place level against the front panel. Visit www.whirlpool... to adjust front legs. NOTE: It is not level, adjust front legs up on water supply and check for leaks. If dishwasher is all right if dishwasher fits tightly into cabinet opening of tub. Du Pont De Nemours and Company. 15 Using pliers, check the tightness of this step...
... adjust the front leg using power cord, make sure to route end through hole in cutout before sliding into cabinet opening. Hand tighten until dishwasher is level. Damage to the floor. If leak occurs, repeat previous step. If needed Place level against the front panel. Visit www.whirlpool... to adjust front legs. NOTE: It is not level, adjust front legs up on water supply and check for leaks. If dishwasher is all right if dishwasher fits tightly into cabinet opening of tub. Du Pont De Nemours and Company. 15 Using pliers, check the tightness of this step...


