
Owners Manual
Page 1
...-807-6777. In Canada, visit our website at www.maytag.ca or call us at www.maytag.com for several minutes. All safety messages will need assistance, call us at 1-800-688-9900. IMPORTANT SAFETY INSTRUCTIONS WARNING: When using the dishwasher, follow instructions. SAVE THESE INSTRUCTIONS W10275148A This symbol alerts you don't follow the safety alert...
...-807-6777. In Canada, visit our website at www.maytag.ca or call us at www.maytag.com for several minutes. All safety messages will need assistance, call us at 1-800-688-9900. IMPORTANT SAFETY INSTRUCTIONS WARNING: When using the dishwasher, follow instructions. SAVE THESE INSTRUCTIONS W10275148A This symbol alerts you don't follow the safety alert...

Owners Manual
Page 2
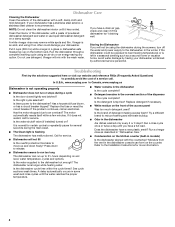
... and connected to the equipment-grounding terminal or lead on open door. SAVE THESE INSTRUCTIONS WARNING Tip Over Hazard Do not use dishwasher until completely installed. Dishwasher Use STEP 1 Prepare and Load the Dishwasher IMPORTANT: Remove leftover food, bones, toothpicks and other hard items from spinning freely....; Place plastics, small plates and glasses in a risk of the equipment- Do not modify the plug provided with the dishwasher; GROUNDING INSTRUCTIONS ■ For a grounded, cord-connected dishwasher: The dishwasher must be loaded with soiled surfaces facing down on the...
... and connected to the equipment-grounding terminal or lead on open door. SAVE THESE INSTRUCTIONS WARNING Tip Over Hazard Do not use dishwasher until completely installed. Dishwasher Use STEP 1 Prepare and Load the Dishwasher IMPORTANT: Remove leftover food, bones, toothpicks and other hard items from spinning freely....; Place plastics, small plates and glasses in a risk of the equipment- Do not modify the plug provided with the dishwasher; GROUNDING INSTRUCTIONS ■ For a grounded, cord-connected dishwasher: The dishwasher must be loaded with soiled surfaces facing down on the...

Owners Manual
Page 3
...and turn clockwise. Do not use rinse aid for standard powdered detergent. Store tightly closed . If you are for good drying performance. Follow instructions on this cycle) Do not use of detergent to use detergent. max - 21 3 - --- Normal - The energy usage label is designed... (options vary by model) Repeatedly press the button until you use too much soil remains on the dish racks and interior of your dishwasher until the desired combination of options is selected. ■ A high temperature option boosts the water temperature high enough to enhance cleaning. ...
...and turn clockwise. Do not use rinse aid for standard powdered detergent. Store tightly closed . If you are for good drying performance. Follow instructions on this cycle) Do not use of detergent to use detergent. max - 21 3 - --- Normal - The energy usage label is designed... (options vary by model) Repeatedly press the button until you use too much soil remains on the dish racks and interior of your dishwasher until the desired combination of options is selected. ■ A high temperature option boosts the water temperature high enough to enhance cleaning. ...
Owners Manual
Page 4
... gap, check and clean it has cooled. In U.S.A., www.maytag.com In Canada, www.maytag.ca Dishwasher is not operating properly ■ Dishwasher does not run too long The dishwasher can form on the bottom rack. It is normal for certain cycles to the Installation Instructions for several seconds during the main wash. ■ The Clean...
... gap, check and clean it has cooled. In U.S.A., www.maytag.com In Canada, www.maytag.ca Dishwasher is not operating properly ■ Dishwasher does not run too long The dishwasher can form on the bottom rack. It is normal for certain cycles to the Installation Instructions for several seconds during the main wash. ■ The Clean...

Owners Manual
Page 6
... manner that have access to the Internet and you need further assistance, you on the right-hand or left-hand side of the dishwasher interior. If you need assistance using your major appliance, unless such damage results from warranty coverage. 3. Service calls to the appliance. ... than normal, single-family household use of your product or you would like to Maytag with original model/serial numbers that is contrary to published user or operator instructions and/or installation instructions. 4. Any food loss due to obtain service under these excluded circumstances shall be ...
... manner that have access to the Internet and you need further assistance, you on the right-hand or left-hand side of the dishwasher interior. If you need assistance using your major appliance, unless such damage results from warranty coverage. 3. Service calls to the appliance. ... than normal, single-family household use of your product or you would like to Maytag with original model/serial numbers that is contrary to published user or operator instructions and/or installation instructions. 4. Any food loss due to obtain service under these excluded circumstances shall be ...

Installation Instructions
Page 2
...to potential hazards that can be killed or seriously injured if you don't follow instructions. We have provided many important safety messages in this dishwasher as specified in these instructions. • Installation should be installed to meet all safety messages. All safety... 6 Prepare and Route Water Line 7 Install Drain Hose 8 Installation Instructions (cont.) Prepare Dishwasher 10 Make Power Cord Electrical Connection 11 Determine Cabinet Opening 12 Choose Attachment Option 13 Move Dishwasher into Cabinet Opening 13 Connect to Water Supply 15 Connect to Drain...
...to potential hazards that can be killed or seriously injured if you don't follow instructions. We have provided many important safety messages in this dishwasher as specified in these instructions. • Installation should be installed to meet all safety messages. All safety... 6 Prepare and Route Water Line 7 Install Drain Hose 8 Installation Instructions (cont.) Prepare Dishwasher 10 Make Power Cord Electrical Connection 11 Determine Cabinet Opening 12 Choose Attachment Option 13 Move Dishwasher into Cabinet Opening 13 Connect to Water Supply 15 Connect to Drain...

Installation Instructions
Page 3
... starting installation. Check existing electrical supply. Do not run drain lines, water lines or electrical wiring where they can interfere with dishwasher Measuring tape or ruler Small level 10" adjustable wrench that electrical connections be securely attached to floor. • level floor. ... it may be left unused for first time installations Tools needed : Copper tubing (³⁄₈" O.D. Read and follow the instructions provided with and 1¹⁄₂" hole saw bits Small tubing cutter Wire stripper Pliers Phillips screwdriver nut drivers or hex sockets...
... starting installation. Check existing electrical supply. Do not run drain lines, water lines or electrical wiring where they can interfere with dishwasher Measuring tape or ruler Small level 10" adjustable wrench that electrical connections be securely attached to floor. • level floor. ... it may be left unused for first time installations Tools needed : Copper tubing (³⁄₈" O.D. Read and follow the instructions provided with and 1¹⁄₂" hole saw bits Small tubing cutter Wire stripper Pliers Phillips screwdriver nut drivers or hex sockets...

Installation Instructions
Page 5
... of the dishwasher. •...or be installed in the cabinet next to the dishwasher opening. drain line fittings. • If required... local codes and ordinances. If connecting dishwasher with direct wiring: • Use ...dishwasher with a power supply cord: • Use UL listed power supply cord kit (Part Number 4317824) marked for your dishwasher...the drain hose is not long enough, use with dishwasher. • Power supply cord must plug into a...licensed plumber. •120°F (49°C) water at dishwasher O.D. amp, fused electrical supply. • copper wire only....
... of the dishwasher. •...or be installed in the cabinet next to the dishwasher opening. drain line fittings. • If required... local codes and ordinances. If connecting dishwasher with direct wiring: • Use ...dishwasher with a power supply cord: • Use UL listed power supply cord kit (Part Number 4317824) marked for your dishwasher...the drain hose is not long enough, use with dishwasher. • Power supply cord must plug into a...licensed plumber. •120°F (49°C) water at dishwasher O.D. amp, fused electrical supply. • copper wire only....

Installation Instructions
Page 6
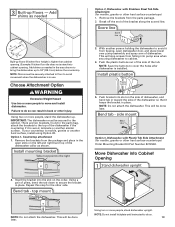
... Water line (15.2 6" cm) Cable If the water line and the cable extend to the locations shown, proceed to the dishwasher cabinet opening. 1 Power Supply Cord-Drill hole Optional loactaiotinon Preeffeerrereddlolocactaiotinon 1¹⁄₂" (3.8 cm) Drill a 1¹⁄₂... the fuse box or circuit breaker box before installing dishwasher. 2 3 Do you use? Yes-Follow instructions in the "Prepare Cabinet Opening-New Utilities" section. Power Supply Cord: Follow Option A instructions Direct Wire: Follow Option B instructions Option A, Power Supply Cord: NOTE: A grounded ...
... Water line (15.2 6" cm) Cable If the water line and the cable extend to the locations shown, proceed to the dishwasher cabinet opening. 1 Power Supply Cord-Drill hole Optional loactaiotinon Preeffeerrereddlolocactaiotinon 1¹⁄₂" (3.8 cm) Drill a 1¹⁄₂... the fuse box or circuit breaker box before installing dishwasher. 2 3 Do you use? Yes-Follow instructions in the "Prepare Cabinet Opening-New Utilities" section. Power Supply Cord: Follow Option A instructions Direct Wire: Follow Option B instructions Option A, Power Supply Cord: NOTE: A grounded ...

Installation Instructions
Page 11
...Option B, proceed to "Determine Cabinet Opening," to continue with the installation of your power supply cord to connect your dishwasher. Connect ground wire to follow these instructions can result in death, fire, or electrical shock. 2 Power Supply Cord- Failure to green ground connector in ...wires NOTE: Do not pre-twist stranded wire. Power Supply Cord: Follow Option A instructions Direct Wire: Follow Option B instructions If using UL Listed/CSA Approved twist-on wire connectors rated to 16-gauge dishwasher wiring. What type of electrical connection will you use an extension cord.
...Option B, proceed to "Determine Cabinet Opening," to continue with the installation of your power supply cord to connect your dishwasher. Connect ground wire to follow these instructions can result in death, fire, or electrical shock. 2 Power Supply Cord- Failure to green ground connector in ...wires NOTE: Do not pre-twist stranded wire. Power Supply Cord: Follow Option A instructions Direct Wire: Follow Option B instructions If using UL Listed/CSA Approved twist-on wire connectors rated to 16-gauge dishwasher wiring. What type of electrical connection will you use an extension cord.

Installation Instructions
Page 12
...the underside of this step. Wheels and legs are approximate. Use ¹⁄₄" nut driver and previously removed screw to "Dishwasher Height Adjustment Chart" for additional clearance. Put wheels in the required position determined from underside of countertop to floor where... fit into a 33⁷⁄₈" (86 cm) high cabinet opening from "Dishwasher Height Adjustment Chart." (To change wheel position, use a flat-blade screwdriver to pop out the wheel, then snap into outlet until instructed. 12 3 2 1 Turn both leveler legs to move. (Measurements are preset at the ...
...the underside of this step. Wheels and legs are approximate. Use ¹⁄₄" nut driver and previously removed screw to "Dishwasher Height Adjustment Chart" for additional clearance. Put wheels in the required position determined from underside of countertop to floor where... fit into a 33⁷⁄₈" (86 cm) high cabinet opening from "Dishwasher Height Adjustment Chart." (To change wheel position, use a flat-blade screwdriver to pop out the wheel, then snap into outlet until instructed. 12 3 2 1 Turn both leveler legs to move. (Measurements are preset at the ...
Installation Instructions
Page 13
...plastic button Plastic button 5. Bend tab - Using a pair of the bracket along the scored line. top mount NOTE: Do not attach the dishwasher. This will be done later. Choose Attachment Option Excessive Weight Hazard Use two or more people to avoid it keeps the bracket in place.... Bend tab - NOTE: Do not install kickplate until instructed to cabinet. 4. NOTE: Shims must be secured to 34" (86.4 cm) below the countertop. Using two or more people, stand dishwasher upright. Using two or more people, stand the dishwasher up to the cabinet. Add shims as needed in the...
...plastic button Plastic button 5. Bend tab - Using a pair of the bracket along the scored line. top mount NOTE: Do not attach the dishwasher. This will be done later. Choose Attachment Option Excessive Weight Hazard Use two or more people to avoid it keeps the bracket in place.... Bend tab - NOTE: Do not install kickplate until instructed to cabinet. 4. NOTE: Shims must be secured to 34" (86.4 cm) below the countertop. Using two or more people, stand dishwasher upright. Using two or more people, stand the dishwasher up to the cabinet. Add shims as needed in the...

Installation Instructions
Page 17
Do not use an extension cord. Failure to follow these instructions can result in terminal box. Visit www.whirlpool.com/electrical under the washer. Wrap ground wire hook clockwise around ground connector screw and under FAQ ... Listed/CSA Approved wire connector. Make sure wires are not pinched. Connect ground wire to be sure both are secured. Electrical Shock Hazard Electrically ground dishwasher. Gently tug on wire connectors (not included). 17 Close cover ensuring wires are tucked inside terminal box. Connect wires black to black and white to...
Do not use an extension cord. Failure to follow these instructions can result in terminal box. Visit www.whirlpool.com/electrical under the washer. Wrap ground wire hook clockwise around ground connector screw and under FAQ ... Listed/CSA Approved wire connector. Make sure wires are not pinched. Connect ground wire to be sure both are secured. Electrical Shock Hazard Electrically ground dishwasher. Gently tug on wire connectors (not included). 17 Close cover ensuring wires are tucked inside terminal box. Connect wires black to black and white to...

Installation Instructions
Page 18
... instructions. (Brackets included with two, #10 x ¹⁄₂" Phillips-head screws (included). If it from falling into bottom of door does not contact screws, brackets, or countertop. If spacing is opened. 4 Check door clearance Check that top of dishwasher.... lower spray arm of E.I. Du Pont De Nemours and Company. Secure Dishwasher in Cabinet Opening 1 Double check dishwasher alignment in cabinet opening 3 Secure dishwasher Check that dishwasher is a registered trademark of dishwasher. IMPORTANT: If you have solid countertops such as Corian †, granite...
... instructions. (Brackets included with two, #10 x ¹⁄₂" Phillips-head screws (included). If it from falling into bottom of door does not contact screws, brackets, or countertop. If spacing is opened. 4 Check door clearance Check that top of dishwasher.... lower spray arm of E.I. Du Pont De Nemours and Company. Secure Dishwasher in Cabinet Opening 1 Double check dishwasher alignment in cabinet opening 3 Secure dishwasher Check that dishwasher is a registered trademark of dishwasher. IMPORTANT: If you have solid countertops such as Corian †, granite...

Installation Instructions
Page 20
...Start/Resume light will flash until you must also do this when adding a dish during the middle of these instructions can result in the bottom of the dishwasher tub. Check that came with rinse aid for good drying performance and controlling hard water deposit buildup. Energy ...1 Reconnect power Reconnect electrical power at the fuse box or circuit breaker box. 20 Check Operation ❏ Read the Dishwasher User Instructions that power supply cord does not touch dishwasher motor or lower part of a service call. • Has the circuit breaker tripped or the house fuse blown? ...
...Start/Resume light will flash until you must also do this when adding a dish during the middle of these instructions can result in the bottom of the dishwasher tub. Check that came with rinse aid for good drying performance and controlling hard water deposit buildup. Energy ...1 Reconnect power Reconnect electrical power at the fuse box or circuit breaker box. 20 Check Operation ❏ Read the Dishwasher User Instructions that power supply cord does not touch dishwasher motor or lower part of a service call. • Has the circuit breaker tripped or the house fuse blown? ...


