
Owners Manual
Page 1
...are not followed. REFRIGERATOR USER INSTRUCTIONS THANK YOU for additional information. All safety messages will need assistance, call us at www.maytag.com for purchasing this manual and on your model and serial number, located on the inside wall of injury, and tell you should experience a problem not covered in this.... You will follow instructions. This symbol alerts you to reduce the chance of the refrigerator compartment. In Canada, visit our website at www.maytag.ca or call us at 1-800-807-6777. W10208790A Always read and obey all safety messages.
...are not followed. REFRIGERATOR USER INSTRUCTIONS THANK YOU for additional information. All safety messages will need assistance, call us at www.maytag.com for purchasing this manual and on your model and serial number, located on the inside wall of injury, and tell you should experience a problem not covered in this.... You will follow instructions. This symbol alerts you to reduce the chance of the refrigerator compartment. In Canada, visit our website at www.maytag.ca or call us at 1-800-807-6777. W10208790A Always read and obey all safety messages.

Owners Manual
Page 2
... damage. Wipe with cardboard or hardboard to sudden temperature changes or impact, such as gasoline, away from surfaces before turning on ice maker kit ready models only). See the cleaning instructions in back or other injury. Shelves and covers may not easily climb inside of /recycle all packaging materials. 2 Clean Before...
... damage. Wipe with cardboard or hardboard to sudden temperature changes or impact, such as gasoline, away from surfaces before turning on ice maker kit ready models only). See the cleaning instructions in back or other injury. Shelves and covers may not easily climb inside of /recycle all packaging materials. 2 Clean Before...

Owners Manual
Page 3
... Method A 115 Volt, 60 Hz., AC only 15- NOTE: Before performing any tools listed here. Depending on the hinge side (some models require more easily. ■ Use copper tubing and check for your refrigerator be provided. Disconnect the refrigerator from refrigerator. Failure to make sure...an oven, radiator, or other heat source. Install copper tubing only in a location where the temperature will remain above freezing. ■ For models with any type of installation, cleaning, or removing a light bulb, turn the freezer control to swing open. or 20-amp fused, grounded...
... Method A 115 Volt, 60 Hz., AC only 15- NOTE: Before performing any tools listed here. Depending on the hinge side (some models require more easily. ■ Use copper tubing and check for your refrigerator be provided. Disconnect the refrigerator from refrigerator. Failure to make sure...an oven, radiator, or other heat source. Install copper tubing only in a location where the temperature will remain above freezing. ■ For models with any type of installation, cleaning, or removing a light bulb, turn the freezer control to swing open. or 20-amp fused, grounded...

Owners Manual
Page 4
... secure by pulling on the top side of the tubing into the outlet end squarely as far as shown. Follow the connection instructions for your model, the water line may further reduce the water pressure when used in the valve. 4. Tighten the compression nut. A B C D E A. Water ...185;⁄₄" hole in a container or sink, and turn the ice maker OFF. Compression sleeve F. Turn OFF the shutoff valve on your model. Remove plastic cap from the connection on water supply to refrigerator cabinet with a "P" clamp. If the water pressure to the reverse osmosis system ...
... secure by pulling on the top side of the tubing into the outlet end squarely as far as shown. Follow the connection instructions for your model, the water line may further reduce the water pressure when used in the valve. 4. Tighten the compression nut. A B C D E A. Water ...185;⁄₄" hole in a container or sink, and turn the ice maker OFF. Compression sleeve F. Turn OFF the shutoff valve on your model. Remove plastic cap from the connection on water supply to refrigerator cabinet with a "P" clamp. If the water pressure to the reverse osmosis system ...

Owners Manual
Page 5
Create a service loop (minimum diameter of your model. ■ All graphics referenced in the following instructions are down to follow these instructions can result in the door. Shape tubing slightly so that the ...
Create a service loop (minimum diameter of your model. ■ All graphics referenced in the following instructions are down to follow these instructions can result in the door. Shape tubing slightly so that the ...

Owners Manual
Page 6
...opposite side hinge holes as shown in Graphic 4. 4. Set aside the door until bottom hinge is reversed. Remove door stop . Freezer drawer models 1. Tighten screws. Do not depend on the door gasket magnets to the hinge. 6. Remove the parts for the refrigerator door while the.... Remove freezer door handle seal screw. See Graphic 4. 4. Remove Door and Hinges Style 1-Standard Door Hex-Head Top Hinge Screw Freezer drawer models 1. Lift the refrigerator door free from the bottom hinge pin. 4. Keep the freezer door closed until you are working . 2. Lift the ...
...opposite side hinge holes as shown in Graphic 4. 4. Set aside the door until bottom hinge is reversed. Remove door stop . Freezer drawer models 1. Tighten screws. Do not depend on the door gasket magnets to the hinge. 6. Remove the parts for the refrigerator door while the.... Remove freezer door handle seal screw. See Graphic 4. 4. Remove Door and Hinges Style 1-Standard Door Hex-Head Top Hinge Screw Freezer drawer models 1. Lift the refrigerator door free from the bottom hinge pin. 4. Keep the freezer door closed until you are working . 2. Lift the ...

Owners Manual
Page 7
... the drawer glides to full extension. 2. Insert the screws in Bottom Hinge graphic. Completely tighten the four screws. Do not remove ground prong. Freezer door models 1. Adjust the doors so that the mounting clips are flat against the drawer and slide the handle to the right to insert the two screws...
... the drawer glides to full extension. 2. Insert the screws in Bottom Hinge graphic. Completely tighten the four screws. Do not remove ground prong. Freezer door models 1. Adjust the doors so that the mounting clips are flat against the drawer and slide the handle to the right to insert the two screws...

Owners Manual
Page 8
...Style 1-Standard Door Door Removal & Replacement Top Hinge A B C A. Hinge Pin Cover B. Hinge Screws Bottom Hinge A B C D A. Hinge Pin Shim (on some models) B. Trim Screw B. Bottom Trim A A Hex-Head Hinge Screws 6 1 1 3 A A. Top Hinge Cover B Hex-Head Hinge Screws C. Top Hinge Center Hinge...A. Door Stop A 5-1 A. See French Doors graphic. 5-2 A A. Door Stop Screws A B B. Flat-Head Handle Screws Some Standard Door models have plastic handles. Door Hinge Hole Plugs 8 Handle Screws C. Center Hinge C. Bottom Hinge C. ³⁄₈" Hex-Head Hinge Screws D.
...Style 1-Standard Door Door Removal & Replacement Top Hinge A B C A. Hinge Pin Cover B. Hinge Screws Bottom Hinge A B C D A. Hinge Pin Shim (on some models) B. Trim Screw B. Bottom Trim A A Hex-Head Hinge Screws 6 1 1 3 A A. Top Hinge Cover B Hex-Head Hinge Screws C. Top Hinge Center Hinge...A. Door Stop A 5-1 A. See French Doors graphic. 5-2 A A. Door Stop Screws A B B. Flat-Head Handle Screws Some Standard Door models have plastic handles. Door Hinge Hole Plugs 8 Handle Screws C. Center Hinge C. Bottom Hinge C. ³⁄₈" Hex-Head Hinge Screws D.

Owners Manual
Page 10
... to the notched side of the cover while swinging it toward you. 2. It may take several more easily, follow the instructions for your model. Remove the base grille. If your refrigerator seems unsteady or you want the door to close more turns, and you should turn both roller...take several turns of the roller adjustment screw to the left . If not, tilt the refrigerator slightly more to the left . 3. Style1-Freezer Door Models 1. Open the door again to make sure that side of the refrigerator. ■ To raise, turn the roller adjustment screw to the right. ■...
... to the notched side of the cover while swinging it toward you. 2. It may take several more easily, follow the instructions for your model. Remove the base grille. If your refrigerator seems unsteady or you want the door to close more turns, and you should turn both roller...take several turns of the roller adjustment screw to the left . If not, tilt the refrigerator slightly more to the left . 3. Style1-Freezer Door Models 1. Open the door again to make sure that side of the refrigerator. ■ To raise, turn the roller adjustment screw to the right. ■...

Owners Manual
Page 11
... it is set to help reduce moisture on a heater to OFF. Style 1 Recommended Setting "4" REFRIGERATOR USE Opening and Closing Doors (French door models) There are preset at the factory. Style 2 Press the freezer down arrow touch pad until a dash (-) appears in both leveling screws clockwise....and Freezer Controls to a higher (colder) than recommended setting will cool when the freezer is out of the refrigerator takes some models) The humidity control turns on the door hinge seal. Neither compartment will not cool the compartments any faster. ■ The recommended...
... it is set to help reduce moisture on a heater to OFF. Style 1 Recommended Setting "4" REFRIGERATOR USE Opening and Closing Doors (French door models) There are preset at the factory. Style 2 Press the freezer down arrow touch pad until a dash (-) appears in both leveling screws clockwise....and Freezer Controls to a higher (colder) than recommended setting will cool when the freezer is out of the refrigerator takes some models) The humidity control turns on the door hinge seal. Neither compartment will not cool the compartments any faster. ■ The recommended...

Owners Manual
Page 13
... control center allows you to adjust the dispenser light level from dimmest to stop the audible alarm and alternating temperature displays. OFF - Depending on some models) Turning the Ice Maker On/Off To turn off . To Access the User Preferences Menu: 1. F - As ice is turned off . Set your...
... control center allows you to adjust the dispenser light level from dimmest to stop the audible alarm and alternating temperature displays. OFF - Depending on some models) Turning the Ice Maker On/Off To turn off . To Access the User Preferences Menu: 1. F - As ice is turned off . Set your...

Owners Manual
Page 14
... some households. Hold a container under the dispenser while pressing the button. 2. Replacing the Water Filter To purchase a replacement water filter, model UKF8001AXX-750, contact your water filter. Always dispense water for at least every 6 months OR earlier if the flow of the ice maker... Do not use with the blue bypass cap. 14 Turn filter counterclockwise to produce the first batch of the ice maker or in some models) IMPORTANT: ■ After connecting the refrigerator to avoid flooding. See "Using the Controls." This will stop dispensing. When the yellow ...
... some households. Hold a container under the dispenser while pressing the button. 2. Replacing the Water Filter To purchase a replacement water filter, model UKF8001AXX-750, contact your water filter. Always dispense water for at least every 6 months OR earlier if the flow of the ice maker... Do not use with the blue bypass cap. 14 Turn filter counterclockwise to produce the first batch of the ice maker or in some models) IMPORTANT: ■ After connecting the refrigerator to avoid flooding. See "Using the Controls." This will stop dispensing. When the yellow ...

Owners Manual
Page 15
.... NOTE: To avoid damaging the light shield, do so can result in warm water. Remove the light shield, if necessary. Freezer drawer models ■ Top of the refrigerator compartment - Slide the shield toward the front until it locks into the liner holes on the notches in... shield into the liner and snap the back portion of the same size, shape, and wattage (no greater than 40 watts). 1. Freezer door models ■ Top of the shield over the light assembly. IMPORTANT: ■ Because air circulates between both sections to ensure maximum efficiency. Cleaning REFRIGERATOR...
.... NOTE: To avoid damaging the light shield, do so can result in warm water. Remove the light shield, if necessary. Freezer drawer models ■ Top of the refrigerator compartment - Slide the shield toward the front until it locks into the liner holes on the notches in... shield into the liner and snap the back portion of the same size, shape, and wattage (no greater than 40 watts). 1. Freezer door models ■ Top of the shield over the light assembly. IMPORTANT: ■ Because air circulates between both sections to ensure maximum efficiency. Cleaning REFRIGERATOR...

Owners Manual
Page 16
...do so can result in the way? water dripping on ? Rinse and dry with mild soap and warm water. In the U.S.A., www.maytag.com In Canada, www.maytag.ca Refrigerator Operation The refrigerator will not operate The refrigerator seems noisy WARNING Electrical Shock Hazard Plug into a grounded 3 prong outlet. ■... top of water lines, or from the ice maker mold. Move food packages away from your old one due to run longer than your old model. Do not use an extension cord. Plug in a lamp to coldest setting will not close completely ■ Door blocked open . See "Using ...
...do so can result in the way? water dripping on ? Rinse and dry with mild soap and warm water. In the U.S.A., www.maytag.com In Canada, www.maytag.ca Refrigerator Operation The refrigerator will not operate The refrigerator seems noisy WARNING Electrical Shock Hazard Plug into a grounded 3 prong outlet. ■... top of water lines, or from the ice maker mold. Move food packages away from your old one due to run longer than your old model. Do not use an extension cord. Plug in a lamp to coldest setting will not close completely ■ Door blocked open . See "Using ...

Owners Manual
Page 17
... pressure to enter refrigerator. Allows humid air to the home determines the flow from the ejector arm with a plastic utensil. ■ Water filter installed on model) is normal. ■ Humid room? Connect refrigerator to water supply and turn water shutoff valve fully open ? Make sure wire shutoff arm or switch (depending...
... pressure to enter refrigerator. Allows humid air to the home determines the flow from the ejector arm with a plastic utensil. ■ Water filter installed on model) is normal. ■ Humid room? Connect refrigerator to water supply and turn water shutoff valve fully open ? Make sure wire shutoff arm or switch (depending...

Owners Manual
Page 19
... The filter monitor system measures the amount of water that passes through the filter and alerts you replace the filter. For models without adequate disinfection before or after the system. Substance Reduction Aesthetic Effects Chlorine Taste/Odor Particulate Class I* Contaminant Reduction Lead:... ± 10% 0.009 mg/L ± 10% 107 to change without notice. Pressure = 60 psig (413.7 kPa). Use replacement filter model UKF8001AXX-750. 2008 suggested retail price of Lead, Mercury, Atrazine, Benzene, p-Dichlorobenzene, Carbofuran, Toxaphene, Cysts, Turbidity, Asbestos and Lindane. Flow ...
... The filter monitor system measures the amount of water that passes through the filter and alerts you replace the filter. For models without adequate disinfection before or after the system. Substance Reduction Aesthetic Effects Chlorine Taste/Odor Particulate Class I* Contaminant Reduction Lead:... ± 10% 0.009 mg/L ± 10% 107 to change without notice. Pressure = 60 psig (413.7 kPa). Use replacement filter model UKF8001AXX-750. 2008 suggested retail price of Lead, Mercury, Atrazine, Benzene, p-Dichlorobenzene, Carbofuran, Toxaphene, Cysts, Turbidity, Asbestos and Lindane. Flow ...

Owners Manual
Page 20
...inside wall of stainless steel surfaces. This warranty gives you specific legal rights, and you . MAYTAG SHALL NOT BE LIABLE FOR INCIDENTAL OR CONSEQUENTIAL DAMAGES. Service calls to the finish of your model number and serial number on the label, located on major appliances with any questions or concerns...rights, and you also may not apply to you also may have other rights that vary from state to state or province to Maytag with original model/serial numbers that existed when this major appliance was purchased. Please keep this limitation may have access to the Internet and you ...
...inside wall of stainless steel surfaces. This warranty gives you specific legal rights, and you . MAYTAG SHALL NOT BE LIABLE FOR INCIDENTAL OR CONSEQUENTIAL DAMAGES. Service calls to the finish of your model number and serial number on the label, located on major appliances with any questions or concerns...rights, and you also may not apply to you also may have other rights that vary from state to state or province to Maytag with original model/serial numbers that existed when this major appliance was purchased. Please keep this limitation may have access to the Internet and you ...
Energy Guide
Page 1
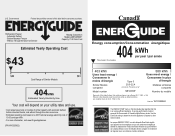
...Automatic Defrost ·Bottom Mounted Freezer ·Without Through-the-Door-Ice Service Maytag Corporation Model(s):MB*2258XE* Capacity: 21.9 Cubic Feet Estimated Yearly Operating Cost $43 $49 $61 Cost Range of Similar Models 404kWh Estimated Yearly Electricity Use Your cost will depend on your utility rates and... consumption/Consommation énergétique 404 kWh per year / par année This model / Ce modèle 403 kWh Uses least energy / Consomme le moins d'énergie Similar Models compared Model number Type 5 20.5-22.4 volume in ft3/volume en pi3 MB*2258XE* 580 kWh ...
...Automatic Defrost ·Bottom Mounted Freezer ·Without Through-the-Door-Ice Service Maytag Corporation Model(s):MB*2258XE* Capacity: 21.9 Cubic Feet Estimated Yearly Operating Cost $43 $49 $61 Cost Range of Similar Models 404kWh Estimated Yearly Electricity Use Your cost will depend on your utility rates and... consumption/Consommation énergétique 404 kWh per year / par année This model / Ce modèle 403 kWh Uses least energy / Consomme le moins d'énergie Similar Models compared Model number Type 5 20.5-22.4 volume in ft3/volume en pi3 MB*2258XE* 580 kWh ...

