Use and Care Guide
Page 4
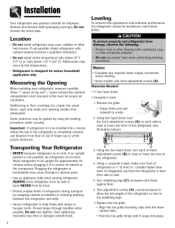
...adjustment screws (A) on the stabilizing legs. Turn stabilizing legs (C) clockwise until it in blankets or inserting padding between the refrigerator and dolly. • Secure refrigerator to side. carpet, tile, wood floors, rugs) may be leveled per instructions below 55 ° F (12... • Refrigerator is level from its side. Materials Needed: • _" hex head driver • Carpenter's level. 1. Allow refrigerator to sit upright for shipment. Your refrigerator was packed carefully for approximately 30 minutes before leveling. • Some models only have ...
...adjustment screws (A) on the stabilizing legs. Turn stabilizing legs (C) clockwise until it in blankets or inserting padding between the refrigerator and dolly. • Secure refrigerator to side. carpet, tile, wood floors, rugs) may be leveled per instructions below 55 ° F (12... • Refrigerator is level from its side. Materials Needed: • _" hex head driver • Carpenter's level. 1. Allow refrigerator to sit upright for shipment. Your refrigerator was packed carefully for approximately 30 minutes before leveling. • Some models only have ...
Use and Care Guide
Page 5
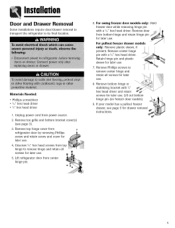
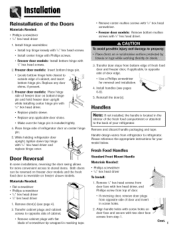
... page 5 for drawer removal instructions. Remove center hinge pin with a -_" hex head driver. Lift out bottom hinge pin (on freezer door models). Materials Needed: • Phillips screwdriver • 5/,,, hex head driver • 3/;, hex head driver 1. Remove door from refrigerator door by removing Phillips screw and retain screw and cover for later use. Retain hinge...
... page 5 for drawer removal instructions. Remove center hinge pin with a -_" hex head driver. Lift out bottom hinge pin (on freezer door models). Materials Needed: • Phillips screwdriver • 5/,,, hex head driver • 3/;, hex head driver 1. Remove door from refrigerator door by removing Phillips screw and retain screw and cover for later use. Retain hinge...
Use and Care Guide
Page 6
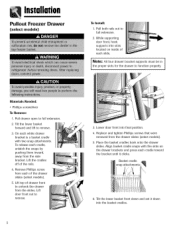
Pullout Freezer Drawer (select models) To Install: 1. Lower door front into the basket cradles. While supporting door front, hook supports into slots located on the drawer brackets and press each ... cradle with the slots on inside of the rails. /4. Lift top of the drawer slides (select models). 5. Basket cradle 6. On each cradle, unlatch the snaps by pushing them inward, away from the drawer slides (select models). . Tilt the lower basket forward and lift to full extension. 2. Pull drawer open to remove. 3. Pull...
Pullout Freezer Drawer (select models) To Install: 1. Lower door front into the basket cradles. While supporting door front, hook supports into slots located on the drawer brackets and press each ... cradle with the slots on inside of the rails. /4. Lift top of the drawer slides (select models). 5. Basket cradle 6. On each cradle, unlatch the snaps by pushing them inward, away from the drawer slides (select models). . Tilt the lower basket forward and lift to full extension. 2. Pull drawer open to remove. 3. Pull...
Use and Care Guide
Page 7
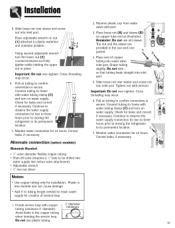
... insert in masking tape. • Remove center mullion screws with 5/,,, hex head screwdriver. • Freezer door models: Remove bottom mullion screws with 3/,, hex head screws. 2. While holding refrigerator door upright, tighten down top hinge with hex head driver, and Phillips screw from top of door....of cabinet. • Remove cabinet plugs with flat blade of refrigerator door on freezer drawer models. ConL Handle design varies from bottom edge of fresh food door and freezer door, if applicable, to outside edge of freezer door on door face and secure with _/,5"hex head driver. ...
... insert in masking tape. • Remove center mullion screws with 5/,,, hex head screwdriver. • Freezer door models: Remove bottom mullion screws with 3/,, hex head screws. 2. While holding refrigerator door upright, tighten down top hinge with hex head driver, and Phillips screw from top of door....of cabinet. • Remove cabinet plugs with flat blade of refrigerator door on freezer drawer models. ConL Handle design varies from bottom edge of fresh food door and freezer door, if applicable, to outside edge of freezer door on door face and secure with _/,5"hex head driver. ...

Use and Care Guide
Page 10
... wrench (2) • '/_" hex nut driver Notes: • Use copper tubing only for creation of copper tubing into inlet port. Installation Connecting the Water Supply ([select models) Materials Needed: • '/4"outer diameter flexible copper tubing • Shut-off valve (requires a '/4" hole to reach water supply for installation. Do not use an old...
... wrench (2) • '/_" hex nut driver Notes: • Use copper tubing only for creation of copper tubing into inlet port. Installation Connecting the Water Supply ([select models) Materials Needed: • '/4"outer diameter flexible copper tubing • Shut-off valve (requires a '/4" hole to reach water supply for installation. Do not use an old...
Use and Care Guide
Page 11
... wrench • '//' hex nut driver Notes: • Use copper tubing only for two to three hours prior to moving the refrigerator to observe the water supply connection for creation of copper tubing into inlet 5. Connect tubing to frame with water tubing clamp (C) and... turn on tubing to its permanent location. 7. Alternate connection (select models) Materials Needed: • '/4" outer diameter flexible copper tubing • Shut-off valve (requires a '/4" hole to frame with water tubing clamp...
... wrench • '//' hex nut driver Notes: • Use copper tubing only for two to three hours prior to moving the refrigerator to observe the water supply connection for creation of copper tubing into inlet 5. Connect tubing to frame with water tubing clamp (C) and... turn on tubing to its permanent location. 7. Alternate connection (select models) Materials Needed: • '/4" outer diameter flexible copper tubing • Shut-off valve (requires a '/4" hole to frame with water tubing clamp...
Use and Care Guide
Page 12
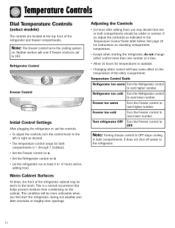
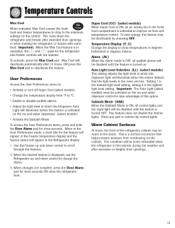
... . It does not shut off power to OFF. TemperatuCreontrols Dial Temperature Controls (select models) The controls are located at the top front of the other compartment. Note: The freezer control turns the cooling system on the temperature of the refrigerator and freezer compartments. If so, adjust the control(s) as desired. • The temperature control...
... . It does not shut off power to OFF. TemperatuCreontrols Dial Temperature Controls (select models) The controls are located at the top front of the other compartment. Note: The freezer control turns the cooling system on the temperature of the refrigerator and freezer compartments. If so, adjust the control(s) as desired. • The temperature control...
Use and Care Guide
Page 13
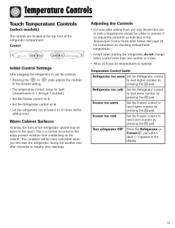
... Guide table below. TemperatuCreontrols Touch Temperature Controls (select models) The controls are located at a time. • Allow 24 hours for temperatures to stabilize. i_i pad. This is 1 through 7 (coldest). • Set the Freezer control on 4. • Set the Refrigerator control on the cabinet. Set the Freezer control to next higher number by pressing the...
... Guide table below. TemperatuCreontrols Touch Temperature Controls (select models) The controls are located at a time. • Allow 24 hours for temperatures to stabilize. i_i pad. This is 1 through 7 (coldest). • Set the Freezer control on 4. • Set the Refrigerator control on the cabinet. Set the Freezer control to next higher number by pressing the...

Use and Care Guide
Page 14
... models) The control is located at the top front of the _-+_ or _Z_ pads shows the current temperature setting. • The display will show the current compartment temperatures and the highest compartment temperatures reached when the power was out. Refrigerator too warm Set the Refrigerator ... of the fresh food compartment. Adjusting the Control 24 hours after adding food, you when one of the doors has been left open either the Freezer or Refrigerator _:_ pad to produce more than one degree at 38 ° F (3° C) in the fresh food compartment and 0° F (-17 &#...
... models) The control is located at the top front of the _-+_ or _Z_ pads shows the current temperature setting. • The display will show the current compartment temperatures and the highest compartment temperatures reached when the power was out. Refrigerator too warm Set the Refrigerator ... of the fresh food compartment. Adjusting the Control 24 hours after adding food, you when one of the doors has been left open either the Freezer or Refrigerator _:_ pad to produce more than one degree at 38 ° F (3° C) in the fresh food compartment and 0° F (-17 &#...
Use and Care Guide
Page 15
...a short title for the feature will appear in the Freezer temperature display and the feature status will appear in operation, the_+_b and _-_ pads for the refrigerator and freezer controls will be more noticeable when the refrigerator is turned on. Press any pad to scroll through the... features. 2. Use the Freezer up and down the refrigerator and freezer after extended door openings or when loading the refrigerator or freezer with warm food. Important: The Auto Light (select models) must be deactivated by choosing OFF. Sabbath Mode (SAB) When...
...a short title for the feature will appear in the Freezer temperature display and the feature status will appear in operation, the_+_b and _-_ pads for the refrigerator and freezer controls will be more noticeable when the refrigerator is turned on. Press any pad to scroll through the... features. 2. Use the Freezer up and down the refrigerator and freezer after extended door openings or when loading the refrigerator or freezer with warm food. Important: The Auto Light (select models) must be deactivated by choosing OFF. Sabbath Mode (SAB) When...
Use and Care Guide
Page 16
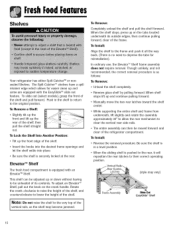
FreshFoodFeotures Shelves Your refrigerator has either Spill-Catcher TM or nonsealed Shelves. To Remove a Shelf: • Slightly tilt up the front and lift up or down without having to ... are equipped with an Elevator TM Shelf. When the shelf stops, press up the front edge of the shelf. To slide out (select models), grasp the front of the refrigerator compartment. While supporting the entire shelf and frame from underneath, lift slightly and rotate the assembly approximately 30 ° to allow the...
FreshFoodFeotures Shelves Your refrigerator has either Spill-Catcher TM or nonsealed Shelves. To Remove a Shelf: • Slightly tilt up the front and lift up or down without having to ... are equipped with an Elevator TM Shelf. When the shelf stops, press up the front edge of the shelf. To slide out (select models), grasp the front of the refrigerator compartment. While supporting the entire shelf and frame from underneath, lift slightly and rotate the assembly approximately 30 ° to allow the...
Use and Care Guide
Page 17
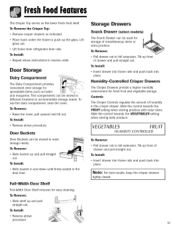
Lift glass out. • Lift frame from refrigerator liner rails. i To Install: • Reverse above procedure. Slide the control towards the FRUIT setting when storing produce with outer skins. I 16 FreshFoodFeotures The Crisper ... fresh fruit and vegetable storage. Tilt up the glass. To Remove: • Raise the cover, pull upward and tilt out. Storage Drawers Snack Drawer (select models) ,_= @ The Snack Drawer can be used for spreadable items such as the lower fresh food shelf. Humidity-Controlled Crisper Drawers The Crisper Drawers provide a higher...
Lift glass out. • Lift frame from refrigerator liner rails. i To Install: • Reverse above procedure. Slide the control towards the FRUIT setting when storing produce with outer skins. I 16 FreshFoodFeotures The Crisper ... fresh fruit and vegetable storage. Tilt up the glass. To Remove: • Raise the cover, pull upward and tilt out. Storage Drawers Snack Drawer (select models) ,_= @ The Snack Drawer can be used for spreadable items such as the lower fresh food shelf. Humidity-Controlled Crisper Drawers The Crisper Drawers provide a higher...
Use and Care Guide
Page 18
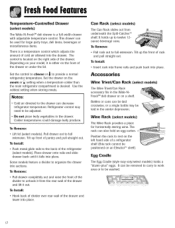
... may need to twelve 12ounce beverage cans. Tilt up to be used for horizontally storing wine. Some models feature a divider to provide a normal refrigerator temperature. It holds up front of rack and pull straight out. To Install: • Insert rack into frame rails and push back...the Spill-Catcher TM shelf. Pull drawer out to full extension. Can Rack (select models) The Can Rack slides out from the rear wall of the refrigerator (select models). Accessories Wine Trivet/Can Rack (select models) The Wine Trivet/Can Rack accessory fits in the Wide-NFresM Mdeli drawer or ...
... may need to twelve 12ounce beverage cans. Tilt up to be used for horizontally storing wine. Some models feature a divider to provide a normal refrigerator temperature. It holds up front of rack and pull straight out. To Install: • Insert rack into frame rails and push back...the Spill-Catcher TM shelf. Pull drawer out to full extension. Can Rack (select models) The Can Rack slides out from the rear wall of the refrigerator (select models). Accessories Wine Trivet/Can Rack (select models) The Wine Trivet/Can Rack accessory fits in the Wide-NFresM Mdeli drawer or ...
Use and Care Guide
Page 19
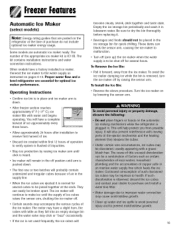
...cubes will rattle as instructed on by lowering the sensor arm. 18 FreezeFreatures Automatic Ice Maker (select models) refrigerator at the time of purchase do not include I opotiotnea:l Eicneermgyakreartinegnegrguyideussatghea.t are posted on the Some models are ejected it is normal for several hours. You will have a complete harvest of ice approximately... raises the sensor arm, shutting the ice maker off (arm up) the ice maker when the water supply is down. • After freezer section reaches approximately 0° F (-17 ° C), ice maker fills with water and begins operating.
...cubes will rattle as instructed on by lowering the sensor arm. 18 FreezeFreatures Automatic Ice Maker (select models) refrigerator at the time of purchase do not include I opotiotnea:l Eicneermgyakreartinegnegrguyideussatghea.t are posted on the Some models are ejected it is normal for several hours. You will have a complete harvest of ice approximately... raises the sensor arm, shutting the ice maker off (arm up) the ice maker when the water supply is down. • After freezer section reaches approximately 0° F (-17 ° C), ice maker fills with water and begins operating.
Use and Care Guide
Page 20
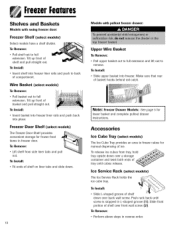
... tabs and pull out. Push rack back until cubes release. To Remove: • Perform above steps in freezer door. Tilt up front of compartment. Wire Basket (select models) To Remove: • Pull basket out to back of basket and pull straight out. To Install: &#...for frozen food items in reverse order. To Install: • Fit ends of shelf down . 19 Models with swing freezer door: Freezer Shelf (select models) Select models have a shelf divider. Note: Freezer Drawer Models: See page 5 for manual dispensing of basket hooks behind rail catch. To Remove: • Pull shelf...
... tabs and pull out. Push rack back until cubes release. To Remove: • Perform above steps in freezer door. Tilt up front of compartment. Wire Basket (select models) To Remove: • Pull basket out to back of basket and pull straight out. To Install: &#...for frozen food items in reverse order. To Install: • Fit ends of shelf down . 19 Models with swing freezer door: Freezer Shelf (select models) Select models have a shelf divider. Note: Freezer Drawer Models: See page 5 for manual dispensing of basket hooks behind rail catch. To Remove: • Pull shelf...
Use and Care Guide
Page 24
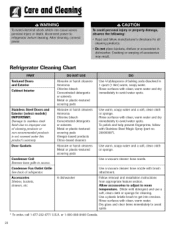
...with clean, warm water. Rinse surfaces with brush attachment. andCleaning Textured Doors and Exterior Cabinet Interior Stainless Steel Doors and Exterior [select models) I M PC RTANT: Damage to stainless steel finish due to improper use a soft, clean cloth or sponge for cleaning. ... or sponge. Use a vacuum cleaner hose nozzle. Dry glass and clear items immediately to access Condenser Fan Outlet Grille See back of refrigerator. Rinse surfaces with Stainless Steel Magic Spray (part no. 20000008"). Door Gaskets Condenser Coil Remove base grille to avoid spots. * To...
...with clean, warm water. Rinse surfaces with brush attachment. andCleaning Textured Doors and Exterior Cabinet Interior Stainless Steel Doors and Exterior [select models) I M PC RTANT: Damage to stainless steel finish due to improper use a soft, clean cloth or sponge for cleaning. ... or sponge. Use a vacuum cleaner hose nozzle. Dry glass and clear items immediately to access Condenser Fan Outlet Grille See back of refrigerator. Rinse surfaces with Stainless Steel Magic Spray (part no. 20000008"). Door Gaskets Condenser Coil Remove base grille to avoid spots. * To...
Use and Care Guide
Page 27
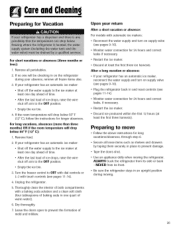
... F (12 ° C): 1. Upon your return After a short vacation or absence: For models with a baking soda solution and a clean soft cloth (four tablespoons of baking soda in one ...all loose items such as shelves and drawers by taping them securely in an upright position during your refrigerator has an automatic ice maker: • Shut off the water supply to the ice maker at...9-10). • Monitor water connection for longer absences. Remove all frozen items also. 3. Turn the freezer control to prevent damage. • Tape the doors shut. • Use an appliance dolly when moving ...
... F (12 ° C): 1. Upon your return After a short vacation or absence: For models with a baking soda solution and a clean soft cloth (four tablespoons of baking soda in one ...all loose items such as shelves and drawers by taping them securely in an upright position during your refrigerator has an automatic ice maker: • Shut off the water supply to the ice maker at...9-10). • Monitor water connection for longer absences. Remove all frozen items also. 3. Turn the freezer control to prevent damage. • Tape the doors shut. • Use an appliance dolly when moving ...
Use and Care Guide
Page 28
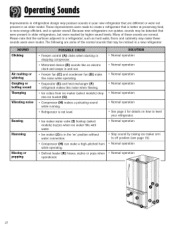
...Refrigerator is not level. • Ice maker water valve (I) hookup (select models) buzzes when ice maker fills with water. • Ice maker (J) is quieter overall. Clicking Air rushing or whirring Gurgling or boiling sound Thumping Vibrating noise Buzzing Humming Hissing or popping • Freezer.... • Motorized device (B) sounds like an electric clock and snaps in and out. • Freezer fan (C) and condenser fan (D) make these sounds are normal. Because new refrigerators run quieter, sounds may be noticed in the 'on' position without water connection, • Compressor ...
...Refrigerator is not level. • Ice maker water valve (I) hookup (select models) buzzes when ice maker fills with water. • Ice maker (J) is quieter overall. Clicking Air rushing or whirring Gurgling or boiling sound Thumping Vibrating noise Buzzing Humming Hissing or popping • Freezer.... • Motorized device (B) sounds like an electric clock and snaps in and out. • Freezer fan (C) and condenser fan (D) make these sounds are normal. Because new refrigerators run quieter, sounds may be noticed in the 'on' position without water connection, • Compressor ...
Use and Care Guide
Page 34
...and/or gas supply. Warranties are available from whom your dealer to refrigerator or freezer product failures. 7. IMPLIED WARRANTIES, INCLUDING WARRANTIES OF MERCHANTABILITY OR FITNESS FOR... For products requiring ventilation, rigid metal ducting must be readily determined. 3. MAYTAG CORPORATION SHALL NOT BE LIABLE FOR INCIDENTAL OR CONSEQUENTIAL DAMAGES. THIS WARRANTY GIVES...purchase (sales receipt). 33 U.S.customers using TTY for commercial or industrial use. 5. Model number and serial number; e. Improper installation, delivery, or maintenance. e. Correct installation...
...and/or gas supply. Warranties are available from whom your dealer to refrigerator or freezer product failures. 7. IMPLIED WARRANTIES, INCLUDING WARRANTIES OF MERCHANTABILITY OR FITNESS FOR... For products requiring ventilation, rigid metal ducting must be readily determined. 3. MAYTAG CORPORATION SHALL NOT BE LIABLE FOR INCIDENTAL OR CONSEQUENTIAL DAMAGES. THIS WARRANTY GIVES...purchase (sales receipt). 33 U.S.customers using TTY for commercial or industrial use. 5. Model number and serial number; e. Improper installation, delivery, or maintenance. e. Correct installation...

