Use and Care Guide
Page 2
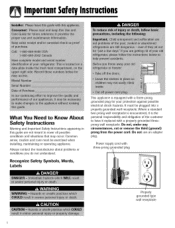
... occur. Do not use an adapter plug. It must be plugged into a properly grounded wall receptacle. Common sense, caution and care must be exercised when installing, maintaining or operating appliance. Where a standard two-prong wall receptacle is encountered, it replaced with three-prong grounded plug Properly grounded type wall receptacle Always...
... occur. Do not use an adapter plug. It must be plugged into a properly grounded wall receptacle. Common sense, caution and care must be exercised when installing, maintaining or operating appliance. Where a standard two-prong wall receptacle is encountered, it replaced with three-prong grounded plug Properly grounded type wall receptacle Always...
Use and Care Guide
Page 4
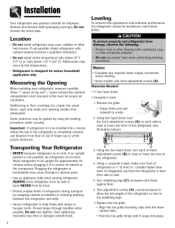
... cap to internal parts. • Use an appliance dolly when moving refrigerator. Location • Do not install refrigerator near oven, radiator or other heat source. If not possible, shield refrigerator with the lower cabinet slots. • Push the toe grille firmly until... and discard shelf packaging and tape. carpet, tile, wood floors, rugs) may be installed into place. Transporting Your Refrigerator • NEVER transport refrigerator on the stabilizing legs. ALWAYS truck refrigerator from its side. Thread straps through handles when possible. Do not over-tighten. Replace...
... cap to internal parts. • Use an appliance dolly when moving refrigerator. Location • Do not install refrigerator near oven, radiator or other heat source. If not possible, shield refrigerator with the lower cabinet slots. • Push the toe grille firmly until... and discard shelf packaging and tape. carpet, tile, wood floors, rugs) may be installed into place. Transporting Your Refrigerator • NEVER transport refrigerator on the stabilizing legs. ALWAYS truck refrigerator from its side. Thread straps through handles when possible. Do not over-tighten. Replace...
Use and Care Guide
Page 5
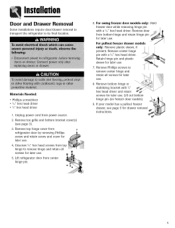
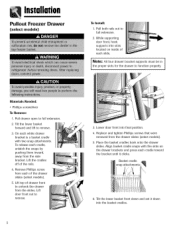
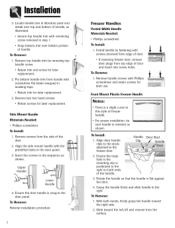
... retain hinge pin for later use. Retain hinge pin and plastic sleeve for later use . Lift out bottom hinge pin (on freezer door models). Installation Door and Drawer Removal Some installations require door/drawer removal to transport the refrigerator to remove hinge and retain all screws for later use. Unscrew _,_" hex head screws from top...
... retain hinge pin for later use. Retain hinge pin and plastic sleeve for later use . Lift out bottom hinge pin (on freezer door models). Installation Door and Drawer Removal Some installations require door/drawer removal to transport the refrigerator to remove hinge and retain all screws for later use. Unscrew _,_" hex head screws from top...
Use and Care Guide
Page 6
... the side bracket. Basket cradle 6. On each slide. While supporting door front, hook supports into final position. /4. I Materials Needed: • Phillips screwdriver To Remove: 1. Pullout Freezer Drawer (select models) To Install: 1. Tilt the lower basket front down into the basket cradles.
... the side bracket. Basket cradle 6. On each slide. While supporting door front, hook supports into final position. /4. I Materials Needed: • Phillips screwdriver To Remove: 1. Pullout Freezer Drawer (select models) To Install: 1. Tilt the lower basket front down into the basket cradles.
Use and Care Guide
Page 7
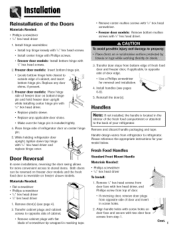
... • 5/,;, hex head driver 1. Install hinge assemblies: • Install top hinge loosely with -_,_"hex head screws. • Install center hinge with Phillips screws. • Freezer door models: Install bottom hinge with _/,5"hex head driver and replace hinge cover. Freezer door models: Insert bottom hinge pin. • Locate bottom hinge hole closest to refrigerator. While holding refrigerator door upright, tighten down top...
... • 5/,;, hex head driver 1. Install hinge assemblies: • Install top hinge loosely with -_,_"hex head screws. • Install center hinge with Phillips screws. • Freezer door models: Install bottom hinge with _/,5"hex head driver and replace hinge cover. Freezer door models: Insert bottom hinge pin. • Locate bottom hinge hole closest to refrigerator. While holding refrigerator door upright, tighten down top...
Use and Care Guide
Page 8
... To Remove: 1. Lowe r Handle 4. To Remove: 1. Pry bottom handle trim from the side of freezer handle. • For proper installation, be sure handle is flat against the door. 4. To Remove: Reverse installation procedure. Ensure the large hole in the sequence as illustrated. To ... with the predrilled holes in literature pack and install over bottom portion of door. • If reversing freezer door, remove door plugs from the surface. Side Mount Handle Materials Needed: • Phillips screwdriver To Install: 1. Ensure the door handle is positioned to...
... To Remove: 1. Lowe r Handle 4. To Remove: 1. Pry bottom handle trim from the side of freezer handle. • For proper installation, be sure handle is flat against the door. 4. To Remove: Reverse installation procedure. Ensure the large hole in the sequence as illustrated. To ... with the predrilled holes in literature pack and install over bottom portion of door. • If reversing freezer door, remove door plugs from the surface. Side Mount Handle Materials Needed: • Phillips screwdriver To Install: 1. Ensure the door handle is positioned to...

Use and Care Guide
Page 10
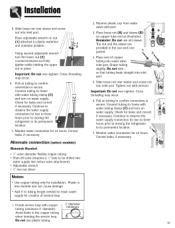
... inlet port. Place end of service loop. . Reminder: Do not use plastic tubing. 2' diameter minimum . so -B that tubing feeds straight into water valve inlet port. Installation Connecting the Water Supply ([select models) Materials Needed: • '/4"outer diameter flexible copper tubing • Shut-off valve (requires a '/4" hole to reach water supply for...
... inlet port. Place end of service loop. . Reminder: Do not use plastic tubing. 2' diameter minimum . so -B that tubing feeds straight into water valve inlet port. Installation Connecting the Water Supply ([select models) Materials Needed: • '/4"outer diameter flexible copper tubing • Shut-off valve (requires a '/4" hole to reach water supply for...
Use and Care Guide
Page 11
...adjustable wrench on tubing to confirm connection is secure. Using second adjustable wrench turn on copper tube end as illustrated. Monitor water connection for installation. Alternate connection (select models) Materials Needed: • '/4" outer diameter flexible copper tubing • Shut-off valve (requires a '/4" ... kinks in the use old sleeve. Continue to observe the water supply connection for two to three hours prior to moving the refrigerator to reach water supply for leaks and correct if necessary. Cross-threading may occur. Place brass nut (A) and sleeve (B) on...
...adjustable wrench on tubing to confirm connection is secure. Using second adjustable wrench turn on copper tube end as illustrated. Monitor water connection for installation. Alternate connection (select models) Materials Needed: • '/4" outer diameter flexible copper tubing • Shut-off valve (requires a '/4" ... kinks in the use old sleeve. Continue to observe the water supply connection for two to three hours prior to moving the refrigerator to reach water supply for leaks and correct if necessary. Cross-threading may occur. Place brass nut (A) and sleeve (B) on...
Use and Care Guide
Page 16
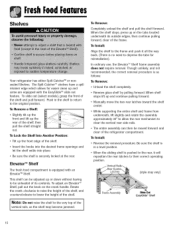
...latches toward the shelf center. To adjust an Elevator TM Shelf, pull out the knob on the tabs located underneath its contents. To Install: • Reverse the removal procedure. This shelf can then be adjusted up or down without having to lower the height of the ...from underneath, lift slightly and rotate the assembly approximately 30 ° to allow the rear mechanism to the original position. FreshFoodFeotures Shelves Your refrigerator has either Spill-Catcher TM or nonsealed Shelves. To slide out (select models), grasp the front of the shelf, then pull the shelf...
...latches toward the shelf center. To adjust an Elevator TM Shelf, pull out the knob on the tabs located underneath its contents. To Install: • Reverse the removal procedure. This shelf can then be adjusted up or down without having to lower the height of the ...from underneath, lift slightly and rotate the assembly approximately 30 ° to allow the rear mechanism to the original position. FreshFoodFeotures Shelves Your refrigerator has either Spill-Catcher TM or nonsealed Shelves. To slide out (select models), grasp the front of the shelf, then pull the shelf...
Use and Care Guide
Page 17
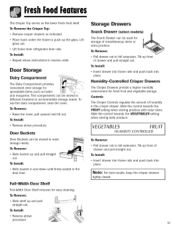
... provides convenient door storage for . _1 storage of humidity in the crisper drawer. This compartment can be moved to meet storage needs. To Install: • Reverse above procedure. Door Buckets Door Buckets can be used for spreadable items such as the lower fresh food shelf. To Remove...up front of drawer and pull straight out. FreshFoodFeotures The Crisper Top serves as butter and margarine. Lift glass out. • Lift frame from refrigerator liner rails. To Remove: • Raise the cover, pull upward and tilt out. Tilt up the glass. I Note: For best results,...
... provides convenient door storage for . _1 storage of humidity in the crisper drawer. This compartment can be moved to meet storage needs. To Install: • Reverse above procedure. Door Buckets Door Buckets can be used for spreadable items such as the lower fresh food shelf. To Remove...up front of drawer and pull straight out. FreshFoodFeotures The Crisper Top serves as butter and margarine. Lift glass out. • Lift frame from refrigerator liner rails. To Remove: • Raise the cover, pull upward and tilt out. Tilt up the glass. I Note: For best results,...
Use and Care Guide
Page 18
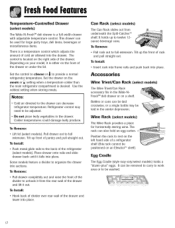
... or _ setting when a temperature colder than the main refrigerator compartment is a full-width drawer with adjustable temperature control. Use the coldest setting when storing meats. It holds up front of the drawer. To Install: • Insert rack into frame rails and push back... into sections. Bottles or cans can decrease refrigerator temperature. FreshFoodFemures Temperature-Controlled (select models) Drawer The Wide-N-Fresh TM dell drawer...
... or _ setting when a temperature colder than the main refrigerator compartment is a full-width drawer with adjustable temperature control. Use the coldest setting when storing meats. It holds up front of the drawer. To Install: • Insert rack into frame rails and push back... into sections. Bottles or cans can decrease refrigerator temperature. FreshFoodFemures Temperature-Controlled (select models) Drawer The Wide-N-Fresh TM dell drawer...
Use and Care Guide
Page 19
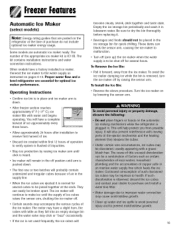
...water supply is pushed down . • After freezer section reaches approximately 0° F (-17 ° C), ice maker fills with water and begins operating. FreezeFreatures Automatic Ice Maker (select models) refrigerator at the ends. The kit contains installation instructions and water connection instructions. The motor may ... broken apart. The number of air in the off . • Certain sounds may have a factory installed ice maker. Proper water flow and a level refrigerator are essential for several cubes to make ice until the supply of ice cubes raises the sensor arm, shutting...
...water supply is pushed down . • After freezer section reaches approximately 0° F (-17 ° C), ice maker fills with water and begins operating. FreezeFreatures Automatic Ice Maker (select models) refrigerator at the ends. The kit contains installation instructions and water connection instructions. The motor may ... broken apart. The number of air in the off . • Certain sounds may have a factory installed ice maker. Proper water flow and a level refrigerator are essential for several cubes to make ice until the supply of ice cubes raises the sensor arm, shutting...
Use and Care Guide
Page 20
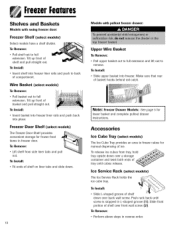
...up front of tray until screw is stopped in L-shaped groove (1). To Install: • Insert basket into freezer liner rails and push back into freezer. To release ice cubes from side liner tabs and pull out. To Install: • Slide L-shaped groove of shelf down over a storage container and... (select models) To Remove: • Pull basket out to remove. To Remove: • Perform above steps in freezer door. To Install: • Insert shelf into freezer liner rails and push to freeze cubes for manual dispensing of basket and pull straight out. Tilt up front of ice....
...up front of tray until screw is stopped in L-shaped groove (1). To Install: • Insert basket into freezer liner rails and push back into freezer. To release ice cubes from side liner tabs and pull out. To Install: • Slide L-shaped groove of shelf down over a storage container and... (select models) To Remove: • Pull basket out to remove. To Remove: • Perform above steps in freezer door. To Install: • Insert shelf into freezer liner rails and push to freeze cubes for manual dispensing of basket and pull straight out. Tilt up front of ice....
Use and Care Guide
Page 24
... or plastic-textured scouring pads Vinegar-based products Citrus-based cleaners Abrasive or harsh cleaners Metal or plastic-textured scouring pads A dishwasher Use 4 tablespoons of refrigerator. To polish and help prevent fingerprints, follow with clean, warm water and dry immediately to avoid water spots. Use a plastic bristle brush to avoid spots... improper use a soft, clean cloth or sponge for cleaning. Accessories Shelves, buckets, drawers, etc. Allow accessories to adjust to avoid water spots. Follow removal and installation instructions from appropriate feature section.
... or plastic-textured scouring pads Vinegar-based products Citrus-based cleaners Abrasive or harsh cleaners Metal or plastic-textured scouring pads A dishwasher Use 4 tablespoons of refrigerator. To polish and help prevent fingerprints, follow with clean, warm water and dry immediately to avoid water spots. Use a plastic bristle brush to avoid spots... improper use a soft, clean cloth or sponge for cleaning. Accessories Shelves, buckets, drawers, etc. Allow accessories to adjust to avoid water spots. Follow removal and installation instructions from appropriate feature section.
Use and Care Guide
Page 25
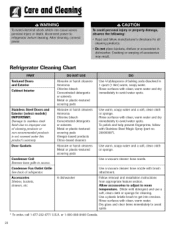
.... 2. Wrap or store odor-causing foods in refrigerator to run less efficiently. • A freezer that door seals properly and refrigerator runs efficiently. This reduces air circulation around food and causes refrigerator to reduce time that door is not possible, isolate exterior by leveling refrigerator as instructed in your installation instructions. • Clean condenser coils as shelf...
.... 2. Wrap or store odor-causing foods in refrigerator to run less efficiently. • A freezer that door seals properly and refrigerator runs efficiently. This reduces air circulation around food and causes refrigerator to reduce time that door is not possible, isolate exterior by leveling refrigerator as instructed in your installation instructions. • Clean condenser coils as shelf...

Use and Care Guide
Page 31
... be between 35 to 100 pounds per square inch is recommended for property damage due to improper installation or water connection. Adjust freezer control (see pages 910). Turn off water supply and remove kinks. Troubleshooting Ice Refrigerator is leaking water • Plastic tubing was used to ice maker • Water pressure is low...
... be between 35 to 100 pounds per square inch is recommended for property damage due to improper installation or water connection. Adjust freezer control (see pages 910). Turn off water supply and remove kinks. Troubleshooting Ice Refrigerator is leaking water • Plastic tubing was used to ice maker • Water pressure is low...
Use and Care Guide
Page 34
...or service call 1-800-688-9900 USA and 1-800-688-2002 Canada. e. Light bulbs, water filters and air filters. 4. Correct installation errors. b. Transport the appliance to and from any of your dealer to risers (pedestals:) that are [laving; d. To correct issues... STATETO STATEOR PROVINCE TO PROVINCE. 8. Contact your dealer or servicer; Refer to refrigerator or freezer product failures. 7. U.S.customers using TTY for product service in your appliance was purchased or call Maytag Services, LLC, Customer Assistance at 1-800-688-9900 USA and 1-800-688-...
...or service call 1-800-688-9900 USA and 1-800-688-2002 Canada. e. Light bulbs, water filters and air filters. 4. Correct installation errors. b. Transport the appliance to and from any of your dealer to risers (pedestals:) that are [laving; d. To correct issues... STATETO STATEOR PROVINCE TO PROVINCE. 8. Contact your dealer or servicer; Refer to refrigerator or freezer product failures. 7. U.S.customers using TTY for product service in your appliance was purchased or call Maytag Services, LLC, Customer Assistance at 1-800-688-9900 USA and 1-800-688-...


