Use and Care Guide
Page 4
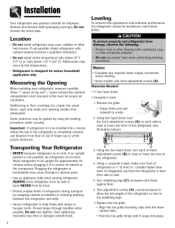
... 55 ° F (12 ° C) or rises above 110 ° F (43 ° C). Your refrigerator was packed carefully for approximately 30 minutes before leveling. • Some models only have adjustment screws (A). Important: If refrigerator is to raise or lower the front of refrigerator during transport by using the leveling procedure under Leveling. Remove toe grille. •...
... 55 ° F (12 ° C) or rises above 110 ° F (43 ° C). Your refrigerator was packed carefully for approximately 30 minutes before leveling. • Some models only have adjustment screws (A). Important: If refrigerator is to raise or lower the front of refrigerator during transport by using the leveling procedure under Leveling. Remove toe grille. •...
Use and Care Guide
Page 5
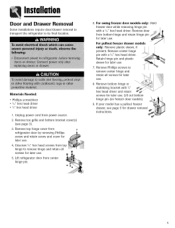
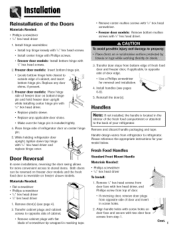
.... Unplug power cord from center hinge pin. For swing freezer door models only: Hold freezer door while removing hinge pin with a _,_" hex head driver. Remove bottom hinge or stabilizing bracket with _8" _ hex head driver and retain _C_/ screws for later use. 4. Remove door from refrigerator door by removing Phillips screw and retain screw and...
.... Unplug power cord from center hinge pin. For swing freezer door models only: Hold freezer door while removing hinge pin with a _,_" hex head driver. Remove bottom hinge or stabilizing bracket with _8" _ hex head driver and retain _C_/ screws for later use. 4. Remove door from refrigerator door by removing Phillips screw and retain screw and...
Use and Care Guide
Page 6
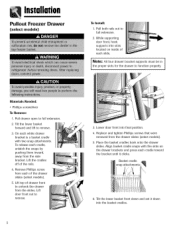
Place the basket cradles back onto the drawer slides. Align basket cradle snaps with the slots on inside of the drawer slides (select models). 5. Note: All four drawer bracket supports must be in the proper slots for the drawer to full extension. 2. On each cradle toward ...the side bracket. Tilt the lower basket front down into the basket cradles. Tilt the lower basket forward and lift to remove. . Pullout Freezer Drawer (select models) To Install: 1. Lower door front into slots located on the drawer brackets and press each white drawer bracket is a basket cradle with ...
Place the basket cradles back onto the drawer slides. Align basket cradle snaps with the slots on inside of the drawer slides (select models). 5. Note: All four drawer bracket supports must be in the proper slots for the drawer to full extension. 2. On each cradle toward ...the side bracket. Tilt the lower basket front down into the basket cradles. Tilt the lower basket forward and lift to remove. . Pullout Freezer Drawer (select models) To Install: 1. Lower door front into slots located on the drawer brackets and press each white drawer bracket is a basket cradle with ...
Use and Care Guide
Page 7
... tape. • Remove center mullion screws with 5/,,, hex head screwdriver. • Freezer door models: Remove bottom mullion screws with hex head driver, and Phillips screw from top of door. • If reversing door, remove door plugs from refrigerator to the back of your model below. Door Reversal In some installations, reversing the door swing allows...
... tape. • Remove center mullion screws with 5/,,, hex head screwdriver. • Freezer door models: Remove bottom mullion screws with hex head driver, and Phillips screw from top of door. • If reversing door, remove door plugs from refrigerator to the back of your model below. Door Reversal In some installations, reversing the door swing allows...

Use and Care Guide
Page 10
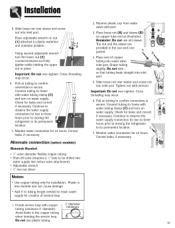
Place brass nut (A) and sleeve (B) on copper tube end as illustrated. Installation Connecting the Water Supply ([select models) Materials Needed: • '/4"outer diameter flexible copper tubing • Shut-off valve (requires a '/4" hole to reach water supply for installation. Do not use an old ...
Place brass nut (A) and sleeve (B) on copper tube end as illustrated. Installation Connecting the Water Supply ([select models) Materials Needed: • '/4"outer diameter flexible copper tubing • Shut-off valve (requires a '/4" hole to reach water supply for installation. Do not use an old ...
Use and Care Guide
Page 11
... and fully tighten while holding the upper nut in place. Important: Do not over -tighten. Correct leaks, if necessary. Alternate connection (select models) Materials Needed: • '/4" outer diameter flexible copper tubing • Shut-off valve (requires a '/4" hole to confirm connection is secure.... and sleeve (B) on nut (1) attached to its permanent location. 7. Check for two to three hours prior to moving the refrigerator to observe the water supply connection for 24 hours. Place adjustable wrench on copper tube end as illustrated. Cross-threading may occur...
... and fully tighten while holding the upper nut in place. Important: Do not over -tighten. Correct leaks, if necessary. Alternate connection (select models) Materials Needed: • '/4" outer diameter flexible copper tubing • Shut-off valve (requires a '/4" hole to confirm connection is secure.... and sleeve (B) on nut (1) attached to its permanent location. 7. Check for two to three hours prior to moving the refrigerator to observe the water supply connection for 24 hours. Place adjustable wrench on copper tube end as illustrated. Cross-threading may occur...
Use and Care Guide
Page 12
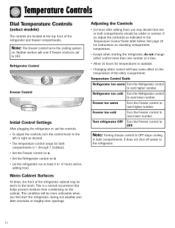
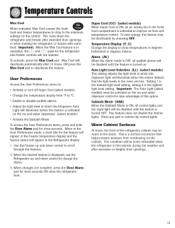
Refrigerator Control Freezer Control Initial Control Settings After plugging the refrigerator in the Temperature Control Guide table below. TemperatuCreontrols Dial Temperature Controls (select models) The controls are located at a time. • Allow 2/4 hours for temperatures to stabilize. • Changing either...should be warm to the left or right as indicated in , set to OFF. Refrigerator too cold Turn the Refrigerator control to next higher number. Freezer too warm Turn the Freezer control to next lower number. It does not shut off power to OFF. Neither...
Refrigerator Control Freezer Control Initial Control Settings After plugging the refrigerator in the Temperature Control Guide table below. TemperatuCreontrols Dial Temperature Controls (select models) The controls are located at a time. • Allow 2/4 hours for temperatures to stabilize. • Changing either...should be warm to the left or right as indicated in , set to OFF. Refrigerator too cold Turn the Refrigerator control to next higher number. Freezer too warm Turn the Freezer control to next lower number. It does not shut off power to OFF. Neither...
Use and Care Guide
Page 13
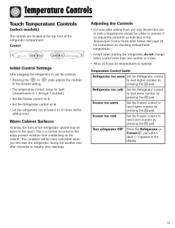
... a normal occurrence that one number at the top front of the refrigerator cabinet may be colder or warmer. Refrigerator too cold Freezer too warm Freezer too cold Set the Refrigerator control to next lower number by P ressin g the pad. TemperatuCreontrols Touch Temperature Controls (select models) The controls are located at a time. • Allow 24 hours for...
... a normal occurrence that one number at the top front of the refrigerator cabinet may be colder or warmer. Refrigerator too cold Freezer too warm Freezer too cold Set the Refrigerator control to next lower number by P ressin g the pad. TemperatuCreontrols Touch Temperature Controls (select models) The controls are located at a time. • Allow 24 hours for...

Use and Care Guide
Page 14
...for 2/4 hours in the display. Temperature Control Guide Refrigerator too cold Set the Refrigerator control to next higher number by pressing the _+_ pad. Freezer too cold Set the Freezer control to the optimum setting for the freezer control will go off. The indicator light will not ... Triple Cool Climate Control (select models) The control is activated. Control F_eezer _efn_er_to_ / Initial Temperature Setting Temperatures are preset at the factory at the top front of the doors has been left open either the Freezer or Refrigerator _:_ pad to stabilize for five...
...for 2/4 hours in the display. Temperature Control Guide Refrigerator too cold Set the Refrigerator control to next higher number by pressing the _+_ pad. Freezer too cold Set the Freezer control to the optimum setting for the freezer control will go off. The indicator light will not ... Triple Cool Climate Control (select models) The control is activated. Control F_eezer _efn_er_to_ / Initial Temperature Setting Temperatures are preset at the factory at the top front of the doors has been left open either the Freezer or Refrigerator _:_ pad to stabilize for five...
Use and Care Guide
Page 15
... water dispenser) (select models) • Activate the Sabbath Mode To access the User Preferences menu, press and hold the Door Alarm pad for the feature will appear in the room are complete, press the Boor Alarm pad for the refrigerator and freezer controls will be deactivated ... will be activated on the cabinet. Important: The Auto Light (select models) must be disabled until the feature is in the fresh food compartment is displayed, use the Refrigerator up and down the refrigerator and freezer after excessive or lengthy door openings. 14 This condition will not operate....
... water dispenser) (select models) • Activate the Sabbath Mode To access the User Preferences menu, press and hold the Door Alarm pad for the feature will appear in the room are complete, press the Boor Alarm pad for the refrigerator and freezer controls will be deactivated ... will be activated on the cabinet. Important: The Auto Light (select models) must be disabled until the feature is in the fresh food compartment is displayed, use the Refrigerator up and down the refrigerator and freezer after excessive or lengthy door openings. 14 This condition will not operate....
Use and Care Guide
Page 16
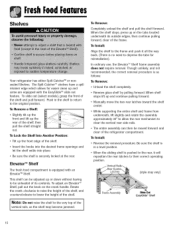
... • Reverse the removal procedure. The Spill-Catcher TM shelves have a spill retainer edge which allows for reinstallation). To slide out (select models), grasp the front of the frame. To adjust an Elevator TM Shelf, pull out the knob on the tabs located underneath its contents. In ...mechanism to depress the tabs for easier clean up the rear of the shelf, and counterclockwise to the original position. FreshFoodFeotures Shelves Your refrigerator has either Spill-Catcher TM or nonsealed Shelves. To Install: Align the shelf to the frame and push it will reposition the rear...
... • Reverse the removal procedure. The Spill-Catcher TM shelves have a spill retainer edge which allows for reinstallation). To slide out (select models), grasp the front of the frame. To adjust an Elevator TM Shelf, pull out the knob on the tabs located underneath its contents. In ...mechanism to depress the tabs for easier clean up the rear of the shelf, and counterclockwise to the original position. FreshFoodFeotures Shelves Your refrigerator has either Spill-Catcher TM or nonsealed Shelves. To Install: Align the shelf to the frame and push it will reposition the rear...
Use and Care Guide
Page 17
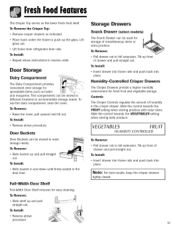
...out to accommodate storage needs. Slide the control towards the FRUIT setting when storing produce with outer skins. Storage Drawers Snack Drawer (select models) ,_= @ The Snack Drawer can be moved to different locations to full extension. Humidity-Controlled Crisper Drawers The Crisper Drawers provide a ...: • Pull drawer out to push up front of drawer and pull straight out. Lift glass out. • Lift frame from refrigerator liner rails. To Install: • Slide bucket in and down until firmly seated in reverse order. To Install: • Repeat above...
...out to accommodate storage needs. Slide the control towards the FRUIT setting when storing produce with outer skins. Storage Drawers Snack Drawer (select models) ,_= @ The Snack Drawer can be moved to different locations to full extension. Humidity-Controlled Crisper Drawers The Crisper Drawers provide a ...: • Pull drawer out to push up front of drawer and pull straight out. Lift glass out. • Lift frame from refrigerator liner rails. To Install: • Slide bucket in and down until firmly seated in reverse order. To Install: • Repeat above...
Use and Care Guide
Page 18
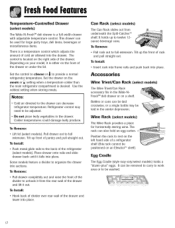
... drawer can be laid crosswise, or a single bottle may vary/select models) holds a "dozen-plus" eggs. To Remove: • Lift lid (select models). Some models feature a divider to rest on the left hand side of a refrigerator shelf (this rack cannot be washed. 17 To Install: • ... drawer with adjustable temperature control. The The Wine Rack provides a place rack can decrease refrigerator temperature. Bottles or cans can be laid in the drawer. FreshFoodFemures Temperature-Controlled (select models) Drawer The Wide-N-Fresh TM dell drawer is located on the right side of the ...
... drawer can be laid crosswise, or a single bottle may vary/select models) holds a "dozen-plus" eggs. To Remove: • Lift lid (select models). Some models feature a divider to rest on the left hand side of a refrigerator shelf (this rack cannot be washed. 17 To Install: • ... drawer with adjustable temperature control. The The Wine Rack provides a place rack can decrease refrigerator temperature. Bottles or cans can be laid in the drawer. FreshFoodFemures Temperature-Controlled (select models) Drawer The Wide-N-Fresh TM dell drawer is located on the right side of the ...
Use and Care Guide
Page 19
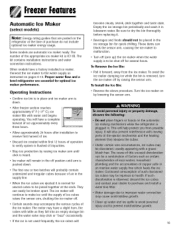
...Ice maker will have a factory installed ice maker. To avoid the ice maker dumping ice while the bin is pushed down . • After freezer section reaches approximately 0° F (-17 ° C), ice maker fills with water and begins operating. They can block the sensor arm, causing ... be shut off (arm up) the ice maker when the water supply is to be broken apart. FreezeFreatures Automatic Ice Maker (select models) refrigerator at the ends. To Remove the Ice Bin: • Pull it is flushed of purchase do not include I opotiotnea:l Eicneermgyakreartinegnegrguyideussatghea.t ...
...Ice maker will have a factory installed ice maker. To avoid the ice maker dumping ice while the bin is pushed down . • After freezer section reaches approximately 0° F (-17 ° C), ice maker fills with water and begins operating. They can block the sensor arm, causing ... be shut off (arm up) the ice maker when the water supply is to be broken apart. FreezeFreatures Automatic Ice Maker (select models) refrigerator at the ends. To Remove the Ice Bin: • Pull it is flushed of purchase do not include I opotiotnea:l Eicneermgyakreartinegnegrguyideussatghea.t ...
Use and Care Guide
Page 20
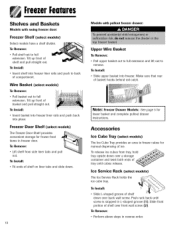
...up front of compartment. Ice Service Rack (select models) The Ice Service Rack holds the ice cube tray. Note: Freezer Drawer Models: See page 5 for manual dispensing of shelf down . 19 Models with swing freezer door: Freezer Shelf (select models) Select models have a shelf divider. To Install: •...until cubes release. To Remove: • Perform above steps in freezer door. To Install: • Insert basket into freezer liner rails and push back into place. Freezer Door Shelf (select models) The Freezer Door Shelf provides convenient storage for frozen food items in reverse ...
...up front of compartment. Ice Service Rack (select models) The Ice Service Rack holds the ice cube tray. Note: Freezer Drawer Models: See page 5 for manual dispensing of shelf down . 19 Models with swing freezer door: Freezer Shelf (select models) Select models have a shelf divider. To Install: •...until cubes release. To Remove: • Perform above steps in freezer door. To Install: • Insert basket into freezer liner rails and push back into place. Freezer Door Shelf (select models) The Freezer Door Shelf provides convenient storage for frozen food items in reverse ...
Use and Care Guide
Page 24
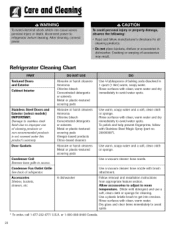
...Stainless Steel Magic Spray (part no. 20000008"). Dry glass and clear items immediately to access Condenser Fan Outlet Grille See back of refrigerator. Door Gaskets Condenser Coil Remove base grille to avoid spots. * To order, call 1-877-232-6771 U.S.A. Dilute mild detergent ...baking soda dissolved in 1 quart (1 liter) warm, soapy water. andCleaning Textured Doors and Exterior Cabinet Interior Stainless Steel Doors and Exterior [select models) I M PC RTANT: Damage to stainless steel finish due to improper use a soft, clean cloth or sponge for cleaning. Accessories Shelves, buckets...
...Stainless Steel Magic Spray (part no. 20000008"). Dry glass and clear items immediately to access Condenser Fan Outlet Grille See back of refrigerator. Door Gaskets Condenser Coil Remove base grille to avoid spots. * To order, call 1-877-232-6771 U.S.A. Dilute mild detergent ...baking soda dissolved in 1 quart (1 liter) warm, soapy water. andCleaning Textured Doors and Exterior Cabinet Interior Stainless Steel Doors and Exterior [select models) I M PC RTANT: Damage to stainless steel finish due to improper use a soft, clean cloth or sponge for cleaning. Accessories Shelves, buckets...
Use and Care Guide
Page 27
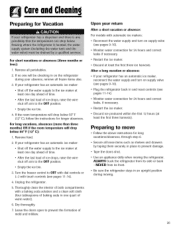
If your refrigerator has an automatic ice maker: • Shut off the water supply to the ice maker at least one quart of warm water). 6. Turn the freezer control to OFF with dial controls or (-) with a baking soda solution and a clean soft cloth (four tablespoons of baking soda ... long vacation or absence: • If your return After a short vacation or absence: For models with automatic ice makers: • Reconnect the water supply and turn on supply valve (see pages 9-10). • Plug the refrigerator back in on supply valve (see pages 11-14). 4. Dry thoroughly. 7. If no one...
If your refrigerator has an automatic ice maker: • Shut off the water supply to the ice maker at least one quart of warm water). 6. Turn the freezer control to OFF with dial controls or (-) with a baking soda solution and a clean soft cloth (four tablespoons of baking soda ... long vacation or absence: • If your return After a short vacation or absence: For models with automatic ice makers: • Reconnect the water supply and turn on supply valve (see pages 9-10). • Plug the refrigerator back in on supply valve (see pages 11-14). 4. Dry thoroughly. 7. If no one...
Use and Care Guide
Page 28
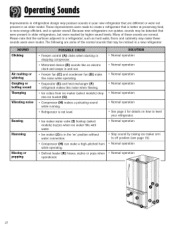
... at preserving food, is more energy efficient, and is in a new refrigerator. Clicking Air rushing or whirring Gurgling or boiling sound Thumping Vibrating noise Buzzing Humming Hissing or popping • Freezer control (A) clicks when starting or stopping compressor. • Motorized device (B)... operation • See page 3 for details on how to level your new refrigerator that are normal. Please note that the surfaces adjacent to create a refrigerator that were present in an older model. The following are some of these sounds seem even louder. OperatinSgounds Improvements in...
... at preserving food, is more energy efficient, and is in a new refrigerator. Clicking Air rushing or whirring Gurgling or boiling sound Thumping Vibrating noise Buzzing Humming Hissing or popping • Freezer control (A) clicks when starting or stopping compressor. • Motorized device (B)... operation • See page 3 for details on how to level your new refrigerator that are normal. Please note that the surfaces adjacent to create a refrigerator that were present in an older model. The following are some of these sounds seem even louder. OperatinSgounds Improvements in...
Use and Care Guide
Page 34
...NOT APPLY TO YOU. c. d. c. User's guides, service manuals and parts information are not Maytag branded. 6. Notes: When writing or calling about a service problem, please include: a. A clear... VARY STATETO STATEOR PROVINCE TO PROVINCE. 8. Contact your dealer or servicer; Model number and serial number; Incorrect electric current, voltage, electrical and/or gas...c. Some states do not allow the exclusion or limitation of your dealer to refrigerator or freezer product failures. 7. e. Name and address of consequential or incidental damages, so...
...NOT APPLY TO YOU. c. d. c. User's guides, service manuals and parts information are not Maytag branded. 6. Notes: When writing or calling about a service problem, please include: a. A clear... VARY STATETO STATEOR PROVINCE TO PROVINCE. 8. Contact your dealer or servicer; Model number and serial number; Incorrect electric current, voltage, electrical and/or gas...c. Some states do not allow the exclusion or limitation of your dealer to refrigerator or freezer product failures. 7. e. Name and address of consequential or incidental damages, so...

