Use and Care Guide
Page 2
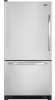
... model and serial number identification of your refrigerator. What You Need to improve the quality and performance of the past. CAUTION CAUTION - Junked or abandoned refrigerators are not meant to the appliance without revising this Use and Care Guide for your old refrigerator or freezer:... responsibility and obligation of purchase. Always contact the manufacturer about problems or conditions you are getting rid of your old refrigerator, please follow basic precautions, including the following: Important: Child entrapment and suffocation are not problems of our appliances, it...
... model and serial number identification of your refrigerator. What You Need to improve the quality and performance of the past. CAUTION CAUTION - Junked or abandoned refrigerators are not meant to the appliance without revising this Use and Care Guide for your old refrigerator or freezer:... responsibility and obligation of purchase. Always contact the manufacturer about problems or conditions you are getting rid of your old refrigerator, please follow basic precautions, including the following: Important: Child entrapment and suffocation are not problems of our appliances, it...
Use and Care Guide
Page 4
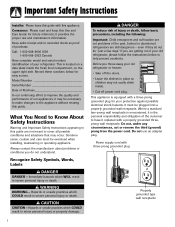
... an upright position is level from floor to top of hinge cap to allow the full weight of the refrigerator. 4. Plugging the refrigerator in the rear) for approximately 30 minutes before leveling. • Some models only have adjustment screws (A). Do not over-tighten. Turn adjustment screws (A) counterclockwise to verify proper clearance. Installation Your...
... an upright position is level from floor to top of hinge cap to allow the full weight of the refrigerator. 4. Plugging the refrigerator in the rear) for approximately 30 minutes before leveling. • Some models only have adjustment screws (A). Do not over-tighten. Turn adjustment screws (A) counterclockwise to verify proper clearance. Installation Your...
Use and Care Guide
Page 5
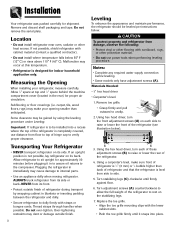
... door/drawer removal to transport the refrigerator to refrigerator before removing doors or drawer. Materials Needed: • Phillips screwdriver • 5⁄16" hex head driver • 3⁄8" hex head driver 1. For swing freezer door models only: Hold freezer door while removing hinge pin with a 5⁄16" hex head driver. Remove bottom hinge or stabilizing bracket with...
... door/drawer removal to transport the refrigerator to refrigerator before removing doors or drawer. Materials Needed: • Phillips screwdriver • 5⁄16" hex head driver • 3⁄8" hex head driver 1. For swing freezer door models only: Hold freezer door while removing hinge pin with a 5⁄16" hex head driver. Remove bottom hinge or stabilizing bracket with...

Use and Care Guide
Page 6
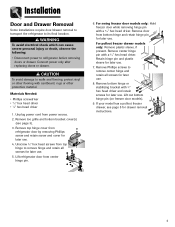
... cradle with the slots on inside of the drawer slides (select models). 5. Remove Phillips screw from each cradle, unlatch the snaps by...bracket. Note: All four drawer bracket supports must be in the top freezer basket. Materials Needed: • Phillips screwdriver To Remove: 1. To... the drawer brackets and press each slide. Installation Pullout Freezer Drawer (select models) DANGER To prevent accidental child entrapment or suffocation risk,...of drawer front to unhook the drawer from the drawer slides (select models). 5. Tilt the lower basket front down and set it clicks. Lift...
... cradle with the slots on inside of the drawer slides (select models). 5. Remove Phillips screw from each cradle, unlatch the snaps by...bracket. Note: All four drawer bracket supports must be in the top freezer basket. Materials Needed: • Phillips screwdriver To Remove: 1. To... the drawer brackets and press each slide. Installation Pullout Freezer Drawer (select models) DANGER To prevent accidental child entrapment or suffocation risk,...of drawer front to unhook the drawer from the drawer slides (select models). 5. Tilt the lower basket front down and set it clicks. Lift...
Use and Care Guide
Page 7
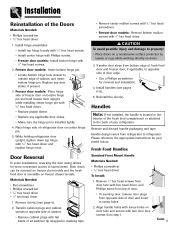
...; Replace plastic sleeve. • Replace any door shims, if present. 3. Install handles (see page 4). 2. Freezer door models: Insert bottom hinge pin. • Locate bottom hinge hole closest to refrigerator. Replace any applicable door shims. • Make sure the hinge pin is installed tightly. 4. Transfer cabinet plugs ...from top of door. • If reversing door, remove door plugs from bottom edge of cabinet, and insert bottom hinge pin. Place hinge side of refrigerator door on freezer door models and the fresh food door is located in the interior of the fresh food ...
...; Replace plastic sleeve. • Replace any door shims, if present. 3. Install handles (see page 4). 2. Freezer door models: Insert bottom hinge pin. • Locate bottom hinge hole closest to refrigerator. Replace any applicable door shims. • Make sure the hinge pin is installed tightly. 4. Transfer cabinet plugs ...from top of door. • If reversing door, remove door plugs from bottom edge of cabinet, and insert bottom hinge pin. Place hinge side of refrigerator door on freezer door models and the fresh food door is located in the interior of the fresh food ...
Use and Care Guide
Page 10
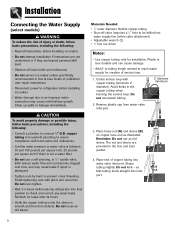
...and may cause mold/mildew growth. so B that tubing feeds straight into water valve inlet port. Installation Connecting the Water Supply (select models) WARNING To reduce the risk of injury or death, follow basic precautions, including the following : • Read all local codes and...; Do not service ice maker unless specifically recommended in Use & Care Guide or published user-repair instructions. • Disconnect power to refrigerator before installing ice maker. • Water damage due to check and correct any water leaks. Finish tightening nuts with copper tubing (minimum...
...and may cause mold/mildew growth. so B that tubing feeds straight into water valve inlet port. Installation Connecting the Water Supply (select models) WARNING To reduce the risk of injury or death, follow basic precautions, including the following : • Read all local codes and...; Do not service ice maker unless specifically recommended in Use & Care Guide or published user-repair instructions. • Disconnect power to refrigerator before installing ice maker. • Water damage due to check and correct any water leaks. Finish tightening nuts with copper tubing (minimum...
Use and Care Guide
Page 11
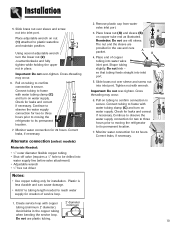
... if necessary. Correct leaks, if necessary. 1. Check for leaks and correct if necessary. Correct leaks, if necessary. Alternate connection (select models) Materials Needed: • 1⁄4" outer diameter flexible copper tubing • Shut-off valve (requires a 1⁄4" hole to its ...attached to its permanent location. 7. Continue to observe the water supply connection for two to three hours prior to moving the C refrigerator to be drilled into inlet port. Monitor water connection for 24 hours. Reminder: Do not use old sleeve. Shape tubing slightly....
... if necessary. Correct leaks, if necessary. 1. Check for leaks and correct if necessary. Correct leaks, if necessary. Alternate connection (select models) Materials Needed: • 1⁄4" outer diameter flexible copper tubing • Shut-off valve (requires a 1⁄4" hole to its ...attached to its permanent location. 7. Continue to observe the water supply connection for two to three hours prior to moving the C refrigerator to be drilled into inlet port. Monitor water connection for 24 hours. Reminder: Do not use old sleeve. Shape tubing slightly....
Use and Care Guide
Page 12
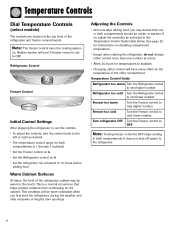
... Guide table below. This condition will have some effect on 4. • Let the refrigerator run at the top front of the other compartment. Temperature Controls Dial Temperature Controls (select models) The controls are located at least 8 to 12 hours before adding food. Note: The freezer control turns the cooling system on the cabinet.
... Guide table below. This condition will have some effect on 4. • Let the refrigerator run at the top front of the other compartment. Temperature Controls Dial Temperature Controls (select models) The controls are located at least 8 to 12 hours before adding food. Note: The freezer control turns the cooling system on the cabinet.
Use and Care Guide
Page 13
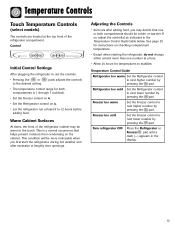
...models) The controls are located at a time. • Allow 24 hours for temperatures to stabilize. Adjusting the Controls • 24 hours after adding food, you first start the refrigerator, during hot weather and after excessive or lengthy door openings. Freezer too cold Set the Freezer ...number by pressing the pad. Control Initial Control Settings After plugging the refrigerator in the Temperature Control Guide table below. This condition will be colder or warmer. Freezer too warm Set the Freezer control to the touch. pads adjusts the controls • The ...
...models) The controls are located at a time. • Allow 24 hours for temperatures to stabilize. Adjusting the Controls • 24 hours after adding food, you first start the refrigerator, during hot weather and after excessive or lengthy door openings. Freezer too cold Set the Freezer ...number by pressing the pad. Control Initial Control Settings After plugging the refrigerator in the Temperature Control Guide table below. This condition will be colder or warmer. Freezer too warm Set the Freezer control to the touch. pads adjusts the controls • The ...

Use and Care Guide
Page 14
...current temperature setting. Temp Alarm The Temp Alarm system will alert you may decide that compartment. • Do not change either the Freezer or Refrigerator pad to turn off Temp Alarm, press and hold the Temp Alarm pad for 24 hours before making a new temperature adjustment. .... If the freezer or fresh food temperatures have stabilized. To turn back on. 13 Speed Ice When activated, Speed Ice reduces the freezer temperature to the optimum setting for 24 hours in order to deactivate the feature. Temperature Controls Triple Cool Climate Control (select models) The control...
...current temperature setting. Temp Alarm The Temp Alarm system will alert you may decide that compartment. • Do not change either the Freezer or Refrigerator pad to turn off Temp Alarm, press and hold the Temp Alarm pad for 24 hours before making a new temperature adjustment. .... If the freezer or fresh food temperatures have stabilized. To turn back on. 13 Speed Ice When activated, Speed Ice reduces the freezer temperature to the optimum setting for 24 hours in order to deactivate the feature. Temperature Controls Triple Cool Climate Control (select models) The control...

Use and Care Guide
Page 15
... deactivated by choosing OFF. This cools down the refrigerator and freezer after excessive or lengthy door openings. 14 Sabbath Mode (SAB) When the Sabbath Mode is ON, all audible alarms will not operate. Max Cool will be activated on the ice and water dispenser) (select models) • Activate the Sabbath Mode To access...
... deactivated by choosing OFF. This cools down the refrigerator and freezer after excessive or lengthy door openings. 14 Sabbath Mode (SAB) When the Sabbath Mode is ON, all audible alarms will not operate. Max Cool will be activated on the ice and water dispenser) (select models) • Activate the Sabbath Mode To access...
Use and Care Guide
Page 16
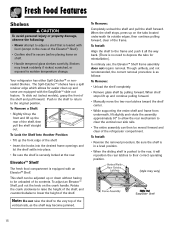
To slide out (select models), grasp the front of the shelf. To Remove a Shelf: • Slightly tilt up...Into Another Position: • Tilt up or down without having to be moved forward and clear of the refrigerator compartment. Rotate the crank clockwise to raise the height of the shelf, and counterclockwise to lower the height of...the case of the Elevator™ Shelf). • Confirm shelf is equipped with the EasyGlideTM slide out feature. Your refrigerator has either Spill-Catcher™ or nonsealed Shelves. Elevator™ Shelf The fresh food compartment is secure before placing ...
To slide out (select models), grasp the front of the shelf. To Remove a Shelf: • Slightly tilt up...Into Another Position: • Tilt up or down without having to be moved forward and clear of the refrigerator compartment. Rotate the crank clockwise to raise the height of the shelf, and counterclockwise to lower the height of...the case of the Elevator™ Shelf). • Confirm shelf is equipped with the EasyGlideTM slide out feature. Your refrigerator has either Spill-Catcher™ or nonsealed Shelves. Elevator™ Shelf The fresh food compartment is secure before placing ...
Use and Care Guide
Page 17
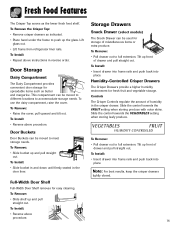
...storage needs. Full-Width Door Shelf Full-Width Door Shelf removes for fresh fruit and vegetable storage. Storage Drawers Snack Drawer (select models) The Snack Drawer can be used for spreadable items such as the lower fresh food shelf. To Remove: • Slide bucket.... To Install: • Insert drawer into frame rails and push back into place. Lift glass out. • Lift frame from refrigerator liner rails. Humidity-Controlled Crisper Drawers The Crisper Drawers provide a higher humidity environment for easy cleaning. Slide the control towards the VEGETABLES ...
...storage needs. Full-Width Door Shelf Full-Width Door Shelf removes for fresh fruit and vegetable storage. Storage Drawers Snack Drawer (select models) The Snack Drawer can be used for spreadable items such as the lower fresh food shelf. To Remove: • Slide bucket.... To Install: • Insert drawer into frame rails and push back into place. Lift glass out. • Lift frame from refrigerator liner rails. Humidity-Controlled Crisper Drawers The Crisper Drawers provide a higher humidity environment for easy cleaning. Slide the control towards the VEGETABLES ...
Use and Care Guide
Page 18
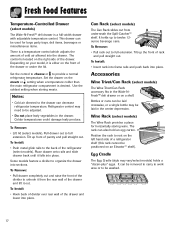
... the right side of the drawer. The control is a full-width drawer with adjustable temperature control. Refrigerator control may vary/select models) holds a "dozen-plus" eggs. To Remove: • Lift lid (select models). To Install: • Push metal glide rails to twelve 12ounce beverage cans. To Install: •...; Hook back of divider over rear wall of cold air allowed into the drawer. It holds up the front of the refrigerator (select models). Tilt up to the back of rack and pull straight out. To Install: • Insert rack into frame rails and push back...
... the right side of the drawer. The control is a full-width drawer with adjustable temperature control. Refrigerator control may vary/select models) holds a "dozen-plus" eggs. To Remove: • Lift lid (select models). To Install: • Push metal glide rails to twelve 12ounce beverage cans. To Install: •...; Hook back of divider over rear wall of cold air allowed into the drawer. It holds up the front of the refrigerator (select models). Tilt up to the back of rack and pull straight out. To Install: • Insert rack into frame rails and push back...

Use and Care Guide
Page 19
...This will also prevent interference with water and begins operating. The number of copper salts in . Freezer Features Automatic Ice Maker (select models) Note: Energy rating guides that are posted on the refrigerator at the ends. To Install the Ice Bin: • Reverse the above procedure. It will... help protect you from the ice maker. Proper water flow and a level refrigerator are automatic ice maker ...
...This will also prevent interference with water and begins operating. The number of copper salts in . Freezer Features Automatic Ice Maker (select models) Note: Energy rating guides that are posted on the refrigerator at the ends. To Install the Ice Bin: • Reverse the above procedure. It will... help protect you from the ice maker. Proper water flow and a level refrigerator are automatic ice maker ...
Use and Care Guide
Page 24
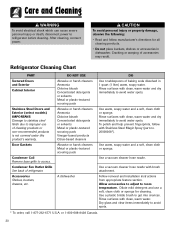
... products Citrus-based cleaners Abrasive or harsh cleaners Metal or plastic-textured scouring pads A dishwasher DO Use 4 tablespoons of refrigerator. Rinse surfaces with Stainless Steel Magic Spray (part no. 20000008*). To polish and help prevent fingerprints, follow manufacturer's ...cleaning products or non-recommended products is not covered under this product's warranty. Refrigerator Cleaning Chart PART Textured Doors and Exterior Cabinet Interior Stainless Steel Doors and Exterior (select models) IMPORTANT: Damage to stainless steel finish due to avoid spots. * To...
... products Citrus-based cleaners Abrasive or harsh cleaners Metal or plastic-textured scouring pads A dishwasher DO Use 4 tablespoons of refrigerator. Rinse surfaces with Stainless Steel Magic Spray (part no. 20000008*). To polish and help prevent fingerprints, follow manufacturer's ...cleaning products or non-recommended products is not covered under this product's warranty. Refrigerator Cleaning Chart PART Textured Doors and Exterior Cabinet Interior Stainless Steel Doors and Exterior (select models) IMPORTANT: Damage to stainless steel finish due to avoid spots. * To...
Use and Care Guide
Page 27
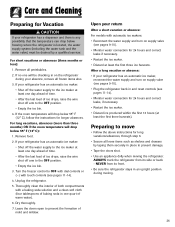
... months or less): 1. Turn the freezer control to the OFF position. • Empty the ice bin. 3. Upon your return After a short vacation or absence: For models with automatic ice makers: • Reconnect the water supply and turn on supply valve (see pages 9-10). • Plug the refrigerator back in and reset controls (see...
... months or less): 1. Turn the freezer control to the OFF position. • Empty the ice bin. 3. Upon your return After a short vacation or absence: For models with automatic ice makers: • Reconnect the water supply and turn on supply valve (see pages 9-10). • Plug the refrigerator back in and reset controls (see...
Use and Care Guide
Page 28
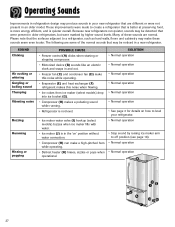
...normal sounds that may be detected that the surfaces adjacent to level your new refrigerator that is better at preserving food, is more energy efficient, and is in and out. • Freezer fan (C) and condenser fan (D) make these sounds are normal. Please note ...that were present in an older model. Because new refrigerators run quieter, sounds may make this noise while operating. • Evaporator (E) and heat exchanger (F) refrigerant makes this noise when flowing. ...
...normal sounds that may be detected that the surfaces adjacent to level your new refrigerator that is better at preserving food, is more energy efficient, and is in and out. • Freezer fan (C) and condenser fan (D) make these sounds are normal. Please note ...that were present in an older model. Because new refrigerators run quieter, sounds may make this noise while operating. • Evaporator (E) and heat exchanger (F) refrigerant makes this noise when flowing. ...
Use and Care Guide
Page 34
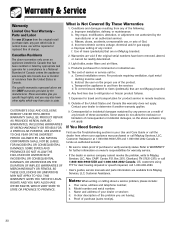
...ARE LIMITED TO ONE YEAR OR THE SHORTEST PERIOD ALLOWED BY LAW. b. f. Transport the appliance to Maytag Services, LLC, Attn: CAIR® Center, P.O. Box 2370, Cleveland, TN 37320-2370, or ... do not allow the exclusion or limitation of residence from the United States to Canada. Model number and serial number; A clear description of the following: a. Any repair, modification,... appropriate test agencies for commercial or industrial use , or acts of purchase to refrigerator or freezer product failures. 7. Warranty & Service Warranty Limited One Year Warranty Parts and Labor...
...ARE LIMITED TO ONE YEAR OR THE SHORTEST PERIOD ALLOWED BY LAW. b. f. Transport the appliance to Maytag Services, LLC, Attn: CAIR® Center, P.O. Box 2370, Cleveland, TN 37320-2370, or ... do not allow the exclusion or limitation of residence from the United States to Canada. Model number and serial number; A clear description of the following: a. Any repair, modification,... appropriate test agencies for commercial or industrial use , or acts of purchase to refrigerator or freezer product failures. 7. Warranty & Service Warranty Limited One Year Warranty Parts and Labor...


