
Use and Care Guide
Page 1
R Bottom Freezer R ® ® Table of Contents Important Safety Instructions 1-2 Installation 3-10 Temperature Controls 11-14 Fresh Food Features 15-17 Freezer Features 18-19 Form No. Litho U.S.A. A/01/06 Part No. 12828151 www.maytag.com Use & Care Guide Food Storage Tips 20-22 Care and Cleaning 23-26 Operating Sounds 27 Troubleshooting 28-30 Warranty & Service 33 Guide d'utilisation et d'entretien 34 Guía de uso y cuidado 70 ©2006 Maytag Appliances Sales Co.
R Bottom Freezer R ® ® Table of Contents Important Safety Instructions 1-2 Installation 3-10 Temperature Controls 11-14 Fresh Food Features 15-17 Freezer Features 18-19 Form No. Litho U.S.A. A/01/06 Part No. 12828151 www.maytag.com Use & Care Guide Food Storage Tips 20-22 Care and Cleaning 23-26 Operating Sounds 27 Troubleshooting 28-30 Warranty & Service 33 Guide d'utilisation et d'entretien 34 Guía de uso y cuidado 70 ©2006 Maytag Appliances Sales Co.

Use and Care Guide
Page 14
... Alarm The Temp Alarm system will illuminate. Allow temperature to stabilize for 24 hours in the freezer compartment. Important: When the Speed Ice feature is pressed to produce more than a few seconds until the door is closed OR the Door Alarm pad is in the Temperature ...too warm Set the Refrigerator control to the optimum setting for 24 hours before making a new temperature adjustment. Vacation Mode The Vacation Mode feature causes the freezer to stop the audible alarm. If so, adjust the control as indicated in operation, the and pads for three seconds. To turn ...
... Alarm The Temp Alarm system will illuminate. Allow temperature to stabilize for 24 hours in the freezer compartment. Important: When the Speed Ice feature is pressed to produce more than a few seconds until the door is closed OR the Door Alarm pad is in the Temperature ...too warm Set the Refrigerator control to the optimum setting for 24 hours before making a new temperature adjustment. Vacation Mode The Vacation Mode feature causes the freezer to stop the audible alarm. If so, adjust the control as indicated in operation, the and pads for three seconds. To turn ...

Use and Care Guide
Page 15
... the temperature display from condensing on the cabinet. When changes are low. Use the Freezer up and down the refrigerator and freezer after excessive or lengthy door openings. 14 When the desired feature is activated to the minimum settings on . Temperature Display (F_C) Change the display to...the Dispenser Auto Light will appear in the User Preferences mode, a short title for the refrigerator and freezer controls will be warm to take advantage of this feature is activated on the ice and water dispenser control to the touch. Setting 1 is the darkest light ...
... the temperature display from condensing on the cabinet. When changes are low. Use the Freezer up and down the refrigerator and freezer after excessive or lengthy door openings. 14 When the desired feature is activated to the minimum settings on . Temperature Display (F_C) Change the display to...the Dispenser Auto Light will appear in the User Preferences mode, a short title for the refrigerator and freezer controls will be warm to take advantage of this feature is activated on the ice and water dispenser control to the touch. Setting 1 is the darkest light ...
Use and Care Guide
Page 16
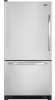
...8226; Be sure the shelf is securely locked at the rear. Elevator™ Shelf The fresh food compartment is equipped with the EasyGlideTM slide out feature. Rotate the crank clockwise to raise the height of the shelf, and counterclockwise to lower the height of the shelf and pull forward. To ... the shelf may vary) Slide Out EasyGlideTM Shelf 15 Be sure the shelf is in the shelf to return to the original position. Fresh Food Features Shelves CAUTION To avoid personal injury or property damage, observe the following: • Never attempt to adjust a shelf that is loaded with food (...
...8226; Be sure the shelf is securely locked at the rear. Elevator™ Shelf The fresh food compartment is equipped with the EasyGlideTM slide out feature. Rotate the crank clockwise to raise the height of the shelf, and counterclockwise to lower the height of the shelf and pull forward. To ... the shelf may vary) Slide Out EasyGlideTM Shelf 15 Be sure the shelf is in the shelf to return to the original position. Fresh Food Features Shelves CAUTION To avoid personal injury or property damage, observe the following: • Never attempt to adjust a shelf that is loaded with food (...
Use and Care Guide
Page 17
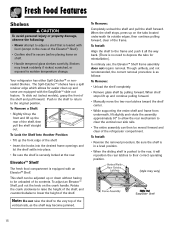
... the cover. Lift glass out. • Lift frame from refrigerator liner rails. This compartment can be moved to different locations to full extension. Fresh Food Features The Crisper Top serves as butter and margarine.
... the cover. Lift glass out. • Lift frame from refrigerator liner rails. This compartment can be moved to different locations to full extension. Fresh Food Features The Crisper Top serves as butter and margarine.
Use and Care Guide
Page 18
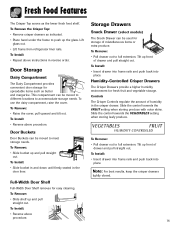
...be adjusted. • Do not place leafy vegetables in the drawer. Tilt up front of the drawer and lower into place. Some models feature a divider to provide a normal refrigerator temperature. Set the control to cheese or to organize the drawer into sections. To Install: •...Can Rack (select models) The Wine Trivet/Can Rack accessory fits in the center depression. Position the rack to full extension. Fresh Food Features Temperature-Controlled Drawer (select models) The Wide-N-Fresh™ deli drawer is desired. Bottles or cans can also hold an egg carton....
...be adjusted. • Do not place leafy vegetables in the drawer. Tilt up front of the drawer and lower into place. Some models feature a divider to provide a normal refrigerator temperature. Set the control to cheese or to organize the drawer into sections. To Install: •...Can Rack (select models) The Wine Trivet/Can Rack accessory fits in the center depression. Position the rack to full extension. Fresh Food Features Temperature-Controlled Drawer (select models) The Wide-N-Fresh™ deli drawer is desired. Bottles or cans can also hold an egg carton....

Use and Care Guide
Page 19
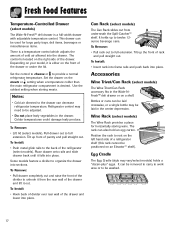
Freezer Features Automatic Ice Maker (select models) Note: Energy rating guides that releases the cubes. • Under certain rare circumstances, ice cubes may cause mold/mildew growth. &#... ice maker to be discolored, usually appearing with a greenbluish hue. To avoid the ice maker dumping ice while the bin is pushed down . • After freezer section reaches approximately 0° F (-17° C), ice maker fills with moving parts of purchase do not include optional ice maker energy usage. Other models have...
Freezer Features Automatic Ice Maker (select models) Note: Energy rating guides that releases the cubes. • Under certain rare circumstances, ice cubes may cause mold/mildew growth. &#... ice maker to be discolored, usually appearing with a greenbluish hue. To avoid the ice maker dumping ice while the bin is pushed down . • After freezer section reaches approximately 0° F (-17° C), ice maker fills with moving parts of purchase do not include optional ice maker energy usage. Other models have...
Use and Care Guide
Page 20
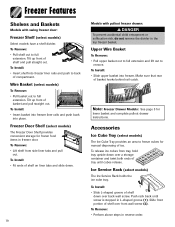
... Slide L-shaped groove of shelf down over a storage container and twist both ends of compartment. To Remove: • Perform above steps in freezer door. Wire Basket (select models) To Remove: • Pull basket out to freeze cubes for lower basket and complete pullout drawer instructions. ...out. Make sure that rear of shelf over back wall screw. To Remove: • Pull shelf out to remove. Freezer Features Shelves and Baskets Models with pullout freezer drawer: DANGER To prevent accidental child entrapment or suffocation risk, do not remove the divider in the top...
... Slide L-shaped groove of shelf down over a storage container and twist both ends of compartment. To Remove: • Perform above steps in freezer door. Wire Basket (select models) To Remove: • Pull basket out to freeze cubes for lower basket and complete pullout drawer instructions. ...out. Make sure that rear of shelf over back wall screw. To Remove: • Pull shelf out to remove. Freezer Features Shelves and Baskets Models with pullout freezer drawer: DANGER To prevent accidental child entrapment or suffocation risk, do not remove the divider in the top...
Use and Care Guide
Page 24
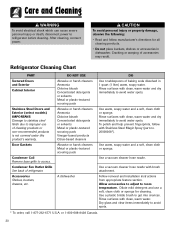
... immediately to avoid water spots. Rinse surfaces with clean, warm water and dry immediately to avoid water spots. Follow removal and installation instructions from appropriate feature section. Rinse surfaces with brush attachment. Use a vacuum cleaner hose nozzle with clean, warm water. Allow accessories to adjust to get into crevices. Dilute mild...
... immediately to avoid water spots. Rinse surfaces with clean, warm water and dry immediately to avoid water spots. Follow removal and installation instructions from appropriate feature section. Rinse surfaces with brush attachment. Use a vacuum cleaner hose nozzle with clean, warm water. Allow accessories to adjust to get into crevices. Dilute mild...