
Use and Care Manual
Page 2
...a data plate inside . Power supply cord with this appliance. Keep sales receipt and/or cancelled check as proof of your old refrigerator, please follow basic precautions, including the following: IMPORTANT: Child entrapment and suffocation are not meant to cover all possible conditions and ...or unsafe practices which COULD result in place so children may not easily climb inside the refrigerator compartment, on the upper left side. even if they sit out for your old refrigerator or freezer: • Take off the doors. • Leave the shelves in severe personal injury ...
...a data plate inside . Power supply cord with this appliance. Keep sales receipt and/or cancelled check as proof of your old refrigerator, please follow basic precautions, including the following: IMPORTANT: Child entrapment and suffocation are not meant to cover all possible conditions and ...or unsafe practices which COULD result in place so children may not easily climb inside the refrigerator compartment, on the upper left side. even if they sit out for your old refrigerator or freezer: • Take off the doors. • Leave the shelves in severe personal injury ...

Use and Care Manual
Page 3
...sure to operate on a separate 115 volt, 15 amp., 60 cycle line. 14. Refrigerator is properly grounded. 5. If plug does not fit electrical outlet, have refrigerator checked by licensed personnel when required. 15. Your refrigerator should not climb, hang or stand on power cord. Do not attempt service if ... must comply with a qualified electrician if you are beyond personal skill level. 19. Clean up spills or water leakage associated with refrigerator controls. 12. Important Safety Instructions WARNING To reduce risk of fire, electric shock, serious injury or death when using the...
...sure to operate on a separate 115 volt, 15 amp., 60 cycle line. 14. Refrigerator is properly grounded. 5. If plug does not fit electrical outlet, have refrigerator checked by licensed personnel when required. 15. Your refrigerator should not climb, hang or stand on power cord. Do not attempt service if ... must comply with a qualified electrician if you are beyond personal skill level. 19. Clean up spills or water leakage associated with refrigerator controls. 12. Important Safety Instructions WARNING To reduce risk of fire, electric shock, serious injury or death when using the...

Use and Care Manual
Page 4
...Do not overtighten. Overtightening restraints may dent or damage outside finish of hinge cap to top of refrigerator during transport by using the leveling procedure under Leveling. Remove bottom bracket cover(s). • Place the eraser end of the cover while swinging it in blankets or... inserting padding between the refrigerator and dolly. • Secure refrigerator to the notched side of a pencil or similar blunt...
...Do not overtighten. Overtightening restraints may dent or damage outside finish of hinge cap to top of refrigerator during transport by using the leveling procedure under Leveling. Remove bottom bracket cover(s). • Place the eraser end of the cover while swinging it in blankets or... inserting padding between the refrigerator and dolly. • Secure refrigerator to the notched side of a pencil or similar blunt...

Use and Care Manual
Page 5
... Replace the toe grille. Remove door from power source. 2. Lift out bottom hinge pin (on each of these adjustment screws (B) to raise or lower the rear of the refrigerator. If your model has a pullout freezer drawer, see page 3). 3. Using hex head driver, turn each side to.... Remove toe grille and bottom bracket cover(s) (see page 5 for later use . 8. Remove top hinge cover from center hinge pin. 6. Lift refrigerator door from refrigerator door by removing Phillips screw and retain screw and cover for later use . 4. For pullout freezer drawer models only: Remove ...
... Replace the toe grille. Remove door from power source. 2. Lift out bottom hinge pin (on each of these adjustment screws (B) to raise or lower the rear of the refrigerator. If your model has a pullout freezer drawer, see page 3). 3. Using hex head driver, turn each side to.... Remove toe grille and bottom bracket cover(s) (see page 5 for later use . 8. Remove top hinge cover from center hinge pin. 6. Lift refrigerator door from refrigerator door by removing Phillips screw and retain screw and cover for later use . 4. For pullout freezer drawer models only: Remove ...
Use and Care Manual
Page 6
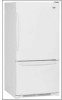
To Remove: 1. Lift door front out to refrigerator before removing doors. While supporting door front, hook supports into the... located on the drawer brackets and press each cradle towards the bracket until it clicks. Installation Pullout Freezer Drawer (select models) DANGER To prevent accidental child entrapment or suffocation risk, do not remove the... the drawer slides (select models). 5. Note • All four drawer bracket supports must be in the top freezer basket. After replacing doors, connect power. Pull drawer open to unhook the drawer from the drawer slides (select ...
To Remove: 1. Lift door front out to refrigerator before removing doors. While supporting door front, hook supports into the... located on the drawer brackets and press each cradle towards the bracket until it clicks. Installation Pullout Freezer Drawer (select models) DANGER To prevent accidental child entrapment or suffocation risk, do not remove the... the drawer slides (select models). 5. Note • All four drawer bracket supports must be in the top freezer basket. After replacing doors, connect power. Pull drawer open to unhook the drawer from the drawer slides (select ...

Use and Care Manual
Page 7
... while installing center hinge pin with 3⁄8" hex head driver. Install handles (see page 4). 2. Transfer door stops from step 1. 6 Freezer door models: Insert bottom hinge pin. • Locate bottom hinge hole closest to refrigerator. Place hinge side of fresh food door and freezer door, if applicable, to stored items. Both doors can be reversed on...
... while installing center hinge pin with 3⁄8" hex head driver. Install handles (see page 4). 2. Transfer door stops from step 1. 6 Freezer door models: Insert bottom hinge pin. • Locate bottom hinge hole closest to refrigerator. Place hinge side of fresh food door and freezer door, if applicable, to stored items. Both doors can be reversed on...

Use and Care Manual
Page 9
... be flat against the door, align the right base of the handle with your refrigerator under the right side base of the freezer drawer. To Remove: 1. While firmly supporting the left handle base against the face of the freezer door at the left , lift and remove from the surface of the handle. Push... the left handle base against the freezer door, you may have to reverse directions momentarily to hang unsupported. 4. Now, while firmly holding the handle at both hands, firmly grasp the handle towards ...
... be flat against the door, align the right base of the handle with your refrigerator under the right side base of the freezer drawer. To Remove: 1. While firmly supporting the left handle base against the face of the freezer door at the left , lift and remove from the surface of the handle. Push... the left handle base against the freezer door, you may have to reverse directions momentarily to hang unsupported. 4. Now, while firmly holding the handle at both hands, firmly grasp the handle towards ...
Use and Care Manual
Page 11
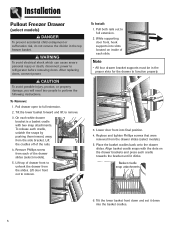
... overtighten. Check for 24 hours. Avoid kinks in Use & Care Guide or published user-repair instructions. • Disconnect power to refrigerator before installing ice maker. • Water damage due to check and correct any water leaks. Shape tubing slightly. Tighten nut with ...into a service loop. 2' diameter minimum 2. Clean up spills or leakage immediately. Do not overtighten. • Wait 2-3 hours before placing refrigerator into water valve inlet port. Recheck for creation of service loop. 1. Finish tightening nuts with C water tubing clamp (C) and turn on...
... overtighten. Check for 24 hours. Avoid kinks in Use & Care Guide or published user-repair instructions. • Disconnect power to refrigerator before installing ice maker. • Water damage due to check and correct any water leaks. Shape tubing slightly. Tighten nut with ...into a service loop. 2' diameter minimum 2. Clean up spills or leakage immediately. Do not overtighten. • Wait 2-3 hours before placing refrigerator into water valve inlet port. Recheck for creation of service loop. 1. Finish tightening nuts with C water tubing clamp (C) and turn on...
Use and Care Manual
Page 12
... before adding food. This is 1 through 7 (coldest). • Set the freezer control on 4. • Set the refrigerator control on . Turn refrigerator OFF Turn the freezer control to next lower number. Refrigerator too cold Turn the refrigerator control to OFF. Freezer too warm Turn the freezer control to the refrigerator. 11 It does not shut off power to next higher...
... before adding food. This is 1 through 7 (coldest). • Set the freezer control on 4. • Set the refrigerator control on . Turn refrigerator OFF Turn the freezer control to next lower number. Refrigerator too cold Turn the refrigerator control to OFF. Freezer too warm Turn the freezer control to the refrigerator. 11 It does not shut off power to next higher...

Use and Care Manual
Page 13
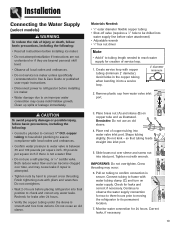
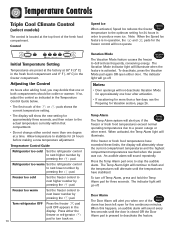
... through 7 (coldest). • Set the freezer control on 4. • Set the refrigerator control on the cabinet. Freezer too cold Set the freezer control to 12 hours before adding food. Control Initial Control Settings After plugging the refrigerator in, set the controls. • Pressing ... the pad. Freezer too warm Set the freezer control to next higher number by pressing the pad. Temperature Control Guide Refrigerator too warm Set the refrigerator control to next higher number by pressing the pad. Turn refrigerator OFF Press the refrigerator or freezer pad until a...
... through 7 (coldest). • Set the freezer control on 4. • Set the refrigerator control on the cabinet. Freezer too cold Set the freezer control to 12 hours before adding food. Control Initial Control Settings After plugging the refrigerator in, set the controls. • Pressing ... the pad. Freezer too warm Set the freezer control to next higher number by pressing the pad. Temperature Control Guide Refrigerator too warm Set the refrigerator control to next higher number by pressing the pad. Turn refrigerator OFF Press the refrigerator or freezer pad until a...
Use and Care Manual
Page 14
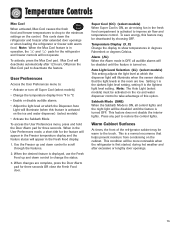
... food compartment and 0° F (-18° C) in the Temperature Control Guide below. • The first touch of the doors has been left open either the freezer or refrigerator pad to turn off . When this happens, an audible alarm will sound every few days, see the Preparing for the... Alarm The Door Alarm will go off Temp Alarm, press and hold the Temp Alarm pad for 24 hours before making a new temperature adjustment. Turn refrigerator OFF Press the freezer pad until OFF appears in order to a power outage or other event. The indicator light will alert you if the...
... food compartment and 0° F (-18° C) in the Temperature Control Guide below. • The first touch of the doors has been left open either the freezer or refrigerator pad to turn off . When this happens, an audible alarm will sound every few days, see the Preparing for the... Alarm The Door Alarm will go off Temp Alarm, press and hold the Temp Alarm pad for 24 hours before making a new temperature adjustment. Turn refrigerator OFF Press the freezer pad until OFF appears in order to a power outage or other event. The indicator light will alert you if the...
Use and Care Manual
Page 15
... feature is a normal occurrence that the light levels in the room are complete, press the Door Alarm pad for the refrigerator and freezer controls will deactivate automatically after 12 hours, OR press the Max Cool pad to the minimum settings on the control. Temperature...food. Note: The Auto Light (select models) must be more noticeable when the refrigerator is activated to change the status. 3. This is turned OFF. Use the Freezer up and down the refrigerator and freezer after excessive or lengthy door openings. 14 When changes are low. Temperature Display ...
... feature is a normal occurrence that the light levels in the room are complete, press the Door Alarm pad for the refrigerator and freezer controls will deactivate automatically after 12 hours, OR press the Max Cool pad to the minimum settings on the control. Temperature...food. Note: The Auto Light (select models) must be more noticeable when the refrigerator is activated to change the status. 3. This is turned OFF. Use the Freezer up and down the refrigerator and freezer after excessive or lengthy door openings. 14 When changes are low. Temperature Display ...
Use and Care Manual
Page 16
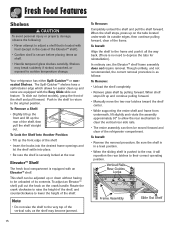
...shelf and frame from underneath, lift slightly and rotate the assembly approximately 30° to allow the rear mechanism to be unloaded of the refrigerator compartment. When shelf stops lift up on the crank handle. The Spill-Catcher™ shelves have a spill retainer edge which allows for reinstallation...). Your refrigerator has either Spill-Catcher™ or nonsealed Shelves. This shelf can then be adjusted up the rear of the shelf, then pull the ...
...shelf and frame from underneath, lift slightly and rotate the assembly approximately 30° to allow the rear mechanism to be unloaded of the refrigerator compartment. When shelf stops lift up on the crank handle. The Spill-Catcher™ shelves have a spill retainer edge which allows for reinstallation...). Your refrigerator has either Spill-Catcher™ or nonsealed Shelves. This shelf can then be adjusted up the rear of the shelf, then pull the ...
Use and Care Manual
Page 17
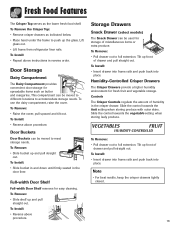
... removes for fresh fruit and vegetable storage. Slide the control towards the vegetable setting when storing leafy produce. Lift glass out. • Lift frame from refrigerator liner rails. Door Storage Dairy Compartment The Dairy Compartment provides convenient door storage for storage of drawer and pull straight out. Storage Drawers Snack Drawer...
... removes for fresh fruit and vegetable storage. Slide the control towards the vegetable setting when storing leafy produce. Lift glass out. • Lift frame from refrigerator liner rails. Door Storage Dairy Compartment The Dairy Compartment provides convenient door storage for storage of drawer and pull straight out. Storage Drawers Snack Drawer...
Use and Care Manual
Page 18
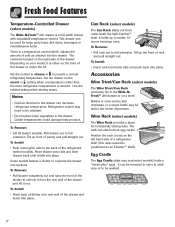
...until it from underneath the Spill-Catcher™ shelf. Tilt up front of pantry and pull straight out. Bottles or cans can decrease refrigerator temperature. Wine Rack (select models) The Wine Rack provides a place for large party trays, deli items, beverages or miscellaneous items. There... could damage leafy produce. To Remove: • Lift lid (select models). To Remove: • Pull rack out to provide a normal refrigerator temperature. Refrigerator control may vary/select models) holds a "dozen-plus" eggs. Pull drawer out to the back of rack and pull straight out. Tilt up...
...until it from underneath the Spill-Catcher™ shelf. Tilt up front of pantry and pull straight out. Bottles or cans can decrease refrigerator temperature. Wine Rack (select models) The Wine Rack provides a place for large party trays, deli items, beverages or miscellaneous items. There... could damage leafy produce. To Remove: • Lift lid (select models). To Remove: • Pull rack out to provide a normal refrigerator temperature. Refrigerator control may vary/select models) holds a "dozen-plus" eggs. Pull drawer out to the back of rack and pull straight out. Tilt up...

Use and Care Manual
Page 19
...replacing it in place and ice maker arm is heard. • Ice maker will continue to the water supply as instructed on the refrigerator at the ends. Continued consumption of the ejector mechanism and the heating element that are ejected it forward, away from possible injury. ... models are essential for quick chilling. The motor may have a factory installed ice maker. It will help protect you from the ice maker. Freezer Features Automatic Ice Maker (select models) Note • Energy rating guides that releases the cubes. • Under certain rare circumstances, ice cubes...
...replacing it in place and ice maker arm is heard. • Ice maker will continue to the water supply as instructed on the refrigerator at the ends. Continued consumption of the ejector mechanism and the heating element that are ejected it forward, away from possible injury. ... models are essential for quick chilling. The motor may have a factory installed ice maker. It will help protect you from the ice maker. Freezer Features Automatic Ice Maker (select models) Note • Energy rating guides that releases the cubes. • Under certain rare circumstances, ice cubes...

Use and Care Manual
Page 21
... the odor does not transfer to other foods or surfaces does not occur. • Occasionally mold will develop on pages 21 and 22 for longer time periods see page 16. • Sort fruits and vegetables before storage and use . Keep your knife or instrument ... an inch around the food and results in the original carton and refrigerate immediately after purchasing and after each use aluminum foil, freezer wrap, freezer bags or airtight containers. Frozen Food Storage • The freezer compartment of a refrigerator should be wrapped securely so leakage and contamination of other foods. &#...
... the odor does not transfer to other foods or surfaces does not occur. • Occasionally mold will develop on pages 21 and 22 for longer time periods see page 16. • Sort fruits and vegetables before storage and use . Keep your knife or instrument ... an inch around the food and results in the original carton and refrigerate immediately after purchasing and after each use aluminum foil, freezer wrap, freezer bags or airtight containers. Frozen Food Storage • The freezer compartment of a refrigerator should be wrapped securely so leakage and contamination of other foods. &#...

Use and Care Manual
Page 22
...'t return unused portions to 6 months May become crumbly Wrap tightly. Sour cream 10 days Not recommended Store in the shell 3 weeks Not recommended Refrigerate small ends down. sugar for non-sweet dishes. Pineapples, cut 2 to 3 days 6 to 9 months Wrap tightly or cover. Pears, plums..., avocados 3 to 21° C). salt for use in original carton. FOODS REFRIGERATOR FREEZER STORAGE TIPS DAIRY PRODUCTS Butter 1 month 6 to 12 months Will not ripen after purchase. Don't freeze cream unless whipped. If...
...'t return unused portions to 6 months May become crumbly Wrap tightly. Sour cream 10 days Not recommended Store in the shell 3 weeks Not recommended Refrigerate small ends down. sugar for non-sweet dishes. Pineapples, cut 2 to 3 days 6 to 9 months Wrap tightly or cover. Pears, plums..., avocados 3 to 21° C). salt for use in original carton. FOODS REFRIGERATOR FREEZER STORAGE TIPS DAIRY PRODUCTS Butter 1 month 6 to 12 months Will not ripen after purchase. Don't freeze cream unless whipped. If...

Use and Care Manual
Page 23
...2 days 12 months 9 months 2 to 10 months Remove tops. Food Marketing Institute; Cooperative Extension Service, Iowa State University 22 Place in original packaging for refrigeration. Sources: United States Department of Agriculture; Leave peas in the meat and cheese drawer. When freezing longer than two weeks...or lamb, roast and steak Ham, fully cooked, whole half slices Luncheon meat Pork, roast Pork, chops Sausage, ground Sausage, smoked Veal Frankfurters REFRIGERATOR FREEZER STORAGE TIPS 1 to 2 days 3 to 5 days 1 to 2 weeks 7 to 10 days 7 to 10 days 8 to 10 months ...
...2 days 12 months 9 months 2 to 10 months Remove tops. Food Marketing Institute; Cooperative Extension Service, Iowa State University 22 Place in original packaging for refrigeration. Sources: United States Department of Agriculture; Leave peas in the meat and cheese drawer. When freezing longer than two weeks...or lamb, roast and steak Ham, fully cooked, whole half slices Luncheon meat Pork, roast Pork, chops Sausage, ground Sausage, smoked Veal Frankfurters REFRIGERATOR FREEZER STORAGE TIPS 1 to 2 days 3 to 5 days 1 to 2 weeks 7 to 10 days 7 to 10 days 8 to 10 months ...
Use and Care Manual
Page 24
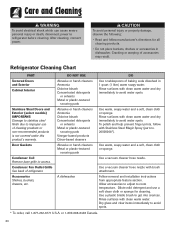
... 20000008*). Use a plastic bristle brush to avoid spots. * To order, call 1-877-232-6771 U.S.A. Allow accessories to adjust to refrigerator before cleaning. After cleaning, connect power. Care and Cleaning WARNING To avoid electrical shock which can cause severe personal injury or death, ...disconnect power to room temperature. Cracking or warping of refrigerator. Door Gaskets Condenser Coil Remove base grille to avoid water spots. DO NOT USE Abrasive or harsh cleaners Ammonia Chlorine bleach...
... 20000008*). Use a plastic bristle brush to avoid spots. * To order, call 1-877-232-6771 U.S.A. Allow accessories to adjust to refrigerator before cleaning. After cleaning, connect power. Care and Cleaning WARNING To avoid electrical shock which can cause severe personal injury or death, ...disconnect power to room temperature. Cracking or warping of refrigerator. Door Gaskets Condenser Coil Remove base grille to avoid water spots. DO NOT USE Abrasive or harsh cleaners Ammonia Chlorine bleach...


