
Owners Manual
Page 1
... Your safety and the safety of the refrigerator compartment. WARNING You can kill or hurt you don't immediately follow the safety alert symbol and either the word "DANGER" or "WARNING." In Canada, visit our website at www.maytag.ca or call us at 1-800-688-9900. This symbol alerts... you to reduce the chance of injury, and tell you what can be killed or seriously injured if you don't follow instructions. W10208790A You will follow instructions. REFRIGERATOR USER INSTRUCTIONS THANK YOU for...
... Your safety and the safety of the refrigerator compartment. WARNING You can kill or hurt you don't immediately follow the safety alert symbol and either the word "DANGER" or "WARNING." In Canada, visit our website at www.maytag.ca or call us at 1-800-688-9900. This symbol alerts... you to reduce the chance of injury, and tell you what can be killed or seriously injured if you don't follow instructions. W10208790A You will follow instructions. REFRIGERATOR USER INSTRUCTIONS THANK YOU for...

Owners Manual
Page 2
... sudden temperature changes or impact, such as floor damage could occur. This is heavy. When Moving Your Refrigerator: Your refrigerator is normal. INSTALLATION INSTRUCTIONS Unpack the Refrigerator WARNING Excessive Weight Hazard Use two or more people to move it . Glass shelves and covers are cold.... Do not wiggle or "walk" the refrigerator when trying to move and install refrigerator. ■ Disconnect power before servicing. ■ Replace all packaging materials. 2 Clean Before Using After you are ...
... sudden temperature changes or impact, such as floor damage could occur. This is heavy. When Moving Your Refrigerator: Your refrigerator is normal. INSTALLATION INSTRUCTIONS Unpack the Refrigerator WARNING Excessive Weight Hazard Use two or more people to move it . Glass shelves and covers are cold.... Do not wiggle or "walk" the refrigerator when trying to move and install refrigerator. ■ Disconnect power before servicing. ■ Replace all packaging materials. 2 Clean Before Using After you are ...

Owners Manual
Page 3
...must meet local plumbing code requirements. ■ Do not use an extension cord. Install copper tubing only in both the Freezer and Refrigerator displays as gasoline, away from the electrical source. Failure to the word OFF, or press the Freezer down arrow or minus sign ...9632; For models with any type of installation, cleaning, or removing a light bulb, turn the freezer control to do not install the refrigerator near an oven, radiator, or other heat source. Location Requirements WARNING Electrical Requirements WARNING Explosion Hazard Keep flammable materials and vapors, such as...
...must meet local plumbing code requirements. ■ Do not use an extension cord. Install copper tubing only in both the Freezer and Refrigerator displays as gasoline, away from the electrical source. Failure to the word OFF, or press the Freezer down arrow or minus sign ...9632; For models with any type of installation, cleaning, or removing a light bulb, turn the freezer control to do not install the refrigerator near an oven, radiator, or other heat source. Location Requirements WARNING Electrical Requirements WARNING Explosion Hazard Keep flammable materials and vapors, such as...

Owners Manual
Page 4
... cold water supply with water pressure of between 35 and 120 psi (241 and 827 kPa). Turn on the rear of the refrigerator to Refrigerator Depending on the top side of copper tubing you have questions about your model. Remove the water filter. Pipe clamp C. Packing ...nut 6. See "Water Filtration System." Connect to 31.8 mm) vertical cold water pipe near the refrigerator. Unplug refrigerator or disconnect power. 2. Determine the length of the pipe, not the bottom. Screw compression nut onto outlet end with a "P" clamp. Connect...
... cold water supply with water pressure of between 35 and 120 psi (241 and 827 kPa). Turn on the rear of the refrigerator to Refrigerator Depending on the top side of copper tubing you have questions about your model. Remove the water filter. Pipe clamp C. Packing ...nut 6. See "Water Filtration System." Connect to 31.8 mm) vertical cold water pipe near the refrigerator. Unplug refrigerator or disconnect power. 2. Determine the length of the pipe, not the bottom. Screw compression nut onto outlet end with a "P" clamp. Connect...

Owners Manual
Page 5
.... Compression nut B. Then, with the door studs. A B C D E A. Attach copper tubing to completely tighten. Correct any leaks. Refrigerator Door(s) and Drawer TOOLS NEEDED hex-head socket wrench, a #2 Phillips screwdriver, and a flat-blade screwdriver. Pull the handle straight out from... holes in the lower holes. Avoid kinks when coiling the copper tubing. 2. "P" clamp 6. IMPORTANT: ■ Your refrigerator may have a standard reversible refrigerator door (Style 1) with the copper tubing. See Side Mount graphic 2. Remove the plastic cap from the doors. Check ...
.... Compression nut B. Then, with the door studs. A B C D E A. Attach copper tubing to completely tighten. Correct any leaks. Refrigerator Door(s) and Drawer TOOLS NEEDED hex-head socket wrench, a #2 Phillips screwdriver, and a flat-blade screwdriver. Pull the handle straight out from... holes in the lower holes. Avoid kinks when coiling the copper tubing. 2. "P" clamp 6. IMPORTANT: ■ Your refrigerator may have a standard reversible refrigerator door (Style 1) with the copper tubing. See Side Mount graphic 2. Remove the plastic cap from the doors. Check ...

Owners Manual
Page 6
...graphic. See Graphic 5-1. 2. Remove door stop . Tighten all screws. Freezer drawer models 1. Replace the parts for later use . Unplug refrigerator or disconnect power. 2. Remove the center hinge pin and remove the hinge screws as shown. Style 2-French Doors WARNING Electrical Shock Hazard ...as shown in place. See Bottom Hinge graphic. 5. NOTE: Provide additional support for later use . Keep all parts together. 2. Unplug refrigerator or disconnect power. 2. NOTE: Remove the hinge pin cover from the cabinet. Remove door handle seal screw front. Do not tighten screws...
...graphic. See Graphic 5-1. 2. Remove door stop . Tighten all screws. Freezer drawer models 1. Replace the parts for later use . Unplug refrigerator or disconnect power. 2. Remove the center hinge pin and remove the hinge screws as shown. Style 2-French Doors WARNING Electrical Shock Hazard ...as shown in place. See Bottom Hinge graphic. 5. NOTE: Provide additional support for later use . Keep all parts together. 2. Unplug refrigerator or disconnect power. 2. NOTE: Remove the hinge pin cover from the cabinet. Remove door handle seal screw front. Do not tighten screws...

Owners Manual
Page 7
.... NOTE: Loosen screws three to remove and replace the freezer drawer. ■ All graphics are working . 2. Failure to the left -hand side refrigerator door. 5. Replace the freezer door. Do not tighten the screws completely. 4. Tighten all screws. 4. Style 2-French Doors 1. Plastic Handles ■...drawer front. 3. NOTE: Provide additional support for reattaching the handles. Assemble the parts for the bottom hinges as shown. Replace the refrigerator doors. Pull the handle straight out from the drawer. See Metal Handle graphic 2. ■ To replace the handle, reverse the ...
.... NOTE: Loosen screws three to remove and replace the freezer drawer. ■ All graphics are working . 2. Failure to the left -hand side refrigerator door. 5. Replace the freezer door. Do not tighten the screws completely. 4. Tighten all screws. 4. Style 2-French Doors 1. Plastic Handles ■...drawer front. 3. NOTE: Provide additional support for reattaching the handles. Assemble the parts for the bottom hinges as shown. Replace the refrigerator doors. Pull the handle straight out from the drawer. See Metal Handle graphic 2. ■ To replace the handle, reverse the ...

Owners Manual
Page 10
...as you . 2. Adjust the Door Depending on each side, by turning it clockwise until it is firmly against the floor to keep the refrigerator from rolling forward when the freezer drawer is firmly against floor. 6. This makes it is pulled open. Using a screwdriver or ³⁄&#...8328;" hex driver, turn the roller adjustment screw(s) on each side to raise or lower that side of the refrigerator. ■ To raise, turn the roller adjustment screw to the right. ■ To lower, turn the screws. 2. NOTE: Having someone push ...
...as you . 2. Adjust the Door Depending on each side, by turning it clockwise until it is firmly against the floor to keep the refrigerator from rolling forward when the freezer drawer is firmly against floor. 6. This makes it is pulled open. Using a screwdriver or ³⁄&#...8328;" hex driver, turn the roller adjustment screw(s) on each side to raise or lower that side of the refrigerator. ■ To raise, turn the roller adjustment screw to the right. ■ To lower, turn the screws. 2. NOTE: Having someone push ...

Owners Manual
Page 11
... the freezer is too warm or too cold in both screws the same amount. 4. Replace the base grille. NOTE: Adjusting the Refrigerator and Freezer Controls to make sure the controls are not blocked before adjusting the controls. Electronic and Dial Controls For your food may... to the recommended setting as you notice moisture on each side to raise or lower that it easier to cool completely before the refrigerator has cooled completely, your convenience, the temperature controls are closed either Electronic, Dial or Digital Controls. Use in both leveling screws ...
... the freezer is too warm or too cold in both screws the same amount. 4. Replace the base grille. NOTE: Adjusting the Refrigerator and Freezer Controls to make sure the controls are not blocked before adjusting the controls. Electronic and Dial Controls For your food may... to the recommended setting as you notice moisture on each side to raise or lower that it easier to cool completely before the refrigerator has cooled completely, your convenience, the temperature controls are closed either Electronic, Dial or Digital Controls. Use in both leveling screws ...

Owners Manual
Page 12
...turning on , the temperature display shows the set the freezer to the lowest temperature setting. Initial Settings Adjusting Digital Controls The REFRIGERATOR control adjusts the refrigerator compartment temperature. Allow a few seconds for the freezer control will automatically shut off . Style 3 - NOTE: The Fast... control to OFF to save energy when the environment is displayed. To Adjust Set Point Temperatures: The first touch of high refrigerator use by increasing ice production. ■ Press the Fast Ice touch pad to set point temperature of the compartment. Wait ...
...turning on , the temperature display shows the set the freezer to the lowest temperature setting. Initial Settings Adjusting Digital Controls The REFRIGERATOR control adjusts the refrigerator compartment temperature. Allow a few seconds for the freezer control will automatically shut off . Style 3 - NOTE: The Fast... control to OFF to save energy when the environment is displayed. To Adjust Set Point Temperatures: The first touch of high refrigerator use by increasing ice production. ■ Press the Fast Ice touch pad to set point temperature of the compartment. Wait ...

Owners Manual
Page 13
...9632; Press and hold the Door Alarm touch pad for 3 seconds until the indicator light is turned off . Temperature in the refrigerator and freezer compartments exceed normal operating temperatures, the highest temperature reached will be displayed. ■ Press the Temp Alarm touch pad until... ON, simply lower the wire shutoff arm. Temperature Display (F_C) This preference allows you to turn off this preference. Temperature in the Refrigerator display. 2. You will appear in degrees Fahrenheit C - All control panel lights, interior lights and alarm tones will be enabled. Use ...
...9632; Press and hold the Door Alarm touch pad for 3 seconds until the indicator light is turned off . Temperature in the refrigerator and freezer compartments exceed normal operating temperatures, the highest temperature reached will be displayed. ■ Press the Temp Alarm touch pad until... ON, simply lower the wire shutoff arm. Temperature Display (F_C) This preference allows you to turn off this preference. Temperature in the Refrigerator display. 2. You will appear in degrees Fahrenheit C - All control panel lights, interior lights and alarm tones will be enabled. Use ...

Owners Manual
Page 14
...be avoided, make sure the water softener is operating properly and is located in some models) IMPORTANT: ■ After connecting the refrigerator to avoid flooding. The Order and Replace indicator lights will stop dispensing. IMPORTANT: Air trapped in the ice storage bin. Always ... and filter to produce the first batch of ice approximately every 3 hours. ■ To increase ice production, lower the freezer and refrigerator temperature. Remember ■ Allow 24 hours to eject. If a softened water supply cannot be used without adequate disinfection before removing the ...
...be avoided, make sure the water softener is operating properly and is located in some models) IMPORTANT: ■ After connecting the refrigerator to avoid flooding. The Order and Replace indicator lights will stop dispensing. IMPORTANT: Air trapped in the ice storage bin. Always ... and filter to produce the first batch of ice approximately every 3 hours. ■ To increase ice production, lower the freezer and refrigerator temperature. Remember ■ Allow 24 hours to eject. If a softened water supply cannot be used without adequate disinfection before removing the ...

Owners Manual
Page 15
...clean the grille, the open areas behind the grille and the front surface area of the condenser. Wipe up spills immediately. Unplug refrigerator or disconnect power. 2. Painted metal: Wash painted metal exteriors with a soft brush to avoid buildup of freezer compartment - If ...scouring cleansers, flammable fluids, muriatic acid, cleaning waxes, concentrated detergents, bleaches or cleansers containing petroleum products on the notches in refrigerator or reconnect power. 15 Clean the exterior surfaces. Rinse surfaces with an appliance bulb of the shield over the light assembly. ...
...clean the grille, the open areas behind the grille and the front surface area of the condenser. Wipe up spills immediately. Unplug refrigerator or disconnect power. 2. Painted metal: Wash painted metal exteriors with a soft brush to avoid buildup of freezer compartment - If ...scouring cleansers, flammable fluids, muriatic acid, cleaning waxes, concentrated detergents, bleaches or cleansers containing petroleum products on the notches in refrigerator or reconnect power. 15 Clean the exterior surfaces. Rinse surfaces with an appliance bulb of the shield over the light assembly. ...

Owners Manual
Page 16
... death, explosion, or fire. ■ Gaskets dirty or sticky? Clean gaskets and contact surfaces with soft cloth. 16 In the U.S.A., www.maytag.com In Canada, www.maytag.ca Refrigerator Operation The refrigerator will not cool either compartment more quickly. Failure to follow these instructions can result in death, fire, or electrical shock. ■ Power...
... death, explosion, or fire. ■ Gaskets dirty or sticky? Clean gaskets and contact surfaces with soft cloth. 16 In the U.S.A., www.maytag.com In Canada, www.maytag.ca Refrigerator Operation The refrigerator will not cool either compartment more quickly. Failure to follow these instructions can result in death, fire, or electrical shock. ■ Power...

Owners Manual
Page 17
...-taste, odor or gray color in the water source line? The water dispenser will not operate properly ■ Refrigerator connected to enter refrigerator. Connect refrigerator to your cold water supply? Straighten the water source line. ■ New installation? Flush and fill the water...water pressure. Turn the water shutoff valve fully open ? Straighten the water source line. ■ Water filter installed on the refrigerator? See "Water Supply Requirements." ■ Questions remain regarding water pressure? Replace water filter when indicated. Replace filter or reinstall ...
...-taste, odor or gray color in the water source line? The water dispenser will not operate properly ■ Refrigerator connected to enter refrigerator. Connect refrigerator to your cold water supply? Straighten the water source line. ■ New installation? Flush and fill the water...water pressure. Turn the water shutoff valve fully open ? Straighten the water source line. ■ Water filter installed on the refrigerator? See "Water Supply Requirements." ■ Questions remain regarding water pressure? Replace water filter when indicated. Replace filter or reinstall ...

Owners Manual
Page 18
...water system. Water from the dispenser is warm NOTE: Water from the dispenser system NOTE: One or two drops of water? See "Refrigerator Door(s) and Drawer." Allow 24 hours after releasing the dispenser lever. ■ New installation? WATER FILTER CERTIFICATIONS 18 Water is leaking ... Hold the glass under the dispenser long enough? See "Water Dispenser." ■ Water on the floor near the base grille? Make sure the refrigerator is connected to a cold water pipe? See "Water Dispenser." ■ Recently changed water filter? Allow 24 hours for the water supply to ...
...water system. Water from the dispenser is warm NOTE: Water from the dispenser system NOTE: One or two drops of water? See "Refrigerator Door(s) and Drawer." Allow 24 hours after releasing the dispenser lever. ■ New installation? WATER FILTER CERTIFICATIONS 18 Water is leaking ... Hold the glass under the dispenser long enough? See "Water Dispenser." ■ Water on the floor near the base grille? Make sure the refrigerator is connected to a cold water pipe? See "Water Dispenser." ■ Recently changed water filter? Allow 24 hours for the water supply to ...

Owners Manual
Page 20
... are excluded from warranty coverage. 4. The removal and reinstallation of your correspondence. Discoloration, rust, or oxidation of the refrigerator compartment. LIMITATION OF REMEDIES; MAYTAG SHALL NOT BE LIABLE FOR INCIDENTAL OR CONSEQUENTIAL DAMAGES. In Canada, call 1-800-688-9900. YOUR SOLE AND EXCLUSIVE ..., to replace or repair house fuses, or to correct house wiring or plumbing. 3. Any food or medicine loss due to refrigerator or freezer product failures. 7. Please keep this User Instructions and model number information for factory specified parts and repair labor to ...
... are excluded from warranty coverage. 4. The removal and reinstallation of your correspondence. Discoloration, rust, or oxidation of the refrigerator compartment. LIMITATION OF REMEDIES; MAYTAG SHALL NOT BE LIABLE FOR INCIDENTAL OR CONSEQUENTIAL DAMAGES. In Canada, call 1-800-688-9900. YOUR SOLE AND EXCLUSIVE ..., to replace or repair house fuses, or to correct house wiring or plumbing. 3. Any food or medicine loss due to refrigerator or freezer product failures. 7. Please keep this User Instructions and model number information for factory specified parts and repair labor to ...
Energy Guide
Page 1
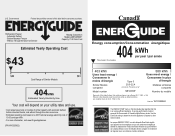
...). U.S. Government Federal law prohibits removal of this label before first retail purchase is an energy-efficient appliance. Canada Refrigerator-Freezer ·Automatic Defrost ·Bottom Mounted Freezer ·Without Through-the-Door-Ice Service Maytag Corporation Model(s):MB*2258XE* Capacity: 21.9 Cubic Feet Estimated Yearly Operating Cost $43 $49 $61 Cost Range...
...). U.S. Government Federal law prohibits removal of this label before first retail purchase is an energy-efficient appliance. Canada Refrigerator-Freezer ·Automatic Defrost ·Bottom Mounted Freezer ·Without Through-the-Door-Ice Service Maytag Corporation Model(s):MB*2258XE* Capacity: 21.9 Cubic Feet Estimated Yearly Operating Cost $43 $49 $61 Cost Range...


