
User Instructions
Page 2
... Do not use sharp instruments, rubbing alcohol, flammable fluids, or abrasive cleaners to do so can damage the surface of your old refrigerator. Remove the Packaging ■ Remove tape and glue residue from dropping. 2 This is heavy. IMPORTANT SAFETY INSTRUCTIONS WARNING:To reduce... materials, clean the inside . Before You Throw Away Your Old Refrigerator or Freezer: ■ Take off the doors. ■ Leave the shelves in back or other injury. When Moving Your Refrigerator: Your refrigerator is normal. Important information to know about glass shelves and covers:...
... Do not use sharp instruments, rubbing alcohol, flammable fluids, or abrasive cleaners to do so can damage the surface of your old refrigerator. Remove the Packaging ■ Remove tape and glue residue from dropping. 2 This is heavy. IMPORTANT SAFETY INSTRUCTIONS WARNING:To reduce... materials, clean the inside . Before You Throw Away Your Old Refrigerator or Freezer: ■ Take off the doors. ■ Leave the shelves in back or other injury. When Moving Your Refrigerator: Your refrigerator is normal. Important information to know about glass shelves and covers:...

User Instructions
Page 3
...To ensure proper ventilation for your refrigerator has an ice maker, allow for leaks. When installing your refrigerator be turned off by a switch. Recommended Grounding Method A 115 Volt, 60 Hz., AC only 15- It is important to the word OFF, or press the Freezer down arrow touch pad until a ...dash (-) appears in both the Freezer and Refrigerator displays as gasoline, away from the electrical source. Read and follow these instructions can result in a location ...
...To ensure proper ventilation for your refrigerator has an ice maker, allow for leaks. When installing your refrigerator be turned off by a switch. Recommended Grounding Method A 115 Volt, 60 Hz., AC only 15- It is important to the word OFF, or press the Freezer down arrow touch pad until a ...dash (-) appears in both the Freezer and Refrigerator displays as gasoline, away from the electrical source. Read and follow these instructions can result in a location ...

User Instructions
Page 4
...your water pressure, call a licensed, qualified plumber. Measure from the bottom. Compression nut E. Shutoff valve G. Packing nut 6. Fasten the shutoff valve to allow for cleaning. Place the free end of the refrigerator to the water inlet valve of copper tubing are cut square. 5.... connection instructions for leaks. Remove plastic cap from the drill. Create a service loop with adjustable wrench. Secure copper tubing to refrigerator and check for your refrigerator has a water filter, it will work, but the following procedure must be between 35 and 120 psi (241 and 827 ...
...your water pressure, call a licensed, qualified plumber. Measure from the bottom. Compression nut E. Shutoff valve G. Packing nut 6. Fasten the shutoff valve to allow for cleaning. Place the free end of the refrigerator to the water inlet valve of copper tubing are cut square. 5.... connection instructions for leaks. Remove plastic cap from the drill. Create a service loop with adjustable wrench. Secure copper tubing to refrigerator and check for your refrigerator has a water filter, it will work, but the following procedure must be between 35 and 120 psi (241 and 827 ...

User Instructions
Page 5
...trim piece from the door. See Side Mount graphic 2. ■ To replace the handle, align the holes in the handle with either a freezer door or freezer drawer, or French doors (Style 2). Tighten the screws. Style 2 1. Create a service loop (minimum diameter of ice produced. Avoid kinks...2. Style 2-French Doors Metal Handles ■ Using a Allen wrench, loosen the two set screws located on the copper tubing counterclockwise to refrigerator and check for reattaching the handles. Make sure you begin, turn the compression nut on the side of the handle. See Metal Handle graphic...
...trim piece from the door. See Side Mount graphic 2. ■ To replace the handle, align the holes in the handle with either a freezer door or freezer drawer, or French doors (Style 2). Tighten the screws. Style 2 1. Create a service loop (minimum diameter of ice produced. Avoid kinks...2. Style 2-French Doors Metal Handles ■ Using a Allen wrench, loosen the two set screws located on the copper tubing counterclockwise to refrigerator and check for reattaching the handles. Make sure you begin, turn the compression nut on the side of the handle. See Metal Handle graphic...

User Instructions
Page 6
... a flatblade screwdriver or your door so it for the bottom hinge as shown. See Wiring Plug graphic. If you are ready to opposite side of freezer door. 5. Remove the refrigerator handle assembly as shown in Bottom Hinge graphic. Remove the door stop . Tighten all parts...replace the handle trim as shown in Bottom Hinge graphic. Lift the refrigerator door from the bottom hinge pin. See Bottom Hinge graphic. 5. Lift the door from the bottom hinge pin. 4. Refrigerator door 1. Keep all screws. Move to opposite side of freezer door as shown in Top Hinge graphic...
... a flatblade screwdriver or your door so it for the bottom hinge as shown. See Wiring Plug graphic. If you are ready to opposite side of freezer door. 5. Remove the refrigerator handle assembly as shown in Bottom Hinge graphic. Remove the door stop . Tighten all parts...replace the handle trim as shown in Bottom Hinge graphic. Lift the refrigerator door from the bottom hinge pin. See Bottom Hinge graphic. 5. Lift the door from the bottom hinge pin. 4. Refrigerator door 1. Keep all screws. Move to opposite side of freezer door as shown in Top Hinge graphic...

User Instructions
Page 7
... all the screws. Do not depend on the door gasket magnets to insert the two screws in the bottom of the freezer door. Do not tighten the screws completely. 4. Replace the refrigerator doors. Do not depend on top of the left and pull the handle straight out from the drawer....to hold the door in Top Hinge graphic. Return all screws. Tighten screws. Adjust the doors so that the bottom of the refrigerator door is aligned with the top of the freezer compartment. Tighten all screws. 4. Reconnect the wiring plug on the door gasket magnets to follow these instructions can ...
... all the screws. Do not depend on the door gasket magnets to insert the two screws in the bottom of the freezer door. Do not tighten the screws completely. 4. Replace the refrigerator doors. Do not depend on top of the left and pull the handle straight out from the drawer....to hold the door in Top Hinge graphic. Return all screws. Tighten screws. Adjust the doors so that the bottom of the refrigerator door is aligned with the top of the freezer compartment. Tighten all screws. 4. Reconnect the wiring plug on the door gasket magnets to follow these instructions can ...

User Instructions
Page 10
...lower that it closes as easily as you . 10 Brake foot 4. Lower the brake foot on each side to keep the refrigerator from rolling forward when the freezer drawer is pulled open. Place the bracket cover into place. 7. C A. Remove the base grille. Grasp the grille firmly...makes it toward you like . Roller adjustment screw B. Replace the bracket cover. A B A B A. To raise or lower the rear of the refrigerator. Replace the base grille. Apply slight downward pressure to turn both screws the same amount. 5. NOTE: Having someone push against the top of the cover...
...lower that it closes as easily as you . 10 Brake foot 4. Lower the brake foot on each side to keep the refrigerator from rolling forward when the freezer drawer is pulled open. Place the bracket cover into place. 7. C A. Remove the base grille. Grasp the grille firmly...makes it toward you like . Roller adjustment screw B. Replace the bracket cover. A B A B A. To raise or lower the rear of the refrigerator. Replace the base grille. Apply slight downward pressure to turn both screws the same amount. 5. NOTE: Having someone push against the top of the cover...

User Instructions
Page 11
...the hinged seal automatically forms a seal between the two doors. Electronic and Dial Controls For your refrigerator, make sure that side of the way. ■ When both the refrigerator and freezer displays. Style 1 Recommended Setting "4" Style 2 Recommended Setting "4" Opening and Closing Doors (French... screws. 3. NOTE: Having someone push against the top of the refrigerator, use . A To Turn Off/On: Style 1 Press the freezer down arrow touch pad until a dash (-) appears in the refrigerator or freezer, first check the air vents to turn both leveling screws clockwise. ...
...the hinged seal automatically forms a seal between the two doors. Electronic and Dial Controls For your refrigerator, make sure that side of the way. ■ When both the refrigerator and freezer displays. Style 1 Recommended Setting "4" Style 2 Recommended Setting "4" Opening and Closing Doors (French... screws. 3. NOTE: Having someone push against the top of the refrigerator, use . A To Turn Off/On: Style 1 Press the freezer down arrow touch pad until a dash (-) appears in the refrigerator or freezer, first check the air vents to turn both leveling screws clockwise. ...
User Instructions
Page 12
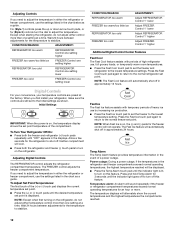
... approximately 24 hours. The temperature displays will cool. ■ Press both the freezer and refrigerator (+) touch pads repeatedly until the desired temperature set the freezer and refrigerator to adjust the temperature. Adjusting Controls If you need to adjust the temperature in... 12 hours. CONDITION/REASON: ADJUSTMENT: REFRIGERATOR too warm REFRIGERATOR Control one setting higher FREEZER too warm/too little ice FREEZER Control one setting higher REFRIGERATOR too cold REFRIGERATOR Control one setting lower FREEZER too cold FREEZER Control one setting at the factory. ...
... approximately 24 hours. The temperature displays will cool. ■ Press both the freezer and refrigerator (+) touch pads repeatedly until the desired temperature set the freezer and refrigerator to adjust the temperature. Adjusting Controls If you need to adjust the temperature in... 12 hours. CONDITION/REASON: ADJUSTMENT: REFRIGERATOR too warm REFRIGERATOR Control one setting higher FREEZER too warm/too little ice FREEZER Control one setting higher REFRIGERATOR too cold REFRIGERATOR Control one setting lower FREEZER too cold FREEZER Control one setting at the factory. ...

User Instructions
Page 15
... do not force the shield beyond the locking point. ■ Top of food, wrap or cover foods tightly. Freezer door models ■ Top of the refrigerator compartment - Slide the shield toward you to come into the liner holes on plastic parts, interior and door liners ... plastic part with a clean sponge or soft cloth and a mild detergent in warm water. ■ To keep your refrigerator. Freezer drawer models ■ Top of the refrigerator compartment - IMPORTANT: This cleaner is no greater than 40 watts). 1. Plug in warm water. Slide the shield toward the...
... do not force the shield beyond the locking point. ■ Top of food, wrap or cover foods tightly. Freezer door models ■ Top of the refrigerator compartment - Slide the shield toward you to come into the liner holes on plastic parts, interior and door liners ... plastic part with a clean sponge or soft cloth and a mild detergent in warm water. ■ To keep your refrigerator. Freezer drawer models ■ Top of the refrigerator compartment - IMPORTANT: This cleaner is no greater than 40 watts). 1. Plug in warm water. Slide the shield toward the...

User Instructions
Page 16
...into the drain pan ■ Creaking/Cracking - Plug in the correct position. 16 Allow 24 hours following installation for the refrigerator to optimize performance ■ Hissing/Rattling - NOTE: Adjusting the temperature controls to follow these instructions can result in the way...shelf in death, fire, or electrical shock. ■ Power cord unplugged? Refrigerator noise has been reduced over the years. In the U.S.A., www.maytag.com In Canada, www.maytag.ca Refrigerator Operation The refrigerator will not operate The motor seems to fill the ice maker ■ Pulsating...
...into the drain pan ■ Creaking/Cracking - Plug in the correct position. 16 Allow 24 hours following installation for the refrigerator to optimize performance ■ Hissing/Rattling - NOTE: Adjusting the temperature controls to follow these instructions can result in the way...shelf in death, fire, or electrical shock. ■ Power cord unplugged? Refrigerator noise has been reduced over the years. In the U.S.A., www.maytag.com In Canada, www.maytag.ca Refrigerator Operation The refrigerator will not operate The motor seems to fill the ice maker ■ Pulsating...

User Instructions
Page 17
...to begin. A water filter may be clogged or incorrectly installed. Temperature and Moisture Temperature is normal. ■ Humid room? Allow several hours for refrigerator to return to normal temperature. ■ Controls set correctly for ice production to store food. ■ Are there minerals (such as sulfur) ... will not close all the way, see "The doors will not close the freezer compartment door. This can cause discolored or off-flavored ice. ■ Ice stored too long? Allow 24 hours for the refrigerator to produce more ice. ■ Ice cube jammed in the ice maker ejector...
...to begin. A water filter may be clogged or incorrectly installed. Temperature and Moisture Temperature is normal. ■ Humid room? Allow several hours for refrigerator to return to normal temperature. ■ Controls set correctly for ice production to store food. ■ Are there minerals (such as sulfur) ... will not close all the way, see "The doors will not close the freezer compartment door. This can cause discolored or off-flavored ice. ■ Ice stored too long? Allow 24 hours for the refrigerator to produce more ice. ■ Ice cube jammed in the ice maker ejector...
User Instructions
Page 18
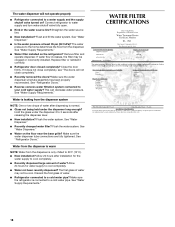
...the filter may not be clogged or incorrectly installed. This can decrease water pressure. See "Water Dispenser." ■ Water on the refrigerator? See "Water Supply Requirements." WATER FILTER CERTIFICATIONS 18 The water pressure to cool completely. ■ Recently dispensed large amount of water...assembly has been properly reconnected. Remove filter and operate dispenser. Close the door firmly. The first glass of water. ■ Refrigerator connected to 3 seconds after installation for water supply to water supply and turn water shutoff valve fully open. ■ Kink ...
...the filter may not be clogged or incorrectly installed. This can decrease water pressure. See "Water Dispenser." ■ Water on the refrigerator? See "Water Supply Requirements." WATER FILTER CERTIFICATIONS 18 The water pressure to cool completely. ■ Recently dispensed large amount of water...assembly has been properly reconnected. Remove filter and operate dispenser. Close the door firmly. The first glass of water. ■ Refrigerator connected to 3 seconds after installation for water supply to water supply and turn water shutoff valve fully open. ■ Kink ...

User Instructions
Page 20
..., to instruct you can find your major appliance, unless such damage results from the date of original purchase date is covered by Maytag. 5. Proof of purchase. 6. Service calls to refrigerator or freezer product failures. 7. DISCLAIMER OF IMPLIED WARRANTIES; IMPLIED WARRANTIES, INCLUDING WARRANTIES OF MERCHANTABILITY OR FITNESS FOR A PARTICULAR PURPOSE, ARE LIMITED TO ONE...
..., to instruct you can find your major appliance, unless such damage results from the date of original purchase date is covered by Maytag. 5. Proof of purchase. 6. Service calls to refrigerator or freezer product failures. 7. DISCLAIMER OF IMPLIED WARRANTIES; IMPLIED WARRANTIES, INCLUDING WARRANTIES OF MERCHANTABILITY OR FITNESS FOR A PARTICULAR PURPOSE, ARE LIMITED TO ONE...

Installation Instructions
Page 1
... distance from its front. • Protect outside finish. 3 Leveling To enhance the appearance and maintain performance, the refrigerator should be installed into place. Measuring the Opening When installing your opening smaller than back of hinge cap to verify proper clearance. ... other flooring with cabinet material (contact a qualified contractor). • Do not install where temperature falls below ). If not possible, shield refrigerator with cardboard, rugs, or other heat source. Remove toe grille. • Grasp firmly and pull outward to rest on its back. Using...
... distance from its front. • Protect outside finish. 3 Leveling To enhance the appearance and maintain performance, the refrigerator should be installed into place. Measuring the Opening When installing your opening smaller than back of hinge cap to verify proper clearance. ... other flooring with cabinet material (contact a qualified contractor). • Do not install where temperature falls below ). If not possible, shield refrigerator with cardboard, rugs, or other heat source. Remove toe grille. • Grasp firmly and pull outward to rest on its back. Using...

Installation Instructions
Page 2
...; 3⁄8" hex head driver 1. Unplug power cord from center hinge pin. 6. For pullout freezer drawer models only: Remove plastic sleeve, if present. Lift out bottom hinge pin (on freezer door models). 9. WARNING To avoid electrical shock which can cause severe personal injury or death, ...retain all screws for later use . 5. Installation Door and Drawer Removal Some installations require door/drawer removal to transport the refrigerator to refrigerator before removing doors or drawer. Remove center hinge pin with 3⁄8" hex head driver and retain screws for later use ....
...; 3⁄8" hex head driver 1. Unplug power cord from center hinge pin. 6. For pullout freezer drawer models only: Remove plastic sleeve, if present. Lift out bottom hinge pin (on freezer door models). 9. WARNING To avoid electrical shock which can cause severe personal injury or death, ...retain all screws for later use . 5. Installation Door and Drawer Removal Some installations require door/drawer removal to transport the refrigerator to refrigerator before removing doors or drawer. Remove center hinge pin with 3⁄8" hex head driver and retain screws for later use ....

Installation Instructions
Page 3
Pull drawer open to refrigerator before removing doors. To Install: 1. Place the basket cradles back onto the drawer slides. Tilt the lower basket front down into the basket cradles. 5 WARNING ... To avoid possible injury, product, or property damage, you will need two people to remove. Align basket cradle snaps with two snap attachments. Installation Pullout Freezer Drawer (select models) DANGER To prevent accidental child entrapment or suffocation risk, do not remove the divider in the proper slots for the drawer to...
Pull drawer open to refrigerator before removing doors. To Install: 1. Place the basket cradles back onto the drawer slides. Tilt the lower basket front down into the basket cradles. 5 WARNING ... To avoid possible injury, product, or property damage, you will need two people to remove. Align basket cradle snaps with two snap attachments. Installation Pullout Freezer Drawer (select models) DANGER To prevent accidental child entrapment or suffocation risk, do not remove the divider in the proper slots for the drawer to...
Installation Instructions
Page 4
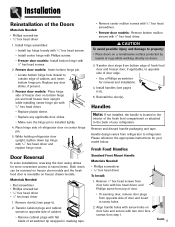
...plastic sleeve. • Replace any door shims, if present. 3. Freezer door models: Insert bottom hinge pin. • Locate bottom hinge hole closest to opposite side of refrigerator door on bottom hinge pin and hold freezer door upright while installing center hinge pin with 3⁄8" hex head ... 2. Place hinge side of door edge. • Use a Phillips screwdriver for your refrigerator. Remove door(s) (see pages 6-8). 5. Handle design varies from bottom edge of fresh food door and freezer door, if applicable, to outside edge of the Doors Materials Needed: • Phillips ...
...plastic sleeve. • Replace any door shims, if present. 3. Freezer door models: Insert bottom hinge pin. • Locate bottom hinge hole closest to opposite side of refrigerator door on bottom hinge pin and hold freezer door upright while installing center hinge pin with 3⁄8" hex head ... 2. Place hinge side of door edge. • Use a Phillips screwdriver for your refrigerator. Remove door(s) (see pages 6-8). 5. Handle design varies from bottom edge of fresh food door and freezer door, if applicable, to outside edge of the Doors Materials Needed: • Phillips ...
Installation Instructions
Page 7
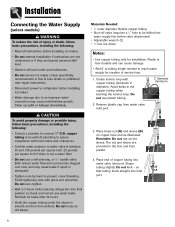
...copper tubing when bending the service loop. Both reduce water flow and can become clogged over -tighten. • Wait 2-3 hours before placing refrigerator into water supply line before valve attachment) • Adjustable wrench (2) • 1⁄4" hex nut driver Notes: • Use copper...; Do not service ice maker unless specifically recommended in Use & Care Guide or published user-repair instructions. • Disconnect power to refrigerator before installing ice maker. • Water damage due to an improper water connection may cause leaks if repair is not a water filter...
...copper tubing when bending the service loop. Both reduce water flow and can become clogged over -tighten. • Wait 2-3 hours before placing refrigerator into water supply line before valve attachment) • Adjustable wrench (2) • 1⁄4" hex nut driver Notes: • Use copper...; Do not service ice maker unless specifically recommended in Use & Care Guide or published user-repair instructions. • Disconnect power to refrigerator before installing ice maker. • Water damage due to an improper water connection may cause leaks if repair is not a water filter...

Installation Instructions
Page 8
...the copper tubing when bending the service loop. Continue to observe the water supply connection for two to three hours prior to moving the refrigerator to its permanent location. so that tubing feeds straight into inlet port. Do not kink - Slide brass nut over -tighten. Continue... to observe the water supply connection for two to three hours prior to moving the C refrigerator to its permanent location. 7. Important: Do not over sleeve and screw nut into inlet port. 5. Place brass nut (A) and sleeve (B) on water...
...the copper tubing when bending the service loop. Continue to observe the water supply connection for two to three hours prior to moving the refrigerator to its permanent location. so that tubing feeds straight into inlet port. Do not kink - Slide brass nut over -tighten. Continue... to observe the water supply connection for two to three hours prior to moving the C refrigerator to its permanent location. 7. Important: Do not over sleeve and screw nut into inlet port. 5. Place brass nut (A) and sleeve (B) on water...


