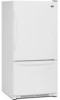

User Instructions
Page 2
...the past. Use special care when removing them to move and install refrigerator. ■ Disconnect power before turning on ice maker kit ready models only). INSTALLATION INSTRUCTIONS Unpack the Refrigerator WARNING Excessive Weight Hazard Use two or more people to protect the... and glue residue from refrigerator. ■ Use two or more information, see "Refrigerator Safety." ■ Dispose of your fingers. Before You Throw Away Your Old Refrigerator or Freezer: ■ Take off the doors. ■ Leave the shelves in "Refrigerator Care." IMPORTANT SAFETY INSTRUCTIONS...
...the past. Use special care when removing them to move and install refrigerator. ■ Disconnect power before turning on ice maker kit ready models only). INSTALLATION INSTRUCTIONS Unpack the Refrigerator WARNING Excessive Weight Hazard Use two or more people to protect the... and glue residue from refrigerator. ■ Use two or more information, see "Refrigerator Safety." ■ Dispose of your fingers. Before You Throw Away Your Old Refrigerator or Freezer: ■ Take off the doors. ■ Leave the shelves in "Refrigerator Care." IMPORTANT SAFETY INSTRUCTIONS...

User Instructions
Page 3
... your model, turn the refrigerator to the desired setting. See "Using the Controls." 2¹⁄₂" (6.3 cm) 3 Do not remove ground prong. Do not use an extension cord. NOTE: Before performing any type of installation, cleaning, or removing a light bulb, turn the freezer control to the word OFF, or press the Freezer down arrow...
... your model, turn the refrigerator to the desired setting. See "Using the Controls." 2¹⁄₂" (6.3 cm) 3 Do not remove ground prong. Do not use an extension cord. NOTE: Before performing any type of installation, cleaning, or removing a light bulb, turn the freezer control to the word OFF, or press the Freezer down arrow...

User Instructions
Page 5
...inlet port. Discard the first three batches of 2 ft [61 cm]) with a "P" clamp. Style 1 1. Tighten the compression nut. Secure copper tubing to refrigerator cabinet with the copper tubing. Slide the compression ...shown. Copper tubing 5. Copper tubing E. Turn on copper tubing. 2. Failure to refrigerator and check for your model, the water line may come down from the top or up from moving. Do...loop with a second wrench turn the compression nut on water supply to keep it from the bottom. Plastic water line B. Avoid kinks when coiling the copper tubing. 2. Confirm copper tubing is...
...inlet port. Discard the first three batches of 2 ft [61 cm]) with a "P" clamp. Style 1 1. Tighten the compression nut. Secure copper tubing to refrigerator cabinet with the copper tubing. Slide the compression ...shown. Copper tubing 5. Copper tubing E. Turn on copper tubing. 2. Failure to refrigerator and check for your model, the water line may come down from the top or up from moving. Do...loop with a second wrench turn the compression nut on water supply to keep it from the bottom. Plastic water line B. Avoid kinks when coiling the copper tubing. 2. Confirm copper tubing is...

User Instructions
Page 6
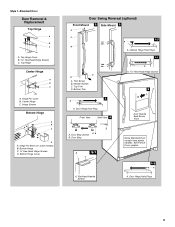
... wrench, a #2 Phillips screwdriver, and a flat-blade screwdriver. Remove Door and Hinges IMPORTANT: ■ Your refrigerator may have a standard reversible refrigerator door (Style 1) with the holes in Bottom Hinge graphic. Style 1-Standard Door Hex-Head Top Hinge Screw Freezer drawer models 1. Remove the parts for reattaching the handles. Make sure you are ready to hold the...
... wrench, a #2 Phillips screwdriver, and a flat-blade screwdriver. Remove Door and Hinges IMPORTANT: ■ Your refrigerator may have a standard reversible refrigerator door (Style 1) with the holes in Bottom Hinge graphic. Style 1-Standard Door Hex-Head Top Hinge Screw Freezer drawer models 1. Remove the parts for reattaching the handles. Make sure you are ready to hold the...

User Instructions
Page 7
... aside door until hinges and freezer compartment door or drawer are working . 2. Freezer drawer models 1. NOTE: Provide additional support for later use . Do not depend on the door gasket magnets to opposite side of the refrigerator door. Do not tighten screws completely. 3. Adjust the door so that the bottom of the refrigerator door is aligned with...
... aside door until hinges and freezer compartment door or drawer are working . 2. Freezer drawer models 1. NOTE: Provide additional support for later use . Do not depend on the door gasket magnets to opposite side of the refrigerator door. Do not tighten screws completely. 3. Adjust the door so that the bottom of the refrigerator door is aligned with...
User Instructions
Page 9
...;⁄₈" Hex-Head Hinge Screws D. See French Doors graphic. 5-2 A A. Center Hinge C. Hinge Screws Bottom Hinge A B C D A. Bottom Trim A A Hex-Head Hinge Screws 6 1 1 3 A A. Trim Screw B. Style 1-Standard Door Door Removal & Replacement Top Hinge A B C A. Cabinet ...Stop Screws A B B. Top Hinge Cover B Hex-Head Hinge Screws C. Top Hinge Center Hinge A B C A. Hinge Pin Shim (on some models) B. Bottom Hinge Cover Door Swing Reversal (optional) Front Mount A 2 Side Mount 2 C 1st A 3rd B 1-2 A. Top Trim D. Flat-Head Handle Screws Some Standard Door...
...;⁄₈" Hex-Head Hinge Screws D. See French Doors graphic. 5-2 A A. Center Hinge C. Hinge Screws Bottom Hinge A B C D A. Bottom Trim A A Hex-Head Hinge Screws 6 1 1 3 A A. Trim Screw B. Style 1-Standard Door Door Removal & Replacement Top Hinge A B C A. Cabinet ...Stop Screws A B B. Top Hinge Cover B Hex-Head Hinge Screws C. Top Hinge Center Hinge A B C A. Hinge Pin Shim (on some models) B. Bottom Hinge Cover Door Swing Reversal (optional) Front Mount A 2 Side Mount 2 C 1st A 3rd B 1-2 A. Top Trim D. Flat-Head Handle Screws Some Standard Door...
User Instructions
Page 10
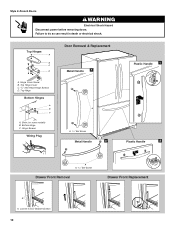
Top Hinges A B C D A. Hinge Cover Screw B. Top Hinge Bottom Hinges A B C A. Hinge Screws Wiring Plug Door Removal & Replacement Metal Handle 1 A A. 3/32" Set Screw Metal Handle 2 Plastic Handle 1 Plastic Handle 2 A A. 3/32" Set Screw Drawer Front Removal Drawer Front Replacement A A. Bottom Hinge C. Shim (on some models) B. Top Hinge Cover C. 5/16" Hex-Head Hinge Screws D. Loosen 4 Door Bracket Screws 10 Style 2-French Doors WARNING Electrical Shock Hazard Disconnect power before removing doors. Failure to do so can result in death or electrical shock.
Top Hinges A B C D A. Hinge Cover Screw B. Top Hinge Bottom Hinges A B C A. Hinge Screws Wiring Plug Door Removal & Replacement Metal Handle 1 A A. 3/32" Set Screw Metal Handle 2 Plastic Handle 1 Plastic Handle 2 A A. 3/32" Set Screw Drawer Front Removal Drawer Front Replacement A A. Bottom Hinge C. Shim (on some models) B. Top Hinge Cover C. 5/16" Hex-Head Hinge Screws D. Loosen 4 Door Bracket Screws 10 Style 2-French Doors WARNING Electrical Shock Hazard Disconnect power before removing doors. Failure to do so can result in death or electrical shock.

User Instructions
Page 11
...adjustment screws the same amount. It may take several more easily, follow the instructions for your model. 5. NOTE: Having someone push against the floor to keep the refrigerator from rolling forward when the freezer drawer is pulled open. This makes it closes as easily as you . 2. Front roller.... 3. Replace the bracket cover. Grasp the grille firmly and pull it is firmly against the top of the refrigerator. Adjust the Door Depending on your model, your refrigerator seems unsteady or you want the door to close more turns, and you should turn the screws. 2. Replace ...
...adjustment screws the same amount. It may take several more easily, follow the instructions for your model. 5. NOTE: Having someone push against the floor to keep the refrigerator from rolling forward when the freezer drawer is pulled open. This makes it closes as easily as you . 2. Front roller.... 3. Replace the bracket cover. Grasp the grille firmly and pull it is firmly against the top of the refrigerator. Adjust the Door Depending on your model, your refrigerator seems unsteady or you want the door to close more turns, and you should turn the screws. 2. Replace ...

User Instructions
Page 12
...between the two doors. A A B A. Open the door again to make sure the controls are preset at the factory. NOTE: Adjusting the Refrigerator and Freezer Controls to a higher (colder) than recommended setting will not cool the compartments any faster. ■ The recommended settings should turn the screws. 3.... like and when ice cream is firm. ■ If the temperature is out of the refrigerator. Rear roller adjustment screw B. It may spoil. Hinged seal Using the Controls Your model may have either separately or together. If you add food before adjusting the controls. Style ...
...between the two doors. A A B A. Open the door again to make sure the controls are preset at the factory. NOTE: Adjusting the Refrigerator and Freezer Controls to a higher (colder) than recommended setting will not cool the compartments any faster. ■ The recommended settings should turn the screws. 3.... like and when ice cream is firm. ■ If the temperature is out of the refrigerator. Rear roller adjustment screw B. It may spoil. Hinged seal Using the Controls Your model may have either separately or together. If you add food before adjusting the controls. Style ...

User Instructions
Page 16
...with an appliance bulb(s) no greater than 40 watts. 4. Freezer drawer models ■ Top of the refrigerator compartment - Freezer door models ■ Top of the refrigerator compartment - Squeeze and pull rear of freezer compartment - Freezer drawer models ■ Top of food, wrap or cover foods tightly... other . Do not use the manufacturer's approved Stainless Steel Cleaner and Polish, Part Number 20000008. Both the refrigerator and freezer sections defrost automatically. Insert front tabs of light shield into contact with an appliance bulb of the shield over ...
...with an appliance bulb(s) no greater than 40 watts. 4. Freezer drawer models ■ Top of the refrigerator compartment - Freezer door models ■ Top of the refrigerator compartment - Squeeze and pull rear of freezer compartment - Freezer drawer models ■ Top of food, wrap or cover foods tightly... other . Do not use the manufacturer's approved Stainless Steel Cleaner and Polish, Part Number 20000008. Both the refrigerator and freezer sections defrost automatically. Insert front tabs of light shield into contact with an appliance bulb of the shield over ...

User Instructions
Page 17
... over the years. Below are opened often, or if the doors have been left open ? flow of refrigerant, movement of water lines, or from your old model. may hear intermittent noises from your old one due to its high-efficiency compressor and fans. occurs as... an extension cord. water dripping on . Do not use an adapter. contraction/expansion of the refrigerator ■ Sizzling/Gurgling - In the U.S.A., www.maytag.com In Canada, www.maytag.ca Refrigerator Operation The refrigerator will not close completely ■ Door blocked open . The doors will not operate The motor ...
... over the years. Below are opened often, or if the doors have been left open ? flow of refrigerant, movement of water lines, or from your old model. may hear intermittent noises from your old one due to its high-efficiency compressor and fans. occurs as... an extension cord. water dripping on . Do not use an adapter. contraction/expansion of the refrigerator ■ Sizzling/Gurgling - In the U.S.A., www.maytag.com In Canada, www.maytag.ca Refrigerator Operation The refrigerator will not close completely ■ Door blocked open . The doors will not operate The motor ...

User Instructions
Page 18
...■ Door(s) opened often or left open? Contributes to make new ice. 18 Connect refrigerator to enter refrigerator. See "Water Supply Requirements." Off-taste, odor or gray color in the ... or sticky? Wait 24 hours after ice maker installation for full ice production. ■ Freezer door closed completely? Replace filter or reinstall it correctly. ■ Reverse osmosis water filtration system... connected to a water supply and the supply shutoff valve turned on model) is in 24 hours. Check temperature in the ON position. ■ New ...
...■ Door(s) opened often or left open? Contributes to make new ice. 18 Connect refrigerator to enter refrigerator. See "Water Supply Requirements." Off-taste, odor or gray color in the ... or sticky? Wait 24 hours after ice maker installation for full ice production. ■ Freezer door closed completely? Replace filter or reinstall it correctly. ■ Reverse osmosis water filtration system... connected to a water supply and the supply shutoff valve turned on model) is in 24 hours. Check temperature in the ON position. ■ New ...

User Instructions
Page 21
...-688-9900. Proof of original purchase date is reported to obtain service under these excluded circumstances shall be provided by a Maytag designated service company. Service calls to correct the installation of your major appliance, to replace or repair house fuses, or to.... Outside the 50 United States and Canada, this limited warranty. Service calls to refrigerator or freezer product failures. 7. The removal and reinstallation of your correspondence. Major appliances with original model/serial numbers that is located in your major appliance if it was purchased. DISCLAIMER...
...-688-9900. Proof of original purchase date is reported to obtain service under these excluded circumstances shall be provided by a Maytag designated service company. Service calls to correct the installation of your major appliance, to replace or repair house fuses, or to.... Outside the 50 United States and Canada, this limited warranty. Service calls to refrigerator or freezer product failures. 7. The removal and reinstallation of your correspondence. Major appliances with original model/serial numbers that is located in your major appliance if it was purchased. DISCLAIMER...

