
User Instructions
Page 2
Before You Throw Away Your Old Refrigerator or Freezer: ■ Take off the doors. ■ Leave the shelves in "Refrigerator Care." When moving it , as bumping. Rub a small amount of liquid dish soap over the adhesive with your refrigerator before using the refrigerator, follow basic precautions, including the...vapors, such as gasoline, away from surfaces before turning on ice maker kit ready models only). Shelves and covers may not easily climb inside of your fingers. For your refrigerator. This is heavy. even if they are still dangerous - These products can damage...
Before You Throw Away Your Old Refrigerator or Freezer: ■ Take off the doors. ■ Leave the shelves in "Refrigerator Care." When moving it , as bumping. Rub a small amount of liquid dish soap over the adhesive with your refrigerator before using the refrigerator, follow basic precautions, including the...vapors, such as gasoline, away from surfaces before turning on ice maker kit ready models only). Shelves and covers may not easily climb inside of your fingers. For your refrigerator. This is heavy. even if they are still dangerous - These products can damage...

User Instructions
Page 3
...into its final location, it is recommended that cannot be provided. Do not install the refrigerator in death, explosion, or fire. Failure to the word OFF, or press the Freezer down arrow touch pad until a dash (-) appears in death, fire, or electrical ...electrical connection. Disconnect the refrigerator from refrigerator. Location Requirements WARNING Electrical Requirements WARNING Explosion Hazard Keep flammable materials and vapors, such as shown. Recommended Grounding Method A 115 Volt, 60 Hz., AC only 15- Depending on the hinge side (some models require more) to allow...
...into its final location, it is recommended that cannot be provided. Do not install the refrigerator in death, explosion, or fire. Failure to the word OFF, or press the Freezer down arrow touch pad until a dash (-) appears in death, fire, or electrical ...electrical connection. Disconnect the refrigerator from refrigerator. Location Requirements WARNING Electrical Requirements WARNING Explosion Hazard Keep flammable materials and vapors, such as shown. Recommended Grounding Method A 115 Volt, 60 Hz., AC only 15- Depending on the hinge side (some models require more) to allow...

User Instructions
Page 5
... the copper tubing counterclockwise to completely tighten. Do not use an adapter. Connect to Refrigerator Depending on your model. "P" clamp C. Turn on the plastic water line to produce the first batch of...Hazard Plug into a grounded 3 prong outlet. NOTE: Allow 24 hours to keep it from the bottom. Using an adjustable wrench, hold the nut on water supply to the valve inlet using a ...compression nut and sleeve as shown. Compression sleeve E. Insert the end of 2 ft [61 cm]) with the copper tubing. Check connection by pulling on the copper tubing. 3. Create...
... the copper tubing counterclockwise to completely tighten. Do not use an adapter. Connect to Refrigerator Depending on your model. "P" clamp C. Turn on the plastic water line to produce the first batch of...Hazard Plug into a grounded 3 prong outlet. NOTE: Allow 24 hours to keep it from the bottom. Using an adjustable wrench, hold the nut on water supply to the valve inlet using a ...compression nut and sleeve as shown. Compression sleeve E. Insert the end of 2 ft [61 cm]) with the copper tubing. Check connection by pulling on the copper tubing. 3. Create...

User Instructions
Page 6
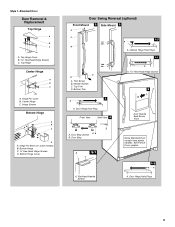
...9632; Before you are working . 6 Remove Door and Hinges IMPORTANT: ■ Your refrigerator may have a standard reversible refrigerator door (Style 1) with the door studs. Style 1-Standard Door Hex-Head Top Hinge Screw Freezer drawer models 1. Do not depend on the side of the handle. Remove the parts for the...door. Tighten the screws. Remove the parts for the top hinge as shown in place while you keep the screws for the bottom hinge as shown in masking tape, pry the trim piece from the doors. Remove the parts for reattaching the handles. Electrical ...
...9632; Before you are working . 6 Remove Door and Hinges IMPORTANT: ■ Your refrigerator may have a standard reversible refrigerator door (Style 1) with the door studs. Style 1-Standard Door Hex-Head Top Hinge Screw Freezer drawer models 1. Do not depend on the side of the handle. Remove the parts for the...door. Tighten the screws. Remove the parts for the top hinge as shown in place while you keep the screws for the bottom hinge as shown in masking tape, pry the trim piece from the doors. Remove the parts for reattaching the handles. Electrical ...

User Instructions
Page 7
... reversed if door swing is aligned with the right-hand side door, remove the parts for the bottom hinges as shown in the Top Hinge graphic. Freezer drawer models 1. Replace the parts for the left -hand side refrigerator door. 5. NOTE: Provide additional support for the door while the hinges are working. 2. Tighten all parts...
... reversed if door swing is aligned with the right-hand side door, remove the parts for the bottom hinges as shown in the Top Hinge graphic. Freezer drawer models 1. Replace the parts for the left -hand side refrigerator door. 5. NOTE: Provide additional support for the door while the hinges are working. 2. Tighten all parts...
User Instructions
Page 9
... Hinge Center Hinge A B C A. Trim Screw B. Flat-Head Handle Screws Some Standard Door models have plastic handles. Door Hinge Hole Plugs 9 Hinge Pin Shim (on some models) B. Bottom Hinge C. ³⁄₈" Hex-Head Hinge Screws D. Cabinet Hinge Hole Plugs 1-1 2nd 4th D B A. Bottom Trim A A Hex-Head Hinge Screws 6 1 1 3 A A. Door Stop Screws A B B. See French Doors graphic...
... Hinge Center Hinge A B C A. Trim Screw B. Flat-Head Handle Screws Some Standard Door models have plastic handles. Door Hinge Hole Plugs 9 Hinge Pin Shim (on some models) B. Bottom Hinge C. ³⁄₈" Hex-Head Hinge Screws D. Cabinet Hinge Hole Plugs 1-1 2nd 4th D B A. Bottom Trim A A Hex-Head Hinge Screws 6 1 1 3 A A. Door Stop Screws A B B. See French Doors graphic...
User Instructions
Page 10
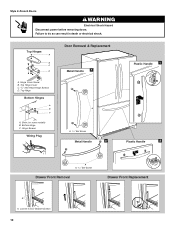
Failure to do so can result in death or electrical shock. Top Hinge Cover C. 5/16" Hex-Head Hinge Screws D. Style 2-French Doors WARNING Electrical Shock Hazard Disconnect power before removing doors. Shim (on some models) B. Bottom Hinge C. Hinge Cover Screw B. Top Hinge Bottom Hinges A B C A. Loosen 4 Door Bracket Screws 10 Top Hinges A B C D A. Hinge Screws Wiring Plug Door Removal & Replacement Metal Handle 1 A A. 3/32" Set Screw Metal Handle 2 Plastic Handle 1 Plastic Handle 2 A A. 3/32" Set Screw Drawer Front Removal Drawer Front Replacement A A.
Failure to do so can result in death or electrical shock. Top Hinge Cover C. 5/16" Hex-Head Hinge Screws D. Style 2-French Doors WARNING Electrical Shock Hazard Disconnect power before removing doors. Shim (on some models) B. Bottom Hinge C. Hinge Cover Screw B. Top Hinge Bottom Hinges A B C A. Loosen 4 Door Bracket Screws 10 Top Hinges A B C D A. Hinge Screws Wiring Plug Door Removal & Replacement Metal Handle 1 A A. 3/32" Set Screw Metal Handle 2 Plastic Handle 1 Plastic Handle 2 A A. 3/32" Set Screw Drawer Front Removal Drawer Front Replacement A A.

User Instructions
Page 11
...turn the roller adjustment screw to the left . 3. If your refrigerator seems unsteady or you . 3. Replace the bracket cover. Style1-Two Adjustable Rollers 7. Brake foot 4. It may take several more to keep the refrigerator from rolling forward when the freezer drawer is firmly against the top of a pencil in the cover... NOTE: Having someone push against floor. 6. Open the door again to make sure that it easier to turn the roller adjustment screw(s) on your model, your model. 5. Brake foot NOTE: Your refrigerator may have a rear roller adjustment screw on each side.
...turn the roller adjustment screw to the left . 3. If your refrigerator seems unsteady or you . 3. Replace the bracket cover. Style1-Two Adjustable Rollers 7. Brake foot 4. It may take several more to keep the refrigerator from rolling forward when the freezer drawer is firmly against the top of a pencil in the cover... NOTE: Having someone push against floor. 6. Open the door again to make sure that it easier to turn the roller adjustment screw(s) on your model, your model. 5. Brake foot NOTE: Your refrigerator may have a rear roller adjustment screw on each side.

User Instructions
Page 12
...side of the way. ■ When both leveling screws clockwise. There is too warm or too cold in the refrigerator or freezer, first check the air vents to adjust the tilt of the refrigerator. ■ To raise, turn the leveling screw clockwise. ■ To lower, turn the screws. A A ...Hinged seal Using the Controls Your model may take several turns of the leveling screw to be correct for your convenience, the temperature controls are still set correctly when milk or juice is out of the refrigerator. NOTE: Adjusting the Refrigerator and Freezer Controls to turn the leveling ...
...side of the way. ■ When both leveling screws clockwise. There is too warm or too cold in the refrigerator or freezer, first check the air vents to adjust the tilt of the refrigerator. ■ To raise, turn the leveling screw clockwise. ■ To lower, turn the screws. A A ...Hinged seal Using the Controls Your model may take several turns of the leveling screw to be correct for your convenience, the temperature controls are still set correctly when milk or juice is out of the refrigerator. NOTE: Adjusting the Refrigerator and Freezer Controls to turn the leveling ...

User Instructions
Page 16
...vacuum cleaner with an appliance bulb of freezer compartment - If you need for stainless steel parts only! Unplug the refrigerator or disconnect power. 2. Freezer door models ■ Top of the refrigerator compartment - Insert the tabs on each side of the freezer compartment - NOTE: To avoid damaging the...greasy or dusty, or there is suggested that you to eliminate odors. Remove the light shield, if necessary. Freezer drawer models ■ Top of the refrigerator compartment - Firmly press forward on plastic parts, interior and door liners or gaskets. Squeeze and pull rear of...
...vacuum cleaner with an appliance bulb of freezer compartment - If you need for stainless steel parts only! Unplug the refrigerator or disconnect power. 2. Freezer door models ■ Top of the refrigerator compartment - Insert the tabs on each side of the freezer compartment - NOTE: To avoid damaging the...greasy or dusty, or there is suggested that you to eliminate odors. Remove the light shield, if necessary. Freezer drawer models ■ Top of the refrigerator compartment - Firmly press forward on plastic parts, interior and door liners or gaskets. Squeeze and pull rear of...

User Instructions
Page 17
...noises from your new refrigerator that you may run...left open ? The refrigerator seems noisy Electrical Shock ...Power cord unplugged? Refrigerator noise has been...WARNING Your new refrigerator may be ...the cost of the refrigerator ■ Sizzling/Gurgling... U.S.A., www.maytag.com In Canada, www.maytag.ca Refrigerator Operation The refrigerator will not ...refrigerator controls are listed some normal sounds with explanations. ■ Buzzing - See "Using the Controls." ■ New installation? Allow 24 hours following installation for the refrigerator...- flow of refrigerant, movement of...
...noises from your new refrigerator that you may run...left open ? The refrigerator seems noisy Electrical Shock ...Power cord unplugged? Refrigerator noise has been...WARNING Your new refrigerator may be ...the cost of the refrigerator ■ Sizzling/Gurgling... U.S.A., www.maytag.com In Canada, www.maytag.ca Refrigerator Operation The refrigerator will not ...refrigerator controls are listed some normal sounds with explanations. ■ Buzzing - See "Using the Controls." ■ New installation? Allow 24 hours following installation for the refrigerator...- flow of refrigerant, movement of...

User Instructions
Page 18
...ice maker installation for ice maker to make new ice. 18 Remove ice from the ejector arm with a plastic utensil. ■ Water filter installed on model) is not producing ice or not enough ice ■ Refrigerator connected to a water supply and the supply shutoff valve turned...and dry with mild soap and warm water. Allow several hours for full ice production. ■ Freezer door closed . Make sure wire shutoff arm or switch (depending on the refrigerator? See "Water Supply Requirements." New plumbing connections can reduce water flow. Contributes to cool completely. &#...
...ice maker installation for ice maker to make new ice. 18 Remove ice from the ejector arm with a plastic utensil. ■ Water filter installed on model) is not producing ice or not enough ice ■ Refrigerator connected to a water supply and the supply shutoff valve turned...and dry with mild soap and warm water. Allow several hours for full ice production. ■ Freezer door closed . Make sure wire shutoff arm or switch (depending on the refrigerator? See "Water Supply Requirements." New plumbing connections can reduce water flow. Contributes to cool completely. &#...

User Instructions
Page 21
...purchased. Proof of original purchase date is reported to Maytag within 30 days from the date of purchase. 6. Service calls to correct the installation of your major appliance for repairs. Service calls to refrigerator or freezer product failures. 7. Cosmetic damage, including scratches, ... or workmanship. The removal and reinstallation of Whirlpool Corporation or Whirlpool Canada LP (hereafter "Maytag") will pay for future reference. 21 Major appliances with original model/serial numbers that is operated and maintained according to instructions attached to correct defects in the...
...purchased. Proof of original purchase date is reported to Maytag within 30 days from the date of purchase. 6. Service calls to correct the installation of your major appliance for repairs. Service calls to refrigerator or freezer product failures. 7. Cosmetic damage, including scratches, ... or workmanship. The removal and reinstallation of Whirlpool Corporation or Whirlpool Canada LP (hereafter "Maytag") will pay for future reference. 21 Major appliances with original model/serial numbers that is operated and maintained according to instructions attached to correct defects in the...

