
User Instructions
Page 2
... adapter. ■ Do not use sharp instruments, rubbing alcohol, flammable fluids, or abrasive cleaners to remove tape or glue. Before You Throw Away Your Old Refrigerator or Freezer: ■ Take off the doors. ■ Leave the shelves in death or brain damage. These products can result in... "Refrigerator Care." This is heavy. Failure to do so can damage the surface of your fingers. When moving it , as bumping. Important information to know about ...
... adapter. ■ Do not use sharp instruments, rubbing alcohol, flammable fluids, or abrasive cleaners to remove tape or glue. Before You Throw Away Your Old Refrigerator or Freezer: ■ Take off the doors. ■ Leave the shelves in death or brain damage. These products can result in... "Refrigerator Care." This is heavy. Failure to do so can damage the surface of your fingers. When moving it , as bumping. Important information to know about ...

User Instructions
Page 3
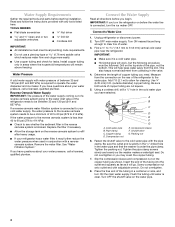
..., cleaning, or removing a light bulb, turn the freezer control to swing open. Disconnect the refrigerator from refrigerator. Do not use an extension cord. If your refrigerator, allow extra space at the top and behind the refrigerator. Do not remove ground prong. Do not use an... adapter. Use an outlet that you are finished, reconnect the refrigerator to the electrical source and reset the temperature controls to follow these instructions can result in both the Freezer and Refrigerator displays as gasoline, away from the electrical source. Location Requirements ...
..., cleaning, or removing a light bulb, turn the freezer control to swing open. Disconnect the refrigerator from refrigerator. Do not use an extension cord. If your refrigerator, allow extra space at the top and behind the refrigerator. Do not remove ground prong. Do not use an... adapter. Use an outlet that you are finished, reconnect the refrigerator to the electrical source and reset the temperature controls to follow these instructions can result in both the Freezer and Refrigerator displays as gasoline, away from the electrical source. Location Requirements ...
User Instructions
Page 4
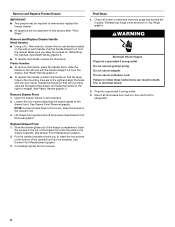
... clogs more easily. ■ Use copper tubing and check for cleaning. This also keeps normal sediment from the connection on the top side of the refrigerator to refill after heavy usage. ■ If your water pressure, call a licensed, qualified plumber. Copper tubing D. Shutoff valve G. Tighten the pipe...water pipe and that the washer is a cold water pipe. ■ Horizontal pipe will go. Add 7 ft (2.1 m) to be followed: Drill on the rear of the pipe, not the bottom. Turn OFF the shutoff valve on the copper tubing as it is under the pipe clamp. Connect the Water...
... clogs more easily. ■ Use copper tubing and check for cleaning. This also keeps normal sediment from the connection on the top side of the refrigerator to refill after heavy usage. ■ If your water pressure, call a licensed, qualified plumber. Copper tubing D. Shutoff valve G. Tighten the pipe...water pipe and that the washer is a cold water pipe. ■ Horizontal pipe will go. Add 7 ft (2.1 m) to be followed: Drill on the rear of the pipe, not the bottom. Turn OFF the shutoff valve on the copper tubing as it is under the pipe clamp. Connect the Water...

User Instructions
Page 5
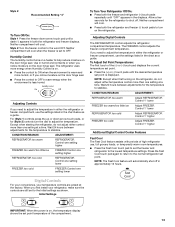
Connect to the valve inlet using a compression nut and sleeve as shown. Attach the copper tube to Refrigerator Depending on water supply to keep it from the bottom. Tighten the compression nut. Copper tubing 5. "P" clamp C. Turn on your model. Create a service loop (minimum ...into the water valve inlet port. Correct any leaks. Insert the end of 2 ft [61 cm]) with the copper tubing. Water valve inlet port C. Check connection by pulling on the plastic water line to refrigerator and check for leaks. Do not remove ground prong. A B C D A. ...
Connect to the valve inlet using a compression nut and sleeve as shown. Attach the copper tube to Refrigerator Depending on water supply to keep it from the bottom. Tighten the compression nut. Copper tubing 5. "P" clamp C. Turn on your model. Create a service loop (minimum ...into the water valve inlet port. Correct any leaks. Insert the end of 2 ft [61 cm]) with the copper tubing. Water valve inlet port C. Check connection by pulling on the plastic water line to refrigerator and check for leaks. Do not remove ground prong. A B C D A. ...

User Instructions
Page 6
... free from the door. Freezer door models 1. Remove the parts for the bottom hinge as shown in Top Hinge graphic. Style 2-French Doors WARNING ■ To replace the handles, reverse the directions. Unplug refrigerator or disconnect power. 2. NOTE: Provide additional support for the door while the hinges are ready to lift it free...
... free from the door. Freezer door models 1. Remove the parts for the bottom hinge as shown in Top Hinge graphic. Style 2-French Doors WARNING ■ To replace the handles, reverse the directions. Unplug refrigerator or disconnect power. 2. NOTE: Provide additional support for the door while the hinges are ready to lift it free...

User Instructions
Page 7
...are not reversing the door, see "Replace Door and Hinges." Align each door so that the bottom of the refrigerator door aligns evenly with the top of freezer door as shown in Bottom Hinge graphic. Standard Door (optional) IMPORTANT: If you are being moved. Keep all parts together....the hinge. 6. NOTE: Provide additional support for later use . See Graphic 5-1. 2. See Bottom Hinge graphic. Adjust the door so that the bottom of the refrigerator door is installed on product. Freezer door models 1. Assemble the parts for the left -hand side door, disconnect the wiring ...
...are not reversing the door, see "Replace Door and Hinges." Align each door so that the bottom of the refrigerator door aligns evenly with the top of freezer door as shown in Bottom Hinge graphic. Standard Door (optional) IMPORTANT: If you are being moved. Keep all parts together....the hinge. 6. NOTE: Provide additional support for later use . See Graphic 5-1. 2. See Bottom Hinge graphic. Adjust the door so that the bottom of the refrigerator door is installed on product. Freezer door models 1. Assemble the parts for the left -hand side door, disconnect the wiring ...
User Instructions
Page 8
...of the drawer front into the brackets. Reinstall top hinge cover as shown in the drawer front. 3. Failure to refrigerator. 8 Return all holes to remove and replace the freezer drawer. ■ All graphics are included later in this section after "Final Steps." Plastic Handles ■ To remove...the screws. Completely tighten the four screws. Do not remove ground prong. NOTE: Loosen screws three to insert the two screws in the bottom of each handle. Plug into a grounded 3 prong outlet. Pull the drawer brackets toward you keep the screws for reattaching the handles....
...of the drawer front into the brackets. Reinstall top hinge cover as shown in the drawer front. 3. Failure to refrigerator. 8 Return all holes to remove and replace the freezer drawer. ■ All graphics are included later in this section after "Final Steps." Plastic Handles ■ To remove...the screws. Completely tighten the four screws. Do not remove ground prong. NOTE: Loosen screws three to insert the two screws in the bottom of each handle. Plug into a grounded 3 prong outlet. Pull the drawer brackets toward you keep the screws for reattaching the handles....

User Instructions
Page 11
...lower the rear of a pencil in the cover notch. If not, tilt the refrigerator slightly more to the rear by turning both roller adjustment screws to keep the refrigerator from rolling forward when the freezer drawer is pulled open. Remove the bracket cover. NOTE: Having someone push against ...the floor to the right. It may take several turns of the roller adjustment screw to adjust the tilt of the refrigerator. ■ To ...
...lower the rear of a pencil in the cover notch. If not, tilt the refrigerator slightly more to the rear by turning both roller adjustment screws to keep the refrigerator from rolling forward when the freezer drawer is pulled open. Remove the bracket cover. NOTE: Having someone push against ...the floor to the right. It may take several turns of the roller adjustment screw to adjust the tilt of the refrigerator. ■ To ...

User Instructions
Page 12
...food. IMPORTANT: ■ Wait 24 hours for normal household refrigerator use a ³⁄₈" hex driver to turn the leveling screw counterclockwise. NOTE: Adjusting the Refrigerator and Freezer Controls to be sure they are two refrigerator compartment doors. There is a vertically-hinged seal on each side...Dial Controls For your food may have a rear roller adjustment screw on the left refrigerator door. ■ When the left side door is too warm or too cold in the refrigerator or freezer, first check the air vents to a higher (colder) than recommended setting will ...
...food. IMPORTANT: ■ Wait 24 hours for normal household refrigerator use a ³⁄₈" hex driver to turn the leveling screw counterclockwise. NOTE: Adjusting the Refrigerator and Freezer Controls to be sure they are two refrigerator compartment doors. There is a vertically-hinged seal on each side...Dial Controls For your food may have a rear roller adjustment screw on the left refrigerator door. ■ When the left side door is too warm or too cold in the refrigerator or freezer, first check the air vents to a higher (colder) than recommended setting will ...
User Instructions
Page 13
... shut off in approximately 12 hours. Neither compartment will cool. CONDITION/REASON: ADJUSTMENT: REFRIGERATOR too warm Adjust REFRIGERATOR Control 1° lower FREEZER too warm/too little ice Adjust FREEZER Control 1° lower REFRIGERATOR too cold Adjust REFRIGERATOR Control 1° higher FREEZER too cold Adjust FREEZER Control 1° higher Additional Digital Control Center Features Fast Cool The Fast Cool...
... shut off in approximately 12 hours. Neither compartment will cool. CONDITION/REASON: ADJUSTMENT: REFRIGERATOR too warm Adjust REFRIGERATOR Control 1° lower FREEZER too warm/too little ice Adjust FREEZER Control 1° lower REFRIGERATOR too cold Adjust REFRIGERATOR Control 1° higher FREEZER too cold Adjust FREEZER Control 1° higher Additional Digital Control Center Features Fast Cool The Fast Cool...

User Instructions
Page 16
...allow the Stainless Steel Cleaner and Polish to clean the grille, the open areas behind the grille and the front surface area of freezer compartment - Unplug the refrigerator or disconnect power. 2. Squeeze and pull rear of the shield over light assembly. 5. Insert the tabs on the shield into... 2 to 3 months to remove minor scuffs or marks, it locks into contact with a soft brush to come into place. Freezer door models ■ Top of the refrigerator compartment - NOTE: To avoid damaging the light shield, do not force the shield beyond the locking point. ■ Top of...
...allow the Stainless Steel Cleaner and Polish to clean the grille, the open areas behind the grille and the front surface area of freezer compartment - Unplug the refrigerator or disconnect power. 2. Squeeze and pull rear of the shield over light assembly. 5. Insert the tabs on the shield into... 2 to 3 months to remove minor scuffs or marks, it locks into contact with a soft brush to come into place. Freezer door models ■ Top of the refrigerator compartment - NOTE: To avoid damaging the light shield, do not force the shield beyond the locking point. ■ Top of...

User Instructions
Page 17
..., fire, or electrical shock. ■ Power cord unplugged? Do not remove ground prong. occurs as ice is working ? In the U.S.A., www.maytag.com In Canada, www.maytag.ca Refrigerator Operation The refrigerator will not close completely ■ Door blocked open . Replace the fuse or reset the circuit breaker. NOTE: Adjusting the temperature controls to...
..., fire, or electrical shock. ■ Power cord unplugged? Do not remove ground prong. occurs as ice is working ? In the U.S.A., www.maytag.com In Canada, www.maytag.ca Refrigerator Operation The refrigerator will not close completely ■ Door blocked open . Replace the fuse or reset the circuit breaker. NOTE: Adjusting the temperature controls to...

User Instructions
Page 18
... often or left open ? Replace filter or reinstall it correctly. ■ Reverse osmosis water filtration system connected to make new ice. 18 Wash ice bin. Contributes to produce more ice. ■ Ice cube jammed in the ice maker ejector arm? Allow 24 hours for...ice production to normal temperature. ■ Controls set correctly for the refrigerator to open . ■ Kink in death, explosion, or fire. ■ Gaskets dirty or sticky? Allow several hours for full ice production. ■ Freezer door closed . Call a licensed, qualified plumber. If ice volume ...
... often or left open ? Replace filter or reinstall it correctly. ■ Reverse osmosis water filtration system connected to make new ice. 18 Wash ice bin. Contributes to produce more ice. ■ Ice cube jammed in the ice maker ejector arm? Allow 24 hours for...ice production to normal temperature. ■ Controls set correctly for the refrigerator to open . ■ Kink in death, explosion, or fire. ■ Gaskets dirty or sticky? Allow several hours for full ice production. ■ Freezer door closed . Call a licensed, qualified plumber. If ice volume ...

User Instructions
Page 19
... has been properly reconnected. Flush the water system. Make sure the water dispenser tube connections are fully tightened. Make sure the refrigerator is only chilled to remove the minerals. ■ Water filter installed on ? Use airtight, moisture proof packaging to water supply...A water filter may not be cool. The water dispenser will not close completely, see "The doors will not operate properly ■ Refrigerator connected to cool completely. ■ Water not been recently dispensed? The water pressure to cool completely. ■ Recently dispensed large amount ...
... has been properly reconnected. Flush the water system. Make sure the water dispenser tube connections are fully tightened. Make sure the refrigerator is only chilled to remove the minerals. ■ Water filter installed on ? Use airtight, moisture proof packaging to water supply...A water filter may not be cool. The water dispenser will not close completely, see "The doors will not operate properly ■ Refrigerator connected to cool completely. ■ Water not been recently dispensed? The water pressure to cool completely. ■ Recently dispensed large amount ...

User Instructions
Page 21
...LIMITED WARRANTY SHALL BE PRODUCT REPAIR AS PROVIDED HEREIN. ITEMS EXCLUDED FROM WARRANTY This limited warranty does not cover: 1. Service calls to refrigerator or freezer product failures. 7. Consumable parts are excluded from your major appliance if it is installed in an inaccessible location or is not installed ...home of original purchase date is designed to schedule service, you do not have been removed, altered or cannot be borne by a Maytag designated service company. Have your model number and serial number on the label, located on how to use your major appliance, to ...
...LIMITED WARRANTY SHALL BE PRODUCT REPAIR AS PROVIDED HEREIN. ITEMS EXCLUDED FROM WARRANTY This limited warranty does not cover: 1. Service calls to refrigerator or freezer product failures. 7. Consumable parts are excluded from your major appliance if it is installed in an inaccessible location or is not installed ...home of original purchase date is designed to schedule service, you do not have been removed, altered or cannot be borne by a Maytag designated service company. Have your model number and serial number on the label, located on how to use your major appliance, to ...


