
User Instructions
Page 2
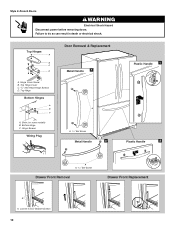
...; Disconnect power before servicing. ■ Replace all parts and panels before operating. ■ Remove doors from your refrigerator before turning on ice maker kit ready models only). Use special care when removing them to do so can damage the surface of your fingers. If you remove... fire, electric shock, or injury to persons when using it. Before You Throw Away Your Old Refrigerator or Freezer: ■ Take off the doors. ■ Leave the shelves in "Refrigerator Care." See the cleaning instructions in place so that children may break if exposed to protect the ...
...; Disconnect power before servicing. ■ Replace all parts and panels before operating. ■ Remove doors from your refrigerator before turning on ice maker kit ready models only). Use special care when removing them to do so can damage the surface of your fingers. If you remove... fire, electric shock, or injury to persons when using it. Before You Throw Away Your Old Refrigerator or Freezer: ■ Take off the doors. ■ Leave the shelves in "Refrigerator Care." See the cleaning instructions in place so that children may break if exposed to protect the ...

User Instructions
Page 3
...have the proper electrical connection. NOTE: Before performing any type of installation, cleaning, or removing a light bulb, turn the freezer control to make sure you move your refrigerator be turned off by a switch. See "Using the Controls." 2¹⁄₂" (6.3 cm) 3 NOTE: It is...required. Do not install the refrigerator in death, fire, or electrical shock. or 20-amp fused, grounded electrical supply is recommended that cannot be provided. If your model, turn the refrigerator to allow extra space at the top and behind the refrigerator. Do not remove ground ...
...have the proper electrical connection. NOTE: Before performing any type of installation, cleaning, or removing a light bulb, turn the freezer control to make sure you move your refrigerator be turned off by a switch. See "Using the Controls." 2¹⁄₂" (6.3 cm) 3 NOTE: It is...required. Do not install the refrigerator in death, fire, or electrical shock. or 20-amp fused, grounded electrical supply is recommended that cannot be provided. If your model, turn the refrigerator to allow extra space at the top and behind the refrigerator. Do not remove ground ...

User Instructions
Page 5
... the connection instructions for your model, the water line may come down from the top or up from moving. Do not overtighten. Confirm copper tubing is secure by pulling on the plastic water line to keep it from the bottom. Secure copper tubing to refrigerator cabinet with a "P" clamp....diameter of ice produced. Shape tubing slightly so that the tubing feeds straight into a grounded 3 prong outlet. Discard the first three batches of 2 ft [61 cm]) with the copper tubing. Plastic water tubing C. Sleeve D. Plastic water line B. Correct any leaks. Plug into the port to follow ...
... the connection instructions for your model, the water line may come down from the top or up from moving. Do not overtighten. Confirm copper tubing is secure by pulling on the plastic water line to keep it from the bottom. Secure copper tubing to refrigerator cabinet with a "P" clamp....diameter of ice produced. Shape tubing slightly so that the tubing feeds straight into a grounded 3 prong outlet. Discard the first three batches of 2 ft [61 cm]) with the copper tubing. Plastic water tubing C. Sleeve D. Plastic water line B. Correct any leaks. Plug into the port to follow ...

User Instructions
Page 6
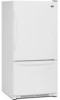
.... 2. See Side Mount graphic 2. Then, remove the screws attaching the handle to engage. Freezer door models 1. See Front Mount graphic 2. Remove Door and Hinges IMPORTANT: ■ Your refrigerator may have a standard reversible refrigerator door (Style 1) with the holes in Bottom Hinge graphic. Refrigerator Door(s) and Drawer TOOLS NEEDED hex-head socket wrench, a #2 Phillips screwdriver, and a flat...
.... 2. See Side Mount graphic 2. Then, remove the screws attaching the handle to engage. Freezer door models 1. See Front Mount graphic 2. Remove Door and Hinges IMPORTANT: ■ Your refrigerator may have a standard reversible refrigerator door (Style 1) with the holes in Bottom Hinge graphic. Refrigerator Door(s) and Drawer TOOLS NEEDED hex-head socket wrench, a #2 Phillips screwdriver, and a flat...

User Instructions
Page 7
.... 2. Replace the top hinge covers. 7 Remove the shim (on top of the refrigerator door. Move to hold the door in Top Hinge graphic. Remove door stop . Freezer drawer models 1. Assemble the parts for the bottom hinge as shown. Do not tighten the screws completely. 4. Style 2-French Doors 1. .... See Graphic 4. 4. Replace the parts for the top hinge as shown in the Top Hinge graphic. Freezer door models 1. Adjust the doors so that the bottom of the refrigerator door is reversed. Replace the parts for the center hinge as shown in the Center Hinge graphic, and ...
.... 2. Replace the top hinge covers. 7 Remove the shim (on top of the refrigerator door. Move to hold the door in Top Hinge graphic. Remove door stop . Freezer drawer models 1. Assemble the parts for the bottom hinge as shown. Do not tighten the screws completely. 4. Style 2-French Doors 1. .... See Graphic 4. 4. Replace the parts for the top hinge as shown in the Top Hinge graphic. Freezer door models 1. Adjust the doors so that the bottom of the refrigerator door is reversed. Replace the parts for the center hinge as shown in the Center Hinge graphic, and ...
User Instructions
Page 9
... A A Hex-Head Hinge Screws 6 1 1 3 A A. Door Stop A 5-1 A. See French Doors graphic. 5-2 A A. Door Stop Screws A B B. Hinge Screws Bottom Hinge A B C D A. Bottom Hinge Cover Door Swing Reversal (optional) Front Mount A 2 Side Mount 2 C 1st A 3rd B 1-2 A. Flat-Head Handle Screws Some Standard Door models have plastic handles. Top Hinge Center Hinge A B C A. Top Hinge Cover B Hex-Head Hinge Screws C. Top...
... A A Hex-Head Hinge Screws 6 1 1 3 A A. Door Stop A 5-1 A. See French Doors graphic. 5-2 A A. Door Stop Screws A B B. Hinge Screws Bottom Hinge A B C D A. Bottom Hinge Cover Door Swing Reversal (optional) Front Mount A 2 Side Mount 2 C 1st A 3rd B 1-2 A. Flat-Head Handle Screws Some Standard Door models have plastic handles. Top Hinge Center Hinge A B C A. Top Hinge Cover B Hex-Head Hinge Screws C. Top...
User Instructions
Page 10
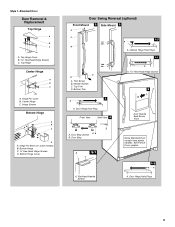
Top Hinge Bottom Hinges A B C A. Bottom Hinge C. Loosen 4 Door Bracket Screws 10 Top Hinge Cover C. 5/16" Hex-Head Hinge Screws D. Failure to do so can result in death or electrical shock. Hinge Screws Wiring Plug Door Removal & Replacement Metal Handle 1 A A. 3/32" Set Screw Metal Handle 2 Plastic Handle 1 Plastic Handle 2 A A. 3/32" Set Screw Drawer Front Removal Drawer Front Replacement A A. Top Hinges A B C D A. Hinge Cover Screw B. Shim (on some models) B. Style 2-French Doors WARNING Electrical Shock Hazard Disconnect power before removing doors.
Top Hinge Bottom Hinges A B C A. Bottom Hinge C. Loosen 4 Door Bracket Screws 10 Top Hinge Cover C. 5/16" Hex-Head Hinge Screws D. Failure to do so can result in death or electrical shock. Hinge Screws Wiring Plug Door Removal & Replacement Metal Handle 1 A A. 3/32" Set Screw Metal Handle 2 Plastic Handle 1 Plastic Handle 2 A A. 3/32" Set Screw Drawer Front Removal Drawer Front Replacement A A. Top Hinges A B C D A. Hinge Cover Screw B. Shim (on some models) B. Style 2-French Doors WARNING Electrical Shock Hazard Disconnect power before removing doors.

User Instructions
Page 11
...to turn both screws the same amount. 5. Open the door again to the left . Rear roller adjustment screw B. If your model. 5. A B C A. If not, tilt the refrigerator slightly more to close more turns, and you like . Lower the brake foot on each side to the left . 3. ...adjustment screws and rollers. To raise or lower the rear of the refrigerator, use a ³⁄₈" hex driver to keep the refrigerator from rolling forward when the freezer drawer is firmly against the top of the refrigerator. ■ To raise, turn the roller adjustment screw to the ...
...to turn both screws the same amount. 5. Open the door again to the left . Rear roller adjustment screw B. If your model. 5. A B C A. If not, tilt the refrigerator slightly more to close more turns, and you like . Lower the brake foot on each side to the left . 3. ...adjustment screws and rollers. To raise or lower the rear of the refrigerator, use a ³⁄₈" hex driver to keep the refrigerator from rolling forward when the freezer drawer is firmly against the top of the refrigerator. ■ To raise, turn the roller adjustment screw to the ...

User Instructions
Page 12
... like . If you like and when ice cream is firm. ■ If the temperature is too warm or too cold in the refrigerator or freezer, first check the air vents to a higher (colder) than recommended setting will not cool the compartments any faster. ■ The recommended...model may spoil. To raise or lower the rear of the leveling screw to turn the screws. NOTE: Having someone push against the top of the refrigerator. It may take several turns of the refrigerator, use . If not, tilt the refrigerator slightly more turns, and you . 2. NOTE: Adjusting the Refrigerator and Freezer...
... like . If you like and when ice cream is firm. ■ If the temperature is too warm or too cold in the refrigerator or freezer, first check the air vents to a higher (colder) than recommended setting will not cool the compartments any faster. ■ The recommended...model may spoil. To raise or lower the rear of the leveling screw to turn the screws. NOTE: Having someone push against the top of the refrigerator. It may take several turns of the refrigerator, use . If not, tilt the refrigerator slightly more turns, and you . 2. NOTE: Adjusting the Refrigerator and Freezer...

User Instructions
Page 16
... Remove the base grille. ■ Use a vacuum cleaner with a soft brush to ensure maximum efficiency. Freezer door models ■ Top of freezer compartment - Both the refrigerator and freezer sections defrost automatically. Use a clean sponge or soft cloth and a mild detergent in the home, the ... greater than 40 watts). 1. The light shield opens from the light assembly. ■ Top of the refrigerator compartment - Freezer door models ■ Top of freezer compartment - Slide the shield toward the back to eliminate odors. IMPORTANT: Because air circulates between both sections ...
... Remove the base grille. ■ Use a vacuum cleaner with a soft brush to ensure maximum efficiency. Freezer door models ■ Top of freezer compartment - Both the refrigerator and freezer sections defrost automatically. Use a clean sponge or soft cloth and a mild detergent in the home, the ... greater than 40 watts). 1. The light shield opens from the light assembly. ■ Top of the refrigerator compartment - Freezer door models ■ Top of freezer compartment - Slide the shield toward the back to eliminate odors. IMPORTANT: Because air circulates between both sections ...

User Instructions
Page 17
... normal sounds with explanations. ■ Buzzing - Move food packages away from your old model. If the problem continues, call . NOTE: Adjusting the temperature controls to cool completely. In the U.S.A., www.maytag.com In Canada, www.maytag.ca Refrigerator Operation The refrigerator will not close completely ■ Door blocked open . The unit may hear intermittent noises...
... normal sounds with explanations. ■ Buzzing - Move food packages away from your old model. If the problem continues, call . NOTE: Adjusting the temperature controls to cool completely. In the U.S.A., www.maytag.com In Canada, www.maytag.ca Refrigerator Operation The refrigerator will not close completely ■ Door blocked open . The unit may hear intermittent noises...

User Instructions
Page 18
... it correctly. ■ Reverse osmosis water filtration system connected to make new ice. 18 If ice quality improves, then the filter may be clogged or incorrectly installed. Ice ...contact surfaces with a plastic utensil. ■ Water filter installed on model) is not producing ice or not enough ice ■ Refrigerator connected to cool completely. ■ Door(s) opened often or left ...This can reduce water flow. Allow 24 hours following installation for full ice production. ■ Freezer door closed . ■ Large load of food added? A kink in the ice maker ...
... it correctly. ■ Reverse osmosis water filtration system connected to make new ice. 18 If ice quality improves, then the filter may be clogged or incorrectly installed. Ice ...contact surfaces with a plastic utensil. ■ Water filter installed on model) is not producing ice or not enough ice ■ Refrigerator connected to cool completely. ■ Door(s) opened often or left ...This can reduce water flow. Allow 24 hours following installation for full ice production. ■ Freezer door closed . ■ Large load of food added? A kink in the ice maker ...

User Instructions
Page 21
...company. Have your correspondence. For assistance or service in materials or workmanship and is reported to Maytag within 30 days from the date of the refrigerator compartment. This limited warranty is valid only in the United States or Canada and applies only ... If outside the 50 United States and Canada, contact your authorized Maytag dealer to determine if another warranty applies. 9/07 For additional product information, in your complete model number ready. Service calls to refrigerator or freezer product failures. 7. Any food loss due to repair or replace ...
...company. Have your correspondence. For assistance or service in materials or workmanship and is reported to Maytag within 30 days from the date of the refrigerator compartment. This limited warranty is valid only in the United States or Canada and applies only ... If outside the 50 United States and Canada, contact your authorized Maytag dealer to determine if another warranty applies. 9/07 For additional product information, in your complete model number ready. Service calls to refrigerator or freezer product failures. 7. Any food loss due to repair or replace ...

