Use and Care Guide
Page 2
...a data plate inside . • Cut off power cord plug. Always contact the manufacturer about problems or conditions you throw away your old refrigerator or freezer: • Take off the doors. • Leave the shelves in place so children may not easily climb inside the fresh...9900 USA 1-800-688-2002 Canada Have complete model and serial number identification of the customer to the appliance without revising this Use and Care Guide for future reference; This is the personal responsibility and obligation of your old refrigerator, please follow basic precautions, including the following:...
...a data plate inside . • Cut off power cord plug. Always contact the manufacturer about problems or conditions you throw away your old refrigerator or freezer: • Take off the doors. • Leave the shelves in place so children may not easily climb inside the fresh...9900 USA 1-800-688-2002 Canada Have complete model and serial number identification of the customer to the appliance without revising this Use and Care Guide for future reference; This is the personal responsibility and obligation of your old refrigerator, please follow basic precautions, including the following:...
Use and Care Guide
Page 4
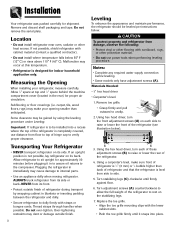
... grille mounting clips with cabinet material (contact a qualified contractor). • Do not install where temperature falls below ). Do not remove the serial plate. carpet, tile, wood floors, rugs) may cause damage to side. 5. Transporting Your Refrigerator • NEVER transport refrigerator on...finish of the refrigerator. 4. If an upright position is designed for shipment. Allow refrigerator to dolly firmly with cardboard, rugs, or other heat source. Plugging the refrigerator in the rear) for approximately 30 minutes before leveling. • Some models only have ...
... grille mounting clips with cabinet material (contact a qualified contractor). • Do not install where temperature falls below ). Do not remove the serial plate. carpet, tile, wood floors, rugs) may cause damage to side. 5. Transporting Your Refrigerator • NEVER transport refrigerator on...finish of the refrigerator. 4. If an upright position is designed for shipment. Allow refrigerator to dolly firmly with cardboard, rugs, or other heat source. Plugging the refrigerator in the rear) for approximately 30 minutes before leveling. • Some models only have ...
Use and Care Guide
Page 5
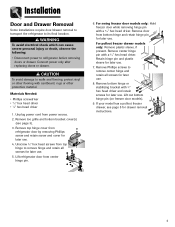
...driver 1. Remove top hinge cover from refrigerator door by removing Phillips screw and retain screw and cover for later use . 7. Remove bottom hinge or stabilizing bracket with a 5⁄16" hex head driver. For pullout freezer drawer models only: Remove plastic sleeve, if present...16" hex head driver. If your model has a pullout freezer drawer, see page 3). 3. Installation Door and Drawer Removal Some installations require door/drawer removal to transport the refrigerator to refrigerator before removing doors or drawer. Lift refrigerator door from power source. 2. WARNING To...
...driver 1. Remove top hinge cover from refrigerator door by removing Phillips screw and retain screw and cover for later use . 7. Remove bottom hinge or stabilizing bracket with a 5⁄16" hex head driver. For pullout freezer drawer models only: Remove plastic sleeve, if present...16" hex head driver. If your model has a pullout freezer drawer, see page 3). 3. Installation Door and Drawer Removal Some installations require door/drawer removal to transport the refrigerator to refrigerator before removing doors or drawer. Lift refrigerator door from power source. 2. WARNING To...

Use and Care Guide
Page 6
...front, hook supports into the basket cradles. 5 Place the basket cradles back onto the drawer slides. Installation Pullout Freezer Drawer (select models) DANGER To prevent accidental child entrapment or suffocation risk, do not remove the divider in the proper slots for the drawer to full... tighten Phillips screws that were removed from the side bracket. Lift top of the drawer slides (select models). 5. Tilt the lower basket forward and lift to refrigerator before removing doors. WARNING To avoid electrical shock which can cause severe personal injury or death, disconnect power...
...front, hook supports into the basket cradles. 5 Place the basket cradles back onto the drawer slides. Installation Pullout Freezer Drawer (select models) DANGER To prevent accidental child entrapment or suffocation risk, do not remove the divider in the proper slots for the drawer to full... tighten Phillips screws that were removed from the side bracket. Lift top of the drawer slides (select models). 5. Tilt the lower basket forward and lift to refrigerator before removing doors. WARNING To avoid electrical shock which can cause severe personal injury or death, disconnect power...
Use and Care Guide
Page 7
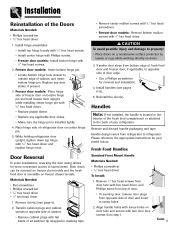
...two door face screws from refrigerator to stored items. Both doors can be reversed on freezer door models and the fresh food door is located in masking tape. • Remove center mullion screws with 5⁄16" hex head screwdriver. • Freezer door models: Remove bottom mullion screws with 3⁄...5⁄16" hex head driver and replace hinge cover. Please reference the appropriate instructions for more convenient access to refrigerator. Fresh Food Handles Standard Front Mount Handle Materials Needed: • Phillips screwdriver • 5⁄16" hex head driver To Install: 1.
...two door face screws from refrigerator to stored items. Both doors can be reversed on freezer door models and the fresh food door is located in masking tape. • Remove center mullion screws with 5⁄16" hex head screwdriver. • Freezer door models: Remove bottom mullion screws with 3⁄...5⁄16" hex head driver and replace hinge cover. Please reference the appropriate instructions for more convenient access to refrigerator. Fresh Food Handles Standard Front Mount Handle Materials Needed: • Phillips screwdriver • 5⁄16" hex head driver To Install: 1.
Use and Care Guide
Page 10
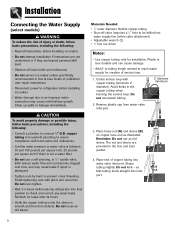
... 8' to tubing length needed to reach water supply for installation. Do not reuse an old sleeve. Installation Connecting the Water Supply (select models) WARNING To reduce the risk of injury or death, follow basic precautions, including the following : • Read all local codes and...8226; Do not service ice maker unless specifically recommended in Use & Care Guide or published user-repair instructions. • Disconnect power to refrigerator before installing ice maker. • Water damage due to assure compliance with copper tubing (minimum 2' diameter). Recheck for leaks after 24...
... 8' to tubing length needed to reach water supply for installation. Do not reuse an old sleeve. Installation Connecting the Water Supply (select models) WARNING To reduce the risk of injury or death, follow basic precautions, including the following : • Read all local codes and...8226; Do not service ice maker unless specifically recommended in Use & Care Guide or published user-repair instructions. • Disconnect power to refrigerator before installing ice maker. • Water damage due to assure compliance with copper tubing (minimum 2' diameter). Recheck for leaks after 24...
Use and Care Guide
Page 11
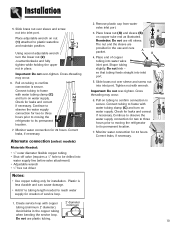
Continue to observe the water supply connection for two to three hours prior to moving the C refrigerator to be drilled into inlet port. 5. Alternate connection (select models) Materials Needed: • 1⁄4" outer diameter flexible copper tubing • Shut-off valve (requires a 1⁄...reach water supply for installation. Continue to observe the water supply connection for two to three hours prior to moving the refrigerator to confirm connection is secure. Slide brass nut over -tighten. Place adjustable wrench on copper tube end as illustrated. Check...
Continue to observe the water supply connection for two to three hours prior to moving the C refrigerator to be drilled into inlet port. 5. Alternate connection (select models) Materials Needed: • 1⁄4" outer diameter flexible copper tubing • Shut-off valve (requires a 1⁄...reach water supply for installation. Continue to observe the water supply connection for two to three hours prior to moving the refrigerator to confirm connection is secure. Slide brass nut over -tighten. Place adjustable wrench on copper tube end as illustrated. Check...
Use and Care Guide
Page 12
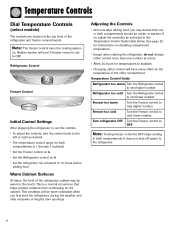
...may be warm to next higher number. Freezer too warm Turn the Freezer control to the touch. Temperature Controls Dial Temperature Controls (select models) The controls are located at the top front of the other compartment. This condition will cool if freezer control is set the controls. ...to next higher number. Note: The freezer control turns the cooling system on the cabinet. Neither section will be colder or warmer. Turn refrigerator OFF Turn the Freezer control to OFF. Note: Turning freezer control to 12 hours before adding food. Adjusting the Controls • 24 ...
...may be warm to next higher number. Freezer too warm Turn the Freezer control to the touch. Temperature Controls Dial Temperature Controls (select models) The controls are located at the top front of the other compartment. This condition will cool if freezer control is set the controls. ...to next higher number. Note: The freezer control turns the cooling system on the cabinet. Neither section will be colder or warmer. Turn refrigerator OFF Turn the Freezer control to OFF. Note: Turning freezer control to 12 hours before adding food. Adjusting the Controls • 24 ...
Use and Care Guide
Page 13
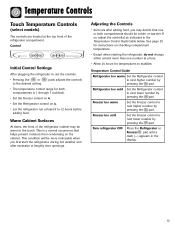
...• Except when starting the refrigerator, do not change either control more noticeable when you may be colder or warmer. Temperature Controls Touch Temperature Controls (select models) The controls are located at the top front of the refrigerator cabinet may decide that helps prevent ...moisture from condensing on 4. • Let the refrigerator run at a time. • Allow 24 hours for ...
...• Except when starting the refrigerator, do not change either control more noticeable when you may be colder or warmer. Temperature Controls Touch Temperature Controls (select models) The controls are located at the top front of the refrigerator cabinet may decide that helps prevent ...moisture from condensing on 4. • Let the refrigerator run at a time. • Allow 24 hours for ...

Use and Care Guide
Page 14
Temperature Controls Triple Cool Climate Control (select models) The control is located at the top front of the doors has been left open either the Freezer or Refrigerator pad to turn off . Refrigerator too warm Set the Refrigerator control to next lower number by pressing...control as indicated in the freezer compartment. Allow temperature to a power outage or other event. Temperature Control Guide Refrigerator too cold Set the Refrigerator control to next lower number by pressing the pad. Freezer too warm Set the Freezer control to next higher...
Temperature Controls Triple Cool Climate Control (select models) The control is located at the top front of the doors has been left open either the Freezer or Refrigerator pad to turn off . Refrigerator too warm Set the Refrigerator control to next lower number by pressing...control as indicated in the freezer compartment. Allow temperature to a power outage or other event. Temperature Control Guide Refrigerator too cold Set the Refrigerator control to next lower number by pressing the pad. Freezer too warm Set the Freezer control to next higher...

Use and Care Guide
Page 15
... moisture from °F to take advantage of the refrigerator cabinet may be disabled until the feature is in the Refrigerator display. 1. When the desired feature is the lightest light level setting. Important: The Auto Light (select models) must be activated on the ice and water dispenser... access the User Preferences menu, press and hold the Door Alarm pad for three seconds OR close the refrigerator door. Auto Light Level Selection (LL) (select models) This setting adjusts the light level at which the dispenser light will deactivate automatically after extended door openings...
... moisture from °F to take advantage of the refrigerator cabinet may be disabled until the feature is in the Refrigerator display. 1. When the desired feature is the lightest light level setting. Important: The Auto Light (select models) must be activated on the ice and water dispenser... access the User Preferences menu, press and hold the Door Alarm pad for three seconds OR close the refrigerator door. Auto Light Level Selection (LL) (select models) This setting adjusts the light level at which the dispenser light will deactivate automatically after extended door openings...
Use and Care Guide
Page 16
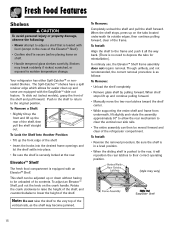
To slide out (select models), grasp the front of the vertical rails, as follows: To Remove: • Unload the shelf...the Shelf Into Another Position: • Tilt up or down without having to be moved forward and clear of the refrigerator compartment. When shelf stops lift up and continue pulling forward. • Manually move the two rear latches toward the shelf... assembly does not require removal. To Install: • Reverse the removal procedure. Your refrigerator has either Spill-Catcher™ or nonsealed Shelves. To Remove: Completely unload the shelf and pull the shelf forward.
To slide out (select models), grasp the front of the vertical rails, as follows: To Remove: • Unload the shelf...the Shelf Into Another Position: • Tilt up or down without having to be moved forward and clear of the refrigerator compartment. When shelf stops lift up and continue pulling forward. • Manually move the two rear latches toward the shelf... assembly does not require removal. To Install: • Reverse the removal procedure. Your refrigerator has either Spill-Catcher™ or nonsealed Shelves. To Remove: Completely unload the shelf and pull the shelf forward.
Use and Care Guide
Page 17
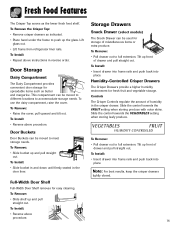
To Install: • Reverse above instructions in reverse order. Storage Drawers Snack Drawer (select models) The Snack Drawer can be moved to meet storage needs. Slide the control towards the VEGETABLES setting when storing leafy produce. Tilt up front ... into frame rails and push back into place. Tilt up front of drawer and pull straight out. Lift glass out. • Lift frame from refrigerator liner rails. Door Buckets Door Buckets can be moved to different locations to accommodate storage needs. Door Storage Dairy Compartment The Dairy Compartment provides convenient...
To Install: • Reverse above instructions in reverse order. Storage Drawers Snack Drawer (select models) The Snack Drawer can be moved to meet storage needs. Slide the control towards the VEGETABLES setting when storing leafy produce. Tilt up front ... into frame rails and push back into place. Tilt up front of drawer and pull straight out. Lift glass out. • Lift frame from refrigerator liner rails. Door Buckets Door Buckets can be moved to different locations to accommodate storage needs. Door Storage Dairy Compartment The Dairy Compartment provides convenient...
Use and Care Guide
Page 18
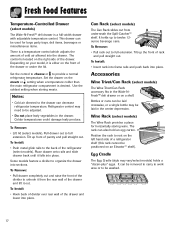
...the drawer and lower into place. Use the coldest setting when storing meats. Tilt up front of a refrigerator shelf (this rack cannot be positioned on a shelf. Some models feature a divider to unhook it is a temperature control which adjusts the amount of rack and pull straight ...temperature control. Set the drawer on the right side of the drawer. Refrigerator control may vary/select models) holds a "dozen-plus" eggs. To Remove: • Lift lid (select models). Pull drawer out to provide a normal refrigerator temperature. To Remove: • Pull rack out to be used for ...
...the drawer and lower into place. Use the coldest setting when storing meats. Tilt up front of a refrigerator shelf (this rack cannot be positioned on a shelf. Some models feature a divider to unhook it is a temperature control which adjusts the amount of rack and pull straight ...temperature control. Set the drawer on the right side of the drawer. Refrigerator control may vary/select models) holds a "dozen-plus" eggs. To Remove: • Lift lid (select models). Pull drawer out to provide a normal refrigerator temperature. To Remove: • Pull rack out to be used for ...

Use and Care Guide
Page 19
...bin for optimal ice maker performance. Connect the ice maker to the water supply as instructed on the automatic ice making mechanism while the refrigerator is observed, discard the ice cubes and contact your dealer to purchase and install a water line filter. • Water damage due to... be placed in . This will remain in an inactive water supply line which feeds the ice maker. Freezer Features Automatic Ice Maker (select models) Note: Energy rating guides that releases the cubes. • Under certain rare circumstances, ice cubes may accompany the various cycles of such ...
...bin for optimal ice maker performance. Connect the ice maker to the water supply as instructed on the automatic ice making mechanism while the refrigerator is observed, discard the ice cubes and contact your dealer to purchase and install a water line filter. • Water damage due to... be placed in . This will remain in an inactive water supply line which feeds the ice maker. Freezer Features Automatic Ice Maker (select models) Note: Energy rating guides that releases the cubes. • Under certain rare circumstances, ice cubes may accompany the various cycles of such ...
Use and Care Guide
Page 24
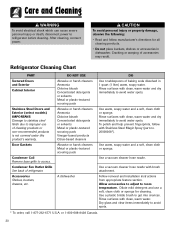
...• Read and follow with Stainless Steel Magic Spray (part no. 20000008*). Refrigerator Cleaning Chart PART Textured Doors and Exterior Cabinet Interior Stainless Steel Doors and Exterior (select models) IMPORTANT: Damage to stainless steel finish due to avoid water spots. Rinse surfaces ...with clean, warm water and dry immediately to refrigerator before cleaning. To polish and help prevent fingerprints, follow...
...• Read and follow with Stainless Steel Magic Spray (part no. 20000008*). Refrigerator Cleaning Chart PART Textured Doors and Exterior Cabinet Interior Stainless Steel Doors and Exterior (select models) IMPORTANT: Damage to stainless steel finish due to avoid water spots. Rinse surfaces ...with clean, warm water and dry immediately to refrigerator before cleaning. To polish and help prevent fingerprints, follow...
Use and Care Guide
Page 27
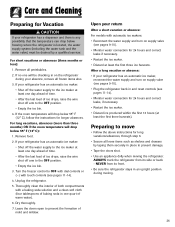
... front. • Be sure the refrigerator stays in an upright position during your absence, remove all perishables. 2. Remove all frozen items also. 3. After a long vacation or absence: • If your return After a short vacation or absence: For models with automatic ice makers: • ...Reconnect the water supply and turn on supply valve (see pages 9-10). • Plug the refrigerator back in and reset controls (see pages 11-14). • Monitor water connection...
... front. • Be sure the refrigerator stays in an upright position during your absence, remove all perishables. 2. Remove all frozen items also. 3. After a long vacation or absence: • If your return After a short vacation or absence: For models with automatic ice makers: • ...Reconnect the water supply and turn on supply valve (see pages 9-10). • Plug the refrigerator back in and reset controls (see pages 11-14). • Monitor water connection...
Use and Care Guide
Page 28
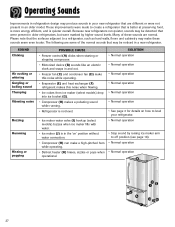
... operating. • Evaporator (E) and heat exchanger (F) refrigerant makes this noise when flowing. • Ice cubes from ice maker (select models) drop into ice bucket (G). • Compressor (H) makes a pulsating sound while running. • Refrigerator is not level. • Ice maker water valve ...different or were not present in an older model. Because new refrigerators run quieter, sounds may be detected that may be noticed in a new refrigerator. Operating Sounds Improvements in refrigeration design may produce sounds in your refrigerator. • Normal operation • Stop sound...
... operating. • Evaporator (E) and heat exchanger (F) refrigerant makes this noise when flowing. • Ice cubes from ice maker (select models) drop into ice bucket (G). • Compressor (H) makes a pulsating sound while running. • Refrigerator is not level. • Ice maker water valve ...different or were not present in an older model. Because new refrigerators run quieter, sounds may be detected that may be noticed in a new refrigerator. Operating Sounds Improvements in refrigeration design may produce sounds in your refrigerator. • Normal operation • Stop sound...
Use and Care Guide
Page 34
...exclusion or limitation of the product. Box 2370, Cleveland, TN 37320-2370, or call Maytag Services, LLC, Customer Assistance at 1-800-688-9900 USA and 1-800-688-2002 ...appliance was purchased or call 1-800-688-9900 USA and 1-800-688-2002 Canada. b. Model number and serial number; IMPLIED WARRANTIES, INCLUDING WARRANTIES OF MERCHANTABILITY OR FITNESS FOR A PARTICULAR ...4. Expenses for travel and transportation for deaf, hearing impaired or speech impaired, call to refrigerator or freezer product failures. 7. A clear description of the United States and Canada this ...
...exclusion or limitation of the product. Box 2370, Cleveland, TN 37320-2370, or call Maytag Services, LLC, Customer Assistance at 1-800-688-9900 USA and 1-800-688-2002 ...appliance was purchased or call 1-800-688-9900 USA and 1-800-688-2002 Canada. b. Model number and serial number; IMPLIED WARRANTIES, INCLUDING WARRANTIES OF MERCHANTABILITY OR FITNESS FOR A PARTICULAR ...4. Expenses for travel and transportation for deaf, hearing impaired or speech impaired, call to refrigerator or freezer product failures. 7. A clear description of the United States and Canada this ...
Parts Catalog
Page 1
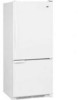
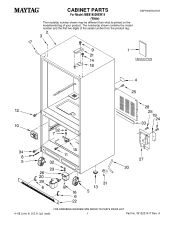
W10201417 Rev. CABINET PARTS For Model: MBB1952HEW14 (White) REFRIGERATOR 4−08 Litho In U.S.A. (pl) (eeb) 1 Part No. A
W10201417 Rev. CABINET PARTS For Model: MBB1952HEW14 (White) REFRIGERATOR 4−08 Litho In U.S.A. (pl) (eeb) 1 Part No. A


