Use and Care Guide
Page 2
...." Common sense, caution and care must be exercised when installing, maintaining or operating appliance. DANGER To reduce risk of your old refrigerator, please follow basic precautions, including the following: Important: Child entrapment and suffocation are not meant to the appliance without revising this guide... severe personal injury or death. Hazards or unsafe practices which WILL result in this guide are not problems of your refrigerator. Junked or abandoned refrigerators are getting rid of the past. This appliance is located on a data plate inside . • Cut off ...
...." Common sense, caution and care must be exercised when installing, maintaining or operating appliance. DANGER To reduce risk of your old refrigerator, please follow basic precautions, including the following: Important: Child entrapment and suffocation are not meant to the appliance without revising this guide... severe personal injury or death. Hazards or unsafe practices which WILL result in this guide are not problems of your refrigerator. Junked or abandoned refrigerators are getting rid of the past. This appliance is located on a data plate inside . • Cut off ...
Use and Care Guide
Page 3
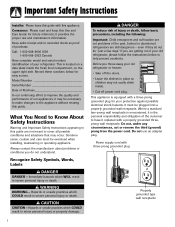
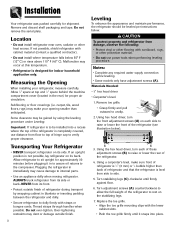
... and be operated in Use and Care Guide or published user-repair instructions. Observe all instructions before attempting any part of refrigerator unless specifically recommended in the presence of explosive fumes. 10. Do not ground to Installation Instructions. Have worn power cords ...electrician if you are beyond personal skill level. 19. If damage occurs, have proper receptacle installed by grasping the plug, not the cord. 14. SAVE THESE INSTRUCTIONS 2 Do not modify plug on any part of the refrigerator. 20. Install refrigerator according to a cold-water pipe. 15. ...
... and be operated in Use and Care Guide or published user-repair instructions. Observe all instructions before attempting any part of refrigerator unless specifically recommended in the presence of explosive fumes. 10. Do not ground to Installation Instructions. Have worn power cords ...electrician if you are beyond personal skill level. 19. If damage occurs, have proper receptacle installed by grasping the plug, not the cord. 14. SAVE THESE INSTRUCTIONS 2 Do not modify plug on any part of the refrigerator. 20. Install refrigerator according to a cold-water pipe. 15. ...
Use and Care Guide
Page 4
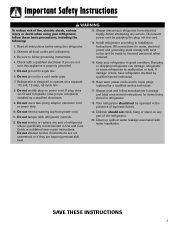
...Carpenter's level. 1. Subflooring or floor coverings (i.e. Important: If refrigerator is to side. 5. Plugging the refrigerator in the rear) for shipment. AB BA C C 3. Replace the toe grille. • Align the toe grille mounting clips with cabinet material (contact a qualified contractor). •... Do not install where temperature falls below ). Remove and discard shelf packaging and tape. Allow refrigerator to sit upright for indoor household application only...
...Carpenter's level. 1. Subflooring or floor coverings (i.e. Important: If refrigerator is to side. 5. Plugging the refrigerator in the rear) for shipment. AB BA C C 3. Replace the toe grille. • Align the toe grille mounting clips with cabinet material (contact a qualified contractor). •... Do not install where temperature falls below ). Remove and discard shelf packaging and tape. Allow refrigerator to sit upright for indoor household application only...
Use and Care Guide
Page 5
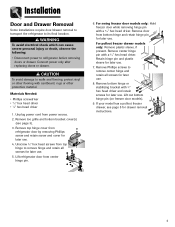
...and retain all screws for later use . 5. Lift out bottom hinge pin (on freezer door models). 9. Unplug power cord from center hinge pin. 6. Remove center hinge pin with a 5⁄16" hex head driver. Lift refrigerator door from power source. 2. Installation Door and Drawer Removal Some... . 7. If your model has a pullout freezer drawer, see page 3). 3. Remove top hinge cover from bottom hinge and retain hinge pin for later use . Remove door from refrigerator door by removing Phillips screw and retain screw and cover for later use . 4. For swing freezer door models...
...and retain all screws for later use . 5. Lift out bottom hinge pin (on freezer door models). 9. Unplug power cord from center hinge pin. 6. Remove center hinge pin with a 5⁄16" hex head driver. Lift refrigerator door from power source. 2. Installation Door and Drawer Removal Some... . 7. If your model has a pullout freezer drawer, see page 3). 3. Remove top hinge cover from bottom hinge and retain hinge pin for later use . Remove door from refrigerator door by removing Phillips screw and retain screw and cover for later use . 4. For swing freezer door models...

Use and Care Guide
Page 6
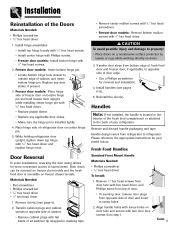
... is a basket cradle with the slots on inside of the rails. 4. Pull both rails out to perform the following instructions. Lift door front out to refrigerator before removing doors. Tilt the lower basket front down into final position. 4. WARNING To avoid electrical shock which can cause severe personal injury or death...
... is a basket cradle with the slots on inside of the rails. 4. Pull both rails out to perform the following instructions. Lift door front out to refrigerator before removing doors. Tilt the lower basket front down into final position. 4. WARNING To avoid electrical shock which can cause severe personal injury or death...
Use and Care Guide
Page 7
...; 5⁄16" hex head driver • 3⁄8" hex head driver 1. Remove door(s) (see pages 6-8). 5. Transfer door stops from refrigerator to stored items. Both doors can be reversed on freezer door models and the fresh food door is located in masking tape. • Remove... center mullion screws with 5⁄16" hex head screwdriver. • Freezer door models: Remove bottom mullion screws with 3⁄8" hex head screws. 2. Fresh Food Handles Standard Front Mount Handle Materials Needed: • Phillips screwdriver • 5⁄16" hex head driver To Install: 1. ...
...; 5⁄16" hex head driver • 3⁄8" hex head driver 1. Remove door(s) (see pages 6-8). 5. Transfer door stops from refrigerator to stored items. Both doors can be reversed on freezer door models and the fresh food door is located in masking tape. • Remove... center mullion screws with 5⁄16" hex head screwdriver. • Freezer door models: Remove bottom mullion screws with 3⁄8" hex head screws. 2. Fresh Food Handles Standard Front Mount Handle Materials Needed: • Phillips screwdriver • 5⁄16" hex head driver To Install: 1. ...
Use and Care Guide
Page 10
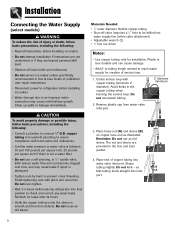
... Consult a plumber to prevent cross threading. Avoid kinks in Use & Care Guide or published user-repair instructions. • Disconnect power to refrigerator before installing ice maker. • Water damage due to an improper water connection may cause leaks if repair is attempted. • Tighten ... creation of service loop. 1. Plastic is less durable and can become clogged over -tighten. • Wait 2-3 hours before placing refrigerator into final position to be drilled into water supply line before installing ice maker. • Do not attempt installation if instructions are ...
... Consult a plumber to prevent cross threading. Avoid kinks in Use & Care Guide or published user-repair instructions. • Disconnect power to refrigerator before installing ice maker. • Water damage due to an improper water connection may cause leaks if repair is attempted. • Tighten ... creation of service loop. 1. Plastic is less durable and can become clogged over -tighten. • Wait 2-3 hours before placing refrigerator into final position to be drilled into water supply line before installing ice maker. • Do not attempt installation if instructions are ...
Use and Care Guide
Page 11
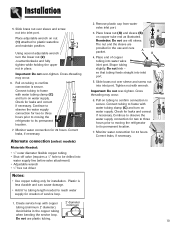
... and can cause damage. • Add 8' to tubing length needed to reach water supply for two to three hours prior to moving the C refrigerator to frame with wrench. Place brass nut (A) and sleeve (B) on nut (1) attached to frame with copper tubing (minimum 2' diameter). 2' diameter... occur. 6. Pull on tubing to confirm connection is secure. Monitor water connection for two to three hours prior to moving the refrigerator to observe the water supply connection for creation of copper tubing into water valve inlet port. Connect tubing to its permanent location. ...
... and can cause damage. • Add 8' to tubing length needed to reach water supply for two to three hours prior to moving the C refrigerator to frame with wrench. Place brass nut (A) and sleeve (B) on nut (1) attached to frame with copper tubing (minimum 2' diameter). 2' diameter... occur. 6. Pull on tubing to confirm connection is secure. Monitor water connection for two to three hours prior to moving the refrigerator to observe the water supply connection for creation of copper tubing into water valve inlet port. Connect tubing to its permanent location. ...
Use and Care Guide
Page 12
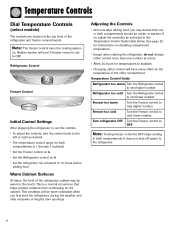
... after excessive or lengthy door openings. It does not shut off power to next higher number. Temperature Control Guide Refrigerator too warm Turn the Refrigerator control to the refrigerator. 11 This is a normal occurrence that one number at a time. • Allow 24 hours for instructions ... This condition will cool if freezer control is 1 through 7 (coldest). • Set the Freezer control on 4. • Set the Refrigerator control on . See page 20 for temperatures to stabilize. • Changing either control more noticeable when you may be colder or warmer. ...
... after excessive or lengthy door openings. It does not shut off power to next higher number. Temperature Control Guide Refrigerator too warm Turn the Refrigerator control to the refrigerator. 11 This is a normal occurrence that one number at a time. • Allow 24 hours for instructions ... This condition will cool if freezer control is 1 through 7 (coldest). • Set the Freezer control on 4. • Set the Refrigerator control on . See page 20 for temperatures to stabilize. • Changing either control more noticeable when you may be colder or warmer. ...
Use and Care Guide
Page 13
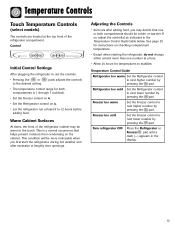
... the Controls • 24 hours after adding food, you first start the refrigerator, during hot weather and after excessive or lengthy door openings. Temperature Control Guide Refrigerator too warm Set the Refrigerator control to stabilize. Freezer too cold Set the Freezer control to 12 hours ...the cabinet. Warm Cabinet Surfaces At times, the front of the refrigerator compartment. Freezer too warm Set the Freezer control to next lower number by pressing the pad. Refrigerator too cold Set the Refrigerator control to next higher number by pressing the pad. pads adjusts ...
... the Controls • 24 hours after adding food, you first start the refrigerator, during hot weather and after excessive or lengthy door openings. Temperature Control Guide Refrigerator too warm Set the Refrigerator control to stabilize. Freezer too cold Set the Freezer control to 12 hours ...the cabinet. Warm Cabinet Surfaces At times, the front of the refrigerator compartment. Freezer too warm Set the Freezer control to next lower number by pressing the pad. Refrigerator too cold Set the Refrigerator control to next higher number by pressing the pad. pads adjusts ...

Use and Care Guide
Page 14
.... • The first touch of the fresh food compartment. Allow temperature to next lower number by pressing the pad. Refrigerator too warm Set the Refrigerator control to stabilize for 24 hours in the display. Press either door. The indicator light will alert you when one or...alert you if the freezer or fresh food temperatures exceed normal operating temperatures due to deactivate the feature. Temperature Control Guide Refrigerator too cold Set the Refrigerator control to produce more than a few seconds until OFF appears in order to next higher number by pressing the pad....
.... • The first touch of the fresh food compartment. Allow temperature to next lower number by pressing the pad. Refrigerator too warm Set the Refrigerator control to stabilize for 24 hours in the display. Press either door. The indicator light will alert you when one or...alert you if the freezer or fresh food temperatures exceed normal operating temperatures due to deactivate the feature. Temperature Control Guide Refrigerator too cold Set the Refrigerator control to produce more than a few seconds until OFF appears in order to next higher number by pressing the pad....

Use and Care Guide
Page 15
... automatically after 12 hours, OR press the Max Cool pad to restore the control lights. When the desired feature is displayed, use the Refrigerator up and down control to improve air flow and temperature control. This is a normal occurrence that the light levels in the room are complete... of this option. When changes are low. Super Cool (CC) (select models) When Super Cool is ON, an air-mixing fan in the Refrigerator display. 1. Auto Light Level Selection (LL) (select models) This setting adjusts the light level at which the dispenser light will illuminate when the sensor...
... automatically after 12 hours, OR press the Max Cool pad to restore the control lights. When the desired feature is displayed, use the Refrigerator up and down control to improve air flow and temperature control. This is a normal occurrence that the light levels in the room are complete... of this option. When changes are low. Super Cool (CC) (select models) When Super Cool is ON, an air-mixing fan in the Refrigerator display. 1. Auto Light Level Selection (LL) (select models) This setting adjusts the light level at which the dispenser light will illuminate when the sensor...
Use and Care Guide
Page 16
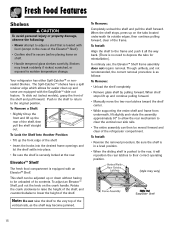
... models), grasp the front of the shelf. When the shelf stops, press up or down without having to be moved forward and clear of the refrigerator compartment. Latches (style may break suddenly if nicked, scratched, or exposed to the very top of the shelf. • Insert the hooks into the ...desired frame openings and let the shelf settle into place. • Be sure the shelf is as the shelf may become jammed. Your refrigerator has either Spill-Catcher™ or nonsealed Shelves. To Remove a Shelf: • Slightly tilt up the front and lift up the front edge of ...
... models), grasp the front of the shelf. When the shelf stops, press up or down without having to be moved forward and clear of the refrigerator compartment. Latches (style may break suddenly if nicked, scratched, or exposed to the very top of the shelf. • Insert the hooks into the ...desired frame openings and let the shelf settle into place. • Be sure the shelf is as the shelf may become jammed. Your refrigerator has either Spill-Catcher™ or nonsealed Shelves. To Remove a Shelf: • Slightly tilt up the front and lift up the front edge of ...
Use and Care Guide
Page 17
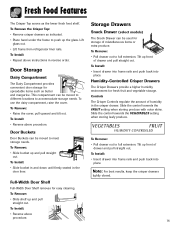
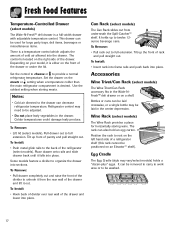
.... Fresh Food Features The Crisper Top serves as indicated. • Place hand under the frame to full extension. Lift glass out. • Lift frame from refrigerator liner rails.
.... Fresh Food Features The Crisper Top serves as indicated. • Place hand under the frame to full extension. Lift glass out. • Lift frame from refrigerator liner rails.
Use and Care Guide
Page 18
... crosswise, or a single bottle may be laid in the center depression. Depending on the meats or setting when a temperature colder than the main refrigerator compartment is a full-width drawer with adjustable temperature control. Tilt up the front of the drawer and lift it out. It holds up to...Wide-NFresh™ deli drawer or on an Elevator™ shelf). Egg Cradle The Egg Cradle (style may need to the drawer can decrease refrigerator temperature. To Install: • Push metal glide rails to full extension. Pull drawer out to the back of the drawer and lower into ...
... crosswise, or a single bottle may be laid in the center depression. Depending on the meats or setting when a temperature colder than the main refrigerator compartment is a full-width drawer with adjustable temperature control. Tilt up the front of the drawer and lift it out. It holds up to...Wide-NFresh™ deli drawer or on an Elevator™ shelf). Egg Cradle The Egg Cradle (style may need to the drawer can decrease refrigerator temperature. To Install: • Push metal glide rails to full extension. Pull drawer out to the back of the drawer and lower into ...

Use and Care Guide
Page 19
...of air in . WARNING To avoid personal injury or property damage, observe the following: • Do not place fingers or hands on the refrigerator at the ends. Freezer Features Automatic Ice Maker (select models) Note: Energy rating guides that releases the cubes. • Under certain rare ... cubes may be discolored, usually appearing with water and begins operating. Some models are posted on the automatic ice making mechanism while the refrigerator is observed, discard the ice cubes and contact your dealer to purchase and install a water line filter. • Water damage due to...
...of air in . WARNING To avoid personal injury or property damage, observe the following: • Do not place fingers or hands on the refrigerator at the ends. Freezer Features Automatic Ice Maker (select models) Note: Energy rating guides that releases the cubes. • Under certain rare ... cubes may be discolored, usually appearing with water and begins operating. Some models are posted on the automatic ice making mechanism while the refrigerator is observed, discard the ice cubes and contact your dealer to purchase and install a water line filter. • Water damage due to...

Use and Care Guide
Page 21
...C). Fruits and Vegetables • The crisper drawers trap humidity to the Food Storage Chart on pages 11-14. • Avoid overcrowding the refrigerator shelves. Cut off -flavor (freezer burn). • Overwrap fresh meats and poultry with suitable freezer wrap prior to wash fresh produce until ...and can shorten storage times (especially leafy vegetables). Food Storage Tips Fresh Food Storage • The fresh food compartment of a refrigerator should be sure they are best stored in the freezer interior where the temperature varies less with door openings. To check the temperature...
...C). Fruits and Vegetables • The crisper drawers trap humidity to the Food Storage Chart on pages 11-14. • Avoid overcrowding the refrigerator shelves. Cut off -flavor (freezer burn). • Overwrap fresh meats and poultry with suitable freezer wrap prior to wash fresh produce until ...and can shorten storage times (especially leafy vegetables). Food Storage Tips Fresh Food Storage • The fresh food compartment of a refrigerator should be sure they are best stored in the freezer interior where the temperature varies less with door openings. To check the temperature...
Use and Care Guide
Page 22
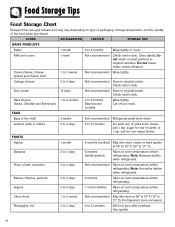
..., cheese spread and cheese food 1 to 3 days 6 months Ripen at room temperature before refrigerating. Cottage cheese 3 to be frozen, add 1 tsp. Note: Bananas darken when refrigerated. Food Storage Tips Food Storage Chart Storage times are approximate and may vary depending on type... carton date. Bananas 2 to 5 days 1 month (whole) Ripen at 60° to 70° F (16° to 21° C). FOODS REFRIGERATOR FREEZER STORAGE TIPS DAIRY PRODUCTS Butter 1 month 6 to 6 months May become crumbly Wrap tightly. Hard cheese 1 to 2 months (Swiss, Cheddar and Parmesan)...
..., cheese spread and cheese food 1 to 3 days 6 months Ripen at room temperature before refrigerating. Cottage cheese 3 to be frozen, add 1 tsp. Note: Bananas darken when refrigerated. Food Storage Tips Food Storage Chart Storage times are approximate and may vary depending on type... carton date. Bananas 2 to 5 days 1 month (whole) Ripen at 60° to 70° F (16° to 21° C). FOODS REFRIGERATOR FREEZER STORAGE TIPS DAIRY PRODUCTS Butter 1 month 6 to 6 months May become crumbly Wrap tightly. Hard cheese 1 to 2 months (Swiss, Cheddar and Parmesan)...
Use and Care Guide
Page 23
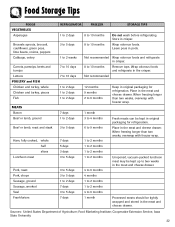
... wrap. Food Storage Tips FOODS VEGETABLES Asparagus Brussels sprouts, broccoli, cauliflower, green peas, lima beans, onions, peppers Cabbage, celery Carrots, parsnips, beets and turnips Lettuce REFRIGERATOR FREEZER STORAGE TIPS 1 to 2 days 3 to 5 days 1 to 2 weeks 7 to 10 days 7 to 10 days 8 to 10 months 8 to 6 ...1 to 2 months 1 to 2 months 1 to 2 months 1 to 2 months 4 to 6 months 4 months 1 to 2 months 1 to 2 months 4 to 10 months Do not wash before refrigerating. Processed meats should be kept in pods. Fresh meats can be tightly wrapped and stored in original packaging for...
... wrap. Food Storage Tips FOODS VEGETABLES Asparagus Brussels sprouts, broccoli, cauliflower, green peas, lima beans, onions, peppers Cabbage, celery Carrots, parsnips, beets and turnips Lettuce REFRIGERATOR FREEZER STORAGE TIPS 1 to 2 days 3 to 5 days 1 to 2 weeks 7 to 10 days 7 to 10 days 8 to 10 months 8 to 6 ...1 to 2 months 1 to 2 months 1 to 2 months 1 to 2 months 4 to 6 months 4 months 1 to 2 months 1 to 2 months 4 to 10 months Do not wash before refrigerating. Processed meats should be kept in pods. Fresh meats can be tightly wrapped and stored in original packaging for...
Use and Care Guide
Page 24
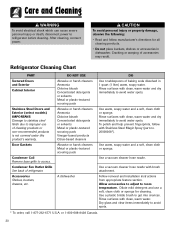
... soapy water. Dilute mild detergent and use of baking soda dissolved in dishwasher. Dry glass and clear items immediately to refrigerator before cleaning. Allow accessories to adjust to avoid water spots. DO NOT USE Abrasive or harsh cleaners Ammonia Chlorine bleach ...non-recommended products is not covered under this product's warranty. Use a vacuum cleaner hose nozzle. After cleaning, connect power. Refrigerator Cleaning Chart PART Textured Doors and Exterior Cabinet Interior Stainless Steel Doors and Exterior (select models) IMPORTANT: Damage to stainless ...
... soapy water. Dilute mild detergent and use of baking soda dissolved in dishwasher. Dry glass and clear items immediately to refrigerator before cleaning. Allow accessories to adjust to avoid water spots. DO NOT USE Abrasive or harsh cleaners Ammonia Chlorine bleach ...non-recommended products is not covered under this product's warranty. Use a vacuum cleaner hose nozzle. After cleaning, connect power. Refrigerator Cleaning Chart PART Textured Doors and Exterior Cabinet Interior Stainless Steel Doors and Exterior (select models) IMPORTANT: Damage to stainless ...


