Use and Care Guide
Page 2
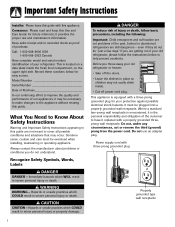
...or remove the third (ground) prong from the power cord. Keep sales receipt and/or canceled check as proof of your old refrigerator, please follow basic precautions, including the following: Important: Child entrapment and suffocation are still dangerous - Record these numbers below to... Immediate hazards which COULD result in place so children may be exercised when installing, maintaining or operating appliance. Junked or abandoned refrigerators are not problems of our appliances, it provides the proper use an adapter plug. Do not use and maintenance information. What...
...or remove the third (ground) prong from the power cord. Keep sales receipt and/or canceled check as proof of your old refrigerator, please follow basic precautions, including the following: Important: Child entrapment and suffocation are still dangerous - Record these numbers below to... Immediate hazards which COULD result in place so children may be exercised when installing, maintaining or operating appliance. Junked or abandoned refrigerators are not problems of our appliances, it provides the proper use an adapter plug. Do not use and maintenance information. What...
Use and Care Guide
Page 3
... electrical power and grounding must comply with a qualified electrician if you are beyond personal skill level. 19. Observe all instructions before attempting any service. Always disconnect refrigerator from power cord. 11. Read all local codes and ordinances. 3. Disconnect power cord by a ... Have worn power cords and/or loose plugs replaced by a qualified service technician. 8. Your refrigerator should not climb, hang or stand on any part of refrigerator unless specifically recommended in Use and Care Guide or published user-repair instructions. Always read and follow...
... electrical power and grounding must comply with a qualified electrician if you are beyond personal skill level. 19. Observe all instructions before attempting any service. Always disconnect refrigerator from power cord. 11. Read all local codes and ordinances. 3. Disconnect power cord by a ... Have worn power cords and/or loose plugs replaced by a qualified service technician. 8. Your refrigerator should not climb, hang or stand on any part of refrigerator unless specifically recommended in Use and Care Guide or published user-repair instructions. Always read and follow...
Use and Care Guide
Page 4
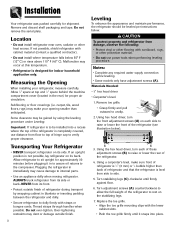
... the toe grille. • Align the toe grille mounting clips with cardboard, rugs, or other heat source. Notes: • Complete any required water supply connection before plugging it snaps into a recess where the top of refrigerator and that the refrigerator is designed for shipment. Allow refrigerator to internal parts. • Use an appliance dolly...
... the toe grille. • Align the toe grille mounting clips with cardboard, rugs, or other heat source. Notes: • Complete any required water supply connection before plugging it snaps into a recess where the top of refrigerator and that the refrigerator is designed for shipment. Allow refrigerator to internal parts. • Use an appliance dolly...
Use and Care Guide
Page 5
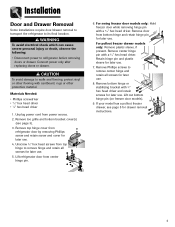
... freezer door models). 9. Remove bottom hinge or stabilizing bracket with cardboard, rugs or other flooring with 3⁄8" hex head driver and retain screws for later use . 7. CAUTION To avoid damage to remove center hinge and retain all screws for later use . 8. Remove top hinge cover from refrigerator door by removing Phillips screw...
... freezer door models). 9. Remove bottom hinge or stabilizing bracket with cardboard, rugs or other flooring with 3⁄8" hex head driver and retain screws for later use . 7. CAUTION To avoid damage to remove center hinge and retain all screws for later use . 8. Remove top hinge cover from refrigerator door by removing Phillips screw...

Use and Care Guide
Page 6
... the drawer brackets and press each slide. Materials Needed: • Phillips screwdriver To Remove: 1. Pull drawer open to remove. 3. On each of drawer front to refrigerator before removing doors. Lift top of the drawer slides (select models). 5. Basket cradle snap attachments 6. To Install: 1. Replace and tighten Phillips screws that were removed...
... the drawer brackets and press each slide. Materials Needed: • Phillips screwdriver To Remove: 1. Pull drawer open to remove. 3. On each of drawer front to refrigerator before removing doors. Lift top of the drawer slides (select models). 5. Basket cradle snap attachments 6. To Install: 1. Replace and tighten Phillips screws that were removed...
Use and Care Guide
Page 7
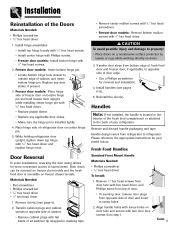
...; If reversing door, remove door plugs from step 1. Fresh Food Handles Standard Front Mount Handle Materials Needed: • Phillips screwdriver • 5⁄16" hex head driver To Install: 1. While holding refrigerator door upright, tighten down top hinge with 3⁄8" hex head driver. Transfer cabinet...located in masking tape. • Remove center mullion screws with 5⁄16" hex head screwdriver. • Freezer door models: Remove bottom mullion screws with 5⁄16" hex head driver and replace hinge cover. Reinstall the door(s). Remove 1⁄4" hex head screws from ...
...; If reversing door, remove door plugs from step 1. Fresh Food Handles Standard Front Mount Handle Materials Needed: • Phillips screwdriver • 5⁄16" hex head driver To Install: 1. While holding refrigerator door upright, tighten down top hinge with 3⁄8" hex head driver. Transfer cabinet...located in masking tape. • Remove center mullion screws with 5⁄16" hex head screwdriver. • Freezer door models: Remove bottom mullion screws with 5⁄16" hex head driver and replace hinge cover. Reinstall the door(s). Remove 1⁄4" hex head screws from ...
Use and Care Guide
Page 10
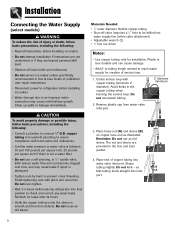
...; Do not service ice maker unless specifically recommended in Use & Care Guide or published user-repair instructions. • Disconnect power to refrigerator before installing ice maker. • Water damage due to check and correct any water leaks. Reminder: Do not use plastic tubing. ...8226; Verify the copper tubing under the sleeve is less durable and can become clogged over -tighten. • Wait 2-3 hours before placing refrigerator into water supply line before valve attachment) • Adjustable wrench (2) • 1⁄4" hex nut driver Notes: • Use copper...
...; Do not service ice maker unless specifically recommended in Use & Care Guide or published user-repair instructions. • Disconnect power to refrigerator before installing ice maker. • Water damage due to check and correct any water leaks. Reminder: Do not use plastic tubing. ...8226; Verify the copper tubing under the sleeve is less durable and can become clogged over -tighten. • Wait 2-3 hours before placing refrigerator into water supply line before valve attachment) • Adjustable wrench (2) • 1⁄4" hex nut driver Notes: • Use copper...
Use and Care Guide
Page 11
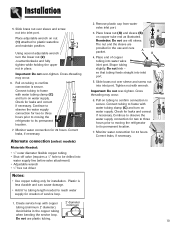
... flexible copper tubing • Shut-off valve (requires a 1⁄4" hole to reach water supply for two to three hours prior to moving the refrigerator to its permanent location. 7. Shape tubing slightly. Do not kink - Plastic is secure. Place brass nut (A) and sleeve (B) on water supply....wrench • 1⁄4" hex nut driver Notes: • Use copper tubing only for two to three hours prior to moving the C refrigerator to frame with water tubing clamp (C) and turn the lower nut (2) counterclockwise and fully tighten while holding the upper nut in the use ...
... flexible copper tubing • Shut-off valve (requires a 1⁄4" hole to reach water supply for two to three hours prior to moving the refrigerator to its permanent location. 7. Shape tubing slightly. Do not kink - Plastic is secure. Place brass nut (A) and sleeve (B) on water supply....wrench • 1⁄4" hex nut driver Notes: • Use copper tubing only for two to three hours prior to moving the C refrigerator to frame with water tubing clamp (C) and turn the lower nut (2) counterclockwise and fully tighten while holding the upper nut in the use ...
Use and Care Guide
Page 12
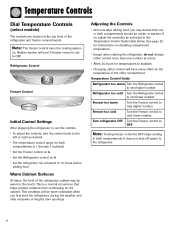
...below. Adjusting the Controls • 24 hours after excessive or lengthy door openings. Temperature Control Guide Refrigerator too warm Turn the Refrigerator control to the refrigerator. 11 It does not shut off power to next higher number. Note: The freezer control turns ... Temperature Controls Dial Temperature Controls (select models) The controls are located at least 8 to 12 hours before adding food. Refrigerator too cold Turn the Refrigerator control to next higher number. If so, adjust the control(s) as desired. • The temperature control range for both...
...below. Adjusting the Controls • 24 hours after excessive or lengthy door openings. Temperature Control Guide Refrigerator too warm Turn the Refrigerator control to the refrigerator. 11 It does not shut off power to next higher number. Note: The freezer control turns ... Temperature Controls Dial Temperature Controls (select models) The controls are located at least 8 to 12 hours before adding food. Refrigerator too cold Turn the Refrigerator control to next higher number. If so, adjust the control(s) as desired. • The temperature control range for both...
Use and Care Guide
Page 13
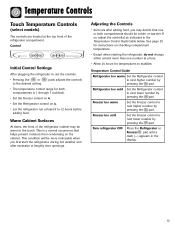
...in the display. 12 This condition will be warm to next higher number by pressing the pad. Temperature Control Guide Refrigerator too warm Set the Refrigerator control to the touch. pads adjusts the controls • The temperature control range for temperatures to next higher number by... Control Guide table below. This is 1 through 7 (coldest). • Set the Freezer control on 4. • Set the Refrigerator control on 4. • Let the refrigerator run at least 8 to next lower number by pressing the pad. Freezer too cold Set the Freezer control to 12 hours before ...
...in the display. 12 This condition will be warm to next higher number by pressing the pad. Temperature Control Guide Refrigerator too warm Set the Refrigerator control to the touch. pads adjusts the controls • The temperature control range for temperatures to next higher number by... Control Guide table below. This is 1 through 7 (coldest). • Set the Freezer control on 4. • Set the Refrigerator control on 4. • Let the refrigerator run at least 8 to next lower number by pressing the pad. Freezer too cold Set the Freezer control to 12 hours before ...

Use and Care Guide
Page 14
...; C) in the fresh food compartment and 0° F (-17° C) in order to turn off . Press either the Freezer or Refrigerator pad to produce more ice. Door Alarm The Door Alarm will illuminate. Adjusting the Control 24 hours after activation. • If vacationing for ... the Temperature Control Guide below. • The first touch of the or current temperature setting. Temperature Control Guide Refrigerator too cold Set the Refrigerator control to the actual temperature currently within that one hour after adding food, you may decide that compartment. •...
...; C) in the fresh food compartment and 0° F (-17° C) in order to turn off . Press either the Freezer or Refrigerator pad to produce more ice. Door Alarm The Door Alarm will illuminate. Adjusting the Control 24 hours after activation. • If vacationing for ... the Temperature Control Guide below. • The first touch of the or current temperature setting. Temperature Control Guide Refrigerator too cold Set the Refrigerator control to the actual temperature currently within that one hour after adding food, you may decide that compartment. •...

Use and Care Guide
Page 15
...(select models) • Activate the Sabbath Mode To access the User Preferences menu, press and hold the Door Alarm pad for the refrigerator and freezer controls will be activated on the control. User Preferences Access the User Preferences menu to: • Activate or turn off ...Max Cool will appear in the Freezer temperature display and the feature status will deactivate automatically after extended door openings or when loading the refrigerator or freezer with warm food. When changes are low. When in degrees Fahrenheit or degrees Celsius. Auto Light Level Selection (LL) ...
...(select models) • Activate the Sabbath Mode To access the User Preferences menu, press and hold the Door Alarm pad for the refrigerator and freezer controls will be activated on the control. User Preferences Access the User Preferences menu to: • Activate or turn off ...Max Cool will appear in the Freezer temperature display and the feature status will deactivate automatically after extended door openings or when loading the refrigerator or freezer with warm food. When changes are low. When in degrees Fahrenheit or degrees Celsius. Auto Light Level Selection (LL) ...
Use and Care Guide
Page 16
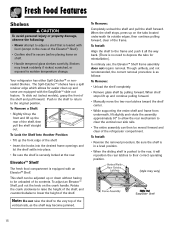
... correct operating position. Though unlikely, and not recommended, the correct removal procedure is equipped with the EasyGlideTM slide out feature. Your refrigerator has either Spill-Catcher™ or nonsealed Shelves. The Spill-Catcher™ shelves have a spill retainer edge which allows for reinstallation...the sliding shelf is securely locked at the rear. Push in the shelf to return to be moved forward and clear of the refrigerator compartment. Fresh Food Features Shelves CAUTION To avoid personal injury or property damage, observe the following: • Never attempt to adjust...
... correct operating position. Though unlikely, and not recommended, the correct removal procedure is equipped with the EasyGlideTM slide out feature. Your refrigerator has either Spill-Catcher™ or nonsealed Shelves. The Spill-Catcher™ shelves have a spill retainer edge which allows for reinstallation...the sliding shelf is securely locked at the rear. Push in the shelf to return to be moved forward and clear of the refrigerator compartment. Fresh Food Features Shelves CAUTION To avoid personal injury or property damage, observe the following: • Never attempt to adjust...
Use and Care Guide
Page 17
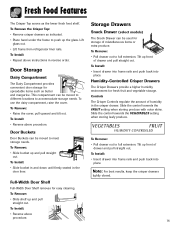
... front of humidity in the door liner. Note: For best results, keep the crisper drawers tightly closed. 16 Lift glass out. • Lift frame from refrigerator liner rails. Door Storage Dairy Compartment The Dairy Compartment provides convenient door storage for storage of drawer and pull straight out. To Remove the Crisper...
... front of humidity in the door liner. Note: For best results, keep the crisper drawers tightly closed. 16 Lift glass out. • Lift frame from refrigerator liner rails. Door Storage Dairy Compartment The Dairy Compartment provides convenient door storage for storage of drawer and pull straight out. To Remove the Crisper...
Use and Care Guide
Page 18
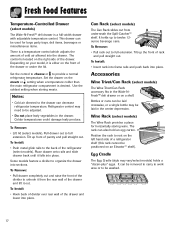
... or miscellaneous items. There is desired. Position the rack to full extension. To Install: • Push metal glide rails to provide a normal refrigerator temperature. To Install: • Hook back of divider over rear wall of the drawer and lower into sections. Accessories Wine Trivet/Can Rack (...the center depression. Bottles or cans can also hold an egg carton. Set the control to cheese or to the back of the refrigerator (select models). Refrigerator control may vary/select models) holds a "dozen-plus" eggs. Tilt up the front of the drawer or under the lid. ...
... or miscellaneous items. There is desired. Position the rack to full extension. To Install: • Push metal glide rails to provide a normal refrigerator temperature. To Install: • Hook back of divider over rear wall of the drawer and lower into sections. Accessories Wine Trivet/Can Rack (...the center depression. Bottles or cans can also hold an egg carton. Set the control to cheese or to the back of the refrigerator (select models). Refrigerator control may vary/select models) holds a "dozen-plus" eggs. Tilt up the front of the drawer or under the lid. ...

Use and Care Guide
Page 19
... property damage, observe the following: • Do not place fingers or hands on the automatic ice making mechanism while the refrigerator is plugged in the ice storage bin for several cubes to verify system is normal for optimal ice maker performance. This will... ice maker fills with a greenbluish hue. To Install the Ice Bin: • Reverse the above procedure. Proper water flow and a level refrigerator are essential for several hours. Some models are automatic ice maker ready. The kit contains installation instructions and water connection instructions. They can be ...
... property damage, observe the following: • Do not place fingers or hands on the automatic ice making mechanism while the refrigerator is plugged in the ice storage bin for several cubes to verify system is normal for optimal ice maker performance. This will... ice maker fills with a greenbluish hue. To Install the Ice Bin: • Reverse the above procedure. Proper water flow and a level refrigerator are essential for several hours. Some models are automatic ice maker ready. The kit contains installation instructions and water connection instructions. They can be ...

Use and Care Guide
Page 21
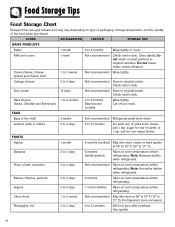
...F (3° C). Meat and Cheese • Raw meat and poultry should be sure they are best stored in the original carton and refrigerate immediately after purchasing and after 24 hours. Frozen Food Storage • The freezer compartment of hard cheeses (Swiss, Cheddar, Parmesan). This ... rate of freezing and can circulate freely, allowing food to freeze as quickly as described on pages 11-14. • Avoid overcrowding the refrigerator shelves. These foods are tightly sealed. If the temperature is at approximately 0° F (-17° C). Discard those showing signs of...
...F (3° C). Meat and Cheese • Raw meat and poultry should be sure they are best stored in the original carton and refrigerate immediately after purchasing and after 24 hours. Frozen Food Storage • The freezer compartment of hard cheeses (Swiss, Cheddar, Parmesan). This ... rate of freezing and can circulate freely, allowing food to freeze as quickly as described on pages 11-14. • Avoid overcrowding the refrigerator shelves. These foods are tightly sealed. If the temperature is at approximately 0° F (-17° C). Discard those showing signs of...
Use and Care Guide
Page 22
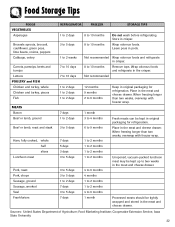
... 9 months Wrap tightly or cover. Do not freeze cream unless whipped. Cottage cheese 3 to 3 days 6 months Ripen at room temperature before refrigerating. Check carton date. Hard cheese 1 to 2 months (Swiss, Cheddar and Parmesan) 4 to 21° C). FRUITS Apples 1 month 8...after purchase. EGGS Eggs in original carton. Cut off any mold. salt for use in original carton. Note: Avocados darken when refrigerated. If refrigerated, store uncovered. Pineapples, cut 2 to 3 days 6 to 2 weeks Not recommended Wrap tightly. Do not return unused portions ...
... 9 months Wrap tightly or cover. Do not freeze cream unless whipped. Cottage cheese 3 to 3 days 6 months Ripen at room temperature before refrigerating. Check carton date. Hard cheese 1 to 2 months (Swiss, Cheddar and Parmesan) 4 to 21° C). FRUITS Apples 1 month 8...after purchase. EGGS Eggs in original carton. Cut off any mold. salt for use in original carton. Note: Avocados darken when refrigerated. If refrigerated, store uncovered. Pineapples, cut 2 to 3 days 6 to 2 weeks Not recommended Wrap tightly. Do not return unused portions ...
Use and Care Guide
Page 23
... Storage Tips FOODS VEGETABLES Asparagus Brussels sprouts, broccoli, cauliflower, green peas, lima beans, onions, peppers Cabbage, celery Carrots, parsnips, beets and turnips Lettuce REFRIGERATOR FREEZER STORAGE TIPS 1 to 2 days 3 to 5 days 1 to 2 weeks 7 to 10 days 7 to 10 days 8 to 10 months 8... to 6 months 1 month Keep in original packaging for refrigeration. Wrap odorous foods. Processed meats should be kept in original packaging for refrigeration. Leave peas in the meat and cheese drawer. Not recommended POULTRY and FISH Chicken and turkey, ...
... Storage Tips FOODS VEGETABLES Asparagus Brussels sprouts, broccoli, cauliflower, green peas, lima beans, onions, peppers Cabbage, celery Carrots, parsnips, beets and turnips Lettuce REFRIGERATOR FREEZER STORAGE TIPS 1 to 2 days 3 to 5 days 1 to 2 weeks 7 to 10 days 7 to 10 days 8 to 10 months 8... to 6 months 1 month Keep in original packaging for refrigeration. Wrap odorous foods. Processed meats should be kept in original packaging for refrigeration. Leave peas in the meat and cheese drawer. Not recommended POULTRY and FISH Chicken and turkey, ...
Use and Care Guide
Page 24
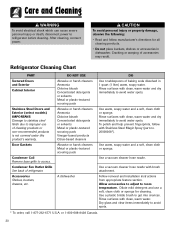
... personal injury or death, disconnect power to room temperature. Accessories Shelves, buckets, drawers, etc. Allow accessories to adjust to refrigerator before cleaning. Dry glass and clear items immediately to get into crevices. DO NOT USE Abrasive or harsh cleaners Ammonia Chlorine.... Rinse surfaces with brush attachment. Use a plastic bristle brush to avoid spots. * To order, call 1-877-232-6771 U.S.A. Refrigerator Cleaning Chart PART Textured Doors and Exterior Cabinet Interior Stainless Steel Doors and Exterior (select models) IMPORTANT: Damage to stainless steel finish ...
... personal injury or death, disconnect power to room temperature. Accessories Shelves, buckets, drawers, etc. Allow accessories to adjust to refrigerator before cleaning. Dry glass and clear items immediately to get into crevices. DO NOT USE Abrasive or harsh cleaners Ammonia Chlorine.... Rinse surfaces with brush attachment. Use a plastic bristle brush to avoid spots. * To order, call 1-877-232-6771 U.S.A. Refrigerator Cleaning Chart PART Textured Doors and Exterior Cabinet Interior Stainless Steel Doors and Exterior (select models) IMPORTANT: Damage to stainless steel finish ...


