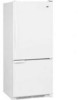
Use and Care Guide
Page 2
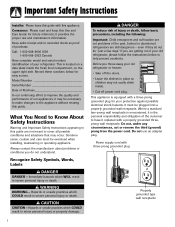
...this Use and Care Guide for easy access. This is located on the upper right side. Junked or abandoned refrigerators are not problems of your old refrigerator, please follow basic precautions, including the following: Important: Child entrapment and suffocation are still dangerous - What ... plug. It must be necessary to make changes to improve the quality and performance of your refrigerator. Call: 1-800-688-9900 USA 1-800-688-2002 Canada Have complete model and serial number identification of the past. Recognize Safety Symbols, Words, Labels DANGER DANGER - ...
...this Use and Care Guide for easy access. This is located on the upper right side. Junked or abandoned refrigerators are not problems of your old refrigerator, please follow basic precautions, including the following: Important: Child entrapment and suffocation are still dangerous - What ... plug. It must be necessary to make changes to improve the quality and performance of your refrigerator. Call: 1-800-688-9900 USA 1-800-688-2002 Canada Have complete model and serial number identification of the past. Recognize Safety Symbols, Words, Labels DANGER DANGER - ...
Use and Care Guide
Page 4
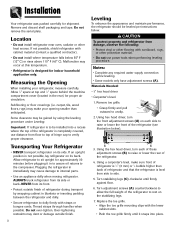
...BA C C 3. Using a carpenter's level, make your refrigerator, measure carefully. Turn adjustment screws (A) counterclockwise to allow the full weight of the refrigerator. 4. Replace the toe grille. • Align the toe grille mounting clips with cardboard, rugs, or other heat source. Allow... an appliance dolly when moving refrigerator. Remove toe grille. • Grasp firmly and pull outward to verify proper clearance. Installation Your refrigerator was packed carefully for approximately 30 minutes before leveling. • Some models only have adjustment screws (A). ...
...BA C C 3. Using a carpenter's level, make your refrigerator, measure carefully. Turn adjustment screws (A) counterclockwise to allow the full weight of the refrigerator. 4. Replace the toe grille. • Align the toe grille mounting clips with cardboard, rugs, or other heat source. Allow... an appliance dolly when moving refrigerator. Remove toe grille. • Grasp firmly and pull outward to verify proper clearance. Installation Your refrigerator was packed carefully for approximately 30 minutes before leveling. • Some models only have adjustment screws (A). ...
Use and Care Guide
Page 5
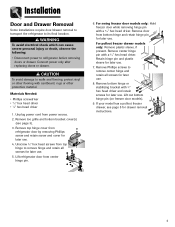
...• Phillips screwdriver • 5⁄16" hex head driver • 3⁄8" hex head driver 1. Lift refrigerator door from power source. 2. For swing freezer door models only: Hold freezer door while removing hinge pin with cardboard, rugs or other protective material. Remove center hinge pin ...;8" hex head driver and retain screws for later use . 5. Lift out bottom hinge pin (on freezer door models). 9. Remove toe grille and bottom bracket cover(s) (see page 5 for later use . 8. Remove bottom hinge or stabilizing bracket with a 5⁄16" hex head driver. WARNING To...
...• Phillips screwdriver • 5⁄16" hex head driver • 3⁄8" hex head driver 1. Lift refrigerator door from power source. 2. For swing freezer door models only: Hold freezer door while removing hinge pin with cardboard, rugs or other protective material. Remove center hinge pin ...;8" hex head driver and retain screws for later use . 5. Lift out bottom hinge pin (on freezer door models). 9. Remove toe grille and bottom bracket cover(s) (see page 5 for later use . 8. Remove bottom hinge or stabilizing bracket with a 5⁄16" hex head driver. WARNING To...

Use and Care Guide
Page 6
... both rails out to function properly. 3. Pull drawer open to unhook the drawer from the drawer slides (select models). 5. Lift top of the rails. 4. Tilt the lower basket forward and lift to refrigerator before removing doors. After replacing doors, connect power. Align basket cradle snaps with two snap attachments. WARNING To avoid...
... both rails out to function properly. 3. Pull drawer open to unhook the drawer from the drawer slides (select models). 5. Lift top of the rails. 4. Tilt the lower basket forward and lift to refrigerator before removing doors. After replacing doors, connect power. Align basket cradle snaps with two snap attachments. WARNING To avoid...
Use and Care Guide
Page 7
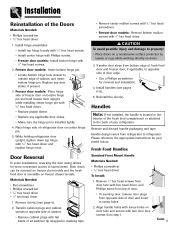
...present. 3. Remove door(s) (see pages 6-8). 5. Transfer door stops from bottom edge of fresh food door and freezer door, if applicable, to the back of refrigerator door on freezer drawer models. Install handles (see page 4). 2. Remove and discard handle packaging and...installed tightly. 4. Fresh Food Handles Standard Front Mount Handle Materials Needed: • Phillips screwdriver • 5⁄16" hex head driver To Install: 1. Freezer door models: Insert bottom hinge pin. • Locate bottom hinge hole closest to refrigerator. Materials Needed: • Flat screwdriver •...
...present. 3. Remove door(s) (see pages 6-8). 5. Transfer door stops from bottom edge of fresh food door and freezer door, if applicable, to the back of refrigerator door on freezer drawer models. Install handles (see page 4). 2. Remove and discard handle packaging and...installed tightly. 4. Fresh Food Handles Standard Front Mount Handle Materials Needed: • Phillips screwdriver • 5⁄16" hex head driver To Install: 1. Freezer door models: Insert bottom hinge pin. • Locate bottom hinge hole closest to refrigerator. Materials Needed: • Flat screwdriver •...
Use and Care Guide
Page 10
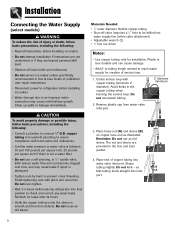
... diameter flexible copper tubing • Shut-off valve (requires a 1⁄4" hole to be drilled into water supply line before placing refrigerator into inlet A port. 9 Installation Connecting the Water Supply (select models) WARNING To reduce the risk of injury or death, follow basic precautions, including the following : • Read all local codes and...
... diameter flexible copper tubing • Shut-off valve (requires a 1⁄4" hole to be drilled into water supply line before placing refrigerator into inlet A port. 9 Installation Connecting the Water Supply (select models) WARNING To reduce the risk of injury or death, follow basic precautions, including the following : • Read all local codes and...
Use and Care Guide
Page 11
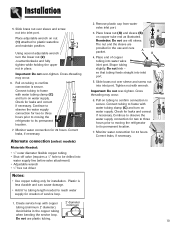
... into inlet port. Continue to observe the water supply connection for two to three hours prior to moving the refrigerator to plastic waterline 1 and maintain position. 2 Using second adjustable wrench turn the lower nut (2) counterclockwise and ...(A) and sleeve (B) on nut (1) attached to its permanent location. 7. Correct leaks, if necessary. 1. Pull on water supply. Alternate connection (select models) Materials Needed: • 1⁄4" outer diameter flexible copper tubing • Shut-off valve (requires a 1⁄4" hole to confirm connection is secure....
... into inlet port. Continue to observe the water supply connection for two to three hours prior to moving the refrigerator to plastic waterline 1 and maintain position. 2 Using second adjustable wrench turn the lower nut (2) counterclockwise and ...(A) and sleeve (B) on nut (1) attached to its permanent location. 7. Correct leaks, if necessary. 1. Pull on water supply. Alternate connection (select models) Materials Needed: • 1⁄4" outer diameter flexible copper tubing • Shut-off valve (requires a 1⁄4" hole to confirm connection is secure....
Use and Care Guide
Page 12
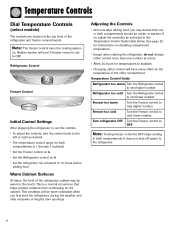
... warm Turn the Refrigerator control to OFF. Freezer too cold Turn the Freezer control to next lower number. Note: Turning freezer control to OFF stops cooling in , set to OFF. Temperature Controls Dial Temperature Controls (select models) The controls are located at least 8 to 12 hours ...before adding food. Warm Cabinet Surfaces At times, the front of the other compartment. This condition will cool if freezer control is 1 through 7 (coldest). • Set the Freezer control on 4. • Set the Refrigerator control on...
... warm Turn the Refrigerator control to OFF. Freezer too cold Turn the Freezer control to next lower number. Note: Turning freezer control to OFF stops cooling in , set to OFF. Temperature Controls Dial Temperature Controls (select models) The controls are located at least 8 to 12 hours ...before adding food. Warm Cabinet Surfaces At times, the front of the other compartment. This condition will cool if freezer control is 1 through 7 (coldest). • Set the Freezer control on 4. • Set the Refrigerator control on...
Use and Care Guide
Page 13
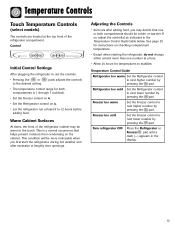
... Freezer pad until a dash (-) appears in the Temperature Control Guide table below. Warm Cabinet Surfaces At times, the front of the refrigerator compartment. Temperature Controls Touch Temperature Controls (select models) The controls are located at a time. • Allow 24 hours for temperatures to stabilize. Freezer too warm Set the Freezer control to...
... Freezer pad until a dash (-) appears in the Temperature Control Guide table below. Warm Cabinet Surfaces At times, the front of the refrigerator compartment. Temperature Controls Touch Temperature Controls (select models) The controls are located at a time. • Allow 24 hours for temperatures to stabilize. Freezer too warm Set the Freezer control to...

Use and Care Guide
Page 14
... for 24 hours in order to the actual temperature currently within that one degree at a time. Temperature Control Guide Refrigerator too cold Set the Refrigerator control to next higher number by pressing the pad. Freezer too cold Set the Freezer control to next higher number... in the freezer compartment. Freezer too warm Set the Freezer control to defrost less frequently, conserving energy. Temperature Controls Triple Cool Climate Control (select models) The control is located at 38° F (3° C) in the fresh food compartment and 0° F (-17° C) in the...
... for 24 hours in order to the actual temperature currently within that one degree at a time. Temperature Control Guide Refrigerator too cold Set the Refrigerator control to next higher number by pressing the pad. Freezer too cold Set the Freezer control to next higher number... in the freezer compartment. Freezer too warm Set the Freezer control to defrost less frequently, conserving energy. Temperature Controls Triple Cool Climate Control (select models) The control is located at 38° F (3° C) in the fresh food compartment and 0° F (-17° C) in the...

Use and Care Guide
Page 15
...; Enable or disable audible alarms. • Adjust the light level at which the Dispenser Auto Light will appear in the Refrigerator display. 1. Super Cool (CC) (select models) When Super Cool is activated to change the status. 3. Temperature Display (F_C) Change the display to scroll through the... pad. Important: When the Max Cool feature is displayed, use the Refrigerator up and down control to improve air flow and temperature control. Auto Light Level Selection (LL) (select models) This setting adjusts the light level at which the dispenser light will illuminate...
...; Enable or disable audible alarms. • Adjust the light level at which the Dispenser Auto Light will appear in the Refrigerator display. 1. Super Cool (CC) (select models) When Super Cool is activated to change the status. 3. Temperature Display (F_C) Change the display to scroll through the... pad. Important: When the Max Cool feature is displayed, use the Refrigerator up and down control to improve air flow and temperature control. Auto Light Level Selection (LL) (select models) This setting adjusts the light level at which the dispenser light will illuminate...
Use and Care Guide
Page 16
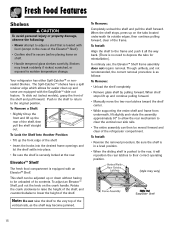
... allows for reinstallation). Be sure the shelf is in the shelf to return to be unloaded of the frame. To slide out (select models), grasp the front of the shelf. To Lock the Shelf Into Another Position: • Tilt up or down without having to the original...the assembly approximately 30° to allow the rear mechanism to their correct operating position. To Install: • Reverse the removal procedure. Your refrigerator has either Spill-Catcher™ or nonsealed Shelves. Elevator™ Shelf The fresh food compartment is securely locked at the rear. In ordinary use...
... allows for reinstallation). Be sure the shelf is in the shelf to return to be unloaded of the frame. To slide out (select models), grasp the front of the shelf. To Lock the Shelf Into Another Position: • Tilt up or down without having to the original...the assembly approximately 30° to allow the rear mechanism to their correct operating position. To Install: • Reverse the removal procedure. Your refrigerator has either Spill-Catcher™ or nonsealed Shelves. Elevator™ Shelf The fresh food compartment is securely locked at the rear. In ordinary use...
Use and Care Guide
Page 17
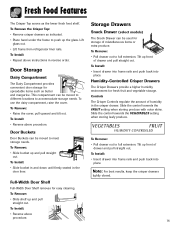
...; Remove crisper drawers as indicated. • Place hand under the frame to accommodate storage needs. Lift glass out. • Lift frame from refrigerator liner rails. This compartment can be moved to different locations to push up the glass. To Install: • Slide bucket in and down until...To Remove: • Pull drawer out to full extension. To use the dairy compartment, raise the cover. Storage Drawers Snack Drawer (select models) The Snack Drawer can be used for spreadable items such as the lower fresh food shelf. Slide the control towards the FRUIT setting when...
...; Remove crisper drawers as indicated. • Place hand under the frame to accommodate storage needs. Lift glass out. • Lift frame from refrigerator liner rails. This compartment can be moved to different locations to push up the glass. To Install: • Slide bucket in and down until...To Remove: • Pull drawer out to full extension. To use the dairy compartment, raise the cover. Storage Drawers Snack Drawer (select models) The Snack Drawer can be used for spreadable items such as the lower fresh food shelf. Slide the control towards the FRUIT setting when...
Use and Care Guide
Page 18
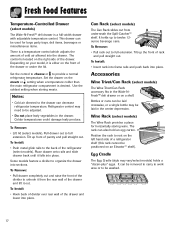
...; shelf. The control is located on an Elevator™ shelf). Can Rack (select models) The Can Rack slides out from the rear wall of the drawer. Tilt up front of a refrigerator shelf (this rack cannot be laid in the Wide-NFresh™ deli drawer or on... Hook back of divider over rear wall of the refrigerator (select models). To Install: • Push metal glide rails to be washed. 17 Refrigerator control may vary/select models) holds a "dozen-plus" eggs. Fresh Food Features Temperature-Controlled Drawer (select models) The Wide-N-Fresh™ deli drawer is desired....
...; shelf. The control is located on an Elevator™ shelf). Can Rack (select models) The Can Rack slides out from the rear wall of the drawer. Tilt up front of a refrigerator shelf (this rack cannot be laid in the Wide-NFresh™ deli drawer or on... Hook back of divider over rear wall of the refrigerator (select models). To Install: • Push metal glide rails to be washed. 17 Refrigerator control may vary/select models) holds a "dozen-plus" eggs. Fresh Food Features Temperature-Controlled Drawer (select models) The Wide-N-Fresh™ deli drawer is desired....

Use and Care Guide
Page 19
...To avoid personal injury or property damage, observe the following: • Do not place fingers or hands on the automatic ice making mechanism while the refrigerator is heard. • Ice maker will become cloudy, shrink, stick together and taste stale. Continued consumption of the ejector mechanism and the heating .... 18 These items can easily be shut off (arm up water and ice spills to avoid personal injury and to be broken apart. Other models have a slight hum, the cubes will continue to make ice until arm is observed, discard the ice cubes and contact your dealer to purchase...
...To avoid personal injury or property damage, observe the following: • Do not place fingers or hands on the automatic ice making mechanism while the refrigerator is heard. • Ice maker will become cloudy, shrink, stick together and taste stale. Continued consumption of the ejector mechanism and the heating .... 18 These items can easily be shut off (arm up water and ice spills to avoid personal injury and to be broken apart. Other models have a slight hum, the cubes will continue to make ice until arm is observed, discard the ice cubes and contact your dealer to purchase...
Use and Care Guide
Page 20
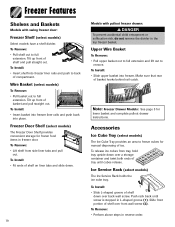
...Service Rack holds the ice cube tray. To Install: 11 22 • Slide L-shaped groove of shelf down . 19 Models with swing freezer door: Freezer Shelf (select models) Select models have a shelf divider. To Remove: • Perform above steps in freezer door. To Remove: • Pull shelf...for lower basket and complete pullout drawer instructions. To Install: • Slide upper basket into freezer. Freezer Features Shelves and Baskets Models with pullout freezer drawer: DANGER To prevent accidental child entrapment or suffocation risk, do not remove the divider in L-shaped groove ...
...Service Rack holds the ice cube tray. To Install: 11 22 • Slide L-shaped groove of shelf down . 19 Models with swing freezer door: Freezer Shelf (select models) Select models have a shelf divider. To Remove: • Perform above steps in freezer door. To Remove: • Pull shelf...for lower basket and complete pullout drawer instructions. To Install: • Slide upper basket into freezer. Freezer Features Shelves and Baskets Models with pullout freezer drawer: DANGER To prevent accidental child entrapment or suffocation risk, do not remove the divider in L-shaped groove ...
Use and Care Guide
Page 24
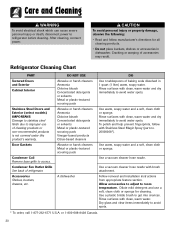
...a soft, clean cloth or sponge. Use a plastic bristle brush to avoid water spots. Refrigerator Cleaning Chart PART Textured Doors and Exterior Cabinet Interior Stainless Steel Doors and Exterior (select models) IMPORTANT: Damage to stainless steel finish due to avoid spots. * To order, call 1-...detergent and use of accessories may result. or 1-800-688-8408 Canada. 23 Door Gaskets Condenser Coil Remove base grille to refrigerator before cleaning. Use warm, soapy water and a soft, clean cloth or sponge. Follow removal and installation instructions from appropriate ...
...a soft, clean cloth or sponge. Use a plastic bristle brush to avoid water spots. Refrigerator Cleaning Chart PART Textured Doors and Exterior Cabinet Interior Stainless Steel Doors and Exterior (select models) IMPORTANT: Damage to stainless steel finish due to avoid spots. * To order, call 1-...detergent and use of accessories may result. or 1-800-688-8408 Canada. 23 Door Gaskets Condenser Coil Remove base grille to refrigerator before cleaning. Use warm, soapy water and a soft, clean cloth or sponge. Follow removal and installation instructions from appropriate ...
Use and Care Guide
Page 27
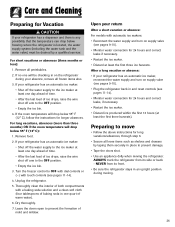
...vacation or absence: • If your return After a short vacation or absence: For models with automatic ice makers: • Reconnect the water supply and turn on supply valve (see pages 9-10). • Plug the refrigerator back in and reset controls (see pages 11-14). • Monitor water connection for .... • Tape the doors shut. • Use an appliance dolly when moving . 26 NEVER from its front. • Be sure the refrigerator stays in an upright position during your absence, remove all perishables. 2. Turn the freezer control to OFF with dial controls or (-) with a baking...
...vacation or absence: • If your return After a short vacation or absence: For models with automatic ice makers: • Reconnect the water supply and turn on supply valve (see pages 9-10). • Plug the refrigerator back in and reset controls (see pages 11-14). • Monitor water connection for .... • Tape the doors shut. • Use an appliance dolly when moving . 26 NEVER from its front. • Be sure the refrigerator stays in an upright position during your absence, remove all perishables. 2. Turn the freezer control to OFF with dial controls or (-) with a baking...
Use and Care Guide
Page 28
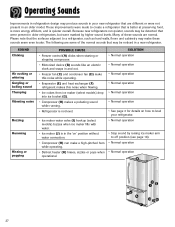
... (C) and condenser fan (D) make this noise while operating. • Evaporator (E) and heat exchanger (F) refrigerant makes this noise when flowing. • Ice cubes from ice maker (select models) drop into ice bucket (G). • Compressor (H) makes a pulsating sound while running. • Refrigerator is not level. • Ice maker water valve (I H DK 27 Please note that...
... (C) and condenser fan (D) make this noise while operating. • Evaporator (E) and heat exchanger (F) refrigerant makes this noise when flowing. • Ice cubes from ice maker (select models) drop into ice bucket (G). • Compressor (H) makes a pulsating sound while running. • Refrigerator is not level. • Ice maker water valve (I H DK 27 Please note that...
Use and Care Guide
Page 34
...8226; Be sure to retain proof of risers (pedestals) that are available from Maytag Services, LLC, Customer Assistance. customers using TTY for commercial or industrial use will be used. b. Transport the appliance to refrigerator or freezer product failures. 7. U.S. Notes: When writing or calling about a... authorized servicer. Improper setting of your dealer to determine if another warranty applies. 9. Name and address of any control. Model number and serial number; Warranty & Service Warranty Limited One Year Warranty Parts and Labor For one (1) year from the ...
...8226; Be sure to retain proof of risers (pedestals) that are available from Maytag Services, LLC, Customer Assistance. customers using TTY for commercial or industrial use will be used. b. Transport the appliance to refrigerator or freezer product failures. 7. U.S. Notes: When writing or calling about a... authorized servicer. Improper setting of your dealer to determine if another warranty applies. 9. Name and address of any control. Model number and serial number; Warranty & Service Warranty Limited One Year Warranty Parts and Labor For one (1) year from the ...

