

Service Manual
Page 53
Open the door and remove the center screw of the front panel in the front shroud. Remove the hinges from the door and relocate them to tune out excessive vibrations generated by the machine during the spin cycle. DISASSEMBLY 1. CABINET ASSEMBLY 5 - 1 Draw the door assembly away from the slots ...bottom and along either side of the door. 3. Always shut off electrical power to the inner door plug. 16008373-01 © 1998 Maytag Corporation SECTION 5. Grasp the door with one screw into the new slots and secure with both hands and lift the hinge area slightly. Figure...
Open the door and remove the center screw of the front panel in the front shroud. Remove the hinges from the door and relocate them to tune out excessive vibrations generated by the machine during the spin cycle. DISASSEMBLY 1. CABINET ASSEMBLY 5 - 1 Draw the door assembly away from the slots ...bottom and along either side of the door. 3. Always shut off electrical power to the inner door plug. 16008373-01 © 1998 Maytag Corporation SECTION 5. Grasp the door with one screw into the new slots and secure with both hands and lift the hinge area slightly. Figure...
Service Manual
Page 63
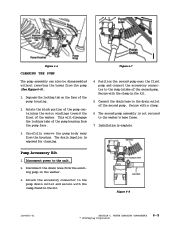
...pump assembly can also be disassembled without removing the hoses from the pump face. 4. The second pump assembly is exposed for cleaning. The drain impeller is not secured to the drain outlet of the second pump. WATER CARRYING COMPONENTS © 1998 Maytag Corporation 6-5 Installation is complete.... 6. Rotate the block portion of the pump containing the motor windings toward the front of the pump housing. 2. This will disengage the locking tabs of the pump housing from the pump (See Figure 6-6). 1. Pump Accessory Kit 1. Depress the locking tab on the face of the washer.
...pump assembly can also be disassembled without removing the hoses from the pump face. 4. The second pump assembly is exposed for cleaning. The drain impeller is not secured to the drain outlet of the second pump. WATER CARRYING COMPONENTS © 1998 Maytag Corporation 6-5 Installation is complete.... 6. Rotate the block portion of the pump containing the motor windings toward the front of the pump housing. 2. This will disengage the locking tabs of the pump housing from the pump (See Figure 6-6). 1. Pump Accessory Kit 1. Depress the locking tab on the face of the washer.


