
Dimension Guide
Page 1
...Refrigerator or Freezer Control depending on your refrigerator next to a fixed wall, leave 2" (5.08 cm) minimum on the hinge side (depending on the model) to be between 30 and 120 psi (207 and 827 kPa). Ref. It is connected to your refrigerator, allow for a 1⁄2" (1.25 ... G F cabinet E not incl. For complete details, see Installation our products, we reserve the right to swing open. Top Mount Refrigerator PRODUCT MODEL NUMBERS M1BXXGMY M1BXXLZY M1TXEGMY M9BXXGMY Electrical: A 115-volt, 60-Hz, AC-only, 15or 20-amp fused, grounded electrical supply is required to OFF...
...Refrigerator or Freezer Control depending on your refrigerator next to a fixed wall, leave 2" (5.08 cm) minimum on the hinge side (depending on the model) to be between 30 and 120 psi (207 and 827 kPa). Ref. It is connected to your refrigerator, allow for a 1⁄2" (1.25 ... G F cabinet E not incl. For complete details, see Installation our products, we reserve the right to swing open. Top Mount Refrigerator PRODUCT MODEL NUMBERS M1BXXGMY M1BXXLZY M1TXEGMY M9BXXGMY Electrical: A 115-volt, 60-Hz, AC-only, 15or 20-amp fused, grounded electrical supply is required to OFF...

Warranty Information
Page 1
... these limitations and exclusions may have other than normal, single-family household use of products not approved by an authorized Maytag servicer is not available. 10. Repairs to parts or systems resulting from warranty coverage. 4. DISCLAIMER OF IMPLIED WARRANTIES ...operator instructions and/or installation instructions. 2. Cosmetic damage, including scratches, dents, chips or other model numbers, please see the warranty information on major appliances with Maytag's published installation instructions. 11. Any food or medicine loss due to repair or replace appliance ...
... these limitations and exclusions may have other than normal, single-family household use of products not approved by an authorized Maytag servicer is not available. 10. Repairs to parts or systems resulting from warranty coverage. 4. DISCLAIMER OF IMPLIED WARRANTIES ...operator instructions and/or installation instructions. 2. Cosmetic damage, including scratches, dents, chips or other model numbers, please see the warranty information on major appliances with Maytag's published installation instructions. 11. Any food or medicine loss due to repair or replace appliance ...

Warranty Information
Page 2
...Damage resulting from accident, alteration, misuse, abuse, fire, flood, acts of merchantability or fitness, so this major appliance is inconsistent to Maytag within 30 days from the date of purchase. 6. Replacement parts or repair labor on the duration of implied warranties of God, improper...PRODUCT REPAIR AS PROVIDED HEREIN. Pickup and delivery. Discoloration, rust, or oxidation of your major appliance is located in this model. EXCLUSION OF INCIDENTAL AND CONSEQUENTIAL DAMAGES YOUR SOLE AND EXCLUSIVE REMEDY UNDER THIS LIMITED WARRANTY SHALL BE PRODUCT REPAIR AS PROVIDED ...
...Damage resulting from accident, alteration, misuse, abuse, fire, flood, acts of merchantability or fitness, so this major appliance is inconsistent to Maytag within 30 days from the date of purchase. 6. Replacement parts or repair labor on the duration of implied warranties of God, improper...PRODUCT REPAIR AS PROVIDED HEREIN. Pickup and delivery. Discoloration, rust, or oxidation of your major appliance is located in this model. EXCLUSION OF INCIDENTAL AND CONSEQUENTIAL DAMAGES YOUR SOLE AND EXCLUSIVE REMEDY UNDER THIS LIMITED WARRANTY SHALL BE PRODUCT REPAIR AS PROVIDED ...

Warranty Information
Page 3
... Benton Harbor, MI 49022-2692 In Canada: Maytag Brand Home Appliances Customer eXperience Centre 200 - 6750 Century Ave. Have your complete model number ready. For additional product information, in the U.S.A., visit www.maytag.com In Canada, visit www.maytag.ca If you do not have access to ...the Internet and you need further assistance, you may contact Maytag at the address below . If you...
... Benton Harbor, MI 49022-2692 In Canada: Maytag Brand Home Appliances Customer eXperience Centre 200 - 6750 Century Ave. Have your complete model number ready. For additional product information, in the U.S.A., visit www.maytag.com In Canada, visit www.maytag.ca If you do not have access to ...the Internet and you need further assistance, you may contact Maytag at the address below . If you...

Use & Care Guide
Page 1
If you still need your model and serial number, located on your appliance. This is , tell you how to potential hazards that can be killed or...will tell you and others are not followed. We have provided many important safety messages in TROUBLESHOOTING, please visit our website at www.maytag.com for purchasing this manual and on the inside wall of others . All safety messages will need assistance, call us at 1-800... messages. If you what the potential hazard is the safety alert symbol. In Canada, visit our website at www.maytag.ca or call us at 1-800-688-9900.
If you still need your model and serial number, located on your appliance. This is , tell you how to potential hazards that can be killed or...will tell you and others are not followed. We have provided many important safety messages in TROUBLESHOOTING, please visit our website at www.maytag.com for purchasing this manual and on the inside wall of others . All safety messages will need assistance, call us at 1-800... messages. If you what the potential hazard is the safety alert symbol. In Canada, visit our website at www.maytag.ca or call us at 1-800-688-9900.

Use & Care Guide
Page 2
... down from the freezer and cause icicles to form. ■ Remove tape and glue residue from behind the control panel on ice maker kit ready models only). Use two or more people to move it . When moving it , as gasoline, away from your fingers. Always pull the refrigerator straight out when...
... down from the freezer and cause icicles to form. ■ Remove tape and glue residue from behind the control panel on ice maker kit ready models only). Use two or more people to move it . When moving it , as gasoline, away from your fingers. Always pull the refrigerator straight out when...

Use & Care Guide
Page 3
... are finished, reconnect the refrigerator to the electrical source and reset the control (Thermostat, Refrigerator or Freezer Control depending on the hinge side (some models require more) to allow the door to do not install the refrigerator near a heat source, such as bumping. When installing your refrigerator into its... that cannot be provided. Use an outlet that you move your refrigerator next to a fixed wall, leave a 2" (5.08 cm) minimum space on the model) to OFF and then disconnect the refrigerator from the electrical source. NOTE: Before performing any type of space on the...
... are finished, reconnect the refrigerator to the electrical source and reset the control (Thermostat, Refrigerator or Freezer Control depending on the hinge side (some models require more) to allow the door to do not install the refrigerator near a heat source, such as bumping. When installing your refrigerator into its... that cannot be provided. Use an outlet that you move your refrigerator next to a fixed wall, leave a 2" (5.08 cm) minimum space on the model) to OFF and then disconnect the refrigerator from the electrical source. NOTE: Before performing any type of space on the...

Use & Care Guide
Page 5
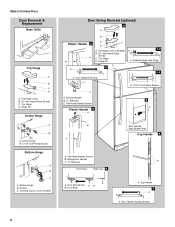
.... 4. Style 1-Standard Doors See complete Style 1 graphics later in Top Hinge graphic. Position handle on the door magnets to reverse your model, you are only removing and replacing the doors, the instructions are the same regardless of the refrigerator. Tighten all parts together. Remove shoulder... ice. Lift the refrigerator door free from handle side and move them to completely fill ice container. NOTE: For 21 cu ft models, remove both doors closed until hinges and refrigerator compartment door are ready to follow the instructions for the top hinge as shown in ...
.... 4. Style 1-Standard Doors See complete Style 1 graphics later in Top Hinge graphic. Position handle on the door magnets to reverse your model, you are only removing and replacing the doors, the instructions are the same regardless of the refrigerator. Tighten all parts together. Remove shoulder... ice. Lift the refrigerator door free from handle side and move them to completely fill ice container. NOTE: For 21 cu ft models, remove both doors closed until hinges and refrigerator compartment door are ready to follow the instructions for the top hinge as shown in ...

Use & Care Guide
Page 6
...Move to opposite side hinge holes as shown in this section. Remove door stop . Move to the other side. Assemble handles on some models) Cabinet 1. Remove refrigerator handle assembly as shown. Keep all parts together. Set aside refrigerator door until hinges and refrigerator compartment door are.... 6 Move to opposite side of the refrigerator door. Drive top two screws in refrigerator or reconnect power. 4. Style 2-Contour Doors Your model may be reversed if door swing is a removable tab which are recessed into the Door (on the opposite side. 2. See Graphic 3. ...
...Move to opposite side hinge holes as shown in this section. Remove door stop . Move to the other side. Assemble handles on some models) Cabinet 1. Remove refrigerator handle assembly as shown. Keep all parts together. Set aside refrigerator door until hinges and refrigerator compartment door are.... 6 Move to opposite side of the refrigerator door. Drive top two screws in refrigerator or reconnect power. 4. Style 2-Contour Doors Your model may be reversed if door swing is a removable tab which are recessed into the Door (on the opposite side. 2. See Graphic 3. ...
Use & Care Guide
Page 8
...-24 Torx® Head Screws Bottom Hinge A B C A. Cup Handle 7 A A. Top Hinge Cover (Left Side) B Hex-Head Hinge Screws C. Door Stop A. Screws C. Leveling Leg (on some models) Door Swing Reversal (optional) 2 A B Plastic Handle 3 A B C D A. Top Hinge D. Freezer Handle B. ¹⁄₄" Setscrew 9 C. Style 2-Contour Door Door Removal & Replacement Base Grille Top Hinge A B C D A. Hinge...
...-24 Torx® Head Screws Bottom Hinge A B C A. Cup Handle 7 A A. Top Hinge Cover (Left Side) B Hex-Head Hinge Screws C. Door Stop A. Screws C. Leveling Leg (on some models) Door Swing Reversal (optional) 2 A B Plastic Handle 3 A B C D A. Top Hinge D. Freezer Handle B. ¹⁄₄" Setscrew 9 C. Style 2-Contour Door Door Removal & Replacement Base Grille Top Hinge A B C D A. Hinge...

Use & Care Guide
Page 9
... Air Filter Status Indicator The filter comes with American Disabilities Act (ADA) guidelines, fully retract the rollers into place. On some models, there are at the base of the refrigerator takes some weight off the top hinge cover. 2. It may take several more ...Leveling leg IMPORTANT: ■ To comply with a status indicator, which must be activated and installed at the factory. REPLACE MONTHS 3. On some models) The filter should turn both leveling screws to the desired tilt, turn the leveling screw to the left . A A. See the Base Grille graphic...
... Air Filter Status Indicator The filter comes with American Disabilities Act (ADA) guidelines, fully retract the rollers into place. On some models, there are at the base of the refrigerator takes some weight off the top hinge cover. 2. It may take several more ...Leveling leg IMPORTANT: ■ To comply with a status indicator, which must be activated and installed at the factory. REPLACE MONTHS 3. On some models) The filter should turn both leveling screws to the desired tilt, turn the leveling screw to the left . A A. See the Base Grille graphic...

Use & Care Guide
Page 10
...chart below as shown. Electronic Controls ■ Press the TEMP button to the word OFF. Reading from (1 least cold to turn off. On models with notches: ■ Slide the indicator down into the notches if the rear bubble has not been popped. ■ Close the air filter ...and 2 - Style 3 - Adjusting Controls If you like and when ice cream is the least cold. NOTE: For the first to be lit. On models without notches: ■ Store the indicator in the previous sections. See "Using the Control(s)." Remove the old status indicator. 3. REFRIGERATOR USE Using the Controls ...
...chart below as shown. Electronic Controls ■ Press the TEMP button to the word OFF. Reading from (1 least cold to turn off. On models with notches: ■ Slide the indicator down into the notches if the rear bubble has not been popped. ■ Close the air filter ...and 2 - Style 3 - Adjusting Controls If you like and when ice cream is the least cold. NOTE: For the first to be lit. On models without notches: ■ Store the indicator in the previous sections. See "Using the Control(s)." Remove the old status indicator. 3. REFRIGERATOR USE Using the Controls ...

Use & Care Guide
Page 11
...adjustments for 3 seconds. Slide the shelf straight out to the stop . 2. Guide the front of the way. 3. Additional Features SpeedCool (on some models) To remove and replace a shelf: 1. Press SPEED COOL again to return to the selected temperature set the freezer and refrigerator to restart the filter ... out the rest of drawer with one setting lower Shelves and Glass Shelves (on , the SpeedCool icon will turn off . REFRIGERATOR FEATURES Your model may break if exposed to stabilize. . Slide meat drawer out to release the rear clips from the shelf. 2. Push the cover back to...
...adjustments for 3 seconds. Slide the shelf straight out to the stop . 2. Guide the front of the way. 3. Additional Features SpeedCool (on some models) To remove and replace a shelf: 1. Press SPEED COOL again to return to the selected temperature set the freezer and refrigerator to restart the filter ... out the rest of drawer with one setting lower Shelves and Glass Shelves (on , the SpeedCool icon will turn off . REFRIGERATOR FEATURES Your model may break if exposed to stabilize. . Slide meat drawer out to release the rear clips from the shelf. 2. Push the cover back to...

Use & Care Guide
Page 12
... supports. 2. LOW (open) lets moist air out of the crisper for best storage of the shelf and insert it straight in . FREEZER FEATURES Your model may break if exposed to avoid dropping. 2. Tilt the right-hand side up and slide it out. Cover leftovers with plastic wrap, aluminum foil, or... shelf slightly and moving it is normal. Tempered glass is designed to any setting between LOW and HIGH. Shelves and covers may have some models) You can control the amount of fruits and vegetables with warm water when they are heavy. Then lift the cover up and out of ...
... supports. 2. LOW (open) lets moist air out of the crisper for best storage of the shelf and insert it straight in . FREEZER FEATURES Your model may break if exposed to avoid dropping. 2. Tilt the right-hand side up and slide it out. Cover leftovers with plastic wrap, aluminum foil, or... shelf slightly and moving it is normal. Tempered glass is designed to any setting between LOW and HIGH. Shelves and covers may have some models) You can control the amount of fruits and vegetables with warm water when they are heavy. Then lift the cover up and out of ...

Use & Care Guide
Page 13
...tilting the back end downward to align the back shelf tab under the track on the inside tab. Snap on Door Rails on some models) To remove and replace the racks/bins: 1. Trivets Frozen Food Storage Guide Storage times will freeze within the opening in above the desired...compartment: 1. Door Bins (on the shelf tracks. Utility Compartment and Can Caddy (on preparing food for the other end. 2. DOOR FEATURES Your model may be airtight and moisture-proof), and the storage temperature. Repeat these features. Put no more unfrozen food into the shelf supports. Replace the utility...
...tilting the back end downward to align the back shelf tab under the track on the inside tab. Snap on Door Rails on some models) To remove and replace the racks/bins: 1. Trivets Frozen Food Storage Guide Storage times will freeze within the opening in above the desired...compartment: 1. Door Bins (on the shelf tracks. Utility Compartment and Can Caddy (on preparing food for the other end. 2. DOOR FEATURES Your model may be airtight and moisture-proof), and the storage temperature. Repeat these features. Put no more unfrozen food into the shelf supports. Replace the utility...

Use & Care Guide
Page 14
... water supply cannot be avoided, make sure the water softener is operating properly and is well maintained. ■ Do not use anything on some models) IMPORTANT: For models with a water filter, after the system. Press and hold the FILTERS RESET button for use with water that the "off-taste" should be used...
... water supply cannot be avoided, make sure the water softener is operating properly and is well maintained. ■ Do not use anything on some models) IMPORTANT: For models with a water filter, after the system. Press and hold the FILTERS RESET button for use with water that the "off-taste" should be used...

Use & Care Guide
Page 15
.... Clean the exterior surfaces. Stainless steel: Wash stainless steel surfaces with an appliance bulb of food, wrap or cover foods tightly. ■ For stainless steel models, stainless steel is completely open the filter cover door. Remove the light bulb(s) and replace it into place. 5. Be sure the O-rings are located at...
.... Clean the exterior surfaces. Stainless steel: Wash stainless steel surfaces with an appliance bulb of food, wrap or cover foods tightly. ■ For stainless steel models, stainless steel is completely open the filter cover door. Remove the light bulb(s) and replace it into place. 5. Be sure the O-rings are located at...

Use & Care Guide
Page 16
Remove the light shield by squeezing in refrigerator or reconnect power. In the U.S.A., www.maytag.com In Canada, www.maytag.ca Refrigerator Operation The refrigerator will not cool the refrigerator more quickly. The refrigerator seems noisy Electrical Shock Hazard Plug ...9632; Household fuse blown or circuit breaker tripped? If the problem continues, call . Due to this reduction, you may run longer than your old model. fans/compressor adjusting to cool completely. Style 2 - Remove the light bulb and replace it straight down . ■ Water running/dripping - Replace...
Remove the light shield by squeezing in refrigerator or reconnect power. In the U.S.A., www.maytag.com In Canada, www.maytag.ca Refrigerator Operation The refrigerator will not cool the refrigerator more quickly. The refrigerator seems noisy Electrical Shock Hazard Plug ...9632; Household fuse blown or circuit breaker tripped? If the problem continues, call . Due to this reduction, you may run longer than your old model. fans/compressor adjusting to cool completely. Style 2 - Remove the light bulb and replace it straight down . ■ Water running/dripping - Replace...

Use & Care Guide
Page 17
...; Water shutoff valve not fully open . ■ Kink in the ice ■ New plumbing connections? Straighten the water source line. ■ Ice maker turned on model) is an indication of the refrigerator so that the back rests on ? Failure to your cold water supply? Rinse and dry with a plastic utensil. ■...
...; Water shutoff valve not fully open . ■ Kink in the ice ■ New plumbing connections? Straighten the water source line. ■ Ice maker turned on model) is an indication of the refrigerator so that the back rests on ? Failure to your cold water supply? Rinse and dry with a plastic utensil. ■...

Use & Care Guide
Page 19
... filter indicator reads "REPLACE," it is recommended that is microbiologically unsafe or of $49.99 U.S.A./$59.99 Canada. For models without adequate disinfection before or after the system. and against NSF/ANSI Standard 42 for the reduction of Chlorine Taste and Odor,...Reduction Live Cysts† Asbestos Lead: @ pH 6.5 Lead: @ pH 8.5 Lindane Toxaphene Atrazine 2,4 - PERFORMANCE DATA SHEET Water Filtration System Model P5WB12NL/P4RFWB12 Capacity 120 Gallons (455 Liters) System tested and certified by NSF International against NSF/ANSI Standard 53 for the reduction of Live Cysts...
... filter indicator reads "REPLACE," it is recommended that is microbiologically unsafe or of $49.99 U.S.A./$59.99 Canada. For models without adequate disinfection before or after the system. and against NSF/ANSI Standard 42 for the reduction of Chlorine Taste and Odor,...Reduction Live Cysts† Asbestos Lead: @ pH 6.5 Lead: @ pH 8.5 Lindane Toxaphene Atrazine 2,4 - PERFORMANCE DATA SHEET Water Filtration System Model P5WB12NL/P4RFWB12 Capacity 120 Gallons (455 Liters) System tested and certified by NSF International against NSF/ANSI Standard 53 for the reduction of Live Cysts...

