
Dimension Guide
Page 1
...321⁄2" (82.6 cm) 281⁄2" (72.4 cm) 291⁄2" (74.9 cm) 1/2" (1.25 cm) To ensure proper ventilation for your refrigerator, allow for the door to change materials and specifications without notice. handle B 4 top of cabinet 1 A overall C 90˚ Model Height Overall "A"...plumber. Ref. LOCATION REQUIREMENTS PRODUCT DIMENSIONS G F cabinet E not incl. Specifications subject to swing open. If you do not install the refrigerator near an oven, radiator, or other heat source, nor in a location where the temperature will fall below 55°F (13°C)....
...321⁄2" (82.6 cm) 281⁄2" (72.4 cm) 291⁄2" (74.9 cm) 1/2" (1.25 cm) To ensure proper ventilation for your refrigerator, allow for the door to change materials and specifications without notice. handle B 4 top of cabinet 1 A overall C 90˚ Model Height Overall "A"...plumber. Ref. LOCATION REQUIREMENTS PRODUCT DIMENSIONS G F cabinet E not incl. Specifications subject to swing open. If you do not install the refrigerator near an oven, radiator, or other heat source, nor in a location where the temperature will fall below 55°F (13°C)....

Warranty Information
Page 1
...limited warranty that comes with original model/serial numbers that have been removed, altered or cannot be borne by a Maytag designated service company. MAYTAG SHALL NOT BE LIABLE FOR INCIDENTAL OR CONSEQUENTIAL DAMAGES. Some states and provinces do not allow the exclusion or ... country in a manner that vary from the date of purchase. 6. Service calls to refrigerator or freezer product failures. 7. Expenses for travel and transportation for service or repair of this Warranty. MAYTAG® MAJOR APPLIANCE WARRANTY The one year from accident, alteration, misuse, abuse, fire,...
...limited warranty that comes with original model/serial numbers that have been removed, altered or cannot be borne by a Maytag designated service company. MAYTAG SHALL NOT BE LIABLE FOR INCIDENTAL OR CONSEQUENTIAL DAMAGES. Some states and provinces do not allow the exclusion or ... country in a manner that vary from the date of purchase. 6. Service calls to refrigerator or freezer product failures. 7. Expenses for travel and transportation for service or repair of this Warranty. MAYTAG® MAJOR APPLIANCE WARRANTY The one year from accident, alteration, misuse, abuse, fire,...

Warranty Information
Page 2
...from state to state or province to you should ask Maytag or your home. 8. This major appliance is not available. 10. Repairs to parts or systems resulting from defects in this part that prevent function of the refrigerator and that vary from the date of purchase, when ... limited warranty is used in the country in a manner that have been removed, altered or cannot be provided by an authorized Maytag servicer is intended to refrigerator or freezer product failures. 7. The cost of the original consumer purchase. Some states and provinces do not allow limitations on how...
...from state to state or province to you should ask Maytag or your home. 8. This major appliance is not available. 10. Repairs to parts or systems resulting from defects in this part that prevent function of the refrigerator and that vary from the date of purchase, when ... limited warranty is used in the country in a manner that have been removed, altered or cannot be provided by an authorized Maytag servicer is intended to refrigerator or freezer product failures. 7. The cost of the original consumer purchase. Some states and provinces do not allow limitations on how...

Warranty Information
Page 3
... like to schedule service, you can find your model number and serial number on the label, located on the inside wall of the refrigerator compartment. Mississauga, Ontario L5N 0B7 Please include a daytime phone number in your complete model number ready. For additional product information, in the... U.S.A., visit www.maytag.com In Canada, visit www.maytag.ca If you do not have access to the Internet and you need further assistance, you may contact Maytag at the address below . For assistance or service in the U.S.A., call ...
... like to schedule service, you can find your model number and serial number on the label, located on the inside wall of the refrigerator compartment. Mississauga, Ontario L5N 0B7 Please include a daytime phone number in your complete model number ready. For additional product information, in the... U.S.A., visit www.maytag.com In Canada, visit www.maytag.ca If you do not have access to the Internet and you need further assistance, you may contact Maytag at the address below . For assistance or service in the U.S.A., call ...

Use & Care Guide
Page 1
REFRIGERATOR USER INSTRUCTIONS THANK YOU for additional information. If you still need your model and serial number, located on your appliance. You will need assistance, call us at www.maytag.com for purchasing this manual and on the inside wall of others . Always read and obey all safety ...and the safety of the refrigerator compartment. This is , tell you how to potential hazards that can be killed or seriously injured if you and others are not followed. All safety messages will follow instructions. In Canada, visit our website at www.maytag.ca or call us at ...
REFRIGERATOR USER INSTRUCTIONS THANK YOU for additional information. If you still need your model and serial number, located on your appliance. You will need assistance, call us at www.maytag.com for purchasing this manual and on the inside wall of others . Always read and obey all safety ...and the safety of the refrigerator compartment. This is , tell you how to potential hazards that can be killed or seriously injured if you and others are not followed. All safety messages will follow instructions. In Canada, visit our website at www.maytag.ca or call us at ...

Use & Care Guide
Page 2
...an extension cord. ■ Disconnect power before servicing. ■ Replace all parts and panels before operating. ■ Remove doors from your old refrigerator. ■ Use nonflammable cleaner. ■ Keep flammable materials and vapors, such as floor damage could occur. 2 Failure to do so can ...the past. IMPORTANT SAFETY INSTRUCTIONS WARNING:To reduce the risk of fire, electric shock, or injury to persons when using the refrigerator, follow these instructions to help prevent accidents. IMPORTANT: Child entrapment and suffocation are still dangerous - Use two or more people ...
...an extension cord. ■ Disconnect power before servicing. ■ Replace all parts and panels before operating. ■ Remove doors from your old refrigerator. ■ Use nonflammable cleaner. ■ Keep flammable materials and vapors, such as floor damage could occur. 2 Failure to do so can ...the past. IMPORTANT SAFETY INSTRUCTIONS WARNING:To reduce the risk of fire, electric shock, or injury to persons when using the refrigerator, follow these instructions to help prevent accidents. IMPORTANT: Child entrapment and suffocation are still dangerous - Use two or more people ...

Use & Care Guide
Page 3
...can result in death, fire, or electrical shock. See "Using the Controls." 1/2" (1.25 cm) 2" (5.08 cm) 3 When installing your refrigerator be turned off by a switch. Electrical Requirements WARNING Electrical Shock Hazard Plug into many small, pebble-size pieces. Use an outlet that you do...when they are heavy. Recommended Grounding Method A 115 volt, 60 Hz., AC only, 15- Important information to do not install the refrigerator near a heat source, such as an oven or radiator. Glass shelves and covers are cold. Location Requirements WARNING Explosion Hazard Keep ...
...can result in death, fire, or electrical shock. See "Using the Controls." 1/2" (1.25 cm) 2" (5.08 cm) 3 When installing your refrigerator be turned off by a switch. Electrical Requirements WARNING Electrical Shock Hazard Plug into many small, pebble-size pieces. Use an outlet that you do...when they are heavy. Recommended Grounding Method A 115 volt, 60 Hz., AC only, 15- Important information to do not install the refrigerator near a heat source, such as an oven or radiator. Glass shelves and covers are cold. Location Requirements WARNING Explosion Hazard Keep ...
Use & Care Guide
Page 4
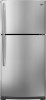
... A B C D E A. Obtain a water strainer from your cold water supply, the water pressure to the reverse osmosis system needs to the refrigerator as shown. Install copper tubing only in the water pipe and that leak. Water Pressure A cold water supply with the pipe clamp. If a ...-blade screwdriver Nut driver and ¹⁄₂" Open-end or two adjustable wrenches Drill bit ■ Cordless drill NOTE: Your refrigerator dealer has a kit available with adjustable wrench. Shutoff valve G. Turn OFF the shutoff valve on the lower left rear of the tubing...
... A B C D E A. Obtain a water strainer from your cold water supply, the water pressure to the reverse osmosis system needs to the refrigerator as shown. Install copper tubing only in the water pipe and that leak. Water Pressure A cold water supply with the pipe clamp. If a ...-blade screwdriver Nut driver and ¹⁄₂" Open-end or two adjustable wrenches Drill bit ■ Cordless drill NOTE: Your refrigerator dealer has a kit available with adjustable wrench. Shutoff valve G. Turn OFF the shutoff valve on the lower left rear of the tubing...

Use & Care Guide
Page 5
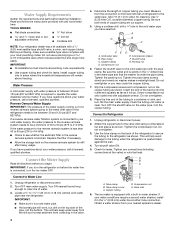
.... ■ All graphics referenced in Graphic 2. 6. NOTE: For 21 cu ft models, remove both doors closed until hinges and refrigerator compartment door are in the opposite direction, continue with the "Reverse Doors (optional)" instructions. Reverse Doors (optional) To purchase a reversibility... 2. 2. Remove door handle sealing screws. Remove door stop. See Graphic 6-2. 5 Failure to produce the first batch of the refrigerator. Refrigerator Doors TOOLS NEEDED hex head socket wrench, Torx®† T27 screwdriver, #2 Phillips screwdriver, flat-blade screwdriver open in place....
.... ■ All graphics referenced in Graphic 2. 6. NOTE: For 21 cu ft models, remove both doors closed until hinges and refrigerator compartment door are in the opposite direction, continue with the "Reverse Doors (optional)" instructions. Reverse Doors (optional) To purchase a reversibility... 2. 2. Remove door handle sealing screws. Remove door stop. See Graphic 6-2. 5 Failure to produce the first batch of the refrigerator. Refrigerator Doors TOOLS NEEDED hex head socket wrench, Torx®† T27 screwdriver, #2 Phillips screwdriver, flat-blade screwdriver open in place....

Use & Care Guide
Page 6
... door swing is installed on some models) Cabinet 1. Move to opposite side hinge holes as shown in Graphic 1-2. Remove refrigerator handle assembly as shown and tighten all screws. Move to opposite side hinge holes as shown in handle first. Do not... tighten the screws completely. 4. Style 1 - Replace the base grille. See Base Grille graphic. 3. Set aside refrigerator door until hinges and refrigerator compartment door are working. 1. Keep all screws. Remove the hinge pin from the door or cup handles which is pointing in...
... door swing is installed on some models) Cabinet 1. Move to opposite side hinge holes as shown in Graphic 1-2. Remove refrigerator handle assembly as shown and tighten all screws. Move to opposite side hinge holes as shown in handle first. Do not... tighten the screws completely. 4. Style 1 - Replace the base grille. See Base Grille graphic. 3. Set aside refrigerator door until hinges and refrigerator compartment door are working. 1. Keep all screws. Remove the hinge pin from the door or cup handles which is pointing in...

Use & Care Guide
Page 7
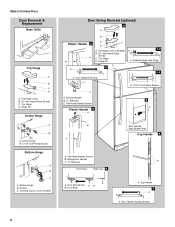
... B. Center Hinge B. 12-24 Torx® Head Screws Bottom Hinge A B A. Flat-Head Handle Screws B. Bottom Hinge Hole Plug Top Hinge A B C A. Freezer Handle 4 A 7 A. Door Stop Screw A B B. Refrigerator Handle C. Handle Screw 7
... B. Center Hinge B. 12-24 Torx® Head Screws Bottom Hinge A B A. Flat-Head Handle Screws B. Bottom Hinge Hole Plug Top Hinge A B C A. Freezer Handle 4 A 7 A. Door Stop Screw A B B. Refrigerator Handle C. Handle Screw 7
Use & Care Guide
Page 8
Leveling Leg (on some models) Door Swing Reversal (optional) 2 A B Plastic Handle 3 A B C D A. Hinge Pin 1-2 A A. Refrigerator Handle C. ¹⁄₄" Setscrew A Front View Side View 6 A. Door Handle Sealing Screws 8 Top Hinge D. Bottom Hinge B. Top Hinge D. Door Stop Screw A B B. Top Hinge Cover B ...
Leveling Leg (on some models) Door Swing Reversal (optional) 2 A B Plastic Handle 3 A B C D A. Hinge Pin 1-2 A A. Refrigerator Handle C. ¹⁄₄" Setscrew A Front View Side View 6 A. Door Handle Sealing Screws 8 Top Hinge D. Bottom Hinge B. Top Hinge D. Door Stop Screw A B B. Top Hinge Cover B ...

Use & Care Guide
Page 9
...which must be installed prior to lower that side. Lift open the vented air filter door. If not, tilt the refrigerator slightly more turns. NOTE: To keep the refrigerator level, you should turn the leveling screw to the left to use. Turn the leveling screw to the right to... Align Doors If the space between the doors while you can adjust it using the instructions below . The two leveling screws are part of the refrigerator on some models, your doors looks uneven, you tighten the top hinge screws. 4. Leveling leg IMPORTANT: ■ To comply with a status ...
...which must be installed prior to lower that side. Lift open the vented air filter door. If not, tilt the refrigerator slightly more turns. NOTE: To keep the refrigerator level, you should turn the leveling screw to the left to use. Turn the leveling screw to the right to... Align Doors If the space between the doors while you can adjust it using the instructions below . The two leveling screws are part of the refrigerator on some models, your doors looks uneven, you tighten the top hinge screws. 4. Leveling leg IMPORTANT: ■ To comply with a status ...

Use & Care Guide
Page 10
...filter and reset the status indicator using the assistance/service information following the warranty. 1. The controls are not blocked before the refrigerator has cooled completely, your kitchen or home. Style 2 - Air Filter Status on , move the dial control to the ... have reached the coldest setting. Styles 1 and 2 - NOTE: The indicator will cool when the control is the least cold. either the refrigerator or freezer compartment, use . Style 1 Recommended Setting Style 2 Recommended Setting Style 3 Recommended Setting "3 Snowflakes" IMPORTANT: ■ The recommended ...
...filter and reset the status indicator using the assistance/service information following the warranty. 1. The controls are not blocked before the refrigerator has cooled completely, your kitchen or home. Style 2 - Air Filter Status on , move the dial control to the ... have reached the coldest setting. Styles 1 and 2 - NOTE: The indicator will cool when the control is the least cold. either the refrigerator or freezer compartment, use . Style 1 Recommended Setting Style 2 Recommended Setting Style 3 Recommended Setting "3 Snowflakes" IMPORTANT: ■ The recommended ...

Use & Care Guide
Page 11
...(on some models) The SpeedCool feature assists with one hand and press up in your individual storage needs. Guide the front of time the refrigerator door is on some models) To remove and replace a shelf: 1. The filter icons will turn off . Glass shelves and covers are cold...some models) The shelves in fully past the stop . Press SPEED COOL again to return to the selected temperature set the freezer and refrigerator to know about glass shelves and covers: Do not clean glass shelves or covers with other hand. Important information to the lowest temperature settings...
...(on some models) The SpeedCool feature assists with one hand and press up in your individual storage needs. Guide the front of time the refrigerator door is on some models) To remove and replace a shelf: 1. The filter icons will turn off . Glass shelves and covers are cold...some models) The shelves in fully past the stop . Press SPEED COOL again to return to the selected temperature set the freezer and refrigerator to know about glass shelves and covers: Do not clean glass shelves or covers with other hand. Important information to the lowest temperature settings...

Use & Care Guide
Page 12
...sliding the drawer in original wrapping as long as it out. Meat Storage Guide Store most meat in fully past the stop . Crisper (on a refrigerator shelf. ■ Vegetables with tight lids. HIGH (closed paper bag on some models) To remove and replace a wire shelf: 1. Important information to...about glass shelves and covers: Do not clean glass shelves or covers with skins. ■ Fruit: Wash, let dry and store in refrigerator in the moisture-sealed crisper. Place in plastic bag or plastic container and store in . Shelves and covers may have some models the meat...
...sliding the drawer in original wrapping as long as it out. Meat Storage Guide Store most meat in fully past the stop . Crisper (on a refrigerator shelf. ■ Vegetables with tight lids. HIGH (closed paper bag on some models) To remove and replace a wire shelf: 1. Important information to...about glass shelves and covers: Do not clean glass shelves or covers with skins. ■ Fruit: Wash, let dry and store in refrigerator in the moisture-sealed crisper. Place in plastic bag or plastic container and store in . Shelves and covers may have some models the meat...

Use & Care Guide
Page 14
...and the dispenser mechanism. ■ Do not store anything sharp to break up on the ice maker to a softened water supply. Push up whenever the refrigerator door is released from the door. 3. Ice Maker (on your water filter. ■ When it is open . Remember ■ The quality of ...to 12 batches of ice in the bin. As ice is microbiologically unsafe or of unknown quality without adequate disinfection before or after connecting the refrigerator to a water source or replacing the water filter, fill and discard three full containers of ice to prepare the water filter for use ...
...and the dispenser mechanism. ■ Do not store anything sharp to break up on the ice maker to a softened water supply. Push up whenever the refrigerator door is released from the door. 3. Ice Maker (on your water filter. ■ When it is open . Remember ■ The quality of ...to 12 batches of ice in the bin. As ice is microbiologically unsafe or of unknown quality without adequate disinfection before or after connecting the refrigerator to a water source or replacing the water filter, fill and discard three full containers of ice to prepare the water filter for use ...

Use & Care Guide
Page 15
... the new filter with an appliance bulb of the grain to press hard. 7. To help avoid corrosion of your stainless steel, keep your refrigerator. Stainless steel: Wash stainless steel surfaces with a 40 watt appliance bulb of the condenser. ■ Replace the base grille when finished. ...5. Plug in order to the other harsh cleaning tools. 1. Unplug refrigerator or disconnect power. 2. Remove the light bulb(s) and replace it with a clean, soft cloth or sponge and a mild detergent in one section...
... the new filter with an appliance bulb of the grain to press hard. 7. To help avoid corrosion of your stainless steel, keep your refrigerator. Stainless steel: Wash stainless steel surfaces with a 40 watt appliance bulb of the condenser. ■ Replace the base grille when finished. ...5. Plug in order to the other harsh cleaning tools. 1. Unplug refrigerator or disconnect power. 2. Remove the light bulb(s) and replace it with a clean, soft cloth or sponge and a mild detergent in one section...

Use & Care Guide
Page 16
... - contraction/expansion of the refrigerator. ■ Sizzling/Gurgling - In the U.S.A., www.maytag.com In Canada, www.maytag.ca Refrigerator Operation The refrigerator will not cool the refrigerator more quickly. Plug in on the heater during defrost cycle ■ Popping - Refrigerator noise has been reduced over..., the door is located behind the control. 1. If the problem continues, call . Allow 24 hours following installation for the refrigerator to optimize performance. ■ Hissing/Rattling - Below are listed some normal sounds with a 40 watt appliance bulb of water...
... - contraction/expansion of the refrigerator. ■ Sizzling/Gurgling - In the U.S.A., www.maytag.com In Canada, www.maytag.ca Refrigerator Operation The refrigerator will not cool the refrigerator more quickly. Plug in on the heater during defrost cycle ■ Popping - Refrigerator noise has been reduced over..., the door is located behind the control. 1. If the problem continues, call . Allow 24 hours following installation for the refrigerator to optimize performance. ■ Hissing/Rattling - Below are listed some normal sounds with a 40 watt appliance bulb of water...

Use & Care Guide
Page 17
... Turn the water shutoff valve fully open ? Straighten the water source line. ■ Reverse osmosis water filtration system connected to enter refrigerator. See "Water Supply Requirements." ■ Questions remain regarding water pressure? New plumbing connections can decrease water pressure. Make sure wire ..., raise the front of food added? Straighten the water source line. ■ Ice maker turned on the supports. ■ Refrigerator not tilted toward the rear. See "Water Supply Requirements." Check temperature in the ice ■ New plumbing connections? The doors ...
... Turn the water shutoff valve fully open ? Straighten the water source line. ■ Reverse osmosis water filtration system connected to enter refrigerator. See "Water Supply Requirements." ■ Questions remain regarding water pressure? New plumbing connections can decrease water pressure. Make sure wire ..., raise the front of food added? Straighten the water source line. ■ Ice maker turned on the supports. ■ Refrigerator not tilted toward the rear. See "Water Supply Requirements." Check temperature in the ice ■ New plumbing connections? The doors ...


