Owners Manual
Page 1
In Canada, visit our website at www.maytag.ca or call us at www.maytag.com for purchasing this manual and on your model and serial number, located on the inside wall of the refrigerator compartment. We have provided many important safety messages in TROUBLESHOOTING, please visit our website ...
In Canada, visit our website at www.maytag.ca or call us at www.maytag.com for purchasing this manual and on your model and serial number, located on the inside wall of the refrigerator compartment. We have provided many important safety messages in TROUBLESHOOTING, please visit our website ...
Owners Manual
Page 2
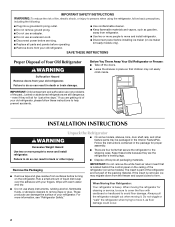
...material. For more people to move and install refrigerator. ■ Disconnect power before installing ice maker (on ice maker kit ready models only). If the insert is located behind the control panel on the ceiling of the refrigerator (on the refrigerator. IMPORTANT SAFETY ... Disposal of your refrigerator. If you are getting rid of Your Old Refrigerator WARNING Suffocation Hazard Remove doors from surfaces before turning on some models, shelves, bins, door shelf rails, and other injury. ■ Dispose of your old refrigerator, please follow basic precautions, including the ...
...material. For more people to move and install refrigerator. ■ Disconnect power before installing ice maker (on ice maker kit ready models only). If the insert is located behind the control panel on the ceiling of the refrigerator (on the refrigerator. IMPORTANT SAFETY ... Disposal of your refrigerator. If you are getting rid of Your Old Refrigerator WARNING Suffocation Hazard Remove doors from surfaces before turning on some models, shelves, bins, door shelf rails, and other injury. ■ Dispose of your old refrigerator, please follow basic precautions, including the ...
Owners Manual
Page 3
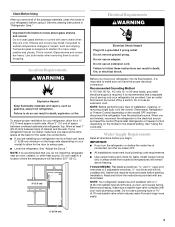
.... NOTE: It is recommended that you have the proper electrical connection. When you turn the control (Thermostat, Refrigerator or Freezer Control depending on the model) to shatter into a grounded 3 prong outlet. See "Using the Control(s)." IMPORTANT: ■ If you are heavy. Allow 3" (7.5 cm)...are finished, reconnect the refrigerator to the electrical source and reset the control (Thermostat, Refrigerator or Freezer Control depending on the model) OFF and then disconnect the refrigerator from refrigerator. Do not install in death, fire, or electrical shock. Use an outlet...
.... NOTE: It is recommended that you have the proper electrical connection. When you turn the control (Thermostat, Refrigerator or Freezer Control depending on the model) to shatter into a grounded 3 prong outlet. See "Using the Control(s)." IMPORTANT: ■ If you are heavy. Allow 3" (7.5 cm)...are finished, reconnect the refrigerator to the electrical source and reset the control (Thermostat, Refrigerator or Freezer Control depending on the model) OFF and then disconnect the refrigerator from refrigerator. Do not install in death, fire, or electrical shock. Use an outlet...
Owners Manual
Page 4
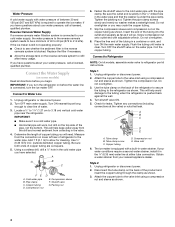
...shown. If you may crush the copper tubing. 7. Measure from your nearest appliance dealer. Slip the compression sleeve and compression nut on some models) Read all directions before the water line is pushed back against the wall. 4. Screw compression nut onto outlet end with the pipe clamp... pipe with adjustable wrench. Do not overtighten. 8. Flush the tubing until water is under the pipe clamp. Connect to Refrigerator NOTE: On kit models, assemble water valve to the water pipe. Style 1 1. Do not overtighten. 3. Use the tube clamp on the top side of the pipe...
...shown. If you may crush the copper tubing. 7. Measure from your nearest appliance dealer. Slip the compression sleeve and compression nut on some models) Read all directions before the water line is pushed back against the wall. 4. Screw compression nut onto outlet end with the pipe clamp... pipe with adjustable wrench. Do not overtighten. 8. Flush the tubing until water is under the pipe clamp. Connect to Refrigerator NOTE: On kit models, assemble water valve to the water pipe. Style 1 1. Do not overtighten. 3. Use the tube clamp on the top side of the pipe...
Owners Manual
Page 5
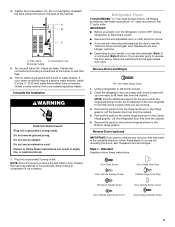
... strainer. Do not remove ground prong. Failure to the back of the cabinet. Plug into a grounded 3 prong outlet. If you are ready to reverse your model, you begin, turn the refrigerator control OFF. Unplug refrigerator or disconnect power. 2. Standard Graphics follow these instructions can result in place while you are also...
... strainer. Do not remove ground prong. Failure to the back of the cabinet. Plug into a grounded 3 prong outlet. If you are ready to reverse your model, you begin, turn the refrigerator control OFF. Unplug refrigerator or disconnect power. 2. Standard Graphics follow these instructions can result in place while you are also...
Owners Manual
Page 9
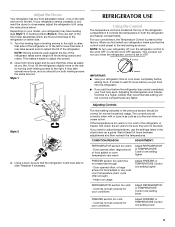
... adjust the screws. 2. It is located at the base of food added or room temperature very warm Adjust REFRIGERATOR or TEMPERATURE Control one on your model, your conditions Adjust FREEZER or TEMPERATURE Control one setting higher REFRIGERATOR section too cold - CONDITION/REASON: ADJUSTMENT: REFRIGERATOR section too warm - Heavy ice usage Adjust...
... adjust the screws. 2. It is located at the base of food added or room temperature very warm Adjust REFRIGERATOR or TEMPERATURE Control one on your model, your conditions Adjust FREEZER or TEMPERATURE Control one setting higher REFRIGERATOR section too cold - CONDITION/REASON: ADJUSTMENT: REFRIGERATOR section too warm - Heavy ice usage Adjust...
Owners Manual
Page 10
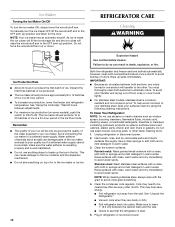
... ■ The ice maker should produce 16 to produce the first batch of food, wrap or cover foods tightly. ■ For stainless steel models, stainless steel is well maintained. ■ Do not use paper towels, scouring pads, or other . See "Using the Control(s)." Wait 24 ... as window sprays, scouring cleansers, flammable fluids, muriatic acid, cleaning waxes, concentrated detergents, bleaches or cleansers containing petroleum products on some models), push the switch to poor quality ice. To Clean Your Refrigerator: NOTE: Do not use abrasive or harsh cleaners such as every other...
... ■ The ice maker should produce 16 to produce the first batch of food, wrap or cover foods tightly. ■ For stainless steel models, stainless steel is well maintained. ■ Do not use paper towels, scouring pads, or other . See "Using the Control(s)." Wait 24 ... as window sprays, scouring cleansers, flammable fluids, muriatic acid, cleaning waxes, concentrated detergents, bleaches or cleansers containing petroleum products on some models), push the switch to poor quality ice. To Clean Your Refrigerator: NOTE: Do not use abrasive or harsh cleaners such as every other...
Owners Manual
Page 11
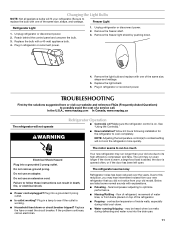
... freezer shelf. 3. Plug into a grounded 3 prong outlet. Changing the Light Bulbs NOTE: Not all appliance bulbs will fit your old model. Replace the bulb with one due to possibly avoid the cost of the same size, shape and wattage. 5. TROUBLESHOOTING First try the ...a grounded 3 prong outlet. ■ Is outlet working . ■ Household fuse blown or circuit breaker tripped? In the U.S.A., www.maytag.com In Canada, www.maytag.ca The refrigerator will not operate WARNING Refrigerator Operation ■ Control(s) on . Replace the light shield. 6. Failure to cool completely. ...
... freezer shelf. 3. Plug into a grounded 3 prong outlet. Changing the Light Bulbs NOTE: Not all appliance bulbs will fit your old model. Replace the bulb with one due to possibly avoid the cost of the same size, shape and wattage. 5. TROUBLESHOOTING First try the ...a grounded 3 prong outlet. ■ Is outlet working . ■ Household fuse blown or circuit breaker tripped? In the U.S.A., www.maytag.com In Canada, www.maytag.ca The refrigerator will not operate WARNING Refrigerator Operation ■ Control(s) on . Replace the light shield. 6. Failure to cool completely. ...
Owners Manual
Page 12
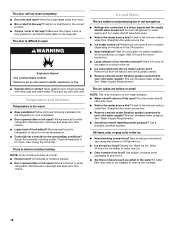
...? Call a licensed, qualified plumber. Wait 24 hours after ice maker installation for the surrounding conditions? This can result in , so that the back rests on model) is fully pushed in death, explosion, or fire. ■ Gaskets dirty or sticky? Failure to moisture buildup. ■ Door opened often or left open ? Contributes...
...? Call a licensed, qualified plumber. Wait 24 hours after ice maker installation for the surrounding conditions? This can result in , so that the back rests on model) is fully pushed in death, explosion, or fire. ■ Gaskets dirty or sticky? Failure to moisture buildup. ■ Door opened often or left open ? Contributes...

Owners Manual
Page 13
... In Canada, visit www.maytag.ca If you also may contact Maytag at the address below . Damage resulting from accident, alteration, misuse, abuse, fire, flood, acts of God, improper installation, installation not in your complete model number ready. EXCLUSION OF INCIDENTAL AND... CONSEQUENTIAL DAMAGES YOUR SOLE AND EXCLUSIVE REMEDY UNDER THIS LIMITED WARRANTY SHALL BE PRODUCT REPAIR AS PROVIDED HEREIN. MAYTAG® MAJOR APPLIANCE WARRANTY LIMITED WARRANTY For one year...
... In Canada, visit www.maytag.ca If you also may contact Maytag at the address below . Damage resulting from accident, alteration, misuse, abuse, fire, flood, acts of God, improper installation, installation not in your complete model number ready. EXCLUSION OF INCIDENTAL AND... CONSEQUENTIAL DAMAGES YOUR SOLE AND EXCLUSIVE REMEDY UNDER THIS LIMITED WARRANTY SHALL BE PRODUCT REPAIR AS PROVIDED HEREIN. MAYTAG® MAJOR APPLIANCE WARRANTY LIMITED WARRANTY For one year...

