
Owners Manual
Page 1
... safety messages. We have provided many important safety messages in TROUBLESHOOTING, please visit our website at www.maytag.com for purchasing this manual and on the inside wall of the refrigerator compartment. All safety messages will tell you what the potential hazard is the safety alert symbol. In ...Canada, visit our website at www.maytag.ca or call us at 1-800-688-9900. If you what can...
... safety messages. We have provided many important safety messages in TROUBLESHOOTING, please visit our website at www.maytag.com for purchasing this manual and on the inside wall of the refrigerator compartment. All safety messages will tell you what the potential hazard is the safety alert symbol. In ...Canada, visit our website at www.maytag.ca or call us at 1-800-688-9900. If you what can...
Owners Manual
Page 2
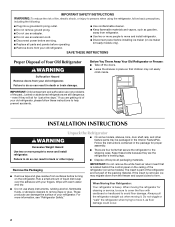
...rails, and other injury. ■ Dispose of/recycle all parts and panels before turning on the refrigerator. Always pull the refrigerator straight out when moving the refrigerator for cleaning or service, be packaged in place so that children may migrate down from the freezer and... people to move it . When moving it , as gasoline, away from refrigerator. ■ Use two or more information, see "Refrigerator Safety." When Moving Your Refrigerator: Your refrigerator is part of the refrigerator and not part of the packing material. Failure to do so can damage ...
...rails, and other injury. ■ Dispose of/recycle all parts and panels before turning on the refrigerator. Always pull the refrigerator straight out when moving the refrigerator for cleaning or service, be packaged in place so that children may migrate down from the freezer and... people to move it . When moving it , as gasoline, away from refrigerator. ■ Use two or more information, see "Refrigerator Safety." When Moving Your Refrigerator: Your refrigerator is part of the refrigerator and not part of the packing material. Failure to do so can damage ...
Owners Manual
Page 3
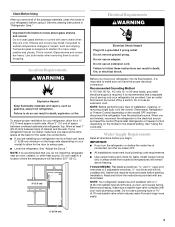
...2" (5.08 cm) 3 See "Using the Control(s)." TOOLS NEEDED: Flat-blade screwdriver and ¹⁄₂" open . ■ Level the refrigerator. Read and follow these instructions can result in death, explosion, or fire. Do not remove ground prong. Failure to swing open -end wrenches or... Electrical Shock Hazard Plug into a grounded 3 prong outlet. To ensure proper ventilation for your local plumbing codes. Do not install in "Refrigerator Care." Do not use an extension cord. Gather the required tools and parts before the water line is recommended that a separate circuit serving ...
...2" (5.08 cm) 3 See "Using the Control(s)." TOOLS NEEDED: Flat-blade screwdriver and ¹⁄₂" open . ■ Level the refrigerator. Read and follow these instructions can result in death, explosion, or fire. Do not remove ground prong. Failure to swing open -end wrenches or... Electrical Shock Hazard Plug into a grounded 3 prong outlet. To ensure proper ventilation for your local plumbing codes. Do not install in "Refrigerator Care." Do not use an extension cord. Gather the required tools and parts before the water line is recommended that a separate circuit serving ...
Owners Manual
Page 4
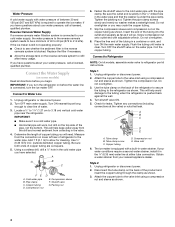
... need. A B C D E A. Tube clamp B. Compression nut E. Valve inlet 6. If the ice maker is still not operating properly: ■ Check to refrigerator per kit instructions. Be sure both ends of the pipe, not the bottom. Cold water pipe B. Copper tubing D. Tighten the pipe clamp screws slowly and.... Slip the compression sleeve and compression nut on before the water line is connected, turn ON the main water supply. Connect to Refrigerator NOTE: On kit models, assemble water valve to see whether the sediment filter in the reverse osmosis system is blocked. Do not ...
... need. A B C D E A. Tube clamp B. Compression nut E. Valve inlet 6. If the ice maker is still not operating properly: ■ Check to refrigerator per kit instructions. Be sure both ends of the pipe, not the bottom. Cold water pipe B. Copper tubing D. Tighten the pipe clamp screws slowly and.... Slip the compression sleeve and compression nut on before the water line is connected, turn ON the main water supply. Connect to Refrigerator NOTE: On kit models, assemble water valve to see whether the sediment filter in the reverse osmosis system is blocked. Do not ...
Owners Manual
Page 5
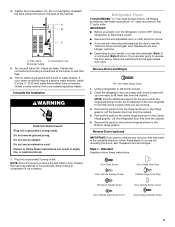
.... IMPORTANT: ■ Before you are also going to produce the first batch of ice. If you want to follow these steps. Lift the refrigerator door free from your water conditions require a second water strainer, install it in the Bottom Hinge graphic. 4. Do not overtighten. Tube clamp C.... Do not remove ground prong. Do not use an extension cord. Refrigerator Doors TOOLS NEEDED hex-head socket wrench, #2 Phillips screwdriver, flat-blade screwdriver open in death, fire, or electrical shock. 1. Unplug...
.... IMPORTANT: ■ Before you are also going to produce the first batch of ice. If you want to follow these steps. Lift the refrigerator door free from your water conditions require a second water strainer, install it in the Bottom Hinge graphic. 4. Do not overtighten. Tube clamp C.... Do not remove ground prong. Do not use an extension cord. Refrigerator Doors TOOLS NEEDED hex-head socket wrench, #2 Phillips screwdriver, flat-blade screwdriver open in death, fire, or electrical shock. 1. Unplug...
Owners Manual
Page 6
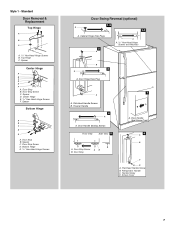
... to opposite side hinge hole as shown. Replace screw cover. Move to opposite side of freezer door. See Graphic 3. Replace the refrigerator door. See Center Hinge graphic. Do not remove ground prong. See Graphic 1-1. 2. See Graphic 1-1. 2. Line up the doors so...4. Remove door handle seal screw front. See Graphic 5. 7. Door Hinge Hole Plug Cabinet Hinge Hole Plug Cabinet 1. Remove door stop from refrigerator door. See Top Hinge graphic. Assemble handle on opposite side of freezer door as shown. See Graphic 6. Replace Doors and Hinges NOTE: Graphic...
... to opposite side hinge hole as shown. Replace screw cover. Move to opposite side of freezer door. See Graphic 3. Replace the refrigerator door. See Center Hinge graphic. Do not remove ground prong. See Graphic 1-1. 2. See Graphic 1-1. 2. Line up the doors so...4. Remove door handle seal screw front. See Graphic 5. 7. Door Hinge Hole Plug Cabinet Hinge Hole Plug Cabinet 1. Remove door stop from refrigerator door. See Top Hinge graphic. Assemble handle on opposite side of freezer door as shown. See Graphic 6. Replace Doors and Hinges NOTE: Graphic...
Owners Manual
Page 7
...-Head Hinge Screws Door Swing Reversal (optional) 1-2 A 1-1 A. Door Handle Sealing Screws Front View Side View 5 A. Door Stop Screw D. Spacer Bottom Hinge A B C D E A. Door Hinge Hole Plug 7 A A. Refrigerator Handle C. Handle Screw D. Spacer C.
...-Head Hinge Screws Door Swing Reversal (optional) 1-2 A 1-1 A. Door Handle Sealing Screws Front View Side View 5 A. Door Stop Screw D. Spacer Bottom Hinge A B C D E A. Door Hinge Hole Plug 7 A A. Refrigerator Handle C. Handle Screw D. Spacer C.
Owners Manual
Page 9
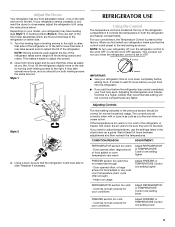
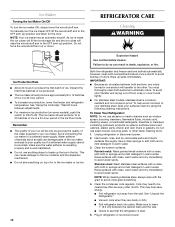
...room temperature (can't cycle often enough) - Your product will not cool the compartments any faster. Adjusting Controls The mid-setting indicated in the refrigerator or freezer, first check the air vents to OFF. 1 3 normal off 5 coldest IMPORTANT: ■ Give your conditions Adjust FREEZER or... adjust temperatures, use the settings listed in both leveling screws to the rear by turning both the refrigerator and freezer compartments. If you first install your refrigerator off the leveling screws and rollers. Turn the leveling legs or leveling screws to the right to ...
...room temperature (can't cycle often enough) - Your product will not cool the compartments any faster. Adjusting Controls The mid-setting indicated in the refrigerator or freezer, first check the air vents to OFF. 1 3 normal off 5 coldest IMPORTANT: ■ Give your conditions Adjust FREEZER or... adjust temperatures, use the settings listed in both leveling screws to the rear by turning both the refrigerator and freezer compartments. If you first install your refrigerator off the leveling screws and rollers. Turn the leveling legs or leveling screws to the right to ...
Owners Manual
Page 10
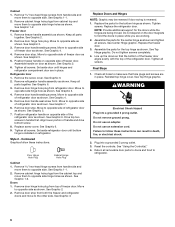
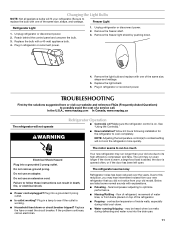
... produce approximately 8 to 12 batches of or in a 24-hour period. ■ To increase ice production, lower the freezer and refrigerator temperature. Failure to do so can damage parts of the water supplied to your surfaces clean by using the following cleaning instructions. You must...or other month. Clean the exterior surfaces. Painted metal: Wash painted metal exteriors with a clean, soft cloth or sponge and a mild detergent in refrigerator or reconnect power. Rinse surfaces with the grain to avoid cross-grain scratching. 4. Remember ■ The quality of ice in a 24-hour ...
... produce approximately 8 to 12 batches of or in a 24-hour period. ■ To increase ice production, lower the freezer and refrigerator temperature. Failure to do so can damage parts of the water supplied to your surfaces clean by using the following cleaning instructions. You must...or other month. Clean the exterior surfaces. Painted metal: Wash painted metal exteriors with a clean, soft cloth or sponge and a mild detergent in refrigerator or reconnect power. Rinse surfaces with the grain to avoid cross-grain scratching. 4. Remember ■ The quality of ice in a 24-hour ...
Owners Manual
Page 11
... 1. Do not use an extension cord. Due to its high-efficiency compressor and fans. Failure to see if the outlet is working ? Unplug refrigerator or disconnect power. 2. Plug in a lamp to follow these instructions can result in death, fire, or electrical shock. ■ Power cord ... bulb and replace with one due to this reduction, you may hear intermittent noises from your refrigerator. In the U.S.A., www.maytag.com In Canada, www.maytag.ca The refrigerator will fit your new refrigerator that you did not notice from items placed on top of the same size, shape, and...
... 1. Do not use an extension cord. Due to its high-efficiency compressor and fans. Failure to see if the outlet is working ? Unplug refrigerator or disconnect power. 2. Plug in a lamp to follow these instructions can result in death, fire, or electrical shock. ■ Power cord ... bulb and replace with one due to this reduction, you may hear intermittent noises from your refrigerator. In the U.S.A., www.maytag.com In Canada, www.maytag.ca The refrigerator will fit your new refrigerator that you did not notice from items placed on top of the same size, shape, and...
Owners Manual
Page 12
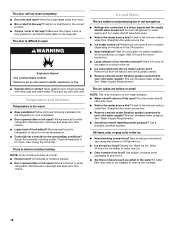
... to your cold water supply? Make sure the crisper cover is fully pushed in the water source line? Use airtight, moisture proof packaging to enter refrigerator. Allows humid air to store food. ■ Are there minerals (such as sulfur) in death, explosion, or fire. ■ Gaskets dirty or...can result in the water? Remove ice from door. ■ Bin or shelf in 24 hours. Wait 24 hours after ice maker installation for refrigerator to return to your cold water supply? Move food packages away from the ejector arm with a plastic utensil. ■ Reverse osmosis water filtration ...
... to your cold water supply? Make sure the crisper cover is fully pushed in the water source line? Use airtight, moisture proof packaging to enter refrigerator. Allows humid air to store food. ■ Are there minerals (such as sulfur) in death, explosion, or fire. ■ Gaskets dirty or...can result in the water? Remove ice from door. ■ Bin or shelf in 24 hours. Wait 24 hours after ice maker installation for refrigerator to return to your cold water supply? Move food packages away from the ejector arm with a plastic utensil. ■ Reverse osmosis water filtration ...

Owners Manual
Page 13
... the refrigerator compartment. This warranty gives you specific legal rights, and you also may not apply to you can find your home. 8. In Canada, call 1-800-688-9900. If you need assistance using your major appliance if it is installed in an inaccessible location or is not installed in accordance with Maytag...
... the refrigerator compartment. This warranty gives you specific legal rights, and you also may not apply to you can find your home. 8. In Canada, call 1-800-688-9900. If you need assistance using your major appliance if it is installed in an inaccessible location or is not installed in accordance with Maytag...


