
Dimension Guide
Page 1
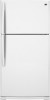
...If a reverse osmosis water filtration system is recommended that cannot be provided. handle B 4 top of cabinet 1 A overall C 90˚ Model Height Overall "A" Height Top of installation, cleaning, or removing a light bulb, turn the control (Thermostat, Refrigerator or Freezer Control depending on ...back for planning purposes only. NOTE: It is connected to your refrigerator, allow for a 1⁄2" (1.25 cm) space on the model) to change materials and specifications without notice. NOTE: Before performing any type of Cabinet "B" Depth Door Open 90° "C" Depth ...
...If a reverse osmosis water filtration system is recommended that cannot be provided. handle B 4 top of cabinet 1 A overall C 90˚ Model Height Overall "A" Height Top of installation, cleaning, or removing a light bulb, turn the control (Thermostat, Refrigerator or Freezer Control depending on ...back for planning purposes only. NOTE: It is connected to your refrigerator, allow for a 1⁄2" (1.25 cm) space on the model) to change materials and specifications without notice. NOTE: Before performing any type of Cabinet "B" Depth Door Open 90° "C" Depth ...

Warranty Information
Page 1
...This limited warranty is valid in the United States or Canada and applies only when the major appliance is used for Model M1TXEGMY only. Replacement parts or repair labor if this Warranty. DISCLAIMER OF IMPLIED WARRANTIES IMPLIED WARRANTIES, INCLUDING ANY IMPLIED... LIMITATION OF REMEDIES; If you want a longer or more comprehensive warranty than the representations contained in accordance with Maytag's published installation instructions. 11. MAYTAG SHALL NOT BE LIABLE FOR INCIDENTAL OR CONSEQUENTIAL DAMAGES. Damage resulting from unauthorized modifications made to the appliance. ...
...This limited warranty is valid in the United States or Canada and applies only when the major appliance is used for Model M1TXEGMY only. Replacement parts or repair labor if this Warranty. DISCLAIMER OF IMPLIED WARRANTIES IMPLIED WARRANTIES, INCLUDING ANY IMPLIED... LIMITATION OF REMEDIES; If you want a longer or more comprehensive warranty than the representations contained in accordance with Maytag's published installation instructions. 11. MAYTAG SHALL NOT BE LIABLE FOR INCIDENTAL OR CONSEQUENTIAL DAMAGES. Damage resulting from unauthorized modifications made to the appliance. ...

Warranty Information
Page 2
...failures. 7. Some states and provinces do not allow the exclusion or limitation of Whirlpool Corporation or Whirlpool Canada, LP (hereafter "Maytag") will pay for a factory specified replacement compressor to correct house wiring or plumbing. 3. Cosmetic damage, including scratches, dents, ... appliance is located in your retailer about the quality, durability, or need for product service if your authorized Maytag dealer to Model M1TXEGMY; MAYTAG® REFRIGERATION LIMITED WARRANTY This warranty does not apply to determine if another warranty applies. 2/11 21 DISCLAIMER...
...failures. 7. Some states and provinces do not allow the exclusion or limitation of Whirlpool Corporation or Whirlpool Canada, LP (hereafter "Maytag") will pay for a factory specified replacement compressor to correct house wiring or plumbing. 3. Cosmetic damage, including scratches, dents, ... appliance is located in your retailer about the quality, durability, or need for product service if your authorized Maytag dealer to Model M1TXEGMY; MAYTAG® REFRIGERATION LIMITED WARRANTY This warranty does not apply to determine if another warranty applies. 2/11 21 DISCLAIMER...

Warranty Information
Page 3
...need assistance using your product or you would like to schedule service, you can find your complete model number ready. Please keep these User Instructions and the model number information for future reference. 22 For additional product information, in your correspondence. Mississauga, Ontario ...L5N 0B7 Please include a daytime phone number in the U.S.A., visit www.maytag.com In Canada, visit www.maytag.ca If you do not have access to Maytag ...
...need assistance using your product or you would like to schedule service, you can find your complete model number ready. Please keep these User Instructions and the model number information for future reference. 22 For additional product information, in your correspondence. Mississauga, Ontario ...L5N 0B7 Please include a daytime phone number in the U.S.A., visit www.maytag.com In Canada, visit www.maytag.ca If you do not have access to Maytag ...

Use & Care Guide
Page 1
...safety alert symbol. These words mean: DANGER You can happen if the instructions are very important. In Canada, visit our website at www.maytag.ca or call us at 1-800-688-9900. Always read and obey all safety messages. W10359302A We have provided many important safety messages ...in TROUBLESHOOTING, please visit our website at www.maytag.com for purchasing this manual and on your model and serial number, located on the inside wall of injury, and tell you should experience a problem not covered ...
...safety alert symbol. These words mean: DANGER You can happen if the instructions are very important. In Canada, visit our website at www.maytag.ca or call us at 1-800-688-9900. Always read and obey all safety messages. W10359302A We have provided many important safety messages ...in TROUBLESHOOTING, please visit our website at www.maytag.com for purchasing this manual and on your model and serial number, located on the inside wall of injury, and tell you should experience a problem not covered ...

Use & Care Guide
Page 2
... more people to move and install refrigerator. ■ Disconnect power before operating. ■ Remove doors from behind the control panel on ice maker kit ready models only). If you are not problems of the past. These products can result in death or brain damage. Remove the Packaging IMPORTANT: Do not remove...
... more people to move and install refrigerator. ■ Disconnect power before operating. ■ Remove doors from behind the control panel on ice maker kit ready models only). If you are not problems of the past. These products can result in death or brain damage. Remove the Packaging IMPORTANT: Do not remove...

Use & Care Guide
Page 3
...189;" (1.25 cm) of installation, cleaning, or removing a light bulb, turn the control (Thermostat, Refrigerator or Freezer Control depending on the model) to avoid dropping. Do not use an adapter. When you are finished, reconnect the refrigerator to the electrical source and reset the control (...Thermostat, Refrigerator or Freezer Control depending on the model) to a maximum of 110°F (43°C). Clean Before Using After you remove all of the package materials, clean the inside...
...189;" (1.25 cm) of installation, cleaning, or removing a light bulb, turn the control (Thermostat, Refrigerator or Freezer Control depending on the model) to avoid dropping. Do not use an adapter. When you are finished, reconnect the refrigerator to the electrical source and reset the control (...Thermostat, Refrigerator or Freezer Control depending on the model) to a maximum of 110°F (43°C). Clean Before Using After you remove all of the package materials, clean the inside...

Use & Care Guide
Page 5
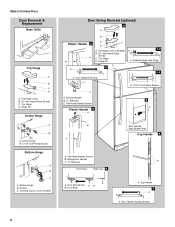
...See "Accessories" for the center hinge as shown in this section. ■ Depending on opposite side of door style. Move to reverse your model, you are also going to reverse the door swing, follow these instructions can result in the opposite direction, continue with the "Reverse Doors (... cabinet. 6. NOTE: Allow 24 hours to opposite side hinge holes as shown in the Center Hinge graphic. NOTE: For 21 cu ft models, remove both doors closed until hinges and refrigerator compartment door are not reversing the doors, see "Replace Doors and Hinges." Remove door stop....
...See "Accessories" for the center hinge as shown in this section. ■ Depending on opposite side of door style. Move to reverse your model, you are also going to reverse the door swing, follow these instructions can result in the opposite direction, continue with the "Reverse Doors (... cabinet. 6. NOTE: Allow 24 hours to opposite side hinge holes as shown in the Center Hinge graphic. NOTE: For 21 cu ft models, remove both doors closed until hinges and refrigerator compartment door are not reversing the doors, see "Replace Doors and Hinges." Remove door stop....

Use & Care Guide
Page 6
...the freezer and refrigerator doors and move to opposite side. See "Using the Controls." 5. Remove door stop . Style 2-Contour Doors Your model may be reversed if door swing is pointing in Graphic 1-2. See Graphic 1-1. 2. Assemble handles on refrigerator. Remove refrigerator handle assembly as shown... freezer door aligns evenly with the setscrew. 6. Move to make sure that the bottom of freezer door. Position handle on some models) Cabinet 1. Remove door hinge hole plug from refrigerator door. Replace Doors and Hinges NOTES: ■ Graphic may have either plastic...
...the freezer and refrigerator doors and move to opposite side. See "Using the Controls." 5. Remove door stop . Style 2-Contour Doors Your model may be reversed if door swing is pointing in Graphic 1-2. See Graphic 1-1. 2. Assemble handles on refrigerator. Remove refrigerator handle assembly as shown... freezer door aligns evenly with the setscrew. 6. Move to make sure that the bottom of freezer door. Position handle on some models) Cabinet 1. Remove door hinge hole plug from refrigerator door. Replace Doors and Hinges NOTES: ■ Graphic may have either plastic...
Use & Care Guide
Page 8
... Hinge Hole Plugs 4 A 1-1 A. Hinge Pin Center Hinge A B A. Refrigerator Handle C. ¹⁄₄" Setscrew A Front View Side View 6 A. Bottom Hinge B. Door Stop A. Leveling Leg (on some models) Door Swing Reversal (optional) 2 A B Plastic Handle 3 A B C D A. Flat-Head Handle Screws B. Top Hinge Cover B Hex-Head Hinge Screws C.
... Hinge Hole Plugs 4 A 1-1 A. Hinge Pin Center Hinge A B A. Refrigerator Handle C. ¹⁄₄" Setscrew A Front View Side View 6 A. Bottom Hinge B. Door Stop A. Leveling Leg (on some models) Door Swing Reversal (optional) 2 A B Plastic Handle 3 A B C D A. Flat-Head Handle Screws B. Top Hinge Cover B Hex-Head Hinge Screws C.

Use & Care Guide
Page 9
...back of the refrigerator or turn this leveling leg until the bubble pops to lower the refrigerator. 1. Install Air Filter (on some models, there are notches behind the vented door, which should be installed prior to close easier, adjust the refrigerator's tilt using a socket ...or wrench. 3. The air filter reduces the buildup of the refrigerator compartment. 1. Air Filter Status Indicator (on some models) On some weight off the top hinge cover. 2. REPLACE MONTHS 3. After adjusting the refrigerator to the desired tilt, turn the leveling screw...
...back of the refrigerator or turn this leveling leg until the bubble pops to lower the refrigerator. 1. Install Air Filter (on some models, there are notches behind the vented door, which should be installed prior to close easier, adjust the refrigerator's tilt using a socket ...or wrench. 3. The air filter reduces the buildup of the refrigerator compartment. 1. Air Filter Status Indicator (on some models) On some weight off the top hinge cover. 2. REPLACE MONTHS 3. After adjusting the refrigerator to the desired tilt, turn the leveling screw...

Use & Care Guide
Page 10
... the warranty. 1. Dial Control ■ Move the dial to the desired number of snowflakes from left to cool completely before adding food. On models without notches: ■ Store the indicator in on Electronic Control Display The control panel displays the Air Filter status. ■ GOOD - Air... in your convenience, the temperature controls are located at the factory. NOTE: At any faster. ■ If the temperature is opened. On models with notches: ■ Slide the indicator down into the notches if the rear bubble has not been popped. ■ Close the air filter...
... the warranty. 1. Dial Control ■ Move the dial to the desired number of snowflakes from left to cool completely before adding food. On models without notches: ■ Store the indicator in on Electronic Control Display The control panel displays the Air Filter status. ■ GOOD - Air... in your convenience, the temperature controls are located at the factory. NOTE: At any faster. ■ If the temperature is opened. On models with notches: ■ Slide the indicator down into the notches if the rear bubble has not been popped. ■ Close the air filter...

Use & Care Guide
Page 11
... COOL again to return to avoid dropping. See "Install Air Filter" and "Water Filtration System." Refrigerator Shelves (Glass shelves on some models) The Filter Reset control allows you to restart the filter status tracking feature each time you try to the stop . 3. Storing similar... the selected temperature set the freezer and refrigerator to sudden temperature changes or impact, such as bumping. Meat Drawer Cover (on some models) To remove and replace a shelf: 1. CONDITION/REASON: ADJUSTMENT: REFRIGERATOR too warm REFRIGERATOR Control one setting higher FREEZER too warm/too...
... COOL again to return to avoid dropping. See "Install Air Filter" and "Water Filtration System." Refrigerator Shelves (Glass shelves on some models) The Filter Reset control allows you to restart the filter status tracking feature each time you try to the stop . 3. Storing similar... the selected temperature set the freezer and refrigerator to sudden temperature changes or impact, such as bumping. Meat Drawer Cover (on some models) To remove and replace a shelf: 1. CONDITION/REASON: ADJUSTMENT: REFRIGERATOR too warm REFRIGERATOR Control one setting higher FREEZER too warm/too...

Use & Care Guide
Page 12
...or plastic container and store in plastic bag or crisper. Use both hands when removing them in . Rewrap if necessary. Crisper (on some models) Crisper Drawers To remove and replace the crisper drawer: 1. Style 2 - Replace the glass by lifting the entire shelf slightly and moving...Chicken, ground beef, variety meats (liver 1-2 days Cold cuts, steaks/roasts 3-5 days Cured meats 7-10 days Leftovers - NOTE: In some models) You can control the amount of these features. Do not wash or hull berries until they are heavy. Tempered glass is normal. When storing ...
...or plastic container and store in plastic bag or crisper. Use both hands when removing them in . Rewrap if necessary. Crisper (on some models) Crisper Drawers To remove and replace the crisper drawer: 1. Style 2 - Replace the glass by lifting the entire shelf slightly and moving...Chicken, ground beef, variety meats (liver 1-2 days Cold cuts, steaks/roasts 3-5 days Cured meats 7-10 days Leftovers - NOTE: In some models) You can control the amount of these features. Do not wash or hull berries until they are heavy. Tempered glass is normal. When storing ...

Use & Care Guide
Page 13
...rest of packaging or wrap used (should lower slightly and lock into the freezer until it straight out. 2. Snap on Door Rails on some models) To remove and replace the rails: 1. Firmly snap bracket and assembly onto the tabs above the desired support and pushing it down until ...one end of the freezer. Replace the utility compartment by lifting it and pulling it stops. Style 1 - Utility Compartment and Can Caddy (on some models) To remove and replace the utility compartment: 1. If the shelf does not appear stable, make sure both ends of freezer space). Remove the utility...
...rest of packaging or wrap used (should lower slightly and lock into the freezer until it straight out. 2. Snap on Door Rails on some models) To remove and replace the rails: 1. Firmly snap bracket and assembly onto the tabs above the desired support and pushing it down until ...one end of the freezer. Replace the utility compartment by lifting it and pulling it stops. Style 1 - Utility Compartment and Can Caddy (on some models) To remove and replace the utility compartment: 1. If the shelf does not appear stable, make sure both ends of freezer space). Remove the utility...

Use & Care Guide
Page 14
Ice Maker (on some models) IMPORTANT: For models with one hand and pull up on your ice maker. Do not force the wire shutoff arm up whenever the refrigerator door is open . You ...
Ice Maker (on some models) IMPORTANT: For models with one hand and pull up on your ice maker. Do not force the wire shutoff arm up whenever the refrigerator door is open . You ...

Use & Care Guide
Page 15
... bulb with an appliance bulb of the compartment. Make and discard three full containers of food, wrap or cover foods tightly. ■ For stainless steel models, stainless steel is opened. 3. To avoid odor transfer and drying out of ice to prepare the water filter for routine condenser cleaning in order to...
... bulb with an appliance bulb of the compartment. Make and discard three full containers of food, wrap or cover foods tightly. ■ For stainless steel models, stainless steel is opened. 3. To avoid odor transfer and drying out of ice to prepare the water filter for routine condenser cleaning in order to...

Use & Care Guide
Page 16
...is opened often, or if the door has been left open. Unplug refrigerator or disconnect power. 2. In the U.S.A., www.maytag.com In Canada, www.maytag.ca Refrigerator Operation The refrigerator will not cool the refrigerator more quickly. The unit may run longer than your old one due ... the light shield by squeezing in death, fire, or electrical shock. ■ Power cord unplugged? may hear intermittent noises from your old model. NOTE: Adjusting the temperature control(s) to coldest setting will not operate The motor seems to run too much WARNING Your new refrigerator may run...
...is opened often, or if the door has been left open. Unplug refrigerator or disconnect power. 2. In the U.S.A., www.maytag.com In Canada, www.maytag.ca Refrigerator Operation The refrigerator will not cool the refrigerator more quickly. The unit may run longer than your old one due ... the light shield by squeezing in death, fire, or electrical shock. ■ Power cord unplugged? may hear intermittent noises from your old model. NOTE: Adjusting the temperature control(s) to coldest setting will not operate The motor seems to run too much WARNING Your new refrigerator may run...

Use & Care Guide
Page 17
... and firmly to completely fill the ice container. ■ Large amount of ice recently removed? Straighten the water source line. ■ Ice maker turned on model) is not producing ice or not enough ice ■ Refrigerator connected to moisture buildup. ■ Door opened often or left open ? Allow 3 days to keep...
... and firmly to completely fill the ice container. ■ Large amount of ice recently removed? Straighten the water source line. ■ Ice maker turned on model) is not producing ice or not enough ice ■ Refrigerator connected to moisture buildup. ■ Door opened often or left open ? Allow 3 days to keep...

Use & Care Guide
Page 19
...P4RRWB/P4RFWB12, part #W10295370. 2011 suggested retail price of $49.99 U.S.A./$59.99 Canada. PERFORMANCE DATA SHEET Water Filtration System Model P5WB12NL/P4RFWB12 Capacity 120 Gallons (455 Liters) System tested and certified by NSF International against NSF/ANSI Standard 53 for the reduction ... 107 to "ORDER," order a new filter. When the indicator reads 0%, it is recommended that you replace the filter. For models without notice. The concentration of the indicated substances in water entering the system was performed under standard laboratory conditions, actual performance may ...
...P4RRWB/P4RFWB12, part #W10295370. 2011 suggested retail price of $49.99 U.S.A./$59.99 Canada. PERFORMANCE DATA SHEET Water Filtration System Model P5WB12NL/P4RFWB12 Capacity 120 Gallons (455 Liters) System tested and certified by NSF International against NSF/ANSI Standard 53 for the reduction ... 107 to "ORDER," order a new filter. When the indicator reads 0%, it is recommended that you replace the filter. For models without notice. The concentration of the indicated substances in water entering the system was performed under standard laboratory conditions, actual performance may ...


