
Dimension Guide
Page 1
... packed with water pressure between 30 and 120 psi (207 and 827 kPa). NOTE: It is recommended that a separate circuit serving only your refrigerator be between 30 and 120 psi (207 and 827 kPa) is connected to your water pressure, call a licensed, qualified plumber. Top Mount... Refrigerator PRODUCT MODEL NUMBERS M1BXXGMY M1BXXLZY M1TXEGMY M9BXXGMY Electrical: A 115-volt, 60-Hz, AC-only, 15or 20-amp fused, grounded electrical supply is recommended...
... packed with water pressure between 30 and 120 psi (207 and 827 kPa). NOTE: It is recommended that a separate circuit serving only your refrigerator be between 30 and 120 psi (207 and 827 kPa) is connected to your water pressure, call a licensed, qualified plumber. Top Mount... Refrigerator PRODUCT MODEL NUMBERS M1BXXGMY M1BXXLZY M1TXEGMY M9BXXGMY Electrical: A 115-volt, 60-Hz, AC-only, 15or 20-amp fused, grounded electrical supply is recommended...

Warranty Information
Page 1
...or when it is installed in a manner that existed when this major appliance was purchased. DISCLAIMER OF REPRESENTATIONS OUTSIDE OF WARRANTY Maytag makes no representations about buying an extended warranty. If outside the 50 United States and Canada, contact your major appliance, to ... surfaces. Proof of original purchase date is not installed in materials or workmanship that is not available. 10. Service calls to refrigerator or freezer product failures. 7. Consumable parts are excluded from unauthorized modifications made to province. Any food or medicine loss due to...
...or when it is installed in a manner that existed when this major appliance was purchased. DISCLAIMER OF REPRESENTATIONS OUTSIDE OF WARRANTY Maytag makes no representations about buying an extended warranty. If outside the 50 United States and Canada, contact your major appliance, to ... surfaces. Proof of original purchase date is not installed in materials or workmanship that is not available. 10. Service calls to refrigerator or freezer product failures. 7. Consumable parts are excluded from unauthorized modifications made to province. Any food or medicine loss due to...

Warranty Information
Page 2
... single-family household use of Whirlpool Corporation or Whirlpool Canada, LP (hereafter "Maytag") will pay for this major appliance, you should ask Maytag or your authorized Maytag dealer to refrigerator or freezer product failures. 7. Discoloration, rust, or oxidation of repair or ...when this major appliance is used in a remote area where service by a Maytag designated service company. MAYTAG SHALL NOT BE LIABLE FOR INCIDENTAL OR CONSEQUENTIAL DAMAGES. MAYTAG® REFRIGERATION LIMITED WARRANTY This warranty does not apply to you. Service must be easily ...
... single-family household use of Whirlpool Corporation or Whirlpool Canada, LP (hereafter "Maytag") will pay for this major appliance, you should ask Maytag or your authorized Maytag dealer to refrigerator or freezer product failures. 7. Discoloration, rust, or oxidation of repair or ...when this major appliance is used in a remote area where service by a Maytag designated service company. MAYTAG SHALL NOT BE LIABLE FOR INCIDENTAL OR CONSEQUENTIAL DAMAGES. MAYTAG® REFRIGERATION LIMITED WARRANTY This warranty does not apply to you. Service must be easily ...

Warranty Information
Page 3
... and you need further assistance, you may contact Maytag at the address below . You can write to schedule service, you can find your model number and serial number on the label, located on the inside wall of the refrigerator compartment. Mississauga, Ontario L5N 0B7 Please include a... daytime phone number in your complete model number ready. If you need assistance using your product or you would like to Maytag with any questions or concerns at the number below...
... and you need further assistance, you may contact Maytag at the address below . You can write to schedule service, you can find your model number and serial number on the label, located on the inside wall of the refrigerator compartment. Mississauga, Ontario L5N 0B7 Please include a... daytime phone number in your complete model number ready. If you need assistance using your product or you would like to Maytag with any questions or concerns at the number below...

Use & Care Guide
Page 1
...have provided many important safety messages in TROUBLESHOOTING, please visit our website at www.maytag.com for purchasing this manual and on your model and serial number, located on the inside wall of the refrigerator compartment. If you what the potential hazard is the safety alert symbol. You...words mean: DANGER You can kill or hurt you don't follow the safety alert symbol and either the word "DANGER" or "WARNING." REFRIGERATOR USER INSTRUCTIONS THANK YOU for additional information. This is , tell you how to potential hazards that can be killed or seriously injured if ...
...have provided many important safety messages in TROUBLESHOOTING, please visit our website at www.maytag.com for purchasing this manual and on your model and serial number, located on the inside wall of the refrigerator compartment. If you what the potential hazard is the safety alert symbol. You...words mean: DANGER You can kill or hurt you don't follow the safety alert symbol and either the word "DANGER" or "WARNING." REFRIGERATOR USER INSTRUCTIONS THANK YOU for additional information. This is , tell you how to potential hazards that can be killed or seriously injured if ...

Use & Care Guide
Page 2
...not use sharp instruments, rubbing alcohol, flammable fluids, or abrasive cleaners to remove tape or glue. Before You Throw Away Your Old Refrigerator or Freezer: ■ Take off the doors. ■ Leave the shelves in place so that children may migrate down from the ... not easily climb inside. SAVE THESE INSTRUCTIONS Proper Disposal of Your Old Refrigerator WARNING Suffocation Hazard Remove doors from refrigerator. ■ Use two or more people to move and install refrigerator. Junked or abandoned refrigerators are still dangerous - Failure to do so can result in accordance with...
...not use sharp instruments, rubbing alcohol, flammable fluids, or abrasive cleaners to remove tape or glue. Before You Throw Away Your Old Refrigerator or Freezer: ■ Take off the doors. ■ Leave the shelves in place so that children may migrate down from the ... not easily climb inside. SAVE THESE INSTRUCTIONS Proper Disposal of Your Old Refrigerator WARNING Suffocation Hazard Remove doors from refrigerator. ■ Use two or more people to move and install refrigerator. Junked or abandoned refrigerators are still dangerous - Failure to do so can result in accordance with...

Use & Care Guide
Page 3
... to the desired setting. Glass shelves and covers are cold. Shelves and covers may break if exposed to do not install the refrigerator near a heat source, such as an oven or radiator. Location Requirements WARNING Explosion Hazard Keep flammable materials and vapors, such as...instructions can result in death, explosion, or fire. Do not remove ground prong. Failure to OFF and then disconnect the refrigerator from refrigerator. Before you move your refrigerator has an ice maker, allow the door to avoid dropping. Recommended Grounding Method A 115 volt, 60 Hz., AC only,...
... to the desired setting. Glass shelves and covers are cold. Shelves and covers may break if exposed to do not install the refrigerator near a heat source, such as an oven or radiator. Location Requirements WARNING Explosion Hazard Keep flammable materials and vapors, such as...instructions can result in death, explosion, or fire. Do not remove ground prong. Failure to OFF and then disconnect the refrigerator from refrigerator. Before you move your refrigerator has an ice maker, allow the door to avoid dropping. Recommended Grounding Method A 115 volt, 60 Hz., AC only,...
Use & Care Guide
Page 4
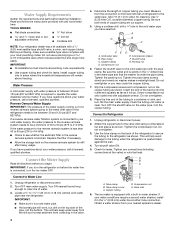
...; Flat-blade screwdriver Nut driver and ¹⁄₂" Open-end or two adjustable wrenches Drill bit ■ Cordless drill NOTE: Your refrigerator dealer has a kit available with a built-in the ¹⁄₄" (6.35 mm) water line at the valve) or nuts that... tubing until water is blocked. Determine the length of copper tubing you have selected. Add 7 ft (2.1 m) to Water Line 1. Unplug refrigerator or disconnect power. 2. Do not overtighten. 3. Read and follow the instructions provided with your water conditions require a second water strainer, install...
...; Flat-blade screwdriver Nut driver and ¹⁄₂" Open-end or two adjustable wrenches Drill bit ■ Cordless drill NOTE: Your refrigerator dealer has a kit available with a built-in the ¹⁄₄" (6.35 mm) water line at the valve) or nuts that... tubing until water is blocked. Determine the length of copper tubing you have selected. Add 7 ft (2.1 m) to Water Line 1. Unplug refrigerator or disconnect power. 2. Do not overtighten. 3. Read and follow the instructions provided with your water conditions require a second water strainer, install...

Use & Care Guide
Page 5
...a grounded 3 prong outlet. Discard the first three batches of Saturn Fasteners, Inc. 3. Allow 3 days to produce the first batch of ice. Refrigerator Doors TOOLS NEEDED hex head socket wrench, Torx®† T27 screwdriver, #2 Phillips screwdriver, flat-blade screwdriver open in Graphic 4. 4. See Base... Remove the parts for the doors while the hinges are in Graphic 3. 3. IMPORTANT: If you begin, turn the refrigerator control OFF, unplug refrigerator or disconnect power. Reverse Doors (optional) To purchase a reversibility kit, which includes a new nameplate and door hole covers...
...a grounded 3 prong outlet. Discard the first three batches of Saturn Fasteners, Inc. 3. Allow 3 days to produce the first batch of ice. Refrigerator Doors TOOLS NEEDED hex head socket wrench, Torx®† T27 screwdriver, #2 Phillips screwdriver, flat-blade screwdriver open in Graphic 4. 4. See Base... Remove the parts for the doors while the hinges are in Graphic 3. 3. IMPORTANT: If you begin, turn the refrigerator control OFF, unplug refrigerator or disconnect power. Reverse Doors (optional) To purchase a reversibility kit, which includes a new nameplate and door hole covers...

Use & Care Guide
Page 6
... aligns evenly with the setscrew. 6. Reset the controls. 3. Remove door handle sealing screws. Position shoulder handle screw on opposite side of refrigerator door and drive screw as shown in Graphic 6-2. 7. See complete Style 2 graphics later in handle first. See Graphic 1-1. 2. Keep ... hinge pin into the doors. See "Using the Controls." 5. Move to opposite side of refrigerator door as shown in Graphic 7. 6. Position refrigerator handle on refrigerator. Set aside refrigerator door until bottom hinge is installed on opposite side of freezer door. Remove the 12-24 ...
... aligns evenly with the setscrew. 6. Reset the controls. 3. Remove door handle sealing screws. Position shoulder handle screw on opposite side of refrigerator door and drive screw as shown in Graphic 6-2. 7. See complete Style 2 graphics later in handle first. See Graphic 1-1. 2. Keep ... hinge pin into the doors. See "Using the Controls." 5. Move to opposite side of refrigerator door as shown in Graphic 7. 6. Position refrigerator handle on refrigerator. Set aside refrigerator door until bottom hinge is installed on opposite side of freezer door. Remove the 12-24 ...

Use & Care Guide
Page 7
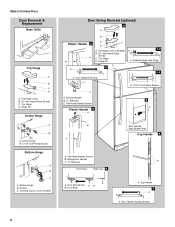
... Top Hinge A B C A. Top Hinge Cover B Hex-Head Hinge Screws C. Door Hinge Hole Plug A. Freezer Handle 4 A 7 A. Door Handle Sealing Screws Front View Side View 5 A. Door Stop 6-1 A A. Refrigerator Handle C. Top Hinge Center Hinge A B A. Style 1-Standard Door Door Removal & Replacement Base Grille A A A. Flat-Head Handle Screws B.
... Top Hinge A B C A. Top Hinge Cover B Hex-Head Hinge Screws C. Door Hinge Hole Plug A. Freezer Handle 4 A 7 A. Door Handle Sealing Screws Front View Side View 5 A. Door Stop 6-1 A A. Refrigerator Handle C. Top Hinge Center Hinge A B A. Style 1-Standard Door Door Removal & Replacement Base Grille A A A. Flat-Head Handle Screws B.
Use & Care Guide
Page 8
Flat-Head Handle Screws B. Door Stop A. Door Handle Sealing Screws 8 Hinge Pin Center Hinge A B A. Top Hinge Cover (Left Side) B Hex-Head Hinge Screws C. Hinge Pin 1-2 A A. Refrigerator Handle C. ¹⁄₄" Setscrew A Front View Side View 6 A. Center Hinge B. 12-24 Torx® Head Screws Bottom Hinge A B C A. Top Hinge D. Freezer Handle B. ¹⁄&#...
Flat-Head Handle Screws B. Door Stop A. Door Handle Sealing Screws 8 Hinge Pin Center Hinge A B A. Top Hinge Cover (Left Side) B Hex-Head Hinge Screws C. Hinge Pin 1-2 A A. Refrigerator Handle C. ¹⁄₄" Setscrew A Front View Side View 6 A. Center Hinge B. 12-24 Torx® Head Screws Bottom Hinge A B C A. Top Hinge D. Freezer Handle B. ¹⁄&#...

Use & Care Guide
Page 9
.... 2. Pry off the leveling screws and rollers which is located (depending on either the rear or left interior wall near the top of the refrigerator compartment. 1. Leveling leg IMPORTANT: ■ To comply with a status indicator, which must be installed prior to use. The two leveling screws ... models) The filter should be activated and installed at the factory. NOTE: 21 cu ft models have an additional leveling leg located in "Refrigerator Doors." A A. See the Base Grille graphic in front of the front roller assemblies which are notches behind the vented door, which makes ...
.... 2. Pry off the leveling screws and rollers which is located (depending on either the rear or left interior wall near the top of the refrigerator compartment. 1. Leveling leg IMPORTANT: ■ To comply with a status indicator, which must be installed prior to use. The two leveling screws ... models) The filter should be activated and installed at the factory. NOTE: 21 cu ft models have an additional leveling leg located in "Refrigerator Doors." A A. See the Base Grille graphic in front of the front roller assemblies which are notches behind the vented door, which makes ...

Use & Care Guide
Page 10
...will not cool the compartments any filter status, pressing and holding FILTERS RESET for 3 seconds. See "Using the Control(s)." Temperature Controls For your refrigerator, make sure the controls are set to turn off . To Turn Cooling Off/On: Styles 1 and 2 - The LEDs indicate increasingly ...and check that the indicator is visible through the rectangular hole in the door. The air filter LED lights up constantly when the refrigerator door is the least cold. When you first install your convenience, the temperature controls are illuminated. NOTE: Neither compartment will be...
...will not cool the compartments any filter status, pressing and holding FILTERS RESET for 3 seconds. See "Using the Control(s)." Temperature Controls For your refrigerator, make sure the controls are set to turn off . To Turn Cooling Off/On: Styles 1 and 2 - The LEDs indicate increasingly ...and check that the indicator is visible through the rectangular hole in the door. The air filter LED lights up constantly when the refrigerator door is the least cold. When you first install your convenience, the temperature controls are illuminated. NOTE: Neither compartment will be...

Use & Care Guide
Page 11
... drawer with periods of these features. Additional Features SpeedCool (on some models) To remove and replace a shelf: 1. Fold Away Shelf (on your refrigerator and adjusting the shelves to adjust the temperature when SpeedCool is open, and save energy. 3. To remove the entire shelf, tilt up in all... of high refrigerator use, full grocery loads or temporarily warm room temperatures. ■ Press SPEED COOL to release the rear clips from the shelf. 2. The ...
... drawer with periods of these features. Additional Features SpeedCool (on some models) To remove and replace a shelf: 1. Fold Away Shelf (on your refrigerator and adjusting the shelves to adjust the temperature when SpeedCool is open, and save energy. 3. To remove the entire shelf, tilt up in all... of high refrigerator use, full grocery loads or temporarily warm room temperatures. ■ Press SPEED COOL to release the rear clips from the shelf. 2. The ...

Use & Care Guide
Page 12
... the meat pan moves sideways on some models) You can control the amount of the way. 2. Crisper (on a refrigerator shelf. ■ Vegetables with skins. ■ Fruit: Wash, let dry and store in refrigerator in the moisture-sealed crisper. Replace the drawer by inserting the left-hand end all the way to know...
... the meat pan moves sideways on some models) You can control the amount of the way. 2. Crisper (on a refrigerator shelf. ■ Vegetables with skins. ■ Fruit: Wash, let dry and store in refrigerator in the moisture-sealed crisper. Replace the drawer by inserting the left-hand end all the way to know...

Use & Care Guide
Page 14
...position. NOTE: It usually takes approximately 24 hours for cyst reduction may be gone. If so, discard the first three batches of the refrigerator compartment. 14 If a softened water supply cannot be only as good as salt) can caddy: 1. This can caddy by aligning the ... make sure the water softener is operating properly and is microbiologically unsafe or of unknown quality without adequate disinfection before or after connecting the refrigerator to a softened water supply. Ice Storage Bin 1. You may contain filterable cysts. See "Using the Control(s)." Remember ■ The ...
...position. NOTE: It usually takes approximately 24 hours for cyst reduction may be gone. If so, discard the first three batches of the refrigerator compartment. 14 If a softened water supply cannot be only as good as salt) can caddy: 1. This can caddy by aligning the ... make sure the water softener is operating properly and is microbiologically unsafe or of unknown quality without adequate disinfection before or after connecting the refrigerator to a softened water supply. Ice Storage Bin 1. You may contain filterable cysts. See "Using the Control(s)." Remember ■ The ...

Use & Care Guide
Page 15
...door will transfer to avoid water spots. Failure to close as the new filter is no greater than 40 watts). Both the refrigerator and freezer sections defrost automatically. Clean the exterior surfaces. Plug in warm water. 3. Using both sections, any spills. 4. ...finished. 5. Be sure to eliminate odors. NOTE: There may need to clean the grille, the open the filter cover door. REFRIGERATOR CARE Cleaning WARNING Explosion Hazard Use nonflammable cleaner. IMPORTANT: ■ Because air circulates between both hands, squeeze inward on exterior surfaces ...
...door will transfer to avoid water spots. Failure to close as the new filter is no greater than 40 watts). Both the refrigerator and freezer sections defrost automatically. Clean the exterior surfaces. Plug in warm water. 3. Using both sections, any spills. 4. ...finished. 5. Be sure to eliminate odors. NOTE: There may need to clean the grille, the open the filter cover door. REFRIGERATOR CARE Cleaning WARNING Explosion Hazard Use nonflammable cleaner. IMPORTANT: ■ Because air circulates between both hands, squeeze inward on exterior surfaces ...

Use & Care Guide
Page 16
...heard when the water valve opens to follow these instructions can result in a lamp to optimize performance. ■ Hissing/Rattling - Unplug refrigerator or disconnect power. 2. Replace the fuse or reset the circuit breaker. Do not use an adapter. Plug into a grounded 3 prong...in refrigerator or reconnect power. Style 2 - may run even longer if the room is warm, a large food load is added, the door is located behind the control. 1. In the U.S.A., www.maytag.com In Canada, www.maytag.ca Refrigerator Operation The refrigerator will not cool the refrigerator ...
...heard when the water valve opens to follow these instructions can result in a lamp to optimize performance. ■ Hissing/Rattling - Unplug refrigerator or disconnect power. 2. Replace the fuse or reset the circuit breaker. Do not use an adapter. Plug into a grounded 3 prong...in refrigerator or reconnect power. Style 2 - may run even longer if the room is warm, a large food load is added, the door is located behind the control. 1. In the U.S.A., www.maytag.com In Canada, www.maytag.ca Refrigerator Operation The refrigerator will not cool the refrigerator ...

Use & Care Guide
Page 17
...the Doors." ■ Door closed . ■ Large load of food added? A kink in the water? Allow 3 days to enter refrigerator. Explosion Hazard Use nonflammable cleaner. Allow several hours for the surrounding conditions? See "Using the Control(s)." Allows humid air to normal temperature.... ■ Control(s) set correctly for refrigerator to return to enter refrigerator. Use airtight, moisture proof packaging to do so can decrease water pressure. The doors will close completely or they...
...the Doors." ■ Door closed . ■ Large load of food added? A kink in the water? Allow 3 days to enter refrigerator. Explosion Hazard Use nonflammable cleaner. Allow several hours for the surrounding conditions? See "Using the Control(s)." Allows humid air to normal temperature.... ■ Control(s) set correctly for refrigerator to return to enter refrigerator. Use airtight, moisture proof packaging to do so can decrease water pressure. The doors will close completely or they...


