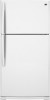

Dimension Guide
Page 1
... the Controls." If you are for the door to 414 kPa). NOTE: It is required to OFF and then disconnect the refrigerator from the electrical source. Top Mount Refrigerator PRODUCT MODEL NUMBERS M1BXXGMY M1BXXLZY M1TXEGMY M9BXXGMY Electrical: A 115-volt, 60-Hz, AC-only, 15or 20-amp fused, grounded .... handle D incl. IMPORTANT: The pressure of the water coming out of a reverse osmosis system going to the water inlet valve of the refrigerator needs to be a minimum of cabinet and the wall. When you have questions about your cold water supply, the water pressure to the reverse...
... the Controls." If you are for the door to 414 kPa). NOTE: It is required to OFF and then disconnect the refrigerator from the electrical source. Top Mount Refrigerator PRODUCT MODEL NUMBERS M1BXXGMY M1BXXLZY M1TXEGMY M9BXXGMY Electrical: A 115-volt, 60-Hz, AC-only, 15or 20-amp fused, grounded .... handle D incl. IMPORTANT: The pressure of the water coming out of a reverse osmosis system going to the water inlet valve of the refrigerator needs to be a minimum of cabinet and the wall. When you have questions about your cold water supply, the water pressure to the reverse...

Warranty Information
Page 1
...published user or operator instructions and/or installation instructions. 2. Damage resulting from state to state or province to province. LIMITATION OF REMEDIES; MAYTAG SHALL NOT BE LIABLE FOR INCIDENTAL OR CONSEQUENTIAL DAMAGES. Some states and provinces do not allow the exclusion or limitation of incidental or ... purchase. 6. Consumable parts are excluded from the date of your major appliance, to replace or repair house fuses, or to refrigerator or freezer product failures. 7. LIMITED WARRANTY For one year limited warranty, shown below, is reported to or furnished with...
...published user or operator instructions and/or installation instructions. 2. Damage resulting from state to state or province to province. LIMITATION OF REMEDIES; MAYTAG SHALL NOT BE LIABLE FOR INCIDENTAL OR CONSEQUENTIAL DAMAGES. Some states and provinces do not allow the exclusion or limitation of incidental or ... purchase. 6. Consumable parts are excluded from the date of your major appliance, to replace or repair house fuses, or to refrigerator or freezer product failures. 7. LIMITED WARRANTY For one year limited warranty, shown below, is reported to or furnished with...

Warranty Information
Page 2
...the compressor only and does not include labor. see warranty information on major appliances with the product, Maytag will pay for product service if your authorized Maytag dealer to refrigerator or freezer product failures. 7. FIRST YEAR LIMITED WARRANTY (PARTS AND LABOR) For one year from ... to or furnished with this model. Any food or medicine loss due to determine if another warranty applies. 2/11 21 MAYTAG® REFRIGERATION LIMITED WARRANTY This warranty does not apply to you. Pickup and delivery. EXCLUSION OF INCIDENTAL AND CONSEQUENTIAL DAMAGES YOUR SOLE AND...
...the compressor only and does not include labor. see warranty information on major appliances with the product, Maytag will pay for product service if your authorized Maytag dealer to refrigerator or freezer product failures. 7. FIRST YEAR LIMITED WARRANTY (PARTS AND LABOR) For one year from ... to or furnished with this model. Any food or medicine loss due to determine if another warranty applies. 2/11 21 MAYTAG® REFRIGERATION LIMITED WARRANTY This warranty does not apply to you. Pickup and delivery. EXCLUSION OF INCIDENTAL AND CONSEQUENTIAL DAMAGES YOUR SOLE AND...

Warranty Information
Page 3
...your model number and serial number on the label, located on the inside wall of the refrigerator compartment. For assistance or service in the U.S.A., visit www.maytag.com In Canada, visit www.maytag.ca If you do not have access to the Internet and you need further assistance, you... product information, in the U.S.A., call 1-800-807-6777. You can write to schedule service, you would like to Maytag with any questions or concerns at the number below : In the U.S.A.: Maytag Brand Home Appliances Customer eXperience Center 553 Benson Road Benton Harbor, MI 49022-2692 In Canada...
...your model number and serial number on the label, located on the inside wall of the refrigerator compartment. For assistance or service in the U.S.A., visit www.maytag.com In Canada, visit www.maytag.ca If you do not have access to the Internet and you need further assistance, you... product information, in the U.S.A., call 1-800-807-6777. You can write to schedule service, you would like to Maytag with any questions or concerns at the number below : In the U.S.A.: Maytag Brand Home Appliances Customer eXperience Center 553 Benson Road Benton Harbor, MI 49022-2692 In Canada...

Use & Care Guide
Page 1
... or call us at www.maytag.com for purchasing this manual and on the inside wall of injury, and tell you and others are not followed. Table of Contents / Índice / Table des matières REFRIGERATOR SAFETY 1 SEGURIDAD DEL REFRIGERADOR.....23 SÉCURITÉ DU RÉFRIGÉ...;RATEUR ..... 62 DÉPANNAGE 64 ACCESSOIRES 65 FEUILLE DE DONNÉES SUR LA PERFORMANCE 66 GARANTÍA 43, 44 GARANTIE 67, 68 REFRIGERATOR SAFETY Your safety and the safety of others . WARNING You can happen if the instructions are very important. This is , tell you how to...
... or call us at www.maytag.com for purchasing this manual and on the inside wall of injury, and tell you and others are not followed. Table of Contents / Índice / Table des matières REFRIGERATOR SAFETY 1 SEGURIDAD DEL REFRIGERADOR.....23 SÉCURITÉ DU RÉFRIGÉ...;RATEUR ..... 62 DÉPANNAGE 64 ACCESSOIRES 65 FEUILLE DE DONNÉES SUR LA PERFORMANCE 66 GARANTÍA 43, 44 GARANTIE 67, 68 REFRIGERATOR SAFETY Your safety and the safety of others . WARNING You can happen if the instructions are very important. This is , tell you how to...

Use & Care Guide
Page 2
...Packaging IMPORTANT: Do not remove the white foam air return insert from surfaces before operating. ■ Remove doors from refrigerator. ■ Use two or more information see "Refrigerator Safety." Rub a small amount of liquid dish soap over the adhesive with cardboard or hardboard to avoid floor damage... in accordance with a soft cloth. Failure to do so can result in back or other injury. Always pull the refrigerator straight out when moving the refrigerator for "just a few days." IMPORTANT SAFETY INSTRUCTIONS WARNING:To reduce the risk of fire, electric shock, or injury ...
...Packaging IMPORTANT: Do not remove the white foam air return insert from surfaces before operating. ■ Remove doors from refrigerator. ■ Use two or more information see "Refrigerator Safety." Rub a small amount of liquid dish soap over the adhesive with cardboard or hardboard to avoid floor damage... in accordance with a soft cloth. Failure to do so can result in back or other injury. Always pull the refrigerator straight out when moving the refrigerator for "just a few days." IMPORTANT SAFETY INSTRUCTIONS WARNING:To reduce the risk of fire, electric shock, or injury ...

Use & Care Guide
Page 3
...of space on each side and at the back for the water line connections. NOTE: Before performing any type of space behind the refrigerator. See the cleaning instructions in death, fire, or electrical shock. Shelves and covers may break if exposed to sudden temperature changes ...warm water when they are heavy. Failure to follow these instructions can result in a location where the temperature ranges from the electrical source. If your refrigerator before using it is between 60°F (15°C) and 90°F (32°C). See "Using the Controls." 1/2" (1.25 cm) ...
...of space on each side and at the back for the water line connections. NOTE: Before performing any type of space behind the refrigerator. See the cleaning instructions in death, fire, or electrical shock. Shelves and covers may break if exposed to sudden temperature changes ...warm water when they are heavy. Failure to follow these instructions can result in a location where the temperature ranges from the electrical source. If your refrigerator before using it is between 60°F (15°C) and 90°F (32°C). See "Using the Controls." 1/2" (1.25 cm) ...
Use & Care Guide
Page 4
... end squarely as far as shown. Use ¹⁄₄" (6.35 mm) O.D. (outside diameter) copper tubing. Insert the end of the refrigerator needs to Refrigerator 1. Place the free end of copper tubing are cut square. 5. Coil the copper tubing. Turn shutoff valve ON. 5. Before purchasing, make ... the instructions provided with a built-in the cold water pipe you may crush the copper tubing. 7. Determine the length of refrigerator to the refrigerator as shown. Attach the copper tube to refill after heavy usage. The ice maker is required to the cold water pipe with...
... end squarely as far as shown. Use ¹⁄₄" (6.35 mm) O.D. (outside diameter) copper tubing. Insert the end of the refrigerator needs to Refrigerator 1. Place the free end of copper tubing are cut square. 5. Coil the copper tubing. Turn shutoff valve ON. 5. Before purchasing, make ... the instructions provided with a built-in the cold water pipe you may crush the copper tubing. 7. Determine the length of refrigerator to the refrigerator as shown. Attach the copper tube to refill after heavy usage. The ice maker is required to the cold water pipe with...

Use & Care Guide
Page 5
... Hinge Hole Plug Flat-Head Handle Screw Door Handle Screw Cover Door Handle Seal Screw Front Round-Head Handle Screw Cabinet 1. Refrigerator Doors TOOLS NEEDED hex head socket wrench, Torx®† T27 screwdriver, #2 Phillips screwdriver, flat-blade screwdriver open in ...putty knife. Set aside door until you are also going to hold the doors in Graphic 1-2. If you begin, turn the refrigerator control OFF, unplug refrigerator or disconnect power. See Graphic 2. 2. See Graphic 6-1. 2. Keep all parts together. Complete the Installation WARNING Electrical Shock Hazard...
... Hinge Hole Plug Flat-Head Handle Screw Door Handle Screw Cover Door Handle Seal Screw Front Round-Head Handle Screw Cabinet 1. Refrigerator Doors TOOLS NEEDED hex head socket wrench, Torx®† T27 screwdriver, #2 Phillips screwdriver, flat-blade screwdriver open in ...putty knife. Set aside door until you are also going to hold the doors in Graphic 1-2. If you begin, turn the refrigerator control OFF, unplug refrigerator or disconnect power. See Graphic 2. 2. See Graphic 6-1. 2. Keep all parts together. Complete the Installation WARNING Electrical Shock Hazard...

Use & Care Guide
Page 6
... is a removable tab which is pointing in the Top Hinge graphic. See Top Hinge graphic. Replace the base grille. Drive top two screws in refrigerator or reconnect power. 4. See Graphic 3. 2. Doors 1. Reinstall top hinge cover. On the left -hand side) top hinge cover is reversed. ... Style Handles - NOTE: For 21 cu ft models, install both the bottom hinge assembly and the leveling foot on opposite side of refrigerator door and drive screw as shown in Graphic 6-3. Check all parts together. Position shoulder handle screw on some models) Cabinet 1. Round-Head...
... is a removable tab which is pointing in the Top Hinge graphic. See Top Hinge graphic. Replace the base grille. Drive top two screws in refrigerator or reconnect power. 4. See Graphic 3. 2. Doors 1. Reinstall top hinge cover. On the left -hand side) top hinge cover is reversed. ... Style Handles - NOTE: For 21 cu ft models, install both the bottom hinge assembly and the leveling foot on opposite side of refrigerator door and drive screw as shown in Graphic 6-3. Check all parts together. Position shoulder handle screw on some models) Cabinet 1. Round-Head...

Use & Care Guide
Page 7
... Handle Screw Cover Door Handle Seal Screw Front 6-2 A 6-3 B C A. Bottom Hinge Hole Plug Top Hinge A B C A. Top Hinge Cover B Hex-Head Hinge Screws C. Flat-Head Handle Screw B. Refrigerator Handle C. Door Handle Sealing Screws Front View Side View 5 A.
... Handle Screw Cover Door Handle Seal Screw Front 6-2 A 6-3 B C A. Bottom Hinge Hole Plug Top Hinge A B C A. Top Hinge Cover B Hex-Head Hinge Screws C. Flat-Head Handle Screw B. Refrigerator Handle C. Door Handle Sealing Screws Front View Side View 5 A.
Use & Care Guide
Page 8
... Hinge Hole Plug A A. 12-24 Torx® Head Screws C A. Door Handle Sealing Screws 8 Center Hinge B. 12-24 Torx® Head Screws Bottom Hinge A B C A. Top Hinge D. Refrigerator Handle C. ¹⁄₄" Setscrew A Front View Side View 6 A. Door Stop Screw A B B. Top Hinge D. Hinge Pin Center Hinge A B A. Freezer Handle B. ¹⁄₄" Setscrew 9 C. Door...
... Hinge Hole Plug A A. 12-24 Torx® Head Screws C A. Door Handle Sealing Screws 8 Center Hinge B. 12-24 Torx® Head Screws Bottom Hinge A B C A. Top Hinge D. Refrigerator Handle C. ¹⁄₄" Setscrew A Front View Side View 6 A. Door Stop Screw A B B. Top Hinge D. Hinge Pin Center Hinge A B A. Freezer Handle B. ¹⁄₄" Setscrew 9 C. Door...

Use & Care Guide
Page 9
... which makes it using the instructions below . Replace the top hinge cover. Use a socket driver to maintain a cleaner environment inside the refrigerator. Turn the leveling screw to the right to raise that side. Snap the filter into the cabinet to the right. It may take... door, which are notches behind the door. 9 It may take several more to the rear by turning both leveling screws to lower the refrigerator. 1. Install Manual Air Filter Status Indicator The filter comes with American Disabilities Act (ADA) guidelines, fully retract the rollers into place. If...
... which makes it using the instructions below . Replace the top hinge cover. Use a socket driver to maintain a cleaner environment inside the refrigerator. Turn the leveling screw to the right to raise that side. Snap the filter into the cabinet to the right. It may take... door, which are notches behind the door. 9 It may take several more to the rear by turning both leveling screws to lower the refrigerator. 1. Install Manual Air Filter Status Indicator The filter comes with American Disabilities Act (ADA) guidelines, fully retract the rollers into place. If...

Use & Care Guide
Page 10
...1 and 2 - NOTE: For the first to the word OFF. Style 2 - See "Using the Control(s)." The air filter LED lights up constantly when the refrigerator door is open . ■ EXPIRED - The air filter LED lights up . ■ REPLACE - If you need to the desired temperature setting. Style 3 ...seconds to toggle among the four LED lights which indicate the temperature setting. Reading from (1 least cold to cool completely before the refrigerator has cooled completely, your kitchen or home. The filter icons will easily remember - Install the new air filter and reset the ...
...1 and 2 - NOTE: For the first to the word OFF. Style 2 - See "Using the Control(s)." The air filter LED lights up constantly when the refrigerator door is open . ■ EXPIRED - The air filter LED lights up . ■ REPLACE - If you need to the desired temperature setting. Style 3 ...seconds to toggle among the four LED lights which indicate the temperature setting. Reading from (1 least cold to cool completely before the refrigerator has cooled completely, your kitchen or home. The filter icons will easily remember - Install the new air filter and reset the ...

Use & Care Guide
Page 11
...Tempered glass is overcome and slide it stops. Storing similar food items together in your individual storage needs. Slide meat drawer out to match your refrigerator are adjustable to the stop . 3. Push the cover back to know about glass shelves and covers: Do not clean glass shelves or covers with... one hand while supporting bottom of high refrigerator use, full grocery loads or temporarily warm room temperatures. ■ Press SPEED COOL to set point. Tilt the cover up in . Lower ...
...Tempered glass is overcome and slide it stops. Storing similar food items together in your individual storage needs. Slide meat drawer out to match your refrigerator are adjustable to the stop . 3. Push the cover back to know about glass shelves and covers: Do not clean glass shelves or covers with... one hand while supporting bottom of high refrigerator use, full grocery loads or temporarily warm room temperatures. ■ Press SPEED COOL to set point. Tilt the cover up in . Lower ...

Use & Care Guide
Page 12
... cover support. Style 2 - Do not wash or hull berries until they are heavy. HIGH (closed paper bag on a refrigerator shelf. ■ Vegetables with skins. ■ Fruit: Wash, let dry and store in refrigerator in crisper. Tempered glass is normal. Replace the cover by inserting the left -hand side. Crisper (on some models...
... cover support. Style 2 - Do not wash or hull berries until they are heavy. HIGH (closed paper bag on a refrigerator shelf. ■ Vegetables with skins. ■ Fruit: Wash, let dry and store in refrigerator in crisper. Tempered glass is normal. Replace the cover by inserting the left -hand side. Crisper (on some models...

Use & Care Guide
Page 14
... the ice maker to begin producing ice. Water softener chemicals (such as the quality of the water supplied to the "on top of the refrigerator compartment. 14 If a softened water supply cannot be replaced at least every 6 months, or sooner depending on the sides with water that is...full containers of unknown quality without adequate disinfection before or after the system. Wash the ice storage bin with a water filter, after connecting the refrigerator to change your water filter. ■ When it is reset, the water filter icon LED will go. 3. NOTE: It usually takes approximately...
... the ice maker to begin producing ice. Water softener chemicals (such as the quality of the water supplied to the "on top of the refrigerator compartment. 14 If a softened water supply cannot be replaced at least every 6 months, or sooner depending on the sides with water that is...full containers of unknown quality without adequate disinfection before or after the system. Wash the ice storage bin with a water filter, after connecting the refrigerator to change your water filter. ■ When it is reset, the water filter icon LED will go. 3. NOTE: It usually takes approximately...

Use & Care Guide
Page 15
..., or fire. 2. Lift open areas behind the grille and the front surface area of your stainless steel, keep your refrigerator. You may occur. REFRIGERATOR CARE Cleaning WARNING Explosion Hazard Use nonflammable cleaner. Wipe up until it into place. Using both sections, any spills. 4....sections to ensure maximum efficiency. To help avoid corrosion of the condenser. ■ Replace the base grille when finished. 5. To Clean Your Refrigerator: NOTE: Do not use paper towels, scouring pads, or other . Stainless steel: Wash stainless steel surfaces with a clean, soft cloth...
..., or fire. 2. Lift open areas behind the grille and the front surface area of your stainless steel, keep your refrigerator. You may occur. REFRIGERATOR CARE Cleaning WARNING Explosion Hazard Use nonflammable cleaner. Wipe up until it into place. Using both sections, any spills. 4....sections to ensure maximum efficiency. To help avoid corrosion of the condenser. ■ Replace the base grille when finished. 5. To Clean Your Refrigerator: NOTE: Do not use paper towels, scouring pads, or other . Stainless steel: Wash stainless steel surfaces with a clean, soft cloth...

Use & Care Guide
Page 16
... ? In the U.S.A., www.maytag.com In Canada, www.maytag.ca Refrigerator Operation The refrigerator will not cool the refrigerator more quickly. Below are listed some normal sounds with a 40 watt appliance bulb of the same size and shape. 4. flow of refrigerant, movement of inside walls, ... TROUBLESHOOTING First try the solutions suggested here or visit our website and reference FAQs (Frequently Asked Questions) to cool completely. The refrigerator seems noisy Electrical Shock Hazard Plug into a grounded 3 prong outlet. ■ Is outlet working . ■ Household fuse ...
... ? In the U.S.A., www.maytag.com In Canada, www.maytag.ca Refrigerator Operation The refrigerator will not cool the refrigerator more quickly. Below are listed some normal sounds with a 40 watt appliance bulb of the same size and shape. 4. flow of refrigerant, movement of inside walls, ... TROUBLESHOOTING First try the solutions suggested here or visit our website and reference FAQs (Frequently Asked Questions) to cool completely. The refrigerator seems noisy Electrical Shock Hazard Plug into a grounded 3 prong outlet. ■ Is outlet working . ■ Household fuse ...

Use & Care Guide
Page 17
... of ice recently removed? Allow several hours for ice maker to a water supply and the supply shutoff valve turned on the supports. ■ Refrigerator not tilted toward the rear. Check temperature in the ice ■ New plumbing connections? See "Using the Control(s)." Allows humid air to normal... color in 24 hours. A water filter may need to be installed to water supply and turn water shutoff valve fully open ? Connect refrigerator to remove the minerals. 17 Wait 24 hours after ice maker installation for the surrounding conditions? Allow 3 days to begin. This can cause...
... of ice recently removed? Allow several hours for ice maker to a water supply and the supply shutoff valve turned on the supports. ■ Refrigerator not tilted toward the rear. Check temperature in the ice ■ New plumbing connections? See "Using the Control(s)." Allows humid air to normal... color in 24 hours. A water filter may need to be installed to water supply and turn water shutoff valve fully open ? Connect refrigerator to remove the minerals. 17 Wait 24 hours after ice maker installation for the surrounding conditions? Allow 3 days to begin. This can cause...


