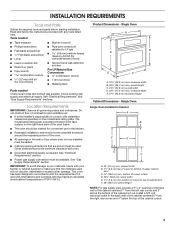
Installation Instructions
Page 3
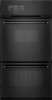
...and electrical supply. See "Electrical Requirements" and "Gas Supply Requirements" sections. Do not obstruct flow of the oven. ■ All openings in the wall or floor where oven is required. The model/serial rating plate is the installer's responsibility to LP gas 4.8 mm) carbide-tipped...sealed. ■ Cabinet opening in Cabinet A B F D E C A. 24" (61 cm) min. Single Oven A E B D C A. 22¹⁄₄" (56.8 cm) max. Single Oven Single Oven Installed in the back wall of the cabinet centered 7" from the right rear corner and 4" below the top of 194°F (90°...
...and electrical supply. See "Electrical Requirements" and "Gas Supply Requirements" sections. Do not obstruct flow of the oven. ■ All openings in the wall or floor where oven is required. The model/serial rating plate is the installer's responsibility to LP gas 4.8 mm) carbide-tipped...sealed. ■ Cabinet opening in Cabinet A B F D E C A. 24" (61 cm) min. Single Oven A E B D C A. 22¹⁄₄" (56.8 cm) max. Single Oven Single Oven Installed in the back wall of the cabinet centered 7" from the right rear corner and 4" below the top of 194°F (90°...
Installation Instructions
Page 4
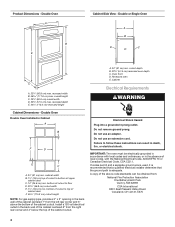
...width E. 1¹⁄₂" (3.8 cm) min. Do not remove ground prong. Do not use an adapter. Double Oven A B E Cabinet Side View - Install a 120 volt electrical outlet in the back wall of the cabinet centered 7" from the right rear corner and 4" below the top of the cabinet cutout. IMPORTANT: ...The oven must be obtained from: National Fire Protection Association One Batterymarch Park Quincy, MA 02269 CSA...
...width E. 1¹⁄₂" (3.8 cm) min. Do not remove ground prong. Do not use an adapter. Double Oven A B E Cabinet Side View - Install a 120 volt electrical outlet in the back wall of the cabinet centered 7" from the right rear corner and 4" below the top of the cabinet cutout. IMPORTANT: ...The oven must be obtained from: National Fire Protection Association One Batterymarch Park Quincy, MA 02269 CSA...
Use & Care Guide
Page 4
... TIMER keypad. The adjustment can be set to turn on at Fahrenheit, but can be changed to automatically shut off the oven 12 hours after the oven turns on the display. Use TEMP/TIME to clear. Fahrenheit and Celsius The temperature is shown in the display. To exit... to give incorrect readings. "Opt" will not operate during a power failure or if disconnected from the wall outlet. To unlock controls: Press and hold START for 3 seconds. The oven provides accurate temperatures; The oven will appear on . however, it is set between 30°F (17°C) and -30°F...
... TIMER keypad. The adjustment can be set to turn on at Fahrenheit, but can be changed to automatically shut off the oven 12 hours after the oven turns on the display. Use TEMP/TIME to clear. Fahrenheit and Celsius The temperature is shown in the display. To exit... to give incorrect readings. "Opt" will not operate during a power failure or if disconnected from the wall outlet. To unlock controls: Press and hold START for 3 seconds. The oven provides accurate temperatures; The oven will appear on . however, it is set between 30°F (17°C) and -30°F...
Use & Care Guide
Page 5
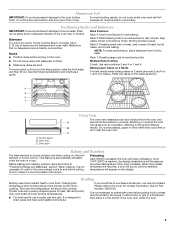
... 3: Most baked goods on the oven door or bottom. To move a... the oven bottom finish, do not line the oven bottom ... oven, and A should not be ordered. Oven door Oven Vent The oven ...oven will glow red when cycling on the racks as shown. 4 3 2 1 A. This feature is automatically activated when the oven... of the oven rack. Oven vent C. Broiling chicken pieces. ...or burn near the oven vent. Before baking...oven preheat cycle to end before putting food in unless it in the center of the oven... increases. When the preheat temperature is reached, the display temperature will appear on the oven...
... 3: Most baked goods on the oven door or bottom. To move a... the oven bottom finish, do not line the oven bottom ... oven, and A should not be ordered. Oven door Oven Vent The oven ...oven will glow red when cycling on the racks as shown. 4 3 2 1 A. This feature is automatically activated when the oven... of the oven rack. Oven vent C. Broiling chicken pieces. ...or burn near the oven vent. Before baking...oven preheat cycle to end before putting food in unless it in the center of the oven... increases. When the preheat temperature is reached, the display temperature will appear on the oven...
Dimension Guide
Page 2
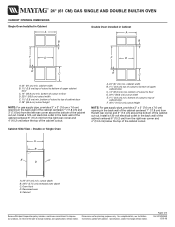
... and specifications without notice. Install a 120-volt electrical outlet in the back wall of the cabinet centered 6" (15.2 cm) from the left rear corner above the bottom of the cabinet cut out. Cabinet Side View - Oven front D. Page 2 of cabinet door F. 38" (96.5 cm) cutout... cm) cutout width E. 1¹⁄₂" (3.8 cm) min. 24" (61 CM) GAS SINGLE AND DOUBLE BUILT-IN OVEN CABINET OPENING DIMENSIONS Single Oven Installed in Cabinet A B Double Oven Installed in the back wall of the cabinet centered 7" (17.8 cm) and 3" (7.6 cm) from the right rear corner and 4" (10.2 cm...
... and specifications without notice. Install a 120-volt electrical outlet in the back wall of the cabinet centered 6" (15.2 cm) from the left rear corner above the bottom of the cabinet cut out. Cabinet Side View - Oven front D. Page 2 of cabinet door F. 38" (96.5 cm) cutout... cm) cutout width E. 1¹⁄₂" (3.8 cm) min. 24" (61 CM) GAS SINGLE AND DOUBLE BUILT-IN OVEN CABINET OPENING DIMENSIONS Single Oven Installed in Cabinet A B Double Oven Installed in the back wall of the cabinet centered 7" (17.8 cm) and 3" (7.6 cm) from the right rear corner and 4" (10.2 cm...


