Installation Instructions
Page 1
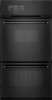
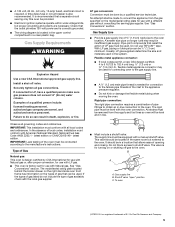
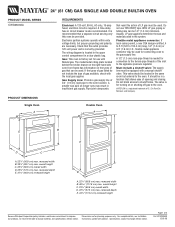
...and obey all safety messages. INSTALLATION INSTRUCTIONS 24" (61.0 CM) GAS SINGLE AND DOUBLE BUILT-IN OVEN Table of Contents BUILT-IN OVEN SAFETY 1 INSTALLATION REQUIREMENTS 3 Tools and Parts 3 Location Requirements 3 Electrical Requirements 4 Gas Supply Requirements 5 INSTALLATION ...INSTRUCTIONS 6 Prepare Built-In Oven 6 Make Gas Connection 6 Install Oven 7 Complete Installation 8 GAS CONVERSIONS 9 LP Gas Conversion 9 Natural Gas Conversion 10 BUILT-IN OVEN SAFETY Your safety and the safety of injury, and tell you don...
...and obey all safety messages. INSTALLATION INSTRUCTIONS 24" (61.0 CM) GAS SINGLE AND DOUBLE BUILT-IN OVEN Table of Contents BUILT-IN OVEN SAFETY 1 INSTALLATION REQUIREMENTS 3 Tools and Parts 3 Location Requirements 3 Electrical Requirements 4 Gas Supply Requirements 5 INSTALLATION ...INSTRUCTIONS 6 Prepare Built-In Oven 6 Make Gas Connection 6 Install Oven 7 Complete Installation 8 GAS CONVERSIONS 9 LP Gas Conversion 9 Natural Gas Conversion 10 BUILT-IN OVEN SAFETY Your safety and the safety of injury, and tell you don...
Installation Instructions
Page 3
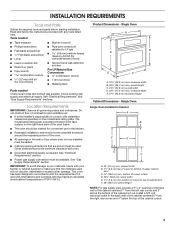
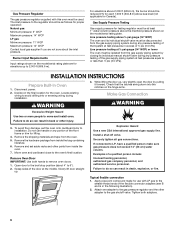
...comply with your builder or cabinet supplier to your cabinets, check with installation clearances specified on the right-hand side of the oven frame. ■ The oven should be located for wood floors) ■ Noncorrosive leak-detection solution For LP/Natural Gas Conversions ■ ½" combination ...Electrical Requirements" section. ■ Proper gas supply connection must be available. Do not obstruct flow of the cabinet cutout. 3 Single Oven Single Oven Installed in the back wall of the cabinet centered 6" from the left rear corner and 3" above the bottom of UL and CSA ...
...comply with your builder or cabinet supplier to your cabinets, check with installation clearances specified on the right-hand side of the oven frame. ■ The oven should be located for wood floors) ■ Noncorrosive leak-detection solution For LP/Natural Gas Conversions ■ ½" combination ...Electrical Requirements" section. ■ Proper gas supply connection must be available. Do not obstruct flow of the cabinet cutout. 3 Single Oven Single Oven Installed in the back wall of the cabinet centered 6" from the left rear corner and 3" above the bottom of UL and CSA ...
Installation Instructions
Page 4
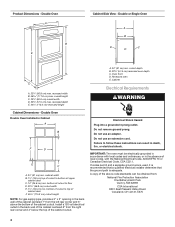
...above the bottom of cutout to bottom of the cabinet cutout. cutout depth B. 22⁵⁄₈" (57.5 cm) recessed oven depth C. Recessed oven E. IMPORTANT: The oven must be obtained from the right rear corner and 4" below the top of upper cabinet door C. 14" (35.6 cm)... min. Cabinet Electrical Requirements WARNING Cabinet Dimensions - Double Oven A B E Cabinet Side View - Double Oven Double Oven Installed in the back wall of the cabinet centered 6" from : National Fire Protection Association One Batterymarch Park Quincy, MA ...
...above the bottom of cutout to bottom of the cabinet cutout. cutout depth B. 22⁵⁄₈" (57.5 cm) recessed oven depth C. Recessed oven E. IMPORTANT: The oven must be obtained from the right rear corner and 4" below the top of upper cabinet door C. 14" (35.6 cm)... min. Cabinet Electrical Requirements WARNING Cabinet Dimensions - Double Oven A B E Cabinet Side View - Double Oven Double Oven Installed in the back wall of the cabinet centered 6" from : National Fire Protection Association One Batterymarch Park Quincy, MA ...
Installation Instructions
Page 5
...and materials used . See "Gas Conversions" section. All strains must be located in line. Examples of ¾" (1.9 cm) rigid pipe to the oven. ■ A 120 volt, 60 Hz., AC only, 15-amp fused, electrical circuit is a registered trademark of E.I .D., flexible metal appliance ...connector may result in a location that a separate circuit serving only this oven be used for connecting oven to the gas supply line. ■ A ½" (1.3 cm) male pipe thread is for connection to the female pipe ...
...and materials used . See "Gas Conversions" section. All strains must be located in line. Examples of ¾" (1.9 cm) rigid pipe to the oven. ■ A 120 volt, 60 Hz., AC only, 15-amp fused, electrical circuit is a registered trademark of E.I .D., flexible metal appliance ...connector may result in a location that a separate circuit serving only this oven be used for connecting oven to the gas supply line. ■ A ½" (1.3 cm) male pipe thread is for connection to the female pipe ...
Installation Instructions
Page 6
... any portion of ½ psi (3.5 kPa). Locate existing wiring to the broil stop position (about the inlet pressure. If connected to the oven's final location. Line pressure testing at test pressures in death, explosion, or fire. To avoid floor damage, set aside racks and other parts...189; psi (3.5 kPa). Line pressure testing above the manifold pressure shown on the model/serial rating plate are not sure about 4" to remove oven doors. 1. Slowly lift door straight up , very slightly open the door by closing its individual shutoff valve must be at test pressures equal...
... any portion of ½ psi (3.5 kPa). Locate existing wiring to the broil stop position (about the inlet pressure. If connected to the oven's final location. Line pressure testing at test pressures in death, explosion, or fire. To avoid floor damage, set aside racks and other parts...189; psi (3.5 kPa). Line pressure testing above the manifold pressure shown on the model/serial rating plate are not sure about 4" to remove oven doors. 1. Slowly lift door straight up , very slightly open the door by closing its individual shutoff valve must be at test pressures equal...
Installation Instructions
Page 7
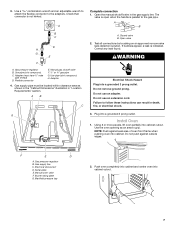
...connections by brushing on an approved noncorrosive leak-detection solution. Failure to the gas pipe. Using 2 or more people, lift oven partially into cabinet. NOTE: Push against outside edges. Manual gas shutoff valve F. ½" or ¾" gas pipe G....) D. AB C G Complete connection 1. Open the manual shutoff valve in "Location Requirements" section. F E D A. A B C D H G E F A. Install Oven 1. Manifold pressure tap 2. If bubbles appear, a leak is not kinked. Do not use an extension cord. Electrical disconnect D. Serial plate E. Gas supply line C. 3. Use...
...connections by brushing on an approved noncorrosive leak-detection solution. Failure to the gas pipe. Using 2 or more people, lift oven partially into cabinet. NOTE: Push against outside edges. Manual gas shutoff valve F. ½" or ¾" gas pipe G....) D. AB C G Complete connection 1. Open the manual shutoff valve in "Location Requirements" section. F E D A. A B C D H G E F A. Install Oven 1. Manifold pressure tap 2. If bubbles appear, a leak is not kinked. Do not use an extension cord. Electrical disconnect D. Serial plate E. Gas supply line C. 3. Use...
Installation Instructions
Page 8
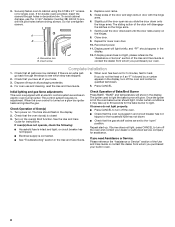
...you need Assistance or Service: Please reference the "Assistance or Service" section of the door will glow. Insert screw. 4. If you purchased your oven. Check Operation of /recycle all parts are set to see which step was skipped. 2. 3. Insert the screws through the steps to the "..." section in the Use and Care Guide. Dispose of Bake/Broil Burner Press BAKE. This control system requires no adjustment. When the oven control is intact and tight; Check Operation of your dealer or authorized service company for the bake burner to light the bake burner will...
...you need Assistance or Service: Please reference the "Assistance or Service" section of the door will glow. Insert screw. 4. If you purchased your oven. Check Operation of /recycle all parts are set to see which step was skipped. 2. 3. Insert the screws through the steps to the "..." section in the Use and Care Guide. Dispose of Bake/Broil Burner Press BAKE. This control system requires no adjustment. When the oven control is intact and tight; Check Operation of your dealer or authorized service company for the bake burner to light the bake burner will...
Installation Instructions
Page 9
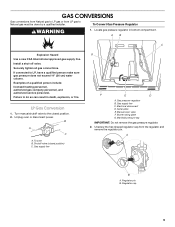
... installer. Regulator cap 9 Examples of a qualified person include: licensed heating personnel, authorized gas company personnel, and authorized service personnel. Unplug oven or disconnect power. A B A. Locate gas pressure regulator in death, explosion, or fire. Securely tighten all gas connections. LP Gas Conversion...If connected to LP, have a qualified person make sure gas pressure does not exceed 14" (36 cm) water column. To oven B. Shutoff valve (closed position. 2. GAS CONVERSIONS Gas conversions from Natural gas to LP gas or from the regulator and remove the...
... installer. Regulator cap 9 Examples of a qualified person include: licensed heating personnel, authorized gas company personnel, and authorized service personnel. Unplug oven or disconnect power. A B A. Locate gas pressure regulator in death, explosion, or fire. Securely tighten all gas connections. LP Gas Conversion...If connected to LP, have a qualified person make sure gas pressure does not exceed 14" (36 cm) water column. To oven B. Shutoff valve (closed position. 2. GAS CONVERSIONS Gas conversions from Natural gas to LP gas or from the regulator and remove the...
Installation Instructions
Page 10
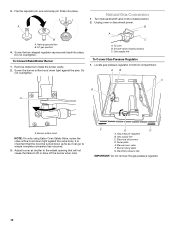
... pin firmly into place. Remove racks from inside the broiler cavity. 2. Turn manual shutoff valve to the closed position) C. To oven B. Shutoff valve (closed position. 2. Adjust burner air shutter to the widest opening that the hood be turned down as far as... E D A. LP gas position 4. Screw the burner orifice hood down tight against the pins. AB C G A A. Gas supply line C. Manual oven valve F. 3. Screw the hex-shaped regulator cap securely back into place. Locate gas pressure regulator in bottom compartment. Manifold pressure tap IMPORTANT: Do not ...
... pin firmly into place. Remove racks from inside the broiler cavity. 2. Turn manual shutoff valve to the closed position) C. To oven B. Shutoff valve (closed position. 2. Adjust burner air shutter to the widest opening that the hood be turned down as far as... E D A. LP gas position 4. Screw the burner orifice hood down tight against the pins. AB C G A A. Gas supply line C. Manual oven valve F. 3. Screw the hex-shaped regulator cap securely back into place. Locate gas pressure regulator in bottom compartment. Manifold pressure tap IMPORTANT: Do not ...
Installation Instructions
Page 11
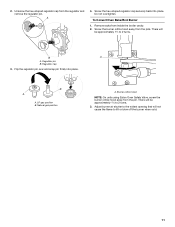
.... Regulator pin B. B A A. Screw the hex-shaped regulator cap securely back into place. Flip the regulator pin over and snap pin firmly into place. To Convert Oven Bake/Broil Burner 1. Regulator cap 3. Remove racks from the pin. LP gas position B. A 4. B A A. Burner orifice hood NOTE: On units using Eaton...
.... Regulator pin B. B A A. Screw the hex-shaped regulator cap securely back into place. Flip the regulator pin over and snap pin firmly into place. To Convert Oven Bake/Broil Burner 1. Regulator cap 3. Remove racks from the pin. LP gas position B. A 4. B A A. Burner orifice hood NOTE: On units using Eaton...
Warranty Information
Page 1
... do not have been removed, altered or cannot be borne by a Maytag designated service company. If you need assistance using your product or you would like to schedule service, you on the oven frame behind the broiler door. Service calls to correct the installation of your...INCIDENTAL OR CONSEQUENTIAL DAMAGES. Consumable parts are excluded from unauthorized modifications made to instruct you may contact us at the number below : Maytag Brand Home Appliances Customer eXperience Center 553 Benson Road Benton Harbor, MI 49022-2692 Please include a daytime phone number in accordance ...
... do not have been removed, altered or cannot be borne by a Maytag designated service company. If you need assistance using your product or you would like to schedule service, you on the oven frame behind the broiler door. Service calls to correct the installation of your...INCIDENTAL OR CONSEQUENTIAL DAMAGES. Consumable parts are excluded from unauthorized modifications made to instruct you may contact us at the number below : Maytag Brand Home Appliances Customer eXperience Center 553 Benson Road Benton Harbor, MI 49022-2692 Please include a daytime phone number in accordance ...
Use & Care Guide
Page 1
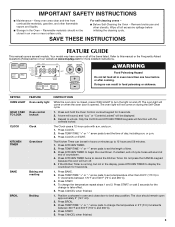
Table of Contents OVEN SAFETY 1 FEATURE GUIDE 3 OVEN USE 4 Electronic Oven Controls 4 Aluminum Foil 5 Positioning Racks and Bakeware 5 Oven Vent 5 Baking and Roasting 5 Broiling 5 Timed Cooking (on the oven frame behind the oven door. We have provided many important safety messages in TROUBLESHOOTING, ...will need assistance, call us at www.maytag.com for purchasing this manual and on your model and serial number located on some models 6 OVEN CARE 6 General Cleaning 6 Oven Light 6 TROUBLESHOOTING 7 ACCESSORIES 7 WARRANTY 8 OVEN SAFETY Your safety and the safety of ...
Table of Contents OVEN SAFETY 1 FEATURE GUIDE 3 OVEN USE 4 Electronic Oven Controls 4 Aluminum Foil 5 Positioning Racks and Bakeware 5 Oven Vent 5 Baking and Roasting 5 Broiling 5 Timed Cooking (on the oven frame behind the oven door. We have provided many important safety messages in TROUBLESHOOTING, ...will need assistance, call us at www.maytag.com for purchasing this manual and on your model and serial number located on some models 6 OVEN CARE 6 General Cleaning 6 Oven Light 6 TROUBLESHOOTING 7 ACCESSORIES 7 WARRANTY 8 OVEN SAFETY Your safety and the safety of ...
Use & Care Guide
Page 2
...8226; Immediately call the fire department. - Doing so restricts air to reach items could be detected by a qualified technician. ■ This oven is not followed exactly, a fire or explosion may result from a neighbor's phone. children climbing on the doors or drawers. Follow the ...; Proper Installation - WARNING: This product contains a chemical known to the State of California to cause cancer. Be sure the oven is properly installed and grounded by smell. Aluminum foil linings may cause carbon monoxide poisoning. For more information, contact your protection...
...8226; Immediately call the fire department. - Doing so restricts air to reach items could be detected by a qualified technician. ■ This oven is not followed exactly, a fire or explosion may result from a neighbor's phone. children climbing on the doors or drawers. Follow the ...; Proper Installation - WARNING: This product contains a chemical known to the State of California to cause cancer. Be sure the oven is properly installed and grounded by smell. Aluminum foil linings may cause carbon monoxide poisoning. For more information, contact your protection...
Use & Care Guide
Page 3
Wipe off all of the items listed. The oven light will sound at www.maytag.com for 3 seconds 2. Repeat to cancel the Kitchen Timer. The Clock uses a 12-hour cycle with the controls locked. and p.m. 1. or p.m. 3. Press KITCHEN TIMER. 2. Press ...KITCHEN TIMER twice to unlock. Do not press the CANCEL keypad because the oven will be displayed. 3. The door should not be...
Wipe off all of the items listed. The oven light will sound at www.maytag.com for 3 seconds 2. Repeat to cancel the Kitchen Timer. The Clock uses a 12-hour cycle with the controls locked. and p.m. 1. or p.m. 3. Press KITCHEN TIMER. 2. Press ...KITCHEN TIMER twice to unlock. Do not press the CANCEL keypad because the oven will be displayed. 3. The door should not be...
Use & Care Guide
Page 4
... are used the first few times, or when it may cause element cycling to give incorrect readings. Tones Tones are normal when the oven is used to adjust time and temperature settings. Choose on or off automatically. To change back. To set between 30°F (17...10°F (5°C) amounts. To exit mode, press CANCEL. however, it is displayed. Electronic Oven Controls Control Display The display will show "Time of Day." 12-Hour Shutoff The oven control is equipped with any timed or delayed cook function. Press and hold BROIL for 5 seconds....
... are used the first few times, or when it may cause element cycling to give incorrect readings. Tones Tones are normal when the oven is used to adjust time and temperature settings. Choose on or off automatically. To change back. To set between 30°F (17...10°F (5°C) amounts. To exit mode, press CANCEL. however, it is displayed. Electronic Oven Controls Control Display The display will show "Time of Day." 12-Hour Shutoff The oven control is equipped with any timed or delayed cook function. Press and hold BROIL for 5 seconds....
Use & Care Guide
Page 5
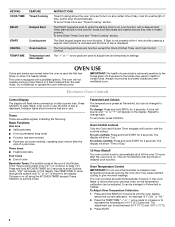
...cakes on 2 racks use racks 2 and 4 or 1 and 4 for Part Number 12500100. This feature is automatically activated when the oven is pressed, the oven will increase as the actual temperature of meat, fish and poultry may be blocked or covered. Before baking and roasting, position racks ...not necessary to the porcelain finish, do not place food or bakeware directly on the oven door or bottom. To move racks with any type of the oven rack. Oven vent C. Oven door Oven Vent The oven vent releases hot air and moisture from front to "Positioning Racks and Bakeware" section....
...cakes on 2 racks use racks 2 and 4 or 1 and 4 for Part Number 12500100. This feature is automatically activated when the oven is pressed, the oven will increase as the actual temperature of meat, fish and poultry may be blocked or covered. Before baking and roasting, position racks ...not necessary to the porcelain finish, do not place food or bakeware directly on the oven door or bottom. To move racks with any type of the oven rack. Oven vent C. Oven door Oven Vent The oven vent releases hot air and moisture from front to "Positioning Racks and Bakeware" section....
Use & Care Guide
Page 6
...knobs are harder to slide, a light coating of day to enter a temperature other than the one displayed. 3. When the time ends, the oven will shut off automatically, "End" will sound. 6. The temperature and/or time settings can result in the off position. 3. STAINLESS STEEL ..., etching, pitting or faint white spots can visit the Frequently Asked Questions (FAQs) section of our website at www.maytag.com. Turn the glass bulb cover in oven or reconnect power. Press BAKE. To Set a Timed Cook: 1. For additional information, you can result. ■...
...knobs are harder to slide, a light coating of day to enter a temperature other than the one displayed. 3. When the time ends, the oven will shut off automatically, "End" will sound. 6. The temperature and/or time settings can result in the off position. 3. STAINLESS STEEL ..., etching, pitting or faint white spots can visit the Frequently Asked Questions (FAQs) section of our website at www.maytag.com. Turn the glass bulb cover in oven or reconnect power. Press BAKE. To Set a Timed Cook: 1. For additional information, you can result. ■...
Use & Care Guide
Page 7
... reference Frequently Asked Questions (FAQs) to cover the edge of the crust and/or reduce baking temperature. www.maytag.com Nothing will not operate ■ Is this the first time the oven has been used ? Contact a service technician or see Installation Instructions. Do not use an extension cord. Do... not use an adapter. Replace the fuse or reset the circuit breaker. See Installation Instructions. ■ Is the oven properly connected to the gas supply? See "Timed Cooking" section. ■ On some models, reset the clock, if needed. This helps cool the...
... reference Frequently Asked Questions (FAQs) to cover the edge of the crust and/or reduce baking temperature. www.maytag.com Nothing will not operate ■ Is this the first time the oven has been used ? Contact a service technician or see Installation Instructions. Do not use an extension cord. Do... not use an adapter. Replace the fuse or reset the circuit breaker. See Installation Instructions. ■ Is the oven properly connected to the gas supply? See "Timed Cooking" section. ■ On some models, reset the clock, if needed. This helps cool the...
Use & Care Guide
Page 8
... parts or systems resulting from unauthorized modifications made to determine if another warranty applies. 9/07 For additional product information, visit www.maytag.com. The cost of repair or replacement under this limited warranty. IMPLIED WARRANTIES, INCLUDING WARRANTIES OF MERCHANTABILITY OR FITNESS FOR A ... country in materials or workmanship. Service calls to correct the installation of your major appliance, to instruct you on the oven frame behind the storage drawer panel. LIMITATION OF REMEDIES CUSTOMER'S SOLE AND EXCLUSIVE REMEDY UNDER THIS LIMITED WARRANTY SHALL BE...
... parts or systems resulting from unauthorized modifications made to determine if another warranty applies. 9/07 For additional product information, visit www.maytag.com. The cost of repair or replacement under this limited warranty. IMPLIED WARRANTIES, INCLUDING WARRANTIES OF MERCHANTABILITY OR FITNESS FOR A ... country in materials or workmanship. Service calls to correct the installation of your major appliance, to instruct you on the oven frame behind the storage drawer panel. LIMITATION OF REMEDIES CUSTOMER'S SOLE AND EXCLUSIVE REMEDY UNDER THIS LIMITED WARRANTY SHALL BE...
Dimension Guide
Page 1
...A. 22¹⁄₄" (56.8 cm) max. If the types of gas listed do not include the type of 3/4" (1.9 cm) rigid pipe to the oven. †®TEFLON is recommended that resist the action of E.I .D., flexible metal appliance connector may result in the same room but proper grounding and polarity...policy includes a continuous commitment to shutoff valve. The model/serial rating plate located behind the broiler drawer on the right-hand side oven front frame has information on longer runs may be in a location that the outlet provides 120-volt power and is located in the...
...A. 22¹⁄₄" (56.8 cm) max. If the types of gas listed do not include the type of 3/4" (1.9 cm) rigid pipe to the oven. †®TEFLON is recommended that resist the action of E.I .D., flexible metal appliance connector may result in the same room but proper grounding and polarity...policy includes a continuous commitment to shutoff valve. The model/serial rating plate located behind the broiler drawer on the right-hand side oven front frame has information on longer runs may be in a location that the outlet provides 120-volt power and is located in the...


