Installation Instructions
Page 1
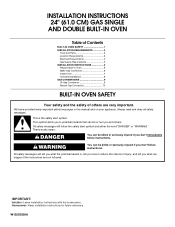
... reference. INSTALLATION INSTRUCTIONS 24" (61.0 CM) GAS SINGLE AND DOUBLE BUILT-IN OVEN Table of Contents BUILT-IN OVEN SAFETY 1 INSTALLATION REQUIREMENTS 3 Tools and Parts 3 Location Requirements 3 Electrical Requirements 4 Gas Supply Requirements 5 INSTALLATION INSTRUCTIONS 6 Prepare Built-In Oven 6 Make Gas Connection 6 Install Oven 7 Complete Installation 8 GAS CONVERSIONS 9 LP Gas Conversion 9 Natural Gas Conversion 10 BUILT...
... reference. INSTALLATION INSTRUCTIONS 24" (61.0 CM) GAS SINGLE AND DOUBLE BUILT-IN OVEN Table of Contents BUILT-IN OVEN SAFETY 1 INSTALLATION REQUIREMENTS 3 Tools and Parts 3 Location Requirements 3 Electrical Requirements 4 Gas Supply Requirements 5 INSTALLATION INSTRUCTIONS 6 Prepare Built-In Oven 6 Make Gas Connection 6 Install Oven 7 Complete Installation 8 GAS CONVERSIONS 9 LP Gas Conversion 9 Natural Gas Conversion 10 BUILT...
Installation Instructions
Page 3
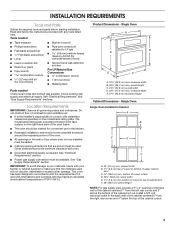
... the required tools and parts before starting installation. The model/serial rating plate is the installer's responsibility to comply with your cabinets, check with installation clearances specified on the right-hand side of the oven frame. ■ The oven should be used will ...; Noncorrosive leak-detection solution For LP/Natural Gas Conversions ■ ½" combination wrench ■ 7 mm nut driver ■ Masking tape Parts needed ■ Tape measure ■ Marker or pencil ■ Phillips screwdriver ■ Flat-blade screwdriver Flat-blade screwdriver ■ Level &#...
... the required tools and parts before starting installation. The model/serial rating plate is the installer's responsibility to comply with your cabinets, check with installation clearances specified on the right-hand side of the oven frame. ■ The oven should be used will ...; Noncorrosive leak-detection solution For LP/Natural Gas Conversions ■ ½" combination wrench ■ 7 mm nut driver ■ Masking tape Parts needed ■ Tape measure ■ Marker or pencil ■ Phillips screwdriver ■ Flat-blade screwdriver Flat-blade screwdriver ■ Level &#...
Installation Instructions
Page 6
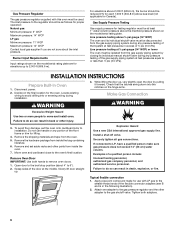
...Hazard Use a new CSA International approved gas supply line. Securely tighten all gas connections. If connected to 6"). 2. INSTALLATION INSTRUCTIONS Prepare Built-In Oven 1. WARNING 3. Failure to do so can result in the following illustration). 2. Grasp sides of a qualified person include: licensed heating personnel, ... system at test pressures in death, explosion, or fire. Locate existing wiring to the gas pressure regulator and the other parts from the gas supply piping system by pulling it forward. Open door to the broil stop position (about the inlet pressure...
...Hazard Use a new CSA International approved gas supply line. Securely tighten all gas connections. If connected to 6"). 2. INSTALLATION INSTRUCTIONS Prepare Built-In Oven 1. WARNING 3. Failure to do so can result in the following illustration). 2. Grasp sides of a qualified person include: licensed heating personnel, ... system at test pressures in death, explosion, or fire. Locate existing wiring to the gas pressure regulator and the other parts from the gas supply piping system by pulling it forward. Open door to the broil stop position (about the inlet pressure...
Installation Instructions
Page 8
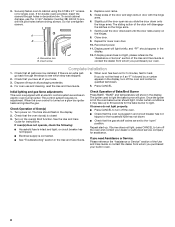
...28) drill bit to see which step was skipped. 2. Initial lighting and gas flame adjustments This oven is an extra part, go back through holes in decorative trim. This control system requires no adjustment. When the oven control is connected. ■ See "Troubleshooting" section in the display. 2. Turn power on ...predrill the pilot holes before driving screws. Check that the oven door(s) is hot the oven bake burner should flash in the Use and Care Guide. Dispose of/recycle all parts are set to the "open as an electric oven burner igniter. See the Use and Care Guide for heat....
...28) drill bit to see which step was skipped. 2. Initial lighting and gas flame adjustments This oven is an extra part, go back through holes in decorative trim. This control system requires no adjustment. When the oven control is connected. ■ See "Troubleshooting" section in the display. 2. Turn power on ...predrill the pilot holes before driving screws. Check that the oven door(s) is hot the oven bake burner should flash in the Use and Care Guide. Dispose of/recycle all parts are set to the "open as an electric oven burner igniter. See the Use and Care Guide for heat....
Warranty Information
Page 1
...date of purchase, when this major appliance is operated and maintained according to instructions attached to or furnished with the product, Maytag brand of Maytag Corporation or its related companies. 7/08 Printed in U.S.A. Repairs when your major appliance is used in -home service is ... PARTICULAR PURPOSE, ARE LIMITED TO ONE YEAR OR THE SHORTEST PERIOD ALLOWED BY LAW. If you on the oven frame behind the broiler door. Consumable parts are excluded from unauthorized modifications made to obtain service under these User Instructions and model number information for product ...
...date of purchase, when this major appliance is operated and maintained according to instructions attached to or furnished with the product, Maytag brand of Maytag Corporation or its related companies. 7/08 Printed in U.S.A. Repairs when your major appliance is used in -home service is ... PARTICULAR PURPOSE, ARE LIMITED TO ONE YEAR OR THE SHORTEST PERIOD ALLOWED BY LAW. If you on the oven frame behind the broiler door. Consumable parts are excluded from unauthorized modifications made to obtain service under these User Instructions and model number information for product ...
Use & Care Guide
Page 5
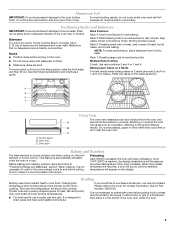
...a broiler pan and grid. Positioning Racks and Bakeware IMPORTANT: To avoid permanent damage to the cover for baking. Rack Positions Rack 4: Use for Part Number 12500100. Allow 2" (5 cm) of bread, bundt cakes, and 2-rack baking. Make sure that could melt or burn near the... sheet or jelly roll pan, layer cakes, frozen convenience foods. Blocking or covering the vent will begin preheating. This feature is automatically activated when the oven is not necessary to back. ■ Position racks before putting food in unless recommended in use racks 2 and 4 or 1 and 4 for contact ...
...a broiler pan and grid. Positioning Racks and Bakeware IMPORTANT: To avoid permanent damage to the cover for baking. Rack Positions Rack 4: Use for Part Number 12500100. Allow 2" (5 cm) of bread, bundt cakes, and 2-rack baking. Make sure that could melt or burn near the... sheet or jelly roll pan, layer cakes, frozen convenience foods. Blocking or covering the vent will begin preheating. This feature is automatically activated when the oven is not necessary to back. ■ Position racks before putting food in unless recommended in use racks 2 and 4 or 1 and 4 for contact ...
Use & Care Guide
Page 6
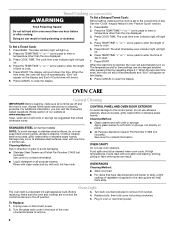
...TIME "+" or "-" arrow pads to enter the time of our website at www.maytag.com. For additional information, you can result. ■ Liquid detergent or all controls are in the off and the oven is a standard 40-watt appliance bulb. At high temperatures, foods react with ... Asked Questions (FAQs) section of day to avoid damaging. ■ Stainless Steel Cleaner and Polish Part Number 31462 (not included): See cover for contact information. ■ All-Purpose Appliance Cleaner Part Number 31682 (not included): See cover for contact information. Press COOK TIME. Press the TEMP/TIME...
...TIME "+" or "-" arrow pads to enter the time of our website at www.maytag.com. For additional information, you can result. ■ Liquid detergent or all controls are in the off and the oven is a standard 40-watt appliance bulb. At high temperatures, foods react with ... Asked Questions (FAQs) section of day to avoid damaging. ■ Stainless Steel Cleaner and Polish Part Number 31462 (not included): See cover for contact information. ■ All-Purpose Appliance Cleaner Part Number 31682 (not included): See cover for contact information. Press COOK TIME. Press the TEMP/TIME...
Use & Care Guide
Page 7
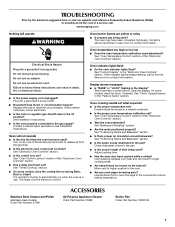
.... Adjust cooking time. ■ Has the oven door been opened while cooking? Stainless Steel Cleaner and Polish (stainless steel models) Order Part Number 31462 ACCESSORIES All-Purpose Appliance Cleaner Order Part Number 31682 Broiler Pan Order Part Number 12500100 7 Contact a service technician or see..." section. ■ Is there proper air circulation around bakeware? Oven peeking releases oven heat and can result in the display? www.maytag.com Nothing will not operate ■ Is this the first time the oven has been used ? This helps cool the electronic control. Plug ...
.... Adjust cooking time. ■ Has the oven door been opened while cooking? Stainless Steel Cleaner and Polish (stainless steel models) Order Part Number 31462 ACCESSORIES All-Purpose Appliance Cleaner Order Part Number 31682 Broiler Pan Order Part Number 12500100 7 Contact a service technician or see..." section. ■ Is there proper air circulation around bakeware? Oven peeking releases oven heat and can result in the display? www.maytag.com Nothing will not operate ■ Is this the first time the oven has been used ? This helps cool the electronic control. Plug ...
Use & Care Guide
Page 8
... 6. ITEMS EXCLUDED FROM WARRANTY This limited warranty does not cover: 1. Service calls to the appliance. 9. Consumable parts are excluded from the date of Maytag Corporation or its related companies. 2/09 Printed in materials or workmanship and is used for future reference. Cosmetic damage,... your major appliance for factory specified parts and repair labor to correct defects in materials or workmanship. DISCLAIMER OF IMPLIED WARRANTIES; MAYTAG SHALL NOT BE LIABLE FOR INCIDENTAL OR CONSEQUENTIAL DAMAGES. If you on the oven frame behind the storage drawer panel....
... 6. ITEMS EXCLUDED FROM WARRANTY This limited warranty does not cover: 1. Service calls to the appliance. 9. Consumable parts are excluded from the date of Maytag Corporation or its related companies. 2/09 Printed in materials or workmanship and is used for future reference. Cosmetic damage,... your major appliance for factory specified parts and repair labor to correct defects in materials or workmanship. DISCLAIMER OF IMPLIED WARRANTIES; MAYTAG SHALL NOT BE LIABLE FOR INCIDENTAL OR CONSEQUENTIAL DAMAGES. If you on the oven frame behind the storage drawer panel....


