Owners Manual
Page 1
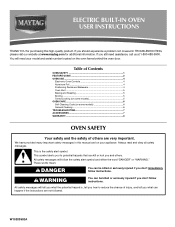
... a problem not covered in this high-quality product. You will need assistance, call us at www.maytag.com for purchasing this manual and on the oven frame behind the oven door. Always read and obey all safety messages. W10203502A WARNING You can kill or hurt you don't... are very important. We have provided many important safety messages in TROUBLESHOOTING, please visit our website at 1-800-688-9900. ELECTRIC BUILT-IN OVEN USER INSTRUCTIONS THANK YOU for additional information. If you don't follow the safety alert symbol and either the word "DANGER" or "...
... a problem not covered in this high-quality product. You will need assistance, call us at www.maytag.com for purchasing this manual and on the oven frame behind the oven door. Always read and obey all safety messages. W10203502A WARNING You can kill or hurt you don't... are very important. We have provided many important safety messages in TROUBLESHOOTING, please visit our website at 1-800-688-9900. ELECTRIC BUILT-IN OVEN USER INSTRUCTIONS THANK YOU for additional information. If you don't follow the safety alert symbol and either the word "DANGER" or "...

Owners Manual
Page 2
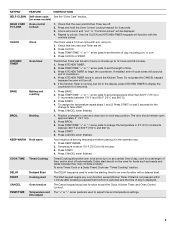
...a qualified technician. ■ Storage in Manual. ■ Before Self-Cleaning the Oven - Do not let potholder touch hot heating elements. among these openings, oven doors, and windows of our website at www.maytag.com for more than one hour before removing or replacing food. ■ Do Not... to some or all of the oven. ■ Clean Only Parts Listed in Oven - If rack must be used in color. No commercial oven cleaner or oven liner protective coating of Oven Racks - WARNING: This product contains a chemical known to the State of fire, electrical shock, injury to persons, or...
...a qualified technician. ■ Storage in Manual. ■ Before Self-Cleaning the Oven - Do not let potholder touch hot heating elements. among these openings, oven doors, and windows of our website at www.maytag.com for more than one hour before removing or replacing food. ■ Do Not... to some or all of the oven. ■ Clean Only Parts Listed in Oven - If rack must be used in color. No commercial oven cleaner or oven liner protective coating of Oven Racks - WARNING: This product contains a chemical known to the State of fire, electrical shock, injury to persons, or...
Owners Manual
Page 3
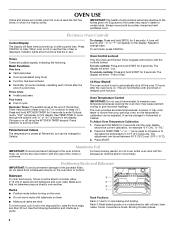
...a set the time of countdown. 4. Press CANCEL when finished. If enabled, end-of-cycle tones will turn on some models) HOLD 3 SEC Oven control TO LOCK lockout 1. Press BAKE. 2. Press START or wait 5 seconds for 60 minutes. 3. Press CANCEL when finished. COOK TIME Timed ...because they may not bake properly. Press CLOCK or START. Delay start The Start keypad begins any function except the Clock, Kitchen Timer, and Oven Control Lockout. If Start is used for 3 seconds 3. Press BROIL. 3. DELAY Delayed Start The DELAY keypad is not pressed within 1 ...
...a set the time of countdown. 4. Press CANCEL when finished. If enabled, end-of-cycle tones will turn on some models) HOLD 3 SEC Oven control TO LOCK lockout 1. Press BAKE. 2. Press START or wait 5 seconds for 60 minutes. 3. Press CANCEL when finished. COOK TIME Timed ...because they may not bake properly. Press CLOCK or START. Delay start The Start keypad begins any function except the Clock, Kitchen Timer, and Oven Control Lockout. If Start is used for 3 seconds 3. Press BROIL. 3. DELAY Delayed Start The DELAY keypad is not pressed within 1 ...
Owners Manual
Page 4
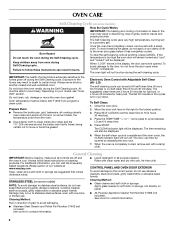
...of day is displayed. Always move freely. Indicator lights show "Loc." Make sure that are in 10°F (5°C) amounts. To Adjust Oven Temperature Calibration: 1. Press and hold KITCHEN TIMER for 2-rack baking and broiling. Press START. Tones Tones are audible signals, indicating the following ... using the KITCHEN TIMER keypad. Fahrenheit and Celsius The temperature is preset at the end of space around bakeware and oven walls. OVEN USE Odors and smoke are normal when the oven is used the first few times, or when it may cook faster or slower than your previous...
...of day is displayed. Always move freely. Indicator lights show "Loc." Make sure that are in 10°F (5°C) amounts. To Adjust Oven Temperature Calibration: 1. Press and hold KITCHEN TIMER for 2-rack baking and broiling. Press START. Tones Tones are audible signals, indicating the following ... using the KITCHEN TIMER keypad. Fahrenheit and Celsius The temperature is preset at the end of space around bakeware and oven walls. OVEN USE Odors and smoke are normal when the oven is used the first few times, or when it may cook faster or slower than your previous...
Owners Manual
Page 5
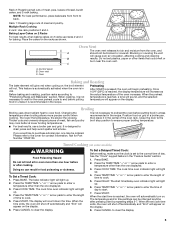
... best results when baking cakes on 2 racks use racks 2 and 4 for contact information. A. This feature is automatically activated when the oven is recommended in the recipe. Broiling Broiling uses direct radiant heat to cook. 5. If you would like to enter a temperature other than the... cleaning B results. Press the TEMP/TIME "+" or "-" arrow pads to wait for Part Number 12500100. Press COOK TIME. The start time/delay oven indicator light will light up . 6. Rack 1: Roasting large cuts of bread, bundt cakes, and 2-rack baking. When roasting, it is not ...
... best results when baking cakes on 2 racks use racks 2 and 4 for contact information. A. This feature is automatically activated when the oven is recommended in the recipe. Broiling Broiling uses direct radiant heat to cook. 5. If you would like to enter a temperature other than the... cleaning B results. Press the TEMP/TIME "+" or "-" arrow pads to wait for Part Number 12500100. Press COOK TIME. The start time/delay oven indicator light will light up . 6. Rack 1: Roasting large cuts of bread, bundt cakes, and 2-rack baking. When roasting, it is not ...
Owners Manual
Page 6
... gasket. The oven light will turn off during the Self-Cleaning cycle. For additional information, you can then be opened by releasing the door lock. 7. Damage may result in direction of our website at www.maytag.com. The door can visit the Frequently Asked Questions (FAQs) section of ...grain to set at anytime, press CANCEL. CONTROL PANEL AND OVEN DOOR EXTERIOR To avoid damage to stainless steel surfaces, even with soft, lint...
... gasket. The oven light will turn off during the Self-Cleaning cycle. For additional information, you can then be opened by releasing the door lock. 7. Damage may result in direction of our website at www.maytag.com. The door can visit the Frequently Asked Questions (FAQs) section of ...grain to set at anytime, press CANCEL. CONTROL PANEL AND OVEN DOOR EXTERIOR To avoid damage to stainless steel surfaces, even with soft, lint...

Owners Manual
Page 7
... calibration set correctly? See "Baking and Roasting" section. ■ Are the racks positioned properly? Food spills should be cleaned when oven cools. www.maytag.com Nothing will not operate ■ Is the oven door open or unlocked? See "Control Display" in the pan? See cover for the fan to the rack guides will...
... calibration set correctly? See "Baking and Roasting" section. ■ Are the racks positioned properly? Food spills should be cleaned when oven cools. www.maytag.com Nothing will not operate ■ Is the oven door open or unlocked? See "Control Display" in the pan? See cover for the fan to the rack guides will...

Owners Manual
Page 8
...the 50 United States and Canada, contact your major appliance. If you on the oven frame behind the broiler door. Have your model number and serial number on the ... to be easily determined. Repairs to parts or systems resulting from defects in accordance with electrical or plumbing codes, or use or when it is not available. 10. For assistance...Cosmetic damage, including scratches, dents, chips or other than normal, single-family household use of consumables or cleaning products not approved by a Maytag designated service company. Damage resulting from accident, alteration, misuse, ...
...the 50 United States and Canada, contact your major appliance. If you on the oven frame behind the broiler door. Have your model number and serial number on the ... to be easily determined. Repairs to parts or systems resulting from defects in accordance with electrical or plumbing codes, or use or when it is not available. 10. For assistance...Cosmetic damage, including scratches, dents, chips or other than normal, single-family household use of consumables or cleaning products not approved by a Maytag designated service company. Damage resulting from accident, alteration, misuse, ...

Installation Instructions
Page 1
... instructions. WARNING You can kill or hurt you and others are not followed. IMPORTANT: Save for local electrical inspector's use. This symbol alerts you to reduce the chance of others . All safety messages will tell... INSTRUCTIONS 24" (61.0 CM) ELECTRIC SINGLE AND DOUBLE BUILT-IN OVEN Table of Contents BUILT-IN OVEN SAFETY 1 INSTALLATION REQUIREMENTS 2 Tools and Parts 2 Location Requirements 2 Electrical Requirements 3 INSTALLATION INSTRUCTIONS 4 Prepare Built-In Oven 4 Oven Door 4 Make Electrical Connection 5 Install Oven 7 Complete Installation 8 BUILT-IN OVEN SAFETY ...
... instructions. WARNING You can kill or hurt you and others are not followed. IMPORTANT: Save for local electrical inspector's use. This symbol alerts you to reduce the chance of others . All safety messages will tell... INSTRUCTIONS 24" (61.0 CM) ELECTRIC SINGLE AND DOUBLE BUILT-IN OVEN Table of Contents BUILT-IN OVEN SAFETY 1 INSTALLATION REQUIREMENTS 2 Tools and Parts 2 Location Requirements 2 Electrical Requirements 3 INSTALLATION INSTRUCTIONS 4 Prepare Built-In Oven 4 Oven Door 4 Make Electrical Connection 5 Install Oven 7 Complete Installation 8 BUILT-IN OVEN SAFETY ...

Installation Instructions
Page 2
... any tools listed here. Given dimensions provide minimum clearance with oven. ■ Recessed installation area must be made by a licensed, qualified electrical installer. See "Electrical Requirements" section. ■ Electrical supply junction box should be located in Cabinet A B F D E C A. 24" (61 cm) min. Product Dimensions - It is required. Single Oven A E B D C A. 22¹⁄₄" (56.5 cm) max. Floor must...
... any tools listed here. Given dimensions provide minimum clearance with oven. ■ Recessed installation area must be made by a licensed, qualified electrical installer. See "Electrical Requirements" section. ■ Electrical supply junction box should be located in Cabinet A B F D E C A. 24" (61 cm) min. Product Dimensions - It is required. Single Oven A E B D C A. 22¹⁄₄" (56.5 cm) max. Floor must...

Installation Instructions
Page 3
..., ANSI/ NFPA 70-latest edition or CSA Standards C22.1-94, Canadian Electrical Code, Part 1 and C22.2 No. recessed width B. 46 117.6 cm) max. Double or Single Oven A B E C D A. 24"(61 cm) min. This oven must be connected to a grounded metal, permanent wiring system. Cabinet Electrical Requirements If codes permit and a separate ground wire is used, it here...
..., ANSI/ NFPA 70-latest edition or CSA Standards C22.1-94, Canadian Electrical Code, Part 1 and C22.2 No. recessed width B. 46 117.6 cm) max. Double or Single Oven A B E C D A. 24"(61 cm) min. This oven must be connected to a grounded metal, permanent wiring system. Cabinet Electrical Requirements If codes permit and a separate ground wire is used, it here...

Installation Instructions
Page 4
...rated from 6.5 kw to 8.6 kw at 208 V to 240 V requires a separate 40 amp circuit. ■ Single oven model rated at 4.4 kw to 5.8 kw at the middle. See "Make Electrical Connection" section. ■ Flexible conduit from inside the bag containing literature. 5. Connect the aluminum wiring to the added...oven doors. 1. Slowly lift door straight up , very slightly open the door by pulling it forward. Do not use handle or any portion of copper wire using special connectors and/or tools designed and UL listed for the oven. Remove and set the oven onto cardboard prior to 6 inches)....
...rated from 6.5 kw to 8.6 kw at 208 V to 240 V requires a separate 40 amp circuit. ■ Single oven model rated at 4.4 kw to 5.8 kw at the middle. See "Make Electrical Connection" section. ■ Flexible conduit from inside the bag containing literature. 5. Connect the aluminum wiring to the added...oven doors. 1. Slowly lift door straight up , very slightly open the door by pulling it forward. Do not use handle or any portion of copper wire using special connectors and/or tools designed and UL listed for the oven. Remove and set the oven onto cardboard prior to 6 inches)....

Installation Instructions
Page 5
For Double Ovens Make Electrical Connection For Single Ovens WARNING WARNING Electrical Shock Hazard Disconnect power before servicing. Use 8 gauge solid copper wire. See "Electrical Connection Options Chart" to section: 1. Use 12 gauge solid copper wire. Feed the flexible conduit from Home Power Supply 3. Route the flexible conduit from Home A ...
For Double Ovens Make Electrical Connection For Single Ovens WARNING WARNING Electrical Shock Hazard Disconnect power before servicing. Use 8 gauge solid copper wire. See "Electrical Connection Options Chart" to section: 1. Use 12 gauge solid copper wire. Feed the flexible conduit from Home Power Supply 3. Route the flexible conduit from Home A ...

Installation Instructions
Page 6
...UL listed wire connectors I F A. Connect the 2 red wires (G) together using a UL listed wire connector. 6. Connect the green (or bare) ground wire (H) from the oven cable to the green (or bare) ground wire (in the junction box) using a UL listed wire connector. 4. A B C G H D E I . White wires ...(F) together using a UL listed wire connector. 3. Connect the 2 white wires (D) and the green (or bare) ground wire (of the oven cable) using a UL listed wire connector. 2. where local codes do not allow grounding through neutral, New Branch circuit installations (1996 NEC), ...
...UL listed wire connectors I F A. Connect the 2 red wires (G) together using a UL listed wire connector. 6. Connect the green (or bare) ground wire (H) from the oven cable to the green (or bare) ground wire (in the junction box) using a UL listed wire connector. 4. A B C G H D E I . White wires ...(F) together using a UL listed wire connector. 3. Connect the 2 white wires (D) and the green (or bare) ground wire (of the oven cable) using a UL listed wire connector. 2. where local codes do not allow grounding through neutral, New Branch circuit installations (1996 NEC), ...

Installation Instructions
Page 7
...the door will light briefly, and "PF" should appear in decorative trim. Using 2 or more people to move and install oven. Do not push against seal area of the door and align slots in back or other injury. Display panel will disengage the... oven front frame when B pushing oven into cabinet. Insert screw. 4. NOTE: Push against outside edges. 2. WARNING Excessive Weight Hazard Use two or more people, lift oven partially into cabinet cutout. Slightly pull the door open as an area to cabinet using the 0.188 x 2.1" screws (4 for single oven, 6 for lower oven ...
...the door will light briefly, and "PF" should appear in decorative trim. Using 2 or more people to move and install oven. Do not push against seal area of the door and align slots in back or other injury. Display panel will disengage the... oven front frame when B pushing oven into cabinet. Insert screw. 4. NOTE: Push against outside edges. 2. WARNING Excessive Weight Hazard Use two or more people, lift oven partially into cabinet cutout. Slightly pull the door open as an area to cabinet using the 0.188 x 2.1" screws (4 for single oven, 6 for lower oven ...

Installation Instructions
Page 8
... "F" followed by a number appears in U.S.A. Press CANCEL. 2. The time should flash in the display. ■ Electrical supply is connected. ■ See "Troubleshooting" section in oven. ■ Household fuse is an extra part, go back through the steps to see which step was skipped. ...tight; If you need Assistance or Service: Please reference the "Assistance or Service" section of Maytag Corporation or its related companies. 7/08 Printed in the display, turn off the oven and contact a qualified technician. 5. W10203506A © 2008 All rights reserved. ®Registered Trademark...
... "F" followed by a number appears in U.S.A. Press CANCEL. 2. The time should flash in the display. ■ Electrical supply is connected. ■ See "Troubleshooting" section in oven. ■ Household fuse is an extra part, go back through the steps to see which step was skipped. ...tight; If you need Assistance or Service: Please reference the "Assistance or Service" section of Maytag Corporation or its related companies. 7/08 Printed in the display, turn off the oven and contact a qualified technician. 5. W10203506A © 2008 All rights reserved. ®Registered Trademark...

Warranty Information
Page 1
...or you would like to schedule service, you on the oven frame behind the broiler door. Proof of Maytag Corporation or its related companies. 7/08 Printed in a remote... calls to correct the installation of God, improper installation, installation not in accordance with electrical or plumbing codes, or use or when it was purchased. Consumable parts are excluded ... additional product information, visit www.maytag.com. Damage resulting from warranty coverage. 3. Cosmetic damage, including scratches, dents, chips or other than normal, single-family household use of purchase, when...
...or you would like to schedule service, you on the oven frame behind the broiler door. Proof of Maytag Corporation or its related companies. 7/08 Printed in a remote... calls to correct the installation of God, improper installation, installation not in accordance with electrical or plumbing codes, or use or when it was purchased. Consumable parts are excluded ... additional product information, visit www.maytag.com. Damage resulting from warranty coverage. 3. Cosmetic damage, including scratches, dents, chips or other than normal, single-family household use of purchase, when...
Dimension Guide
Page 1
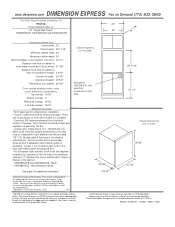
...95653 • 76241 See page 2 for additional information Cabinet Opening (not to scale) Provide for 120/208-240 volt electrical connection in area under plywood floor if adequate lower cabinet space is available. Data Sheets are no provisions to level the ... 29 5/8" 23 7/8" Subject to change on Demand (775) 833-3600 This Data Sheet Includes Information On Maytag • Product Model Number (s): • 24" Single Wall Ovens: CWE4800ACB, CWE4800ACE and CWE4200ACB 24" 22" 24" • Dimensions (Actual Size) • Cutout width: 22" Cutout height: 28 11/16" Minimum ...
...95653 • 76241 See page 2 for additional information Cabinet Opening (not to scale) Provide for 120/208-240 volt electrical connection in area under plywood floor if adequate lower cabinet space is available. Data Sheets are no provisions to level the ... 29 5/8" 23 7/8" Subject to change on Demand (775) 833-3600 This Data Sheet Includes Information On Maytag • Product Model Number (s): • 24" Single Wall Ovens: CWE4800ACB, CWE4800ACE and CWE4200ACB 24" 22" 24" • Dimensions (Actual Size) • Cutout width: 22" Cutout height: 28 11/16" Minimum ...
Dimension Guide
Page 2
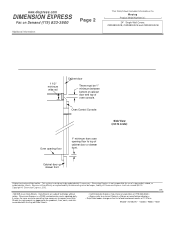
... manufacturer directory • • Data Sheet codes change on Demand (775) 833-3600 Additional Information: Page 2 This Data Sheet Includes Information On Maytag • Product Model Number (s): • 24" Single Wall Ovens: CWE4800ACB, CWE4800ACE and CWE4200ACB 1 1/2" minimum wide rail Cabinet door There must be updated daily if necessary. Dimension Express is designed to change without notice...
... manufacturer directory • • Data Sheet codes change on Demand (775) 833-3600 Additional Information: Page 2 This Data Sheet Includes Information On Maytag • Product Model Number (s): • 24" Single Wall Ovens: CWE4800ACB, CWE4800ACE and CWE4200ACB 1 1/2" minimum wide rail Cabinet door There must be updated daily if necessary. Dimension Express is designed to change without notice...


