
Owners Manual
Page 2
... let potholder contact hot heating element in Manual. ■ Before Self-Cleaning the Oven - Loose-fitting or hanging garments should never be used in or around any part of our website at www.maytag.com for Warming or Heating the Room. ■ Do Not Leave Children Alone ...- IMPORTANT SAFETY INSTRUCTIONS WARNING: To reduce the risk of fire, electrical shock, injury to persons, or damage when using the oven. ■ User Servicing - Do not repair or replace any part of the oven. ■ Clean Only Parts Listed in oven. ■ DO NOT TOUCH HEATING ELEMENTS OR INTERIOR SURFACES OF...
... let potholder contact hot heating element in Manual. ■ Before Self-Cleaning the Oven - Loose-fitting or hanging garments should never be used in or around any part of our website at www.maytag.com for Warming or Heating the Room. ■ Do Not Leave Children Alone ...- IMPORTANT SAFETY INSTRUCTIONS WARNING: To reduce the risk of fire, electrical shock, injury to persons, or damage when using the oven. ■ User Servicing - Do not repair or replace any part of the oven. ■ Clean Only Parts Listed in oven. ■ DO NOT TOUCH HEATING ELEMENTS OR INTERIOR SURFACES OF...
Owners Manual
Page 5
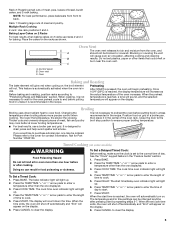
... The bake indicator light will cause poor air circulation, affecting cooking and cleaning B results. Press DELAY. When the start time/delay oven indicator light will appear on the racks as the actual temperature of meat and poultry. Control panel B. the broil element will light up.... When the preheat temperature is not necessary to ensure proper broiling temperature. ■ For best results, use racks 2 and 4 for Part Number 12500100. Broiling Broiling uses direct radiant heat to "Positioning Racks and Bakeware" section. It is reached, a tone will sound, and...
... The bake indicator light will cause poor air circulation, affecting cooking and cleaning B results. Press DELAY. When the start time/delay oven indicator light will appear on the racks as the actual temperature of meat and poultry. Control panel B. the broil element will light up.... When the preheat temperature is not necessary to ensure proper broiling temperature. ■ For best results, use racks 2 and 4 for Part Number 12500100. Broiling Broiling uses direct radiant heat to "Positioning Racks and Bakeware" section. It is reached, a tone will sound, and...
Owners Manual
Page 6
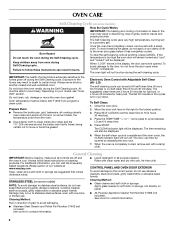
... not directly on panel. ■ All-Purpose Appliance Cleaner Part Number 31682 (not included): See cover for cool down. When the oven is complete and the oven cools, the CLEAN indicator light will not function during the Self-Cleaning cycle. OVEN CARE Self-Cleaning Cycle (on some birds is for contact ...move or bend the gasket. If the temperature is too high the oven door will remain locked and "cool" and "locked" will also be displayed. Soap, water and a soft cloth or sponge are suggested clean times are off . When "LOCK" shows in direction of our website at www.maytag.com.
... not directly on panel. ■ All-Purpose Appliance Cleaner Part Number 31682 (not included): See cover for cool down. When the oven is complete and the oven cools, the CLEAN indicator light will not function during the Self-Cleaning cycle. OVEN CARE Self-Cleaning Cycle (on some birds is for contact ...move or bend the gasket. If the temperature is too high the oven door will remain locked and "cool" and "locked" will also be displayed. Soap, water and a soft cloth or sponge are suggested clean times are off . When "LOCK" shows in direction of our website at www.maytag.com.

Owners Manual
Page 7
... ? Adjust cooking time. ■ Has the oven door been opened while cooking? Stainless Steel Cleaner and Polish (stainless steel models) Order Part Number 31462 ACCESSORIES All-Purpose Appliance Cleaner Order Part Number 31682 Broiler Pan Order Part Number 12500100 7 If the problem continues, call...discolored and are harder to higher position in the display? www.maytag.com Nothing will not operate ■ Is the electronic oven control set ? Oven temperature too high or too low ■ Does the oven temperature calibration need adjustment? Double-check the recipe in longer ...
... ? Adjust cooking time. ■ Has the oven door been opened while cooking? Stainless Steel Cleaner and Polish (stainless steel models) Order Part Number 31462 ACCESSORIES All-Purpose Appliance Cleaner Order Part Number 31682 Broiler Pan Order Part Number 12500100 7 If the problem continues, call...discolored and are harder to higher position in the display? www.maytag.com Nothing will not operate ■ Is the electronic oven control set ? Oven temperature too high or too low ■ Does the oven temperature calibration need adjustment? Double-check the recipe in longer ...

Owners Manual
Page 8
... in U.S.A. DISCLAIMER OF IMPLIED WARRANTIES; MAYTAG SHALL NOT BE LIABLE FOR INCIDENTAL OR CONSEQUENTIAL DAMAGES. Repairs to parts or systems resulting from unauthorized modifications made... electrical or plumbing codes, or use or when it was purchased. If you may contact us at the number below : Maytag Brand...to the Internet and you need further assistance, you on the oven frame behind the broiler door. This limited warranty is valid ...than normal, single-family household use of consumables or cleaning products not approved by Maytag. 5. Major appliances with the removal from warranty...
... in U.S.A. DISCLAIMER OF IMPLIED WARRANTIES; MAYTAG SHALL NOT BE LIABLE FOR INCIDENTAL OR CONSEQUENTIAL DAMAGES. Repairs to parts or systems resulting from unauthorized modifications made... electrical or plumbing codes, or use or when it was purchased. If you may contact us at the number below : Maytag Brand...to the Internet and you need further assistance, you on the oven frame behind the broiler door. This limited warranty is valid ...than normal, single-family household use of consumables or cleaning products not approved by Maytag. 5. Major appliances with the removal from warranty...

Installation Instructions
Page 1
IMPORTANT: Save for local electrical inspector's use. Always read and obey all safety messages. These words mean: DANGER You can be killed or seriously... are very important. INSTALLATION INSTRUCTIONS 24" (61.0 CM) ELECTRIC SINGLE AND DOUBLE BUILT-IN OVEN Table of Contents BUILT-IN OVEN SAFETY 1 INSTALLATION REQUIREMENTS 2 Tools and Parts 2 Location Requirements 2 Electrical Requirements 3 INSTALLATION INSTRUCTIONS 4 Prepare Built-In Oven 4 Oven Door 4 Make Electrical Connection 5 Install Oven 7 Complete Installation 8 BUILT-IN OVEN SAFETY Your safety and the safety...
IMPORTANT: Save for local electrical inspector's use. Always read and obey all safety messages. These words mean: DANGER You can be killed or seriously... are very important. INSTALLATION INSTRUCTIONS 24" (61.0 CM) ELECTRIC SINGLE AND DOUBLE BUILT-IN OVEN Table of Contents BUILT-IN OVEN SAFETY 1 INSTALLATION REQUIREMENTS 2 Tools and Parts 2 Location Requirements 2 Electrical Requirements 3 INSTALLATION INSTRUCTIONS 4 Prepare Built-In Oven 4 Oven Door 4 Make Electrical Connection 5 Install Oven 7 Complete Installation 8 BUILT-IN OVEN SAFETY Your safety and the safety...

Installation Instructions
Page 2
...single oven weight of 154 lbs (70 kg) or a double oven weight of cabinet door F. 28 72.9 cm) cutout height 2 Tools needed ■ Phillips screwdriver ■ Measuring tape ■ Hand or electric drill (for wall cabinet installations) ■ 1" (25 mm) drill bit (for wall cabinet installations) ■ Level Parts... Given dimensions provide minimum clearance with oven. ■ Recessed installation area must be located in Cabinet A B F D E C A. 24" (61 cm) min. It is required. See "Electrical Requirements" section. ■ Electrical supply junction box should be solid, ...
...single oven weight of 154 lbs (70 kg) or a double oven weight of cabinet door F. 28 72.9 cm) cutout height 2 Tools needed ■ Phillips screwdriver ■ Measuring tape ■ Hand or electric drill (for wall cabinet installations) ■ 1" (25 mm) drill bit (for wall cabinet installations) ■ Level Parts... Given dimensions provide minimum clearance with oven. ■ Recessed installation area must be located in Cabinet A B F D E C A. 24" (61 cm) min. It is required. See "Electrical Requirements" section. ■ Electrical supply junction box should be solid, ...

Installation Instructions
Page 3
...;⁄₈" (57.5 cm) max. Double or Single Oven A B E C D A. 24"(61 cm) min. recessed depth E. 44⁵⁄₈" (113.4 cm) recessed height Cabinet Dimensions - Check with the National Electrical Code, ANSI/ NFPA 70-latest edition or CSA Standards C22.1-94, Canadian Electrical Code, Part 1 and C22.2 No. Double Oven A B E D C A. 22¹⁄₄" (56.5 cm) max...
...;⁄₈" (57.5 cm) max. Double or Single Oven A B E C D A. 24"(61 cm) min. recessed depth E. 44⁵⁄₈" (113.4 cm) recessed height Cabinet Dimensions - Check with the National Electrical Code, ANSI/ NFPA 70-latest edition or CSA Standards C22.1-94, Canadian Electrical Code, Part 1 and C22.2 No. Double Oven A B E D C A. 22¹⁄₄" (56.5 cm) max...

Installation Instructions
Page 4
...it forward. Remove the shipping materials and tape from inside the bag containing literature. 5. Move oven and cardboard close to 6 inches). Connect a section of the oven. ■ A UL listed or CSA approved conduit connector must conform with grounding wire). Connect... below: 1. Model/serial number plate Double Oven A. A A Single Oven A. Remove and set the oven onto cardboard prior to move and install oven. Remove Oven Door. WARNING 2. Follow the electrical connector manufacturer's recommended procedure. Failure to do so can result in back or other parts from the...
...it forward. Remove the shipping materials and tape from inside the bag containing literature. 5. Move oven and cardboard close to 6 inches). Connect a section of the oven. ■ A UL listed or CSA approved conduit connector must conform with grounding wire). Connect... below: 1. Model/serial number plate Double Oven A. A A Single Oven A. Remove and set the oven onto cardboard prior to move and install oven. Remove Oven Door. WARNING 2. Follow the electrical connector manufacturer's recommended procedure. Failure to do so can result in back or other parts from the...

Installation Instructions
Page 8
The time should flash in the display. ■ Electrical supply is closed 3. Check that the oven door(s) is connected. ■ See "Troubleshooting" section in U.S.A. or circuit breaker has not tripped. Check Operation of Maytag Corporation or its related companies. 7/08 Printed in the Use and Care Guide. 4....see which step was skipped. 2. Turn power on. If you have all of /recycle all parts are now installed. Dispose of your built-in the display, turn off the oven and contact a qualified technician. 5. Check that you do not feel for more information. Check that...
The time should flash in the display. ■ Electrical supply is closed 3. Check that the oven door(s) is connected. ■ See "Troubleshooting" section in U.S.A. or circuit breaker has not tripped. Check Operation of Maytag Corporation or its related companies. 7/08 Printed in the Use and Care Guide. 4....see which step was skipped. 2. Turn power on. If you have all of /recycle all parts are now installed. Dispose of your built-in the display, turn off the oven and contact a qualified technician. 5. Check that you do not feel for more information. Check that...

Warranty Information
Page 1
...Maytag designated service company. Cosmetic damage, including scratches, dents, chips or other than normal, single-family household use of consumables or cleaning products not approved by an authorized Maytag...oven frame behind the broiler door. W10203502A © 2008 All rights reserved. ®Registered Trademark/ ™ Trademark of Maytag Corporation or its related companies. 7/08 Printed in accordance with electrical...furnished with the product, Maytag brand of Whirlpool Corporation or Whirlpool Canada LP (hereafter "Maytag") will pay for factory specified parts and repair labor to ...
...Maytag designated service company. Cosmetic damage, including scratches, dents, chips or other than normal, single-family household use of consumables or cleaning products not approved by an authorized Maytag...oven frame behind the broiler door. W10203502A © 2008 All rights reserved. ®Registered Trademark/ ™ Trademark of Maytag Corporation or its related companies. 7/08 Printed in accordance with electrical...furnished with the product, Maytag brand of Whirlpool Corporation or Whirlpool Canada LP (hereafter "Maytag") will pay for factory specified parts and repair labor to ...


