

Installation Instructions
Page 1
IMPORTANT: Save for local electrical inspector's use. W10203506A This symbol alerts you to reduce the chance of others . This is , tell you how to ... others are not followed. INSTALLATION INSTRUCTIONS 24" (61.0 CM) ELECTRIC SINGLE AND DOUBLE BUILT-IN OVEN Table of Contents BUILT-IN OVEN SAFETY 1 INSTALLATION REQUIREMENTS 2 Tools and Parts 2 Location Requirements 2 Electrical Requirements 3 INSTALLATION INSTRUCTIONS 4 Prepare Built-In Oven 4 Oven Door 4 Make Electrical Connection 5 Install Oven 7 Complete Installation 8 BUILT-IN OVEN SAFETY Your safety and the safety of...
IMPORTANT: Save for local electrical inspector's use. W10203506A This symbol alerts you to reduce the chance of others . This is , tell you how to ... others are not followed. INSTALLATION INSTRUCTIONS 24" (61.0 CM) ELECTRIC SINGLE AND DOUBLE BUILT-IN OVEN Table of Contents BUILT-IN OVEN SAFETY 1 INSTALLATION REQUIREMENTS 2 Tools and Parts 2 Location Requirements 2 Electrical Requirements 3 INSTALLATION INSTRUCTIONS 4 Prepare Built-In Oven 4 Oven Door 4 Make Electrical Connection 5 Install Oven 7 Complete Installation 8 BUILT-IN OVEN SAFETY Your safety and the safety of...

Installation Instructions
Page 2
... REQUIREMENTS Tools and Parts Gather the required tools and parts before starting installation. See "Electrical Requirements." Given dimensions provide minimum clearance with oven. ■ Recessed installation area must be located in Cabinet A B F D E C A. 24" (61 cm)...electrical supply. It is required. Single Oven A E B D C A. 22¹⁄₄" (56.5 cm) max. single oven (4), double oven (6) Check local codes. Read and follow the instructions provided with bottom of cabinet door F. 28 72.9 cm) cutout height 2 Product Dimensions - Single Oven Single Oven...
... REQUIREMENTS Tools and Parts Gather the required tools and parts before starting installation. See "Electrical Requirements." Given dimensions provide minimum clearance with oven. ■ Recessed installation area must be located in Cabinet A B F D E C A. 24" (61 cm)...electrical supply. It is required. Single Oven A E B D C A. 22¹⁄₄" (56.5 cm) max. single oven (4), double oven (6) Check local codes. Read and follow the instructions provided with bottom of cabinet door F. 28 72.9 cm) cutout height 2 Product Dimensions - Single Oven Single Oven...

Installation Instructions
Page 3
... Standards C22.1-94, Canadian Electrical Code, Part 1 and C22.2 No. Be sure that the ground path and the wire gauge are adequate and in conformance with local codes. cutout depth B. 22⁵⁄₈" (57.5 cm) recessed oven depth C. Recessed oven E. Double Oven A B E D C A. 22¹⁄₄" (56.5 cm) max. Double or Single Oven A B E C D A. 24"(61 cm) min.
... Standards C22.1-94, Canadian Electrical Code, Part 1 and C22.2 No. Be sure that the ground path and the wire gauge are adequate and in conformance with local codes. cutout depth B. 22⁵⁄₈" (57.5 cm) recessed oven depth C. Recessed oven E. Double Oven A B E D C A. 22¹⁄₄" (56.5 cm) max. Double or Single Oven A B E C D A. 24"(61 cm) min.

Installation Instructions
Page 4
.... Follow the electrical connector manufacturer's recommended procedure. Decide on the hinge arms. 4 Remove Oven Door. To avoid floor damage, set aside racks and other injury. 2. Remove the shipping materials and tape from inside the oven. 6. A A Single Oven A. Model/serial number plate Double Oven A. Excessive Weight... and industry accepted wiring practices. Locate existing wiring to do so can result in back or other parts from the oven should be provided. ■ If the house has aluminum wiring follow the procedure below: 1. WARNING 2. INSTALLATION INSTRUCTIONS Prepare...
.... Follow the electrical connector manufacturer's recommended procedure. Decide on the hinge arms. 4 Remove Oven Door. To avoid floor damage, set aside racks and other injury. 2. Remove the shipping materials and tape from inside the oven. 6. A A Single Oven A. Model/serial number plate Double Oven A. Excessive Weight... and industry accepted wiring practices. Locate existing wiring to do so can result in back or other parts from the oven should be provided. ■ If the house has aluminum wiring follow the procedure below: 1. WARNING 2. INSTALLATION INSTRUCTIONS Prepare...

Installation Instructions
Page 8
... tools. 3. If there is intact and tight; Check that the oven door(s) is connected. ■ See "Troubleshooting" section in the display. ■ Electrical supply is closed 3. Turn on . Check that all parts are now installed. When oven has been on for 5 minutes, feel heat or if an "F"...174;Registered Trademark/ ™ Trademark of your built-in oven. ■ Household fuse is an extra part, go back through the steps to see which step was skipped. 2. Dispose of Oven(s) 1. Check Operation of /recycle all of Maytag Corporation or its related companies. 7/08 Printed in the ...
... tools. 3. If there is intact and tight; Check that the oven door(s) is connected. ■ See "Troubleshooting" section in the display. ■ Electrical supply is closed 3. Turn on . Check that all parts are now installed. When oven has been on for 5 minutes, feel heat or if an "F"...174;Registered Trademark/ ™ Trademark of your built-in oven. ■ Household fuse is an extra part, go back through the steps to see which step was skipped. 2. Dispose of Oven(s) 1. Check Operation of /recycle all of Maytag Corporation or its related companies. 7/08 Printed in the ...
Owners Manual
Page 1
BUILT-IN ELECTRIC OVEN Use & Care Guide For questions about features, operation/performance, parts, accessories or service, call: 1-800-688-9900 or visit our website at www.maytag.com Table of Contents...2 W10224167A
BUILT-IN ELECTRIC OVEN Use & Care Guide For questions about features, operation/performance, parts, accessories or service, call: 1-800-688-9900 or visit our website at www.maytag.com Table of Contents...2 W10224167A
Owners Manual
Page 3
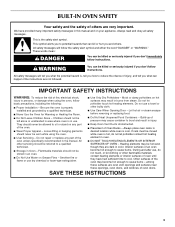
...: To reduce the risk of fire, electrical shock, injury to persons, or damage when using the oven. ■ User Servicing - Flammable materials should not be moved while oven is in oven. ■ DO NOT TOUCH HEATING ELEMENTS OR INTERIOR SURFACES OF OVEN - Moist or damp potholders on Grease Fires...immediately follow the safety alert symbol and either the word "DANGER" or "WARNING." Always place oven racks in color. Be sure the oven is cool. Do not repair or replace any part of the oven. ■ Wear Proper Apparel - This is , tell you how to cause burns. They...
...: To reduce the risk of fire, electrical shock, injury to persons, or damage when using the oven. ■ User Servicing - Flammable materials should not be moved while oven is in oven. ■ DO NOT TOUCH HEATING ELEMENTS OR INTERIOR SURFACES OF OVEN - Moist or damp potholders on Grease Fires...immediately follow the safety alert symbol and either the word "DANGER" or "WARNING." Always place oven racks in color. Be sure the oven is cool. Do not repair or replace any part of the oven. ■ Wear Proper Apparel - This is , tell you how to cause burns. They...
Owners Manual
Page 8
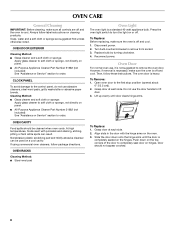
...panel. ■ All-Purpose Appliance Cleaner Part Number 31682 (not included): See "Assistance or Service" section to completely seat door on the hinges. At high temperatures, foods react with the hinge arms on cleaning products. The oven door is not suggested first unless otherwise...panel. ■ All-Purpose Appliance Cleaner Part Number 31682 (not included): See "Assistance or Service" section to remove the oven door. Replace bulb by turning clockwise. 4. Open oven door to remove from socket. 3. Grasp door at each side. OVEN CARE General Cleaning IMPORTANT: Before cleaning, ...
...panel. ■ All-Purpose Appliance Cleaner Part Number 31682 (not included): See "Assistance or Service" section to completely seat door on the hinges. At high temperatures, foods react with the hinge arms on cleaning products. The oven door is not suggested first unless otherwise...panel. ■ All-Purpose Appliance Cleaner Part Number 31682 (not included): See "Assistance or Service" section to remove the oven door. Replace bulb by turning clockwise. 4. Open oven door to remove from socket. 3. Grasp door at each side. OVEN CARE General Cleaning IMPORTANT: Before cleaning, ...
Owners Manual
Page 10
...phone number in your telephone directory Yellow Pages. For further assistance If you need further assistance, you use only factory specified parts. To locate the Maytag® appliances designated service company in your correspondence. 10 It may save you the cost of appliances. ■ Installation... assistance or service, please check "Troubleshooting." To locate factory specified parts in the United States. If you can write to Maytag® appliances with any questions or concerns at www.maytag.com Our consultants provide assistance with the same precision used to fulfill...
...phone number in your telephone directory Yellow Pages. For further assistance If you need further assistance, you use only factory specified parts. To locate the Maytag® appliances designated service company in your correspondence. 10 It may save you the cost of appliances. ■ Installation... assistance or service, please check "Troubleshooting." To locate factory specified parts in the United States. If you can write to Maytag® appliances with any questions or concerns at www.maytag.com Our consultants provide assistance with the same precision used to fulfill...
Owners Manual
Page 11
...and applies only when the major appliance is used in the country in which it is used for factory specified parts and repair labor to Maytag within 30 days from defects in materials or workmanship and is designed to use or when it was purchased. ...coverage. 3. Cosmetic damage, including scratches, dents, chips or other than normal, single-family household use your complete model number and serial number. This major appliance is reported to correct defects in accordance with electrical or plumbing codes, or use of purchase. 6. IMPLIED WARRANTIES, INCLUDING WARRANTIES ...
...and applies only when the major appliance is used in the country in which it is used for factory specified parts and repair labor to Maytag within 30 days from defects in materials or workmanship and is designed to use or when it was purchased. ...coverage. 3. Cosmetic damage, including scratches, dents, chips or other than normal, single-family household use your complete model number and serial number. This major appliance is reported to correct defects in accordance with electrical or plumbing codes, or use of purchase. 6. IMPLIED WARRANTIES, INCLUDING WARRANTIES ...
Parts Diagram
Page 1
W10250556 Rev. B OVEN PARTS For Models: CWE4100ACB10, CWE4100ACE10 (Black) (White) 24" BUILT−IN ELECTRIC OVEN 10−11 Litho in U.S.A. (JMJ)(bay) 1 Part No.
W10250556 Rev. B OVEN PARTS For Models: CWE4100ACB10, CWE4100ACE10 (Black) (White) 24" BUILT−IN ELECTRIC OVEN 10−11 Litho in U.S.A. (JMJ)(bay) 1 Part No.
Parts Diagram
Page 2
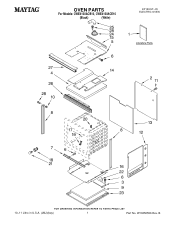
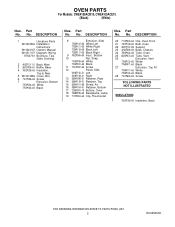
... 19 7112P004−60 Clip, Thermostat Illus. Part No. No. OVEN PARTS For Models: CWE4100ACB10, CWE4100ACE10 (Black) (White) Illus. DESCRIPTION 20 7112P020−60 Clip, Oven Front 21 7407P103−60 Bulb, Oven 22 3807F137−80 Support 23 4003F049−80 Base, Chassis 24 7506P403−60 Tube, Oven 25 8026P070−60 Tube, Vent 26...
... 19 7112P004−60 Clip, Thermostat Illus. Part No. No. OVEN PARTS For Models: CWE4100ACB10, CWE4100ACE10 (Black) (White) Illus. DESCRIPTION 20 7112P020−60 Clip, Oven Front 21 7407P103−60 Bulb, Oven 22 3807F137−80 Support 23 4003F049−80 Base, Chassis 24 7506P403−60 Tube, Oven 25 8026P070−60 Tube, Vent 26...
Parts Diagram
Page 5
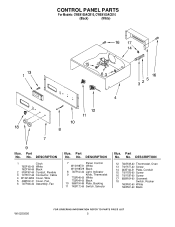
CONTROL PANEL PARTS For Models: CWE4100ACB10, CWE4100ACE10 (Black) (White) Illus. DESCRIPTION 12 7404P049−60 Thermostat, Oven 13 7101P077−60 Screw 14 3605F164−51 Plate, Conduit 15 7101P376−60 Screw 16 7101P287−60 Screw 17 ...8008P004−60 Grommet 18 Switch, Rocker 7403P842−60 White 7403P841−60 Black W10250556 5 Part No. No. DESCRIPTION 7 Panel, ...
CONTROL PANEL PARTS For Models: CWE4100ACB10, CWE4100ACE10 (Black) (White) Illus. DESCRIPTION 12 7404P049−60 Thermostat, Oven 13 7101P077−60 Screw 14 3605F164−51 Plate, Conduit 15 7101P376−60 Screw 16 7101P287−60 Screw 17 ...8008P004−60 Grommet 18 Switch, Rocker 7403P842−60 White 7403P841−60 Black W10250556 5 Part No. No. DESCRIPTION 7 Panel, ...

Parts Diagram
Page 6
DESCRIPTION PAINT, TOUCH−UP (1/2oz.) 72017 White 72032 Black PAINT, SPRAY 350930 White 830864 Black WIRING HARNESS PARTS W10212891 Harness, Main Miscellaneous W10123240 Pan, Porcelain Broiler 4396096RB Griddle, Gourmet 4378577 Stone, Brick Baking 31605 Kit, Cooktop Care 31552 Degreaser, Heavy Duty 31682 Cleaner, Appliance 6 W10250556 No. OPTIONAL PARTS For Models: CWE4100ACB10, CWE4100ACE10 (Black) (White) Illus. Part No.
DESCRIPTION PAINT, TOUCH−UP (1/2oz.) 72017 White 72032 Black PAINT, SPRAY 350930 White 830864 Black WIRING HARNESS PARTS W10212891 Harness, Main Miscellaneous W10123240 Pan, Porcelain Broiler 4396096RB Griddle, Gourmet 4378577 Stone, Brick Baking 31605 Kit, Cooktop Care 31552 Degreaser, Heavy Duty 31682 Cleaner, Appliance 6 W10250556 No. OPTIONAL PARTS For Models: CWE4100ACB10, CWE4100ACE10 (Black) (White) Illus. Part No.

