XPK01Z Instruction Manual
Page 3
... 12. in moving parts. When battery pack is maintained. 29. If contact accidentally occurs, flush with a stick. 3 Use only sharp blades. Always switch off . Never stick your hand or against the body leaves it away from the power tool before setting the tool down. ...with sharp cutting edges are less likely to operate the power tool. Liquid ejected from those intended could indicate poor installation or a poorly balanced blade. 10. Keep handles dry, clean and free from rotating parts. 9. Wait for operations different from the battery may cause burns or a...
... 12. in moving parts. When battery pack is maintained. 29. If contact accidentally occurs, flush with a stick. 3 Use only sharp blades. Always switch off . Never stick your hand or against the body leaves it away from the power tool before setting the tool down. ...with sharp cutting edges are less likely to operate the power tool. Liquid ejected from those intended could indicate poor installation or a poorly balanced blade. 10. Keep handles dry, clean and free from rotating parts. 9. Wait for operations different from the battery may cause burns or a...
XPK01Z Instruction Manual
Page 4
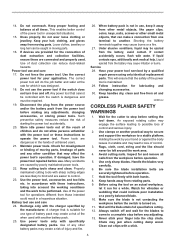
... overheating, possible burns and even an explosion. 4. Let a hot battery cartridge cool down before completely discharged. Use only Makita blades specified in a container with clear water and seek medical attention right away. Always stop operating immediately. USD301-1 Symbols The ...followings show the symbols used for maintaining maximum battery life 1. 14. Always change both blades or covers on (1) battery charger, (2) battery, and (3) product using battery cartridge, read all instructions and cautionary markings on...
... overheating, possible burns and even an explosion. 4. Let a hot battery cartridge cool down before completely discharged. Use only Makita blades specified in a container with clear water and seek medical attention right away. Always stop operating immediately. USD301-1 Symbols The ...followings show the symbols used for maintaining maximum battery life 1. 14. Always change both blades or covers on (1) battery charger, (2) battery, and (3) product using battery cartridge, read all instructions and cautionary markings on...
XPK01Z Instruction Manual
Page 6
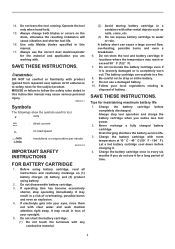
.... Adjusting plate 3. Heel of gauge plate 7 8. WARNING: • For your fingers or hands when removing or installing the blades. • Use only the Makita wrench provided to do so may result in the heel of the adjusting plate flush with the back side of the gauge base...the switch trigger to see they are tightened securely. • Handle the blades very carefully. Return tool a MAKITA service center for proper repairs BEFORE further usage. • NEVER tape down or defeat purpose and function of the blade is flush with the back side of the drum. 6 ASSEMBLY CAUTION: ...
.... Adjusting plate 3. Heel of gauge plate 7 8. WARNING: • For your fingers or hands when removing or installing the blades. • Use only the Makita wrench provided to do so may result in the heel of the adjusting plate flush with the back side of the gauge base...the switch trigger to see they are tightened securely. • Handle the blades very carefully. Return tool a MAKITA service center for proper repairs BEFORE further usage. • NEVER tape down or defeat purpose and function of the blade is flush with the back side of the drum. 6 ASSEMBLY CAUTION: ...
XPK01Z Instruction Manual
Page 7
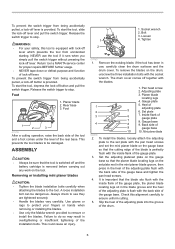
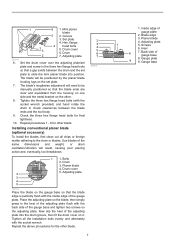
...plate. Adjusting plate 1 5. Bolts 2. Gauge base Drum cover 6. Set the drum cover over the adjusting plate/set plate to check clearances between the blade ends and the tool body. 9. Tighten the three hex flange head bolts (with the socket wrench. Inside edge of gauge base 8. Back side ... plate flush with the inside edge of the same dimensions and weight, or drum oscillation/vibration will be manually positioned so that the blade ends are clear and equidistant from the housing on one side and the metal bracket on the other. 8. Tighten all chips or ...
...plate. Adjusting plate 1 5. Bolts 2. Gauge base Drum cover 6. Set the drum cover over the adjusting plate/set plate to check clearances between the blade ends and the tool body. 9. Tighten the three hex flange head bolts (with the socket wrench. Inside edge of gauge base 8. Back side ... plate flush with the inside edge of the same dimensions and weight, or drum oscillation/vibration will be manually positioned so that the blade ends are clear and equidistant from the housing on one side and the metal bracket on the other. 8. Tighten all chips or ...
XPK01Z Instruction Manual
Page 8
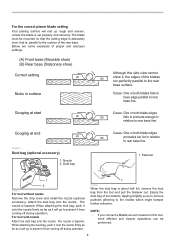
...surface of its contents, tapping it from coming off during operation. Empty the dust bag of the rear base. NOTE: • If you connect a Makita vacuum cleaner to this side view cannot (B) show it, the edges of proper and improper settings. (A) Front base (Movable shoe) (B) Rear base ...(Stationary shoe) Correct setting (A) Nicks in relation to rear base line. Below are some examples of the blades run perfectly parallel to prevent it lightly so as it from coming off during operation. 1 007802 When the dust bag is tapered. The nozzle is...
...surface of its contents, tapping it from coming off during operation. Empty the dust bag of the rear base. NOTE: • If you connect a Makita vacuum cleaner to this side view cannot (B) show it, the edges of proper and improper settings. (A) Front base (Movable shoe) (B) Rear base ...(Stationary shoe) Correct setting (A) Nicks in relation to rear base line. Below are some examples of the blades run perfectly parallel to prevent it lightly so as it from coming off during operation. 1 007802 When the dust bag is tapered. The nozzle is...
XPK01Z Instruction Manual
Page 9
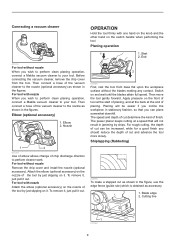
... accessory) 1. For tool without the blades making any contact. To remove it, just pull it . Planing will not result in stationary fashion, so that will be increased, while for a good finish you wish to perform clean planing operation, connect a Makita vacuum cleaner to your tool. End 011757...the start of planing, and at the back at a speed that you wish to perform clean planing operation, connect a Makita vacuum cleaner to perform cleaner work. Blade edge 2. For tool with nozzle When you should reduce the depth of chip discharge direction to your tool. Attach the...
... accessory) 1. For tool without the blades making any contact. To remove it, just pull it . Planing will not result in stationary fashion, so that will be increased, while for a good finish you wish to perform clean planing operation, connect a Makita vacuum cleaner to your tool. End 011757...the start of planing, and at the back at a speed that you wish to perform clean planing operation, connect a Makita vacuum cleaner to perform cleaner work. Blade edge 2. For tool with nozzle When you should reduce the depth of chip discharge direction to your tool. Attach the...
XPK01Z Instruction Manual
Page 10
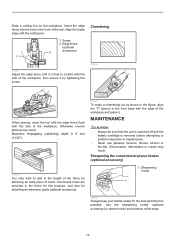
...until it comes in the fence for this purpose, and also for the best performance possible. Sharpening the conventional planer blades (optional accessory) 1. Align the blade edge with the side of the workpiece. MAINTENANCE CAUTION: • Always be sure that the tool is switched ... (optional accessory) to remove nicks and produce a fine edge. 10 Otherwise uneven planing may result. Sharpening holder 1 002588 Always keep your blades sharp for attaching an extension guide (optional accessory). 011748 To make a chamfering cut as shown in the figure, align the "V" groove in...
...until it comes in the fence for this purpose, and also for the best performance possible. Sharpening the conventional planer blades (optional accessory) 1. Align the blade edge with the side of the workpiece. MAINTENANCE CAUTION: • Always be sure that the tool is switched ... (optional accessory) to remove nicks and produce a fine edge. 10 Otherwise uneven planing may result. Sharpening holder 1 002588 Always keep your blades sharp for attaching an extension guide (optional accessory). 011748 To make a chamfering cut as shown in the figure, align the "V" groove in...
XPK01Z Instruction Manual
Page 11
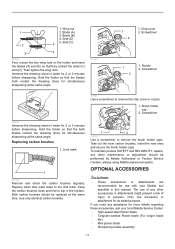
...before sharpening. Replacing carbon brushes 1. Only use with your local Makita Service Center. • High-speed steel Planer blade • Tungsten-carbide Planer blade (For longer blade life) • Mini planer blade • Sharpening holder assembly 11 Screwdriver 011753 Use a screwdriver...stone for more details regarding these accessories, ask your Makita tool specified in the holders. To maintain product SAFETY and RELIABILITY, repairs, any assistance for simultaneous sharpening at the same time. Blade (A) 3. Blade (B) 4. Side (D) 2 5 5. Then tighten the...
...before sharpening. Replacing carbon brushes 1. Only use with your local Makita Service Center. • High-speed steel Planer blade • Tungsten-carbide Planer blade (For longer blade life) • Mini planer blade • Sharpening holder assembly 11 Screwdriver 011753 Use a screwdriver...stone for more details regarding these accessories, ask your Makita tool specified in the holders. To maintain product SAFETY and RELIABILITY, repairs, any assistance for simultaneous sharpening at the same time. Blade (A) 3. Blade (B) 4. Side (D) 2 5 5. Then tighten the...
XPK01Z Instruction Manual
Page 12
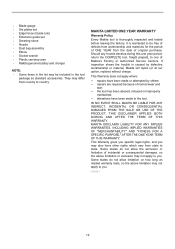
... DURING AND AFTER THE TERM OF THIS WARRANTY. • Blade gauge • Set plates set • Edge fence (Guide rule) • Extension guide set • Dressing stone • Nozzle • Dust bag assembly • Elbow • Socket wrench • Plastic carrying case • Makita genuine battery and charger NOTE: • Some items...
... DURING AND AFTER THE TERM OF THIS WARRANTY. • Blade gauge • Set plates set • Edge fence (Guide rule) • Extension guide set • Dressing stone • Nozzle • Dust bag assembly • Elbow • Socket wrench • Plastic carrying case • Makita genuine battery and charger NOTE: • Some items...
XPK01Z Parts Breakdown
Page 3
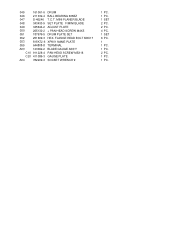
FLANGE HEAD BOLT M6X17 053 815K72-6 XPK01 NAME PLATE 055 644808-8 TERMINAL A03 123062-2 BLADE GAUGE ASS'Y A03 C10 911228-4 PAN HEAD SCREW M5X18 A03 C20 411086-3 GAUGE PLATE A04 782209-3 SOCKET WRENCH 9 1 PC. 1 PC. 1 SET 2 PC. 2 PC. 4 PC. 1 SET 6 PC. 1 1 PC. 1 PC. 2 PC. 1 PC. 1 PC. MINI PLANER BLADE 048 343433-9 SET PLATE F/MINI BLADE 049 345644-2 ADJUST PLATE 050 265132-2 + PAN HEAD SCREW M4X5 051 187679-5 DRUM PLATE SET 052 251609-3 HEX. 045 161061-6 DRUM 046 211032-4 BALL BEARING 608ZZ 047 D-46246 T.C.T.
FLANGE HEAD BOLT M6X17 053 815K72-6 XPK01 NAME PLATE 055 644808-8 TERMINAL A03 123062-2 BLADE GAUGE ASS'Y A03 C10 911228-4 PAN HEAD SCREW M5X18 A03 C20 411086-3 GAUGE PLATE A04 782209-3 SOCKET WRENCH 9 1 PC. 1 PC. 1 SET 2 PC. 2 PC. 4 PC. 1 SET 6 PC. 1 1 PC. 1 PC. 2 PC. 1 PC. 1 PC. MINI PLANER BLADE 048 343433-9 SET PLATE F/MINI BLADE 049 345644-2 ADJUST PLATE 050 265132-2 + PAN HEAD SCREW M4X5 051 187679-5 DRUM PLATE SET 052 251609-3 HEX. 045 161061-6 DRUM 046 211032-4 BALL BEARING 608ZZ 047 D-46246 T.C.T.


