Instruction Manual
Page 2
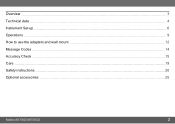
Overview 3 Technical data 4 Instrument Set-up 6 Operations 9 How to use the adapters and wall mount 12 Message Codes 14 Accuracy Check 15 Care 19 Safety instructions 20 Optional accessories 25 Makita SK700D/SK700GD 2
Overview 3 Technical data 4 Instrument Set-up 6 Operations 9 How to use the adapters and wall mount 12 Message Codes 14 Accuracy Check 15 Care 19 Safety instructions 20 Optional accessories 25 Makita SK700D/SK700GD 2
Instruction Manual
Page 3
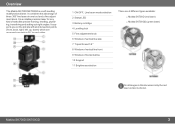
Overview Ov e rv ie w The Makita SK700D/SK700GD is shown. Makita SK700D/SK700GD 3 It combines the advantage of tasks like precise framing, levelling, plumbing, transfering and setting out right angles. It is a reliable precision laser for any kind ... of vertical line side 7 Tripod thread 1/4" 8 Window of vertical line front 9 Window of horizontal line 10 Keypad 11 Brightness selection There are 2 different types available: l Makita SK700D (red laser) l Makita SK700GD (green laser) On all images in one tool and a fine adjustment knob.
Overview Ov e rv ie w The Makita SK700D/SK700GD is shown. Makita SK700D/SK700GD 3 It combines the advantage of tasks like precise framing, levelling, plumbing, transfering and setting out right angles. It is a reliable precision laser for any kind ... of vertical line side 7 Tripod thread 1/4" 8 Window of vertical line front 9 Window of horizontal line 10 Keypad 11 Brightness selection There are 2 different types available: l Makita SK700D (red laser) l Makita SK700GD (green laser) On all images in one tool and a fine adjustment knob.

Instruction Manual
Page 4
... temperature (instrument) Storage temperature (instrument) Laser line width at 5 m (16.4 ft) distance Tripod thread Pulse power for receiver * depending on lighting conditions ** with Makita LDX1 laser receiver SK700D SK700GD 2 x Vertical 360°, 1 x Horizontal 360° Up, down, right, left, front, back 25 m (82 ft)* 35 m (115 ft)* 70 m (230 ft)** ±0.2 mm...
... temperature (instrument) Storage temperature (instrument) Laser line width at 5 m (16.4 ft) distance Tripod thread Pulse power for receiver * depending on lighting conditions ** with Makita LDX1 laser receiver SK700D SK700GD 2 x Vertical 360°, 1 x Horizontal 360° Up, down, right, left, front, back 25 m (82 ft)* 35 m (115 ft)* 70 m (230 ft)** ±0.2 mm...

Instruction Manual
Page 5
... heaviest combination, according to EPTAProcedure 01/2014, are subject to change without notice. Use of any other battery cartridges may differ from country to country. Makita SK700D/SK700GD 5 l The weight may not be available depending on the attachment(s), including the battery cartridge. l Some of the battery cartridges listed above . WARNING Only use...
... heaviest combination, according to EPTAProcedure 01/2014, are subject to change without notice. Use of any other battery cartridges may differ from country to country. Makita SK700D/SK700GD 5 l The weight may not be available depending on the attachment(s), including the battery cartridge. l Some of the battery cartridges listed above . WARNING Only use...
Instruction Manual
Page 6
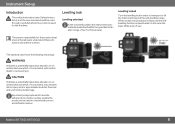
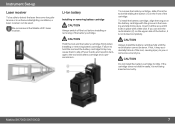
... used for the product must be adhered to in practice as they enable the product to be read through carefully before the product is deactivated. Makita SK700D/SK700GD 6 Levelling lock Levelling unlocked In the unlocked position the instrument automatically levels itself within the specified inclination range. (See Technical data) Levelling locked Turn...
... used for the product must be adhered to in practice as they enable the product to be read through carefully before the product is deactivated. Makita SK700D/SK700GD 6 Levelling lock Levelling unlocked In the unlocked position the instrument automatically levels itself within the specified inclination range. (See Technical data) Levelling locked Turn...
Instruction Manual
Page 7
..., causing injury to you or someone around you can be used. Insert it all the way until the red indicator cannot be seen. Makita SK700D/SK700GD 7 We recommend the Makita LDX1 laser receiver. To install the battery cartridge, align the tongue on the front of the button, it from the tool while sliding...
..., causing injury to you or someone around you can be used. Insert it all the way until the red indicator cannot be seen. Makita SK700D/SK700GD 7 We recommend the Makita LDX1 laser receiver. To install the battery cartridge, align the tongue on the front of the button, it from the tool while sliding...
Instruction Manual
Page 8
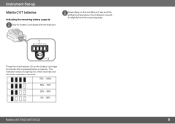
The indicator lamps (1) light up Makita CXT batteries Indicating the remaining battery capacity Only for a few seconds and show the remaining capacity: Makita SK700D/SK700GD 8 Press the check button (2) on the conditions of use and the ambient temperature, the indication may differ slightly from the actual capacity. Instrument Set-up for battery cartridges with the indicator Depending on the battery cartridge to indicate the remaining battery capacity.
The indicator lamps (1) light up Makita CXT batteries Indicating the remaining battery capacity Only for a few seconds and show the remaining capacity: Makita SK700D/SK700GD 8 Press the check button (2) on the conditions of use and the ambient temperature, the indication may differ slightly from the actual capacity. Instrument Set-up for battery cartridges with the indicator Depending on the battery cartridge to indicate the remaining battery capacity.
Instruction Manual
Page 9
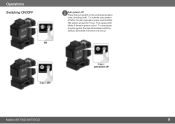
To deactivate it again repeat the described steps until the status LED blinks 3 times in green colour. The status LED blinks 3 times in red colour. Makita SK700D/SK700GD 9 To activate auto poweroff after 30 min operation press and hold the ON button at start for 5 sec. Operations Op e ra tio n s Switching ON/OFF Auto power-off Place the lock switch to the unlocked position (see Levelling lock).
To deactivate it again repeat the described steps until the status LED blinks 3 times in green colour. The status LED blinks 3 times in red colour. Makita SK700D/SK700GD 9 To activate auto poweroff after 30 min operation press and hold the ON button at start for 5 sec. Operations Op e ra tio n s Switching ON/OFF Auto power-off Place the lock switch to the unlocked position (see Levelling lock).
Instruction Manual
Page 10
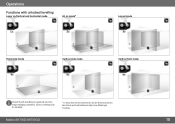
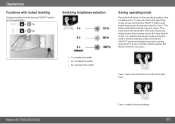
Makita SK700D/SK700GD 10 Operations Functions with unlocked levelling Laser on/Vertical and horizontal mode All on mode* Layout mode Horizontal mode Vertical side mode Vertical front mode Check if self-levelling is required and correspondingly activated. (See Levelling lock for details) * In very hot environments it can be that maximum two lines work simultaneously (see Message Codes).
Makita SK700D/SK700GD 10 Operations Functions with unlocked levelling Laser on/Vertical and horizontal mode All on mode* Layout mode Horizontal mode Vertical side mode Vertical front mode Check if self-levelling is required and correspondingly activated. (See Levelling lock for details) * In very hot environments it can be that maximum two lines work simultaneously (see Message Codes).
Instruction Manual
Page 11
... width Saving operating mode Place the lock switch to the memory and as the new default mode. To save actual line beam mode and brightness Makita SK700D/SK700GD 5 sec = reset to factory settings, press and hold the ON/OFF button and brightness button during operation for 2 sec. The instrument has stored the...
... width Saving operating mode Place the lock switch to the memory and as the new default mode. To save actual line beam mode and brightness Makita SK700D/SK700GD 5 sec = reset to factory settings, press and hold the ON/OFF button and brightness button during operation for 2 sec. The instrument has stored the...

Instruction Manual
Page 12
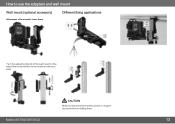
Makita SK700D/SK700GD 12 CAUTION Do not attach other than the following instruments to L-adapter, SK105D/SK105GD/SK106D/SK106GD/SK700D /SK700GD Turn the instrument 360° to assure stable stand. Use the fine adjustment knob and turn the instrument around the vertical intersection / plumb point within &#...
Makita SK700D/SK700GD 12 CAUTION Do not attach other than the following instruments to L-adapter, SK105D/SK105GD/SK106D/SK106GD/SK700D /SK700GD Turn the instrument 360° to assure stable stand. Use the fine adjustment knob and turn the instrument around the vertical intersection / plumb point within &#...
Instruction Manual
Page 13
CAUTION Make sure that it from falling down. Makita SK700D/SK700GD 13 How to use the adapters and wall mount Wall mount (optional accessory) Alignment of horizontal laser lines Different fixing applications Turn the adjustment knob of the wall mount to fine adjust the horizontal line to prevent it is fixed well by screw or magnet to the desired reference level.
CAUTION Make sure that it from falling down. Makita SK700D/SK700GD 13 How to use the adapters and wall mount Wall mount (optional accessory) Alignment of horizontal laser lines Different fixing applications Turn the adjustment knob of the wall mount to fine adjust the horizontal line to prevent it is fixed well by screw or magnet to the desired reference level.
Instruction Manual
Page 14
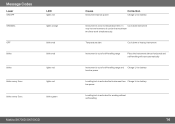
... LED lights red lights orange OFF blinks blinks blinks every 5 sec blinks every 5 sec blinks red blinks red lights red lights red blinks green Makita SK700D/SK700GD Cause Instrument has low power Correction Charge Li-Ion battery Instrument is activated for working without self-levelling 14 In Cool down or heat up...
... LED lights red lights orange OFF blinks blinks blinks every 5 sec blinks every 5 sec blinks red blinks red lights red lights red blinks green Makita SK700D/SK700GD Cause Instrument has low power Correction Charge Li-Ion battery Instrument is activated for working without self-levelling 14 In Cool down or heat up...
Instruction Manual
Page 15
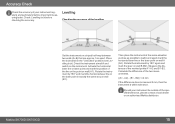
Activate the horizontal laser line or laser point and mark the position of the levelling Makita SK700D/SK700GD Set the instrument on wall (B1). A2) - (B1 - Place the lock switch in exactly the same way on a tripod half-way between two walls (A+B) that ...
Activate the horizontal laser line or laser point and mark the position of the levelling Makita SK700D/SK700GD Set the instrument on wall (B1). A2) - (B1 - Place the lock switch in exactly the same way on a tripod half-way between two walls (A+B) that ...

Instruction Manual
Page 16
.... Place the lock switch in the "Unlocked" position (see Levelling lock). Should your instrument be outside of laser crosshairs on the wall. Makita SK700D/SK700GD 16 Position the instrument approx. 5 m away from the marking. Observe the vertical deviation of the horizontal line from the wall. Position the instrument at a distance ...
.... Place the lock switch in the "Unlocked" position (see Levelling lock). Should your instrument be outside of laser crosshairs on the wall. Makita SK700D/SK700GD 16 Position the instrument approx. 5 m away from the marking. Observe the vertical deviation of the horizontal line from the wall. Position the instrument at a distance ...

Instruction Manual
Page 17
... 2 to direction 1. Rotate the instrument by 180° so that it points in the "Unlocked" position (see Levelling lock). Makita SK700D/SK700GD 17 Accuracy Check Vertical plumb/intersection points Checking the accuracy of the upper plumb intersection point: Checking the accuracy of the lower plumb ...tripod or wall mount bracket near point A1 at a minimum distance of the specified tolerance, please contact a local dealer or an authorised Makita distributor. Mark the laser points A1 and B1 with a pin. Adjust the instrument so that the laser beam hits point A1 exactly....
... 2 to direction 1. Rotate the instrument by 180° so that it points in the "Unlocked" position (see Levelling lock). Makita SK700D/SK700GD 17 Accuracy Check Vertical plumb/intersection points Checking the accuracy of the upper plumb intersection point: Checking the accuracy of the lower plumb ...tripod or wall mount bracket near point A1 at a minimum distance of the specified tolerance, please contact a local dealer or an authorised Makita distributor. Mark the laser points A1 and B1 with a pin. Adjust the instrument so that the laser beam hits point A1 exactly....

Instruction Manual
Page 18
...right-hand perpendicular beam to the wall. Mark the new position of the specified tolerance, please contact a local dealer or an authorised Makita distributor. Accuracy Check Perpendicularity horizontal intersection points Place lock switch in "Unlocked" position (see Levelling lock). Make sure that the lower intersection... the former reference point c1 and the new point c2. Then mark the left-hand beam to the right wall with c1. Makita SK700D/SK700GD 18 Mark a reference point (P1) approx. 5m from the walls and position the lower plumb intersection point exactly on the same...
...right-hand perpendicular beam to the wall. Mark the new position of the specified tolerance, please contact a local dealer or an authorised Makita distributor. Accuracy Check Perpendicularity horizontal intersection points Place lock switch in "Unlocked" position (see Levelling lock). Make sure that the lower intersection... the former reference point c1 and the new point c2. Then mark the left-hand beam to the right wall with c1. Makita SK700D/SK700GD 18 Mark a reference point (P1) approx. 5m from the walls and position the lower plumb intersection point exactly on the same...

Instruction Manual
Page 19
... the glasses without touching the optics with a damp soft cloth. Never use compressed air or modelling clay. Check the levelling accuracy of your fingers. Makita SK700D/SK700GD 19 Care Ca re Never immerse the instrument in water. This could use aggressive cleaning agents or solvents. If the equipment get wet always dry...
... the glasses without touching the optics with a damp soft cloth. Never use compressed air or modelling clay. Check the levelling accuracy of your fingers. Makita SK700D/SK700GD 19 Care Ca re Never immerse the instrument in water. This could use aggressive cleaning agents or solvents. If the equipment get wet always dry...
Instruction Manual
Page 20
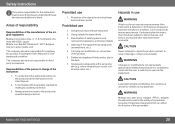
.... Opening of the person in the dark 7. In case of explanatory and hazard labels 4. Do not shine at aircraft or vehicles at the surveying site (e.g. Makita SK700D/SK700GD 20 Responsibilities of the equipment by unauthorised personnel. Permitted use 1. CAUTION Never attempt to accident prevention. 3. Always prevent access to operate the equipment. Projection...
.... Opening of the person in the dark 7. In case of explanatory and hazard labels 4. Do not shine at aircraft or vehicles at the surveying site (e.g. Makita SK700D/SK700GD 20 Responsibilities of the equipment by unauthorised personnel. Permitted use 1. CAUTION Never attempt to accident prevention. 3. Always prevent access to operate the equipment. Projection...

Instruction Manual
Page 21
...of injury. 6. It may cause explosion. 7. If electrolyte gets into your eyes, rinse them out with the products specified by Makita. by the manufacturer. When battery cartridge is not in a risk of the item being shipped, consulting an expert for hazardous material... lithium-ion batteries are subject to fire or temperature above 130 °C may result in use and care 1. Follow your eyesight. 5. Makita SK700D/SK700GD 21 avoid contact. Damaged or modified batteries may reach or exceed 50 °C (122 °F). 7. Follow all instructions and cautionary markings...
...of injury. 6. It may cause explosion. 7. If electrolyte gets into your eyes, rinse them out with the products specified by Makita. by the manufacturer. When battery cartridge is not in a risk of the item being shipped, consulting an expert for hazardous material... lithium-ion batteries are subject to fire or temperature above 130 °C may result in use and care 1. Follow your eyesight. 5. Makita SK700D/SK700GD 21 avoid contact. Damaged or modified batteries may reach or exceed 50 °C (122 °F). 7. Follow all instructions and cautionary markings...


