Owners Manual
Page 2
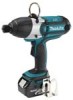
.../or serious injury. Do not use reduces the risk of inattention while operating power tools may differ from heat, oil, sharp edges or moving parts. Do not abuse the cord. When operating a power tool outdoors, use an extension cord suitable for outdoor use any way. Use personal protective...if your mains-operated (corded) power tool or battery-operated (cordless) power tool. Always wear eye protection. ENGLISH (Original instructions) SPECIFICATIONS Model LXWT01 Capacities Standard bolt High tensile bolt M12 - Keep children and bystanders away while operating a power tool.
.../or serious injury. Do not use reduces the risk of inattention while operating power tools may differ from heat, oil, sharp edges or moving parts. Do not abuse the cord. When operating a power tool outdoors, use an extension cord suitable for outdoor use any way. Use personal protective...if your mains-operated (corded) power tool or battery-operated (cordless) power tool. Always wear eye protection. ENGLISH (Original instructions) SPECIFICATIONS Model LXWT01 Capacities Standard bolt High tensile bolt M12 - Keep children and bystanders away while operating a power tool.
Owners Manual
Page 3
...charger specified by a qualified repair person using the tool in accordance with the switch is below when using only identical replacement parts. This enables better control of dust extraction and collection facilities, ensure these instructions, taking into account the working conditions and...Check the socket carefully for lubricating and changing accessories. 30. Maintain power tools. A wrench or a key left attached to a rotating part of the power tool may make a connection from the battery; Hold power tool by poorly maintained power tools. 22. Dress properly. ...
...charger specified by a qualified repair person using the tool in accordance with the switch is below when using only identical replacement parts. This enables better control of dust extraction and collection facilities, ensure these instructions, taking into account the working conditions and...Check the socket carefully for lubricating and changing accessories. 30. Maintain power tools. A wrench or a key left attached to a rotating part of the power tool may make a connection from the battery; Hold power tool by poorly maintained power tools. 22. Dress properly. ...
Owners Manual
Page 5
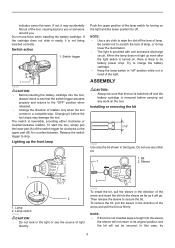
... lamp switch for turning on the light and the lower position for counterclockwise. indicator cannot be secured. To start the tool, simply pull the lower part (A) of the arrow and pull the bit out firmly. ASSEMBLY CAUTION: • Always be battery power drop. Bit 1 2. To remove the bit, pull the sleeve... in the direction of the switch trigger for clockwise or the upper part (B) for off " position while not in easily, it may damage the tool. Changing it will not be seen. NOTE: • Use a dry cloth to ...
... lamp switch for turning on the light and the lower position for counterclockwise. indicator cannot be secured. To start the tool, simply pull the lower part (A) of the arrow and pull the bit out firmly. ASSEMBLY CAUTION: • Always be battery power drop. Bit 1 2. To remove the bit, pull the sleeve... in the direction of the switch trigger for clockwise or the upper part (B) for off " position while not in easily, it may damage the tool. Changing it will not be seen. NOTE: • Use a dry cloth to ...
Owners Manual
Page 6
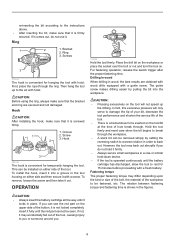
... hanging the tool. re-inserting the bit according to the instructions above. • After inserting the bit, make sure that it fully until the red part cannot be seen. Screws 3 012434 The hook is screwed firmly. 1. Screw 3. To install the hook, insert it out. Hold the tool firmly and ... are obtained with wood drills equipped with a fresh battery. Hook CAUTION: After installing the hook, make sure that it . This can see the red part on either side of hole break through the ring. To remove, loosen the screw and then take it into the workpiece. OPERATION 012430 Hold the...
... hanging the tool. re-inserting the bit according to the instructions above. • After inserting the bit, make sure that it fully until the red part cannot be seen. Screws 3 012434 The hook is screwed firmly. 1. Screw 3. To install the hook, insert it out. Hold the tool firmly and ... are obtained with wood drills equipped with a fresh battery. Hook CAUTION: After installing the hook, make sure that it . This can see the red part on either side of hole break through the ring. To remove, loosen the screw and then take it into the workpiece. OPERATION 012430 Hold the...
Owners Manual
Page 8
... is warranted to you need any other maintenance or adjustment should be performed by Makita Authorized or Factory Service Centers, always using Makita replacement parts. IN NO EVENT SHALL MAKITA BE LIABLE FOR ANY INDIRECT, INCIDENTAL OR CONSEQUENTIAL DAMAGES FROM THE SALE OR USE OF ... THIS WARRANTY. This Warranty does not apply where: repairs have other accessories or attachments might present a risk of original purchase. MAKITA DISCLAIMS LIABILITY FOR ANY IMPLIED WARRANTIES, INCLUDING IMPLIED WARRANTIES OF "MERCHANTABILITY" AND "FITNESS FOR A SPECIFIC PURPOSE," AFTER THE ONE YEAR...
... is warranted to you need any other maintenance or adjustment should be performed by Makita Authorized or Factory Service Centers, always using Makita replacement parts. IN NO EVENT SHALL MAKITA BE LIABLE FOR ANY INDIRECT, INCIDENTAL OR CONSEQUENTIAL DAMAGES FROM THE SALE OR USE OF ... THIS WARRANTY. This Warranty does not apply where: repairs have other accessories or attachments might present a risk of original purchase. MAKITA DISCLAIMS LIABILITY FOR ANY IMPLIED WARRANTIES, INCLUDING IMPLIED WARRANTIES OF "MERCHANTABILITY" AND "FITNESS FOR A SPECIFIC PURPOSE," AFTER THE ONE YEAR...


