Owners Manual
Page 1
Compound Miter Saw Equipped with Electric Blade Brake 255 mm (10") MODEL LS1040 DOUBLE INSULATION INSTRUCTION MANUAL WARNING: For your personal safety, READ and UNDERSTAND before using. www.makitatools.com SAVE THESE INSTRUCTIONS FOR FUTURE REFERENCE.
Compound Miter Saw Equipped with Electric Blade Brake 255 mm (10") MODEL LS1040 DOUBLE INSULATION INSTRUCTION MANUAL WARNING: For your personal safety, READ and UNDERSTAND before using. www.makitatools.com SAVE THESE INSTRUCTIONS FOR FUTURE REFERENCE.
Owners Manual
Page 2
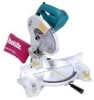
... CLEAN. Form habit of checking to country. Read the owner's manual carefully. SPECIFICATIONS Blade diameter 255 mm (10") Hole diameter 15.88 mm (5/8") Max. Miter angle Left 45°, Right 52° Max. KEEP GUARDS IN PLACE and in working order. 2 3. Cutting capacities (H x W) Bevel angle... Miter angle 0° 45° (left and right) 90.5 mm x 95 mm 90.5 mm x 67 mm 0° (3-9/16" x 3-3/4") 69 mm x 130 mm (3-9/16" x 2-5/8") 69 mm x ...
... CLEAN. Form habit of checking to country. Read the owner's manual carefully. SPECIFICATIONS Blade diameter 255 mm (10") Hole diameter 15.88 mm (5/8") Max. Miter angle Left 45°, Right 52° Max. KEEP GUARDS IN PLACE and in working order. 2 3. Cutting capacities (H x W) Bevel angle... Miter angle 0° 45° (left and right) 90.5 mm x 95 mm 90.5 mm x 67 mm 0° (3-9/16" x 3-3/4") 69 mm x 130 mm (3-9/16" x 2-5/8") 69 mm x ...
Owners Manual
Page 4
... use . Never reach around saw without guards in loss of the tool. A power source with any operation freehand. If in doubt, use your hand to miter saw blade. USE PROPER EXTENSION CORD. When using an extension cord, be sure to use ) replace strict adherence to secure the workpiece. 5. An undersized cord...
... use . Never reach around saw without guards in loss of the tool. A power source with any operation freehand. If in doubt, use your hand to miter saw blade. USE PROPER EXTENSION CORD. When using an extension cord, be sure to use ) replace strict adherence to secure the workpiece. 5. An undersized cord...
Owners Manual
Page 9
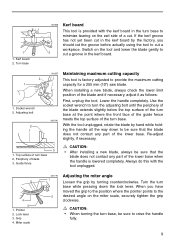
... unplugged, rotate the blade by the factory, you have moved the grip to the position where the pointer points to the desired angle on the miter scale, securely tighten the grip clockwise. Re-adjust slightly, if necessary. 3 1. Always do this with the kerf board in the turn base 2. Pointer 2.... factory adjusted to minimize tearing on the tool and lower the blade gently to raise the handle fully. 9 Lock lever 3. Miter scale 001778 1 2 Adjusting the miter angle Loosen the grip by turning counterclockwise. Switch on the exit side of the lower base. Top surface ot turn base to...
... unplugged, rotate the blade by the factory, you have moved the grip to the position where the pointer points to the desired angle on the miter scale, securely tighten the grip clockwise. Re-adjust slightly, if necessary. 3 1. Always do this with the kerf board in the turn base 2. Pointer 2.... factory adjusted to minimize tearing on the tool and lower the blade gently to raise the handle fully. 9 Lock lever 3. Miter scale 001778 1 2 Adjusting the miter angle Loosen the grip by turning counterclockwise. Switch on the exit side of the lower base. Top surface ot turn base to...
Owners Manual
Page 10
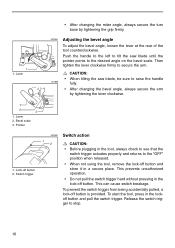
.... 001864 Adjusting the bevel angle To adjust the bevel angle, loosen the lever at the rear of the tool counterclockwise. 1 1. Lever • After changing the miter angle, always secure the turn base by tightening the lever clockwise. 1 2 3 1. Switch trigger • When not using the tool, remove the lock-off button 2. Lock...
.... 001864 Adjusting the bevel angle To adjust the bevel angle, loosen the lever at the rear of the tool counterclockwise. 1 1. Lever • After changing the miter angle, always secure the turn base by tightening the lever clockwise. 1 2 3 1. Switch trigger • When not using the tool, remove the lock-off button 2. Lock...
Owners Manual
Page 14
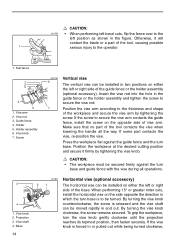
... on the opposite side of the base. Vise knob 2. By turning the vise knob clockwise, the screw remains secured. When performing 15° or greater miter cuts, install the horizontal vise on the side opposite the direction in or pulled out while being turned clockwise,
... on the opposite side of the base. Vise knob 2. By turning the vise knob clockwise, the screw remains secured. When performing 15° or greater miter cuts, install the horizontal vise on the side opposite the direction in or pulled out while being turned clockwise,
Owners Manual
Page 16
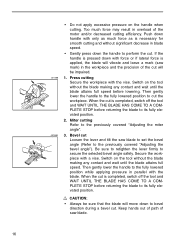
...be impaired. 001788 1. Switch on the handle when cutting. Bevel cut . Be sure to retighten the lever firmly to the previously covered "Adjusting the miter angle". 001868 3. Keep hands out of path of the cut the workpiece. If the handle is pressed down to the previously covered "Adjusting the ...bevel angle"). When the cut . Miter cutting Refer to secure the selected bevel angle safely. Too much force may result in blade speed. • Gently press down handle with force...
...be impaired. 001788 1. Switch on the handle when cutting. Bevel cut . Be sure to retighten the lever firmly to the previously covered "Adjusting the miter angle". 001868 3. Keep hands out of path of the cut the workpiece. If the handle is pressed down to the previously covered "Adjusting the ...bevel angle"). When the cut . Miter cutting Refer to secure the selected bevel angle safely. Too much force may result in blade speed. • Gently press down handle with force...
Owners Manual
Page 17
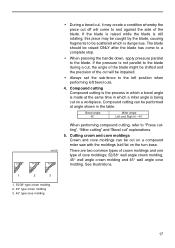
...still rotating, this piece may create a condition whereby the piece cut off will be impaired. • Always set the sub-fence to "Press cutting", "Miter cutting" and "Bevel cut on the turn base. 001555 52∞ 38∞ 45∞ 45∞ 45∞ 45∞ There are two...blade is raised while the blade is made at angle shown in which a miter angle is being cut " explanations. 5. Compound cutting can be cut on a compound miter saw with the moldings laid flat on a workpiece. Bevel angle 45˚ Miter angle Left and Right 0 - 45˚ When performing compound cutting, ...
...still rotating, this piece may create a condition whereby the piece cut off will be impaired. • Always set the sub-fence to "Press cutting", "Miter cutting" and "Bevel cut on the turn base. 001555 52∞ 38∞ 45∞ 45∞ 45∞ 45∞ There are two...blade is raised while the blade is made at angle shown in which a miter angle is being cut " explanations. 5. Compound cutting can be cut on a compound miter saw with the moldings laid flat on a workpiece. Bevel angle 45˚ Miter angle Left and Right 0 - 45˚ When performing compound cutting, ...
Owners Manual
Page 18
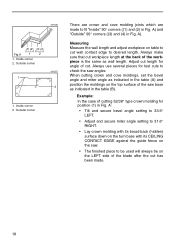
... the table (A) and position the moldings on the saw angles. A: • Tilt and secure bevel angle setting to 33.9° LEFT. • Adjust and secure miter angle setting to fit "Inside" 90° corners ((1) and (2) in the table (B). A) and "Outside" 90° corners ((3) and (4) in Fig. Adjust cut length for angle...
... the table (A) and position the moldings on the saw angles. A: • Tilt and secure bevel angle setting to 33.9° LEFT. • Adjust and secure miter angle setting to fit "Inside" 90° corners ((1) and (2) in the table (B). A) and "Outside" 90° corners ((3) and (4) in Fig. Adjust cut length for angle...

Owners Manual
Page 19
...Bevel Angle Settings EN0002-1 Wall Wall to Crown Molding Angle: 52/38 degrees Wall Angle Bevel Angle Miter Angle (deg.) (deg.) (deg.) 60 43.0 46.8 61 42.8 46.3 62 42.5... 96 31.8 29.0 97 31.5 28.6 98 31.1 28.2 99 30.8 27.7 100 30.4 27.3 Wall Angle Bevel Angle Miter Angle (deg.) (deg.) (deg.) 101 30.1 26.9 102 29.7 26.5 103 29.4 26.1 104 29.0 25.7 105 28... 136 17.2 14.0 137 16.8 13.6 138 16.4 13.3 139 16.0 13.0 140 15.8 12.8 Wall Angle Bevel Angle Miter Angle (deg.) (deg.) (deg.) 141 15.3 12.3 142 14.9 12.0 143 14.5 11.6 144 14.1 11.3 145 13...
...Bevel Angle Settings EN0002-1 Wall Wall to Crown Molding Angle: 52/38 degrees Wall Angle Bevel Angle Miter Angle (deg.) (deg.) (deg.) 60 43.0 46.8 61 42.8 46.3 62 42.5... 96 31.8 29.0 97 31.5 28.6 98 31.1 28.2 99 30.8 27.7 100 30.4 27.3 Wall Angle Bevel Angle Miter Angle (deg.) (deg.) (deg.) 101 30.1 26.9 102 29.7 26.5 103 29.4 26.1 104 29.0 25.7 105 28... 136 17.2 14.0 137 16.8 13.6 138 16.4 13.3 139 16.0 13.0 140 15.8 12.8 Wall Angle Bevel Angle Miter Angle (deg.) (deg.) (deg.) 141 15.3 12.3 142 14.9 12.0 143 14.5 11.6 144 14.1 11.3 145 13...

Owners Manual
Page 20
... Bevel Angle Settings EN0003-1 Wall Wall to Crown Molding Angle: 45 degrees Wall Angle Bevel Angle Miter Angle Wall Angle Bevel Angle Miter Angle (deg.) (deg.) (deg.) (deg.) (deg.) (deg.) 60 37.8 50.8 61 37.5 50.2 62 37.3 49.6 101 26.7 30.2 102 26.4 29.8 103 26.1 29.4 ....9 137 15.0 15.6 138 14.7 15.2 98 27.6 31.6 99 27.3 31.1 100 27.0 30.7 139 14.3 14.8 140 14.0 14.4 Wall Angle Bevel Angle Miter Angle (deg.) (deg.) (deg.) 141 13.7 14.1 142 13.3 13.7 143 13.0 13.3 144 12.6 12.9 145 12.3 12.6 146 11.9 12.2 147 11.6 11...
... Bevel Angle Settings EN0003-1 Wall Wall to Crown Molding Angle: 45 degrees Wall Angle Bevel Angle Miter Angle Wall Angle Bevel Angle Miter Angle (deg.) (deg.) (deg.) (deg.) (deg.) (deg.) 60 37.8 50.8 61 37.5 50.2 62 37.3 49.6 101 26.7 30.2 102 26.4 29.8 103 26.1 29.4 ....9 137 15.0 15.6 138 14.7 15.2 98 27.6 31.6 99 27.3 31.1 100 27.0 30.7 139 14.3 14.8 140 14.0 14.4 Wall Angle Bevel Angle Miter Angle (deg.) (deg.) (deg.) 141 13.7 14.1 142 13.3 13.7 143 13.0 13.3 144 12.6 12.9 145 12.3 12.6 146 11.9 12.2 147 11.6 11...
Owners Manual
Page 21
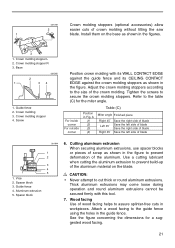
...2 3 4 5 6. Wood facing Use of crown molding without tilting the saw 1 blade. See the figure concerning the dimensions for the miter angle. For inside corner For outside corner Position in the figure to prevent build-up of the crown molding. Adjust the crown molding stoppers... 2 1 34 1. Use a cutting lubricant when cutting the aluminum extrusion to prevent deformation of blade 1. Guide fence 4. A (1) (2) (3) (4) Table (C) Miter angle Finished piece Right 45˚ Left 45˚ Right 45˚ Save the right side of blade Save the left side of blade Save...
...2 3 4 5 6. Wood facing Use of crown molding without tilting the saw 1 blade. See the figure concerning the dimensions for the miter angle. For inside corner For outside corner Position in the figure to prevent build-up of the crown molding. Adjust the crown molding stoppers... 2 1 34 1. Use a cutting lubricant when cutting the aluminum extrusion to prevent deformation of blade 1. Guide fence 4. A (1) (2) (3) (4) Table (C) Miter angle Finished piece Right 45˚ Left 45˚ Right 45˚ Save the right side of blade Save the left side of blade Save...

Owners Manual
Page 23
... that the pointer points to perform inspection or maintenance. CAUTION: • Always secure all moving portions before attempting to 0° on the miter scale. If your tool is for carrying and storage purposes only and not for the best and safest performance. Hex bolt 23 001792 1 Carrying...unplugged before carrying the tool. • Stopper pin is not aligned properly, perform the following: 002258 1. Miter angle 1 Loosen the grip which secures the turn base at right miter angle fully. Lower the handle fully and lock it in the lowered position by carrying grip as shown ...
... that the pointer points to perform inspection or maintenance. CAUTION: • Always secure all moving portions before attempting to 0° on the miter scale. If your tool is for carrying and storage purposes only and not for the best and safest performance. Hex bolt 23 001792 1 Carrying...unplugged before carrying the tool. • Stopper pin is not aligned properly, perform the following: 002258 1. Miter angle 1 Loosen the grip which secures the turn base at right miter angle fully. Lower the handle fully and lock it in the lowered position by carrying grip as shown ...
Owners Manual
Page 26
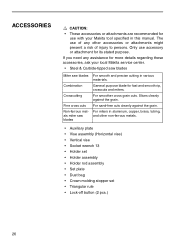
... (2 pcs.) 26 ACCESSORIES CAUTION: • These accessories or attachments are recommended for more details regarding these accessories, ask your Makita tool specified in this manual. For sand-free cuts cleanly against the grain. Only use accessory or attachment for fast and smooth... rip, crosscuts and miters. For miters in various materials. The use with your local Makita service center. • Steel & Carbide-tipped saw blades Miter saw blades Combination Crosscutting Fine cross cuts Non-ferrous metals miter saw blades For smooth and precise cutting ...
... (2 pcs.) 26 ACCESSORIES CAUTION: • These accessories or attachments are recommended for more details regarding these accessories, ask your Makita tool specified in this manual. For sand-free cuts cleanly against the grain. Only use accessory or attachment for fast and smooth... rip, crosscuts and miters. For miters in various materials. The use with your local Makita service center. • Steel & Carbide-tipped saw blades Miter saw blades Combination Crosscutting Fine cross cuts Non-ferrous metals miter saw blades For smooth and precise cutting ...


