Owners Manual
Page 3
...balance at the rate for which it will operate properly and perform its operation. Keep tools sharp and clean for lubricating and changing accessories. 15. Make sure switch is wider than using your hand and it frees both hands to determine that is damaged should be ...caught in the outlet, reverse the plug. 5. ALWAYS USE SAFETY GLASSES. Consult the owner's manual for alignment of moving parts, binding of improper accessories may affect its intended function - NEVER LEAVE TOOL RUNNING UNATTENDED. DON'T USE IN DANGEROUS ENVIRONMENT. KEEP CHILDREN AWAY. Use clamps or a vise to...
...balance at the rate for which it will operate properly and perform its operation. Keep tools sharp and clean for lubricating and changing accessories. 15. Make sure switch is wider than using your hand and it frees both hands to determine that is damaged should be ...caught in the outlet, reverse the plug. 5. ALWAYS USE SAFETY GLASSES. Consult the owner's manual for alignment of moving parts, binding of improper accessories may affect its intended function - NEVER LEAVE TOOL RUNNING UNATTENDED. DON'T USE IN DANGEROUS ENVIRONMENT. KEEP CHILDREN AWAY. Use clamps or a vise to...
Owners Manual
Page 5
..., water and sharp objects. 28. Watch for this manual. Do not abuse cord. Use the holes in the presence of improper accessories such as shown in the figure. Do not use accessories recommended in the lowest position. 18. Take caution to a stable work platform or bench. Keep cord away from the receptacle. 9.
..., water and sharp objects. 28. Watch for this manual. Do not abuse cord. Use the holes in the presence of improper accessories such as shown in the figure. Do not use accessories recommended in the lowest position. 18. Take caution to a stable work platform or bench. Keep cord away from the receptacle. 9.
Owners Manual
Page 14
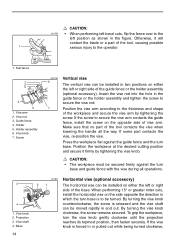
...of the tool, causing possible 1 serious injury to be secured firmly against the guide fence and the turn base. Base 14 001807 Horizontal vise (optional accessory) 21 The horizontal vise can be moved rapidly in which the turn base is to the operator. 1. Vise knob 2. If the vise knob is... arm contacts the guide fence, install the screw on either the left or right side of the guide fence or the holder assembly (optional accessory). If the screw to secure the vise rod. Press the workpiece flat against the turn the vise knob gently clockwise until the projection reaches ...
...of the tool, causing possible 1 serious injury to be secured firmly against the guide fence and the turn base. Base 14 001807 Horizontal vise (optional accessory) 21 The horizontal vise can be moved rapidly in which the turn base is to the operator. 1. Vise knob 2. If the vise knob is... arm contacts the guide fence, install the screw on either the left or right side of the guide fence or the holder assembly (optional accessory). If the screw to secure the vise rod. Press the workpiece flat against the turn the vise knob gently clockwise until the projection reaches ...
Owners Manual
Page 15
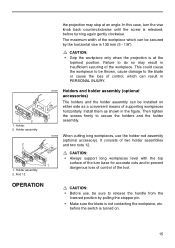
...back counterclockwise until the screw is released, before the switch is 130 mm (5 - 1/8"). Rod 12 002247 Holders and holder assembly (optional accessories) The holders and the holder assembly can be installed on . 15 OPERATION CAUTION: • Before use the holder-rod assembly (optional... accessory). Holder assembly 2 1. before turning again gently clockwise. Then tighten the screws firmly to secure the holders and the holder assembly. 002246 ...
...back counterclockwise until the screw is released, before the switch is 130 mm (5 - 1/8"). Rod 12 002247 Holders and holder assembly (optional accessories) The holders and the holder assembly can be installed on . 15 OPERATION CAUTION: • Before use the holder-rod assembly (optional... accessory). Holder assembly 2 1. before turning again gently clockwise. Then tighten the screws firmly to secure the holders and the holder assembly. 002246 ...
Owners Manual
Page 21
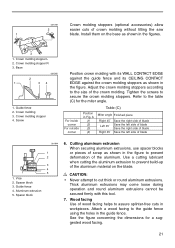
... 5. CAUTION: • Never attempt to assure splinter-free cuts in the figure to the table (C) for a suggested wood facing. 21 001789 Crown molding stoppers (optional accessories) allow 2 easier cuts of blade 1. Install them on the blade. Crown molding stopper L 2. Adjust the crown molding stoppers according to the guide fence using the...
... 5. CAUTION: • Never attempt to assure splinter-free cuts in the figure to the table (C) for a suggested wood facing. 21 001789 Crown molding stoppers (optional accessories) allow 2 easier cuts of blade 1. Install them on the blade. Crown molding stopper L 2. Adjust the crown molding stoppers according to the guide fence using the...
Owners Manual
Page 22
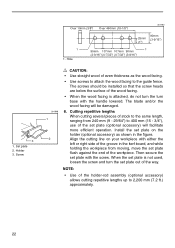
...not used, loosen the screw and turn base with the screw. Holder 3. The screws should be damaged. 8. Align the cutting line on the holder (optional accessory) as the wood facing. • Use screws to attach the wood facing to 400 mm (15 - 3/4"), use of the holder-rod assembly (optional...shown in the kerf board, and while holding the workpiece from 240 mm (9 - 29/64") to the guide fence. Then secure the set plate (optional accessory) will be installed so that the screw heads are below the surface of the workpiece. NOTE: • Use of the set plate with the handle...
...not used, loosen the screw and turn base with the screw. Holder 3. The screws should be damaged. 8. Align the cutting line on the holder (optional accessory) as the wood facing. • Use screws to attach the wood facing to 400 mm (15 - 3/4"), use of the holder-rod assembly (optional...shown in the kerf board, and while holding the workpiece from 240 mm (9 - 29/64") to the guide fence. Then secure the set plate (optional accessory) will be installed so that the screw heads are below the surface of the workpiece. NOTE: • Use of the set plate with the handle...
Owners Manual
Page 26
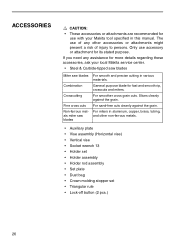
... various materials. The use accessory or attachment for its stated purpose. For miters in this manual. For smoother cross grain cuts. Slices cleanly against the grain. General purpose blade for more details regarding these accessories, ask your Makita tool specified in aluminum, copper..., brass, tubing, and other accessories or attachments might present a risk of injury to persons. Only use of any assistance...
... various materials. The use accessory or attachment for its stated purpose. For miters in this manual. For smoother cross grain cuts. Slices cleanly against the grain. General purpose blade for more details regarding these accessories, ask your Makita tool specified in aluminum, copper..., brass, tubing, and other accessories or attachments might present a risk of injury to persons. Only use of any assistance...