Instruction Manual
Page 5
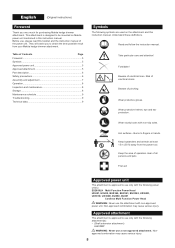
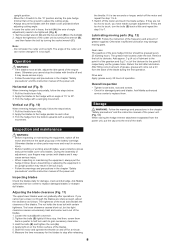
... lines. Hot surfaces - Keep the area of operation clear of Contents Page Foreword 5 Symbols 5 Approved power unit 5 Approved attachment 5 Part description 6 Safety precautions 6 Assembly and adjustment 7 Operation 8 Inspection and maintenance 8 Storage 8 Maintenance schedule 9 Troubleshooting 9 Technical data 9... approved to use only with non-slip soles. Wear sturdy boots with the following symbols are used on Makita power unit mentioned in this instruction manual. Beware of electrical shock. Read and follow the instruction manual. ...
... lines. Hot surfaces - Keep the area of operation clear of Contents Page Foreword 5 Symbols 5 Approved power unit 5 Approved attachment 5 Part description 6 Safety precautions 6 Assembly and adjustment 7 Operation 8 Inspection and maintenance 8 Storage 8 Maintenance schedule 9 Troubleshooting 9 Technical data 9... approved to use only with non-slip soles. Wear sturdy boots with the following symbols are used on Makita power unit mentioned in this instruction manual. Beware of electrical shock. Read and follow the instruction manual. ...
Instruction Manual
Page 6
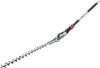
...not overreach. Stop the motor as soon as those dust masks that there is damaged or not fully assembled. They can result in moving parts. • When touching blades or adjusting the blade angle, wear protective gloves. Check all warnings and instructions for safe operation, such as... or knowledge regarding handling of control. • Do not hold the power unit firmly against wire fences. Loss of control may cause serious injury. Part description (Fig. 1) The numbers below refer to use the hedge trimmer. Replace if the blades are compounds found in your right side firmly. ...
...not overreach. Stop the motor as soon as those dust masks that there is damaged or not fully assembled. They can result in moving parts. • When touching blades or adjusting the blade angle, wear protective gloves. Check all warnings and instructions for safe operation, such as... or knowledge regarding handling of control. • Do not hold the power unit firmly against wire fences. Loss of control may cause serious injury. Part description (Fig. 1) The numbers below refer to use the hedge trimmer. Replace if the blades are compounds found in your right side firmly. ...
Instruction Manual
Page 7
...cartridge. • Accelerating the motor with the engine running may be used by a third party may result. • After each use Makita genuine spare parts and accessories only. The gear case becomes hot during operation. • Take a rest to sharpen the blades. • Never repair...nuts, except for the inspection and repair. • Do not touch the gear case. Make sure the cutter unit sits properly. Ask Makita authorized service center for help, give the following steps. 1. Tighten the lock lever (A) firmly as the following information: -- To adjust the...
...cartridge. • Accelerating the motor with the engine running may be used by a third party may result. • After each use Makita genuine spare parts and accessories only. The gear case becomes hot during operation. • Take a rest to sharpen the blades. • Never repair...nuts, except for the inspection and repair. • Do not touch the gear case. Make sure the cutter unit sits properly. Ask Makita authorized service center for help, give the following steps. 1. Tighten the lock lever (A) firmly as the following information: -- To adjust the...
Instruction Manual
Page 8
...; to the point A of the gearbox and 5 g (7 cc) of the blades. Add approx. 3 g (4 cc) of lubricant to 30°. 3. Ask Makita authorized service center to lubricate. The nut holds the truss bolt with an angle of the blades. 1. Hold the bolts (B) and tighten the nuts (A). 4. In...tight. Switch off the motor and touch the blade surface. Ask Makita authorized service center to replace them back a quarter to half turn the bolts (B) back a little and repeat the step 5 to touch, turn each other parts may cause serious injury. • Follow the warnings and precautions in...
...; to the point A of the gearbox and 5 g (7 cc) of the blades. Add approx. 3 g (4 cc) of lubricant to 30°. 3. Ask Makita authorized service center to lubricate. The nut holds the truss bolt with an angle of the blades. 1. Hold the bolts (B) and tighten the nuts (A). 4. In...tight. Switch off the motor and touch the blade surface. Ask Makita authorized service center to replace them back a quarter to half turn the bolts (B) back a little and repeat the step 5 to touch, turn each other parts may cause serious injury. • Follow the warnings and precautions in...
Instruction Manual
Page 9
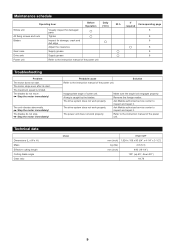
... matter. The blades do not move. The drive system does not work properly. Ask Makita authorized service center to the instruction manual of the power unit. The maximum speed is caught...inspect and repair it . Technical data Dimensions (L x W x H) Mass Effective cutting length Cutting blade angle Gear ratio Model EN401MP mm (inch) 1,624 x 108 x 90 (64" x 4-1/4" x 3-1/2") kg (lbs) 2.8 (6.3) mm (inch) 490...Before Operation Whole unit All fixing screws and nuts Visually inspect for damaged parts Tighten Blades Inspect for damage, crack and dull edge Adjust the clearance Gear...
... matter. The blades do not move. The drive system does not work properly. Ask Makita authorized service center to the instruction manual of the power unit. The maximum speed is caught...inspect and repair it . Technical data Dimensions (L x W x H) Mass Effective cutting length Cutting blade angle Gear ratio Model EN401MP mm (inch) 1,624 x 108 x 90 (64" x 4-1/4" x 3-1/2") kg (lbs) 2.8 (6.3) mm (inch) 490...Before Operation Whole unit All fixing screws and nuts Visually inspect for damaged parts Tighten Blades Inspect for damage, crack and dull edge Adjust the clearance Gear...
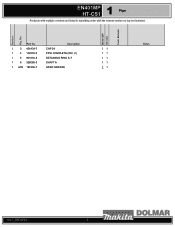
EN401MP 135683-8 135773-7 Parts Breakdown
Page 3
No. Part No. 1 3 424434-7 1 4 142033-0 1 5 961003-8 1 6 326088-5 1 A08 197439-7 Description CAP 24 PIPE COMPLETE (INC. 2) RETAINING RING S-7 SHAFT A GEAR GREASE 11 11 11 11 11 Notes rev 7_03/10/21 3 Section Fig. EN401MP HT-CS1 Tech Bulletin 1 EN401MP HT-CS1 Pipe Products with multiple versions are listed in subsiding order with the newest version on top not indented.
No. Part No. 1 3 424434-7 1 4 142033-0 1 5 961003-8 1 6 326088-5 1 A08 197439-7 Description CAP 24 PIPE COMPLETE (INC. 2) RETAINING RING S-7 SHAFT A GEAR GREASE 11 11 11 11 11 Notes rev 7_03/10/21 3 Section Fig. EN401MP HT-CS1 Tech Bulletin 1 EN401MP HT-CS1 Pipe Products with multiple versions are listed in subsiding order with the newest version on top not indented.
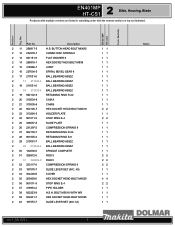
EN401MP 135683-8 135773-7 Parts Breakdown
Page 5
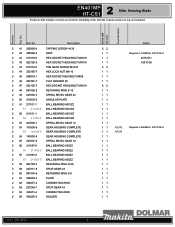
Description 2 11 266817-3 H.S. EN401MP HT-CS1 Tech Bulletin Part No. No. BUTTON HEAD BOLT M6X85 2 12 232279-7 CONED DISC SPRING 6 2 13 941151-9 FLAT WASHER 6 2 14 266818-1 HEX SOCKET HEX BOLT M8X8 2 15 318969-7 JOINT 2 ... 11 11 11 11 11 11 11 22 22 22 11 11 44 22 11 11 11 11 rev 7_03/10/21 5 Notes Section Fig. 2 EN401MP HT-CS1 Slide, Housing, Blade Products with multiple versions are listed in subsiding order with the newest version on top not indented.
Description 2 11 266817-3 H.S. EN401MP HT-CS1 Tech Bulletin Part No. No. BUTTON HEAD BOLT M6X85 2 12 232279-7 CONED DISC SPRING 6 2 13 941151-9 FLAT WASHER 6 2 14 266818-1 HEX SOCKET HEX BOLT M8X8 2 15 318969-7 JOINT 2 ... 11 11 11 11 11 11 11 22 22 22 11 11 44 22 11 11 11 11 rev 7_03/10/21 5 Notes Section Fig. 2 EN401MP HT-CS1 Slide, Housing, Blade Products with multiple versions are listed in subsiding order with the newest version on top not indented.
EN401MP 135683-8 135773-7 Parts Breakdown
Page 6
... 11 11 11 11 11 A9070 A9070 Notes Requires 1-143500-8, 2-911516-9 2015-07> >2015-06 Requires 1-456369-4, 2-911516-9 rev 7_03/10/21 6 EN401MP HT-CS1 Tech Bulletin Part No. No. 2 EN401MP HT-CS1 Slide, Housing, Blade Products with multiple versions are listed in subsiding order with the newest version on top not indented.
... 11 11 11 11 11 A9070 A9070 Notes Requires 1-143500-8, 2-911516-9 2015-07> >2015-06 Requires 1-456369-4, 2-911516-9 rev 7_03/10/21 6 EN401MP HT-CS1 Tech Bulletin Part No. No. 2 EN401MP HT-CS1 Slide, Housing, Blade Products with multiple versions are listed in subsiding order with the newest version on top not indented.
EN401MP 135683-8 135773-7 Parts Breakdown
Page 7
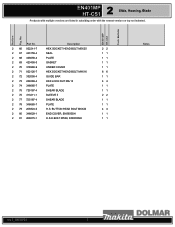
No. Part No. 2 66 922241-7 2 67 443159-4 2 68 346658-4 2 69 423458-0 2 70 318968-9 2 71 922126-7 2 72 332058-4 2 73 264089-4 2 74 346665-7 2 75 725187-4 2 76 313211-1 2 77 725187-4 2 ... PLATE GASKET UNDER COVER HEX SOCKET HEAD BOLT M4X16 GUIDE BAR HEX LOCK NUT M6-10 PLATE SHEAR BLADE SLEEVE 5 SHEAR BLADE PLATE H.S. EN401MP HT-CS1 Tech Bulletin 2 EN401MP HT-CS1 Slide, Housing, Blade Products with multiple versions are listed in subsiding order with the newest version on top not indented. BUTTON...
No. Part No. 2 66 922241-7 2 67 443159-4 2 68 346658-4 2 69 423458-0 2 70 318968-9 2 71 922126-7 2 72 332058-4 2 73 264089-4 2 74 346665-7 2 75 725187-4 2 76 313211-1 2 77 725187-4 2 ... PLATE GASKET UNDER COVER HEX SOCKET HEAD BOLT M4X16 GUIDE BAR HEX LOCK NUT M6-10 PLATE SHEAR BLADE SLEEVE 5 SHEAR BLADE PLATE H.S. EN401MP HT-CS1 Tech Bulletin 2 EN401MP HT-CS1 Slide, Housing, Blade Products with multiple versions are listed in subsiding order with the newest version on top not indented. BUTTON...