Owners Manual
Page 1
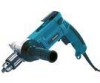
Drill 10 mm (3/8") MODEL DP3002, DP3003 13 mm (1/2") MODEL DP4000, DP4001 13 mm (1/2") MODEL DP4002, DP4003 DP3002 DP4000 DP4002 DP3003 DP4001 DP4003 DOUBLE INSULATION 003006 INSTRUCTION MANUAL WARNING: For your personal safety, READ and UNDERSTAND before using. SAVE THESE INSTRUCTIONS FOR FUTURE REFERENCE. www.makitatools.com
Drill 10 mm (3/8") MODEL DP3002, DP3003 13 mm (1/2") MODEL DP4000, DP4001 13 mm (1/2") MODEL DP4002, DP4003 DP3002 DP4000 DP4002 DP3003 DP4001 DP4003 DOUBLE INSULATION 003006 INSTRUCTION MANUAL WARNING: For your personal safety, READ and UNDERSTAND before using. SAVE THESE INSTRUCTIONS FOR FUTURE REFERENCE. www.makitatools.com
Owners Manual
Page 5
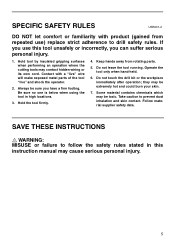
... Always be sure you can suffer serious personal injury. 1. Do not leave the tool running. If you use ) replace strict adherence to drill safety rules. Some material contains chemicals which may contact hidden wiring or its own cord. Operate the tool only when hand-held. 6. Contact... with product (gained from rotating parts. 5. Do not touch the drill bit or the workpiece immediately after operation; Follow material supplier safety data. SPECIFIC SAFETY RULES USB001-2 DO NOT let comfort or familiarity with a "...
... Always be sure you can suffer serious personal injury. 1. Do not leave the tool running. If you use ) replace strict adherence to drill safety rules. Some material contains chemicals which may contact hidden wiring or its own cord. Operate the tool only when hand-held. 6. Contact... with product (gained from rotating parts. 5. Do not touch the drill bit or the workpiece immediately after operation; Follow material supplier safety data. SPECIFIC SAFETY RULES USB001-2 DO NOT let comfort or familiarity with a "...
Owners Manual
Page 9
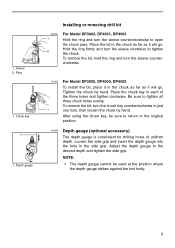
... sleeve clockwise to tighten all three chuck holes evenly. To remove the bit, turn the sleeve counterclockwise. 003053 1 For Model DP3002, DP4000, DP4002 To install the bit, place it in each of uniform depth. Loosen the side grip and insert the depth gauge into the hole in just.... Hold the ring firmly and turn the sleeve counterclockwise to the original position. 003059 Depth gauge (optional accessory) The depth gauge is convenient for drilling holes of the three holes and tighten clockwise. Be sure to tighten the chuck. 1. Chuck key 1 1. Place the chuck key in the ...
... sleeve clockwise to tighten all three chuck holes evenly. To remove the bit, turn the sleeve counterclockwise. 003053 1 For Model DP3002, DP4000, DP4002 To install the bit, place it in each of uniform depth. Loosen the side grip and insert the depth gauge into the hole in just.... Hold the ring firmly and turn the sleeve counterclockwise to the original position. 003059 Depth gauge (optional accessory) The depth gauge is convenient for drilling holes of the three holes and tighten clockwise. Be sure to tighten the chuck. 1. Chuck key 1 1. Place the chuck key in the ...

Owners Manual
Page 10
... slipping when starting or stopping the tool, since there is an initial and final reaction. Drilling in wood, the best results are iron and brass which should be drilled. Grasp the rear handle and the front grip firmly when starting a hole, make an ...8226; Pressing excessively on the tool will only serve to be drilled dry. When drilling action is properly braced before reversing. 1 2 1. Reaction 2. Reaction 10 Drilling operation Drilling in wood When drilling in metal To prevent the bit from a partially drilled hole, be braced to prevent a clockwise reaction. Place the ...
... slipping when starting or stopping the tool, since there is an initial and final reaction. Drilling in wood, the best results are iron and brass which should be drilled. Grasp the rear handle and the front grip firmly when starting a hole, make an ...8226; Pressing excessively on the tool will only serve to be drilled dry. When drilling action is properly braced before reversing. 1 2 1. Reaction 2. Reaction 10 Drilling operation Drilling in wood When drilling in metal To prevent the bit from a partially drilled hole, be braced to prevent a clockwise reaction. Place the ...
Owners Manual
Page 11
...maintenance or adjustment should be removed simply by Makita Authorized or Factory Service Centers, always using Makita replacement parts. CAUTION: • These accessories or attachments are recommended for use with your local Makita service center. • Drill bits • Chuck key • Depth ...guage 11 The use accessory or attachment for more details regarding these accessories, ask your Makita tool specified in order to perform inspection or ...
...maintenance or adjustment should be removed simply by Makita Authorized or Factory Service Centers, always using Makita replacement parts. CAUTION: • These accessories or attachments are recommended for use with your local Makita service center. • Drill bits • Chuck key • Depth ...guage 11 The use accessory or attachment for more details regarding these accessories, ask your Makita tool specified in order to perform inspection or ...

Owners Manual
Page 16
..., misused or improperly maintained: • alterations have been made to you . It is thoroughly inspected and tested before leaving the factory. MAKITA DISCLAIMS LIABILITY FOR ANY IMPLIED WARRANTIES, INCLUDING IMPLIED WARRANTIES OF "MERCHANTABILITY" AND "FITNESS FOR A SPECIFIC PURPOSE," AFTER THE ONE-YEAR TERM OF...chemicals: work in a well ventilated area, and work . If inspection shows the trouble is caused by power sanding, sawing, grinding, drilling, and other reproductive harm. Some states do not allow limitation on how often you may not apply to the tool. This Warranty ...
..., misused or improperly maintained: • alterations have been made to you . It is thoroughly inspected and tested before leaving the factory. MAKITA DISCLAIMS LIABILITY FOR ANY IMPLIED WARRANTIES, INCLUDING IMPLIED WARRANTIES OF "MERCHANTABILITY" AND "FITNESS FOR A SPECIFIC PURPOSE," AFTER THE ONE-YEAR TERM OF...chemicals: work in a well ventilated area, and work . If inspection shows the trouble is caused by power sanding, sawing, grinding, drilling, and other reproductive harm. Some states do not allow limitation on how often you may not apply to the tool. This Warranty ...
Parts Breakdown
Page 2
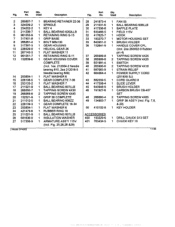
Part QtY. Fig. No. Fig. 7,8, & 20) 1 KEY HOLDER 1 DRILL CHUCK S13 SET 1 CHUCK KEY 10 used Description Part QtY. Used Description 2 285807-7 3 324039-2 4 254202-2 5 211206-7 6 961055-9 7 317401-8 8 266261-4 9 317397-3 10 226529-0 11 267143-3 12 ...-5 16 253133-2 17 211021-9 18 266050-7 19 266069-6 20 152521-9 21 211012-0 22 226139-3 23 253804-1 24 421479-6 25 211021-9 26 681636-0 27 517356-9 2 Model DP4002 1 BEARING RETAINER 22-36 1 SPINDLE 1 KEY 4 1 BALL BEARING 6202LLB 1 RETAINING RING S-15 1 GRIP BASE 1 BOLT M8x130 1 GEAR HOUSING 1 HELICAL GEAR 26 1 FLAT WASHER 11 1 RETAINING...
Part QtY. Fig. No. Fig. 7,8, & 20) 1 KEY HOLDER 1 DRILL CHUCK S13 SET 1 CHUCK KEY 10 used Description Part QtY. Used Description 2 285807-7 3 324039-2 4 254202-2 5 211206-7 6 961055-9 7 317401-8 8 266261-4 9 317397-3 10 226529-0 11 267143-3 12 ...-5 16 253133-2 17 211021-9 18 266050-7 19 266069-6 20 152521-9 21 211012-0 22 226139-3 23 253804-1 24 421479-6 25 211021-9 26 681636-0 27 517356-9 2 Model DP4002 1 BEARING RETAINER 22-36 1 SPINDLE 1 KEY 4 1 BALL BEARING 6202LLB 1 RETAINING RING S-15 1 GRIP BASE 1 BOLT M8x130 1 GEAR HOUSING 1 HELICAL GEAR 26 1 FLAT WASHER 11 1 RETAINING...


