Owners Manual
Page 1
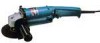
SAVE THESE INSTRUCTIONS FOR FUTURE REFERENCE. Disc Grinder 125 mm (5") MODEL 9005B 125 mm (5") MODEL 9005BZ DOUBLE INSULATION INSTRUCTION MANUAL WARNING: For your personal safety, READ and UNDERSTAND before using. www.makitatools.com
SAVE THESE INSTRUCTIONS FOR FUTURE REFERENCE. Disc Grinder 125 mm (5") MODEL 9005B 125 mm (5") MODEL 9005BZ DOUBLE INSULATION INSTRUCTION MANUAL WARNING: For your personal safety, READ and UNDERSTAND before using. www.makitatools.com
Owners Manual
Page 3
...cords are NOT eye protection. Dust mask, non-skid safety shoes, hard hat, or hearing protection must be caught in unexpected situations. 14. Use clamps or other untrained persons. Damaged cords increase the risk of electric shock if your finger on the switch or plugging in . Personal Safety ...9. Do not abuse the cord. Use safety equipment. If damaged, have the switch on another tool. 3 Keep cord away from moving parts. 11. Always wear eye protection. Store...
...cords are NOT eye protection. Dust mask, non-skid safety shoes, hard hat, or hearing protection must be caught in unexpected situations. 14. Use clamps or other untrained persons. Damaged cords increase the risk of electric shock if your finger on the switch or plugging in . Personal Safety ...9. Do not abuse the cord. Use safety equipment. If damaged, have the switch on another tool. 3 Keep cord away from moving parts. 11. Always wear eye protection. Store...
Owners Manual
Page 4
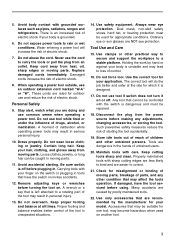
... SERVICE 23. Service or maintenance performed by unqualified personnel could result in the Maintenance section of power and overheating. When servicing a tool, use the next heavier gage. An undersized cord will cause a drop in line voltage resulting in good condition. The smaller the gage number, ...the heavier the cord. Hold tool by qualified repair personnel. If you use ) replace strict adherence to follow Maintenance instructions may contact hidden wiring or its own cord. AWG 18 16 16 14 18 16...
... SERVICE 23. Service or maintenance performed by unqualified personnel could result in the Maintenance section of power and overheating. When servicing a tool, use the next heavier gage. An undersized cord will cause a drop in line voltage resulting in good condition. The smaller the gage number, ...the heavier the cord. Hold tool by qualified repair personnel. If you use ) replace strict adherence to follow Maintenance instructions may contact hidden wiring or its own cord. AWG 18 16 16 14 18 16...
Owners Manual
Page 5
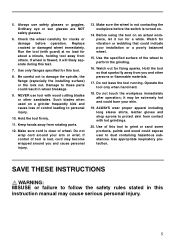
.... Make sure the wheel is not contacting the workpiece before operation. Watch out for this instruction manual may cause serious personal injury. 5 Use of the wheel to follow the safety rules stated in wheel breakage. 9. SAVE THESE INSTRUCTIONS WARNING: MISUSE or failure to perform the grinding.... 16. Run the tool (with guard) at no load for a while. Use only flanges specified for flying sparks. Keep hands away from others. Watch for cracks or damage before the switch is flawed, it run for...
.... Make sure the wheel is not contacting the workpiece before operation. Watch out for this instruction manual may cause serious personal injury. 5 Use of the wheel to follow the safety rules stated in wheel breakage. 9. SAVE THESE INSTRUCTIONS WARNING: MISUSE or failure to perform the grinding.... 16. Run the tool (with guard) at no load for a while. Use only flanges specified for flying sparks. Keep hands away from others. Watch for cracks or damage before the switch is flawed, it run for...
Owners Manual
Page 6
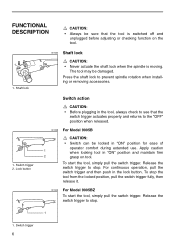
FUNCTIONAL DESCRIPTION CAUTION: • Always be damaged. Release the switch trigger to the "OFF" position when released. 001038 For Model 9005B CAUTION: • Switch can be locked in the tool, always check to see that the tool is moving. Lock button Switch action... CAUTION: • Before plugging in "ON" position for ease of operator comfort during extended use. To start the tool, simply pull the switch trigger. Switch trigger 2. To stop . 1 1. Shaft lock 001024 Shaft lock CAUTION: • ...
FUNCTIONAL DESCRIPTION CAUTION: • Always be damaged. Release the switch trigger to the "OFF" position when released. 001038 For Model 9005B CAUTION: • Switch can be locked in the tool, always check to see that the tool is moving. Lock button Switch action... CAUTION: • Before plugging in "ON" position for ease of operator comfort during extended use. To start the tool, simply pull the switch trigger. Switch trigger 2. To stop . 1 1. Shaft lock 001024 Shaft lock CAUTION: • ...

Owners Manual
Page 7
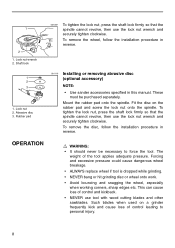
...rotate the wheel guard around 180 degrees. Depressed center grinding wheel/ Multi-disc 3. Screw 001063 Installing or removing wheel guard CAUTION: • When using a depressed center grinding wheel/Multi- 1 disc, wire wheel brush or cut-off wheel, the wheel guard 3 must be fitted on the tool... in reverse. 001074 1 2 3 1. Screw the side grip securely on tool. Wheel guard 2. Lock nut 2. Wheel can shatter during use supplied guard when depressed center grinding wheel/Multi-disc is switched off and unplugged before operation. Be sure to reduce chances of personal injury. ...
...rotate the wheel guard around 180 degrees. Depressed center grinding wheel/ Multi-disc 3. Screw 001063 Installing or removing wheel guard CAUTION: • When using a depressed center grinding wheel/Multi- 1 disc, wire wheel brush or cut-off wheel, the wheel guard 3 must be fitted on the tool... in reverse. 001074 1 2 3 1. Screw the side grip securely on tool. Wheel guard 2. Lock nut 2. Wheel can shatter during use supplied guard when depressed center grinding wheel/Multi-disc is switched off and unplugged before operation. Be sure to reduce chances of personal injury. ...
Owners Manual
Page 8
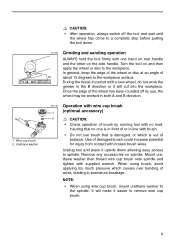
... To remove the disc, follow the installation procedure in reverse. 001110 Installing or removing abrasive disc (optional accessory) NOTE: • Use sander accessories specified in reverse. OPERATION WARNING: • It should never be purchased separately. Rubber pad 001087 To tighten the lock nut...2. This can cause loss of the tool applies adequate pressure. Abrasive disc 3. Mount the rubber pad onto the spindle. Such blades when used on the rubber pad and screw the lock nut onto the spindle. Forcing and excessive pressure could cause dangerous wheel breakage. • ALWAYS...
... To remove the disc, follow the installation procedure in reverse. 001110 Installing or removing abrasive disc (optional accessory) NOTE: • Use sander accessories specified in reverse. OPERATION WARNING: • It should never be purchased separately. Rubber pad 001087 To tighten the lock nut...2. This can cause loss of the tool applies adequate pressure. Abrasive disc 3. Mount the rubber pad onto the spindle. Such blades when used on the rubber pad and screw the lock nut onto the spindle. Forcing and excessive pressure could cause dangerous wheel breakage. • ALWAYS...
Owners Manual
Page 9
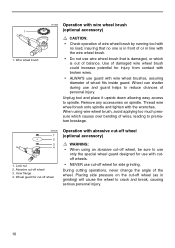
...wires, leading to the spindle. During the break-in period with a new wheel, do not work the grinder in line with brush. • Do not use , the wheel may be worked in both A and B direction. 001139 Operation with wire cup brush 1 (optional accessory) 2 CAUTION: • Check operation of...operation, always switch off by running tool with broken brush wires. Unplug tool and place it easier to the workpiece surface. NOTE: • When using brush, avoid applying too much pressure which is in front of or in the B direction or it will make it upside down . 001124 15&#...
...wires, leading to the spindle. During the break-in period with a new wheel, do not work the grinder in line with brush. • Do not use , the wheel may be worked in both A and B direction. 001139 Operation with wire cup brush 1 (optional accessory) 2 CAUTION: • Check operation of...operation, always switch off by running tool with broken brush wires. Unplug tool and place it easier to the workpiece surface. NOTE: • When using brush, avoid applying too much pressure which is in front of or in the B direction or it will make it upside down . 001124 15&#...
Owners Manual
Page 10
... injury. Inner flange 4. Placing side pressure on spindle. 1 1. Abrasive cut-off wheel for injury from contact with broken wires. • ALWAYS use wire wheel brush that is damaged, or which causes over bending of wheel fits inside guard. Remove any accessories on the cut-off wheel (as...which is in front of the wheel. Unplug tool and place it upside down allowing easy access to reduce chances of balance. Wheel guard for use with abrasive cut -off wheel 3. Wire wheel brush 001232 Operation with wire wheel brush (optional accessory) CAUTION: • Check operation of ...
... injury. Inner flange 4. Placing side pressure on spindle. 1 1. Abrasive cut-off wheel for injury from contact with broken wires. • ALWAYS use wire wheel brush that is damaged, or which causes over bending of wheel fits inside guard. Remove any accessories on the cut-off wheel (as...which is in front of the wheel. Unplug tool and place it upside down allowing easy access to reduce chances of balance. Wheel guard for use with abrasive cut -off wheel 3. Wire wheel brush 001232 Operation with wire wheel brush (optional accessory) CAUTION: • Check operation of ...
Owners Manual
Page 11
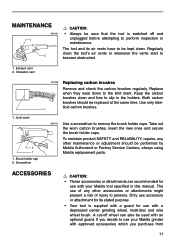
...sure that the tool is supplied with a guard for use accessory or attachment for its air vents have to slip in this manual. Both carbon brushes should be performed by Makita Authorized or Factory Service Centers, always using Makita replacement parts. The tool and its stated purpose. &#...8226; Your tool is switched off wheel can also be used with an optional guard. Inhalation vent 001145 Replacing ...
...sure that the tool is supplied with a guard for use accessory or attachment for its air vents have to slip in this manual. Both carbon brushes should be performed by Makita Authorized or Factory Service Centers, always using Makita replacement parts. The tool and its stated purpose. &#...8226; Your tool is switched off wheel can also be used with an optional guard. Inhalation vent 001145 Replacing ...
Owners Manual
Page 12
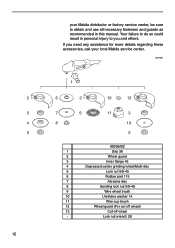
... for more details regarding these accessories, ask your Makita distributor or factory service center, be sure to obtain and use all necessary fasteners and guards as recommended in this manual. If you and others. 2 3 4 5 12 your local Makita service center. 001183 1 6 2 10 12 7 9 8 11 3 13 5 9005B/BZ 1 Grip 36 2 Wheel guard 3 Inner flange 45...
... for more details regarding these accessories, ask your Makita distributor or factory service center, be sure to obtain and use all necessary fasteners and guards as recommended in this manual. If you and others. 2 3 4 5 12 your local Makita service center. 001183 1 6 2 10 12 7 9 8 11 3 13 5 9005B/BZ 1 Grip 36 2 Wheel guard 3 Inner flange 45...
Owners Manual
Page 14
... 20-29 30-39 40-49 50-60 Over 60 BE SURE TO COMPLETE THE CUSTOMER'S PORTION OF THIS FORM AND RETAIN FOR YOUR RECORDS. Use of the product is intended for: Construction Trade Industrial Maintenance Home Maintenance Hobby Other ( ) 4. This product was purchased from: Home Center Hardware/Lumber Store Tool... Paste Paste Paste Paste DATE PURCHASED MONTH DAY YEAR MODEL NO. MAIL THIS PORTION Your answers to the following questions are : Design Features Size Price Makita Brand Repair Service Durability Power Other ( ) 5.
... 20-29 30-39 40-49 50-60 Over 60 BE SURE TO COMPLETE THE CUSTOMER'S PORTION OF THIS FORM AND RETAIN FOR YOUR RECORDS. Use of the product is intended for: Construction Trade Industrial Maintenance Home Maintenance Hobby Other ( ) 4. This product was purchased from: Home Center Hardware/Lumber Store Tool... Paste Paste Paste Paste DATE PURCHASED MONTH DAY YEAR MODEL NO. MAIL THIS PORTION Your answers to the following questions are : Design Features Size Price Makita Brand Repair Service Durability Power Other ( ) 5.

Owners Manual
Page 16
... other masonry products, and • arsenic and chromium from chemically-treated lumber. IN NO EVENT SHALL MAKITA BE LIABLE FOR ANY INDIRECT, INCIDENTAL OR CONSEQUENTIAL DAMAGES FROM THE SALE OR USE OF THE PRODUCT. THIS DISCLAIMER APPLIES BOTH DURING AND AFTER THE TERM OF THIS WARRANTY.... MAKITA LIMITED ONE YEAR WARRANTY Warranty Policy Every Makita tool is caused by defective workmanship or material, Makita will repair (or at our option, replace)...
... other masonry products, and • arsenic and chromium from chemically-treated lumber. IN NO EVENT SHALL MAKITA BE LIABLE FOR ANY INDIRECT, INCIDENTAL OR CONSEQUENTIAL DAMAGES FROM THE SALE OR USE OF THE PRODUCT. THIS DISCLAIMER APPLIES BOTH DURING AND AFTER THE TERM OF THIS WARRANTY.... MAKITA LIMITED ONE YEAR WARRANTY Warranty Policy Every Makita tool is caused by defective workmanship or material, Makita will repair (or at our option, replace)...


