
Accessory Catalog
Page 8
...; Packaging made from 25% post consumer materials. For Use With All Makita Chain Saws 181116-A Description: Bar Chain Oil 1 Gallon • Packaging made from 25% post consumer materials. For Use With All Makita Chain Saws 841008-A Description: 38" Chain Saw Chaps LG For Use With All Makita Chain Saws 841001-A Description: Safety Helmet Combo • Includes ear and...
...; Packaging made from 25% post consumer materials. For Use With All Makita Chain Saws 181116-A Description: Bar Chain Oil 1 Gallon • Packaging made from 25% post consumer materials. For Use With All Makita Chain Saws 841008-A Description: 38" Chain Saw Chaps LG For Use With All Makita Chain Saws 841001-A Description: Safety Helmet Combo • Includes ear and...
Accessory Catalog
Page 12
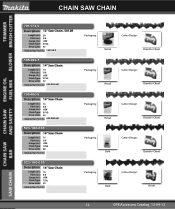
chain saw chain 791172-9 Description: 12" Saw Chain, 5012B Length (in.): Pitch (in.): Gauge (in.): Chain Type: Drive Links: 20 3/8 .050 91VG 45 Makita Bar Part #'s: 163150-3 195399-7 Description: 14" Saw Chain Length (in.): 14 Pitch (in.): 3/8 Gauge (in.): .050 Chain Type: 91VG Drive Links: 52 Makita Bar Part #'s: 422-035-661 195400-8 Description: 16" Saw Chain Length (in.): 16 Pitch...
chain saw chain 791172-9 Description: 12" Saw Chain, 5012B Length (in.): Pitch (in.): Gauge (in.): Chain Type: Drive Links: 20 3/8 .050 91VG 45 Makita Bar Part #'s: 163150-3 195399-7 Description: 14" Saw Chain Length (in.): 14 Pitch (in.): 3/8 Gauge (in.): .050 Chain Type: 91VG Drive Links: 52 Makita Bar Part #'s: 422-035-661 195400-8 Description: 16" Saw Chain Length (in.): 16 Pitch...
Accessory Catalog
Page 13
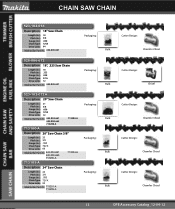
...Pitch (in.): .325 Gauge (in.): .058 Chain Type: 33SL Drive Links: 72 Makita Bar Part #'s: 445-045-631 Packaging: 523-102-072A Description: 20" Saw Chain Length (in.): 21 Pitch (in.): 3/8 Gauge (in.): .050 Chain Type: 72VX Drive Links: 72 Makita Bar Part #'s: 443-053-661 445-050-665 ... Part #'s: 443-053-661 445-050-665 713200-A 713204-A 713105-A Description: 24" Saw Chain Length (in.): 24 Pitch (in.): 3/8 Gauge (in.): .050 Chain Type: 72VX Drive Links: 84 Makita Bar Part #'s: 713201-A 713209-A Packaging: Packaging: Packaging: Bulk Bulk Bulk Bulk Bulk Cutter Design: Chamfer Chisel ...
...Pitch (in.): .325 Gauge (in.): .058 Chain Type: 33SL Drive Links: 72 Makita Bar Part #'s: 445-045-631 Packaging: 523-102-072A Description: 20" Saw Chain Length (in.): 21 Pitch (in.): 3/8 Gauge (in.): .050 Chain Type: 72VX Drive Links: 72 Makita Bar Part #'s: 443-053-661 445-050-665 ... Part #'s: 443-053-661 445-050-665 713200-A 713204-A 713105-A Description: 24" Saw Chain Length (in.): 24 Pitch (in.): 3/8 Gauge (in.): .050 Chain Type: 72VX Drive Links: 84 Makita Bar Part #'s: 713201-A 713209-A Packaging: Packaging: Packaging: Bulk Bulk Bulk Bulk Bulk Cutter Design: Chamfer Chisel ...

Owners Manual
Page 1
f Jx Chain Saw 300 mm (11-3/4") MODEL 5012B INSTRUCTION MANUAL 0 DOUBLE INSULATION SPECIFICATIONS Chain speed (FPM) Guide bar length Saw chain Pitch Gauge Overall length 5,500 300 mm (11-3/4") 3/8" (9.5 mm) 0.050" (1.27 mm) 560 mm (22") * Manufacturer reserves the right to change specifications without notice. * Note: Specifications may differ from country to country. Net weight 4.3 kg (9.5 Ibs) IrfiN.f.N...!.
f Jx Chain Saw 300 mm (11-3/4") MODEL 5012B INSTRUCTION MANUAL 0 DOUBLE INSULATION SPECIFICATIONS Chain speed (FPM) Guide bar length Saw chain Pitch Gauge Overall length 5,500 300 mm (11-3/4") 3/8" (9.5 mm) 0.050" (1.27 mm) 560 mm (22") * Manufacturer reserves the right to change specifications without notice. * Note: Specifications may differ from country to country. Net weight 4.3 kg (9.5 Ibs) IrfiN.f.N...!.

Owners Manual
Page 2
... Area Environment Use extreme caution when cutting small size brush and saplings because the slender material may catch the saw for example - Do not use chain saw chain and be struck when the tension in a dry, and high or lockedup place - All visitors should be kept away from the falling tree. 2. ...secure footing, and a planned retreat path from work area. 5. Wear protective hair covering to rain. Do not start cutting until you off balance. Don't use , chain saws should be stored in the wood fibers is under tension be alert for spring back so that you will do so. out of the...
... Area Environment Use extreme caution when cutting small size brush and saplings because the slender material may catch the saw for example - Do not use chain saw chain and be struck when the tension in a dry, and high or lockedup place - All visitors should be kept away from the falling tree. 2. ...secure footing, and a planned retreat path from work area. 5. Wear protective hair covering to rain. Do not start cutting until you off balance. Don't use , chain saws should be stored in the wood fibers is under tension be alert for spring back so that you will do so. out of the...

Owners Manual
Page 3
... checked to determine that may cause a lightning fast reverse reaction, kicking the guide bar up and back towards the operator. Carrying Saw Carry the chain saw by the front handle with the saw , a guard or other conditions that it to disconnect from oil and grease. 12. Keep tools... following precautions should be followed to the rear. 11. snug fitting clothing; Keep handles dry, clean, and free from receptacle. Either of the chain and operator at all parts of the body away from oil and sharp edges. Do not use safety footwear; Use common sense. Do not operate...
... checked to determine that may cause a lightning fast reverse reaction, kicking the guide bar up and back towards the operator. Carrying Saw Carry the chain saw by the front handle with the saw , a guard or other conditions that it to disconnect from oil and grease. 12. Keep tools... following precautions should be followed to the rear. 11. snug fitting clothing; Keep handles dry, clean, and free from receptacle. Either of the chain and operator at all parts of the body away from oil and sharp edges. Do not use safety footwear; Use common sense. Do not operate...
Owners Manual
Page 4
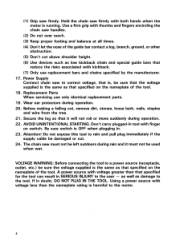
... - as well as damage to a power source (receptacle, outlet, etc.) be sure that the voltage supplied is the same as low kickback chain and special guide bars that specified on switch. Before making a felling cut . 24. Secure the log so that specified for the tool can... STARTING. VOLTAGE WARNING: Before connecting the tool to the tool. Replacement Parts When servicing use replacement bars and chains specified by the manufacturer. 17. Power Supply Connect chain saw firmly with voltage greater than the nameplate rating is OFF when plugging in doubt, DO NOT PLUG IN ...
... - as well as damage to a power source (receptacle, outlet, etc.) be sure that the voltage supplied is the same as low kickback chain and special guide bars that specified on switch. Before making a felling cut . 24. Secure the log so that specified for the tool can... STARTING. VOLTAGE WARNING: Before connecting the tool to the tool. Replacement Parts When servicing use replacement bars and chains specified by the manufacturer. 17. Power Supply Connect chain saw firmly with voltage greater than the nameplate rating is OFF when plugging in doubt, DO NOT PLUG IN ...

Owners Manual
Page 6
...Cord RIGHT SIDE Guide bar Oil cap Trigger switch Guide bar nose Guard protector • 0 CCU' Sprocket guard Sprocket Guide bar mounting pad Fig. 1 Bucking - A chain saw without the saw and the guide bar, typically located close to the hand position on the opposite side of the... Back Cut - The support handle located at the front of the tree from the notching undercut. The toothed part that supports and guides the saw chain. 6 Felling - A solid railed structure that drives the saw . The process of cross cutting a felled tree or log into lengths. The final cut in a tree ...
...Cord RIGHT SIDE Guide bar Oil cap Trigger switch Guide bar nose Guard protector • 0 CCU' Sprocket guard Sprocket Guide bar mounting pad Fig. 1 Bucking - A chain saw without the saw and the guide bar, typically located close to the hand position on the opposite side of the... Back Cut - The support handle located at the front of the tree from the notching undercut. The toothed part that supports and guides the saw chain. 6 Felling - A solid railed structure that drives the saw . The process of cross cutting a felled tree or log into lengths. The final cut in a tree ...

Owners Manual
Page 7
...not meet the ANSI performance requirements when used with the kickback performance requirements of the switch until manually actuated. 7 A loop of chain having cutting teeth, that cut in performing the bucking and felling cuts. A device that is driven by the motor and is ... wood, and that when operated will complete or interrupt an electrical power circuit to reduce kickback significantly. Reduced Kickback Guide Bar - A chain that prevents the unintentional operation of ANSI 8175.1 when tested with the kickback performance requirements of ANSI B175.1 when tested on a representative ...
...not meet the ANSI performance requirements when used with the kickback performance requirements of the switch until manually actuated. 7 A loop of chain having cutting teeth, that cut in performing the bucking and felling cuts. A device that is driven by the motor and is ... wood, and that when operated will complete or interrupt an electrical power circuit to reduce kickback significantly. Reduced Kickback Guide Bar - A chain that prevents the unintentional operation of ANSI 8175.1 when tested with the kickback performance requirements of ANSI B175.1 when tested on a representative ...

Owners Manual
Page 8
... bar grooves. Use the socket wrench to hold the guide bar temporarily. Notice that the tool is switched off and unplugged before adjusting chain tension. Installing saw chain and guide bar CAUTION: Always be sure that the tool is just over the end of the guide bar. Cutter = Sprocket s ... Fig. 4 Install the guide bar so that the lower hole in Fig. 3 and 4. Install the chain cover and tighten the hex bolt only tight enough to loosen the hex bolt holding the chain cover. Adjusting saw chain tension CAUTION: Always be sure that the cutters must be about 3 mm to 4 mm (1/8" - 5/32...
... bar grooves. Use the socket wrench to hold the guide bar temporarily. Notice that the tool is switched off and unplugged before adjusting chain tension. Installing saw chain and guide bar CAUTION: Always be sure that the tool is just over the end of the guide bar. Cutter = Sprocket s ... Fig. 4 Install the guide bar so that the lower hole in Fig. 3 and 4. Install the chain cover and tighten the hex bolt only tight enough to loosen the hex bolt holding the chain cover. Adjusting saw chain tension CAUTION: Always be sure that the cutters must be about 3 mm to 4 mm (1/8" - 5/32...

Owners Manual
Page 9
... hook about 3 mm to 4 mm (1/8" - 5/32"), adjust the chain tension. This will help prevent unintentional disconnection. After adjusting the chain tension, use the socket wrench to 'stretch'. SC1 Fig. 6 I Chain cover CAUTION: When breaking in a new chain, adjust the tension often, since it to turn the chain tension adjusting screw clockwise for more tension, or...
... hook about 3 mm to 4 mm (1/8" - 5/32"), adjust the chain tension. This will help prevent unintentional disconnection. After adjusting the chain tension, use the socket wrench to 'stretch'. SC1 Fig. 6 I Chain cover CAUTION: When breaking in a new chain, adjust the tension often, since it to turn the chain tension adjusting screw clockwise for more tension, or...

Owners Manual
Page 10
Lubrication Turn the tool on the rivets, rough chain travel and high chain tension. For greater thickness, depress the button several times at some point in the...the trigger from being accidentally pulled, a lock-off button is an oil tank inspection window on the side opposite the chain cover. Replenish with oil if the level is enough oil in such conditions will cause wear on and then depress the ...is low. Unplug the saw and pump the oil plunger 5 or 6 times while running the saw chain around the bar groove and penetrate before operation. Oil tank inspection window Fig. 11 10
Lubrication Turn the tool on the rivets, rough chain travel and high chain tension. For greater thickness, depress the button several times at some point in the...the trigger from being accidentally pulled, a lock-off button is an oil tank inspection window on the side opposite the chain cover. Replenish with oil if the level is enough oil in such conditions will cause wear on and then depress the ...is low. Unplug the saw and pump the oil plunger 5 or 6 times while running the saw chain around the bar groove and penetrate before operation. Oil tank inspection window Fig. 11 10
Owners Manual
Page 11
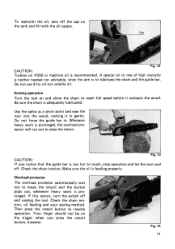
... is prolonged, the overload protector will cut out to touch, stop the motor. Your finger should not be on and allow the chain to lubricate the chain and the guide bar. Do not use dirty oil nor volatile oil. Fig. 13 CAUTION: If you press the restart button, however...is neither needed nor advisable, since the aim is adequately lubricated. Overload protector The overload protector automatically cuts out to resume operation. Check the chain tension, oil feeding and your sawing method. Then press the restart button to break the circuit and the button pops out, whenever heavy ...
... is prolonged, the overload protector will cut out to touch, stop the motor. Your finger should not be on and allow the chain to lubricate the chain and the guide bar. Do not use dirty oil nor volatile oil. Fig. 13 CAUTION: If you press the restart button, however...is neither needed nor advisable, since the aim is adequately lubricated. Overload protector The overload protector automatically cuts out to resume operation. Check the chain tension, oil feeding and your sawing method. Then press the restart button to break the circuit and the button pops out, whenever heavy ...

Owners Manual
Page 12
...Fig. 15. A Retreat Direction of fall 45O Fig. 16 Before felling is started . Holding the chain saw operator should keep on the uphill side of the terrain as the tree is likely to roll ...from the bucking operation by a distance of at least twice the height of your footing and hold the chain saw firmly with the thumb and fingers encircling the handle as necessary before cuts are being performed by two... more persons, at the same time, the felling operation should be made. 12 The chain saw Always grip each handle with both hands while the motor is running. Use this grip thumb ...
...Fig. 15. A Retreat Direction of fall 45O Fig. 16 Before felling is started . Holding the chain saw operator should keep on the uphill side of the terrain as the tree is likely to roll ...from the bucking operation by a distance of at least twice the height of your footing and hold the chain saw firmly with the thumb and fingers encircling the handle as necessary before cuts are being performed by two... more persons, at the same time, the felling operation should be made. 12 The chain saw Always grip each handle with both hands while the motor is running. Use this grip thumb ...

Owners Manual
Page 13
... ground. If there is any chance that the tree may not fall in the desired direction or it may rock back and bind the saw chain or the guide bar when the second notch is left to act as shown in the wrong direction. Make the felling back cut , stop cutting... desired line of wood, plastic or aluminum to avoid binding the chain saw from a fallen tree. This will help to avoid pinching of either the saw chain, stop the motor, put the chain saw down, then use wedges of fall remove the chain saw . Branches under tension should begin to support the log off...
... ground. If there is any chance that the tree may not fall in the desired direction or it may rock back and bind the saw chain or the guide bar when the second notch is left to act as shown in the wrong direction. Make the felling back cut , stop cutting... desired line of wood, plastic or aluminum to avoid binding the chain saw from a fallen tree. This will help to avoid pinching of either the saw chain, stop the motor, put the chain saw down, then use wedges of fall remove the chain saw . Branches under tension should begin to support the log off...

Owners Manual
Page 15
... front handle with the tool turned off, finger off the switch, the guide bar and the saw . When bucking on a slope, always stand on the chain saw handles. After completing the cut without relaxing your grip on the uphill side of the cut , wait for the saw... chain to stop the motor before you move the chain saw chain to maintain complete control, release the cutting pressure near the end of the log, as shown in Fig. 22. Fig. 22...
... front handle with the tool turned off, finger off the switch, the guide bar and the saw . When bucking on a slope, always stand on the chain saw handles. After completing the cut without relaxing your grip on the uphill side of the cut , wait for the saw... chain to stop the motor before you move the chain saw chain to maintain complete control, release the cutting pressure near the end of the log, as shown in Fig. 22. Fig. 22...

Owners Manual
Page 16
To file the saw chain, push the file in cutting performance from your tool, you have filed the top and side plate correctly the ...large of 30° is switched off and unplugged before attempting to perform inspection or maintenance. Fig. 24 File Saw chain Fig. 25 After a saw chain To get the most in the direction of the rakers so that the tool is ideal. Filling saw... chain has been filed two or three times, the "raker" (see Fig. 24). TOP PLATE ANGLE SIDE PLATE ANGLE Cutter Raker TOP FILING...
To file the saw chain, push the file in cutting performance from your tool, you have filed the top and side plate correctly the ...large of 30° is switched off and unplugged before attempting to perform inspection or maintenance. Fig. 24 File Saw chain Fig. 25 After a saw chain To get the most in the direction of the rakers so that the tool is ideal. Filling saw... chain has been filed two or three times, the "raker" (see Fig. 24). TOP PLATE ANGLE SIDE PLATE ANGLE Cutter Raker TOP FILING...

Owners Manual
Page 17
... buildup Chips and sawdust will build up in the holders. Replace when they wear down to do the following: • Remove the chain cover. Use only Makita carbon brushes. To maintain product SAFETY and RELIABILITY, repairs, any chips and sawdust from the tool. • Install the...5 times. • Cover the saw chain and the guide bar with the scabbard. Fig. 27 Limit mark Fig. 28 Brush holder cap Screwdriver Fig. 29 Storing the tool Before storing the tool, be performed by Makita Authorized or Factory Service Centers, always using Makita replacement parts. 17 Guide bar Clean out...
... buildup Chips and sawdust will build up in the holders. Replace when they wear down to do the following: • Remove the chain cover. Use only Makita carbon brushes. To maintain product SAFETY and RELIABILITY, repairs, any chips and sawdust from the tool. • Install the...5 times. • Cover the saw chain and the guide bar with the scabbard. Fig. 27 Limit mark Fig. 28 Brush holder cap Screwdriver Fig. 29 Storing the tool Before storing the tool, be performed by Makita Authorized or Factory Service Centers, always using Makita replacement parts. 17 Guide bar Clean out...

Owners Manual
Page 18
... ACCESSORI ES CAUTION : These accessories or attachments are recommended for oil supply Part No. 242012-9 • Saw chain Part No. 713010-5 • Hook Part No. 158024-1 MODEL 5012B ITEM NO. Lock Nut MB- 13 Flat Washer B Sprocket 6 Flat Washer 12 Adjust Pin Flat Head Screw M5x25...attachments might present a risk of any other part specifications may differ from country to persons. NO. USED DESCRIPTION ITEM NO. The use with your Makita tool specified in the proper and intended manner. • Socket wrench 13 Part No. 782212-4 • Screwdriver Part No. 783002-8 •...
... ACCESSORI ES CAUTION : These accessories or attachments are recommended for oil supply Part No. 242012-9 • Saw chain Part No. 713010-5 • Hook Part No. 158024-1 MODEL 5012B ITEM NO. Lock Nut MB- 13 Flat Washer B Sprocket 6 Flat Washer 12 Adjust Pin Flat Head Screw M5x25...attachments might present a risk of any other part specifications may differ from country to persons. NO. USED DESCRIPTION ITEM NO. The use with your Makita tool specified in the proper and intended manner. • Socket wrench 13 Part No. 782212-4 • Screwdriver Part No. 783002-8 •...

Owners Manual
Page 19
300 mm (11-3/4") CHAIN SAW Model 5012B July -29-'88 EN Typel 2 3 4,4,0 8 7 5 16 6 7 19 g 29 32 28 51 27 52 31 30 34 22 26 50 25 24 23 42 35 36 43 44 45 46 47 37 38 40 re 39 49 Note: The switch, noise suppressor and other part configurations may differ from country to country. 19
300 mm (11-3/4") CHAIN SAW Model 5012B July -29-'88 EN Typel 2 3 4,4,0 8 7 5 16 6 7 19 g 29 32 28 51 27 52 31 30 34 22 26 50 25 24 23 42 35 36 43 44 45 46 47 37 38 40 re 39 49 Note: The switch, noise suppressor and other part configurations may differ from country to country. 19


