
User manual, English (US)
Page 5
...with A/V Jacks 10 Connecting to a Cable Box (Optional 11 Connecting to the fullest extent of... (Daylight Saving Time 21 V-chip Options 22 Closed Caption Options 25 Auto Power Down 26 Viewing Analog TV 27 Others Troubleshooting 30 Specifications 31 Warranty Back Cover © 2010 Funai Electric Co., Ltd.... 10 Connecting to a TV with the design is strictly prohibited. Funai shall aggressively enforce its intellectual property rights to Other Devices 12 Initial Setup (Setup Wizard) Initial Setup 13 Basic Operation Selecting Channels on Digital Broadcasting 7 Accessories 7 ...
...with A/V Jacks 10 Connecting to a Cable Box (Optional 11 Connecting to the fullest extent of... (Daylight Saving Time 21 V-chip Options 22 Closed Caption Options 25 Auto Power Down 26 Viewing Analog TV 27 Others Troubleshooting 30 Specifications 31 Warranty Back Cover © 2010 Funai Electric Co., Ltd.... 10 Connecting to a TV with the design is strictly prohibited. Funai shall aggressively enforce its intellectual property rights to Other Devices 12 Initial Setup (Setup Wizard) Initial Setup 13 Basic Operation Selecting Channels on Digital Broadcasting 7 Accessories 7 ...

User manual, English (US)
Page 13
...11) External input channel Canal de entrada externo Ch3 - Puede alternar entre el c3 y 4 manteniendo presionado [SETUP] durante 3 segundos. Follow the directions shown on your TV. (Refer to activate the STB. Appropriate Viewing Channel Configuración apropiada de el Canal de Visión ...Viewing Connection STB Cable Box DVD or VCR A (p.10) "CH3" - - D (p.12) "CH3" - External input channel Canal de entrada externo • If your TV's manual.) Encienda el TV, y seleccione el canal que quiera ver (canal 3 o uno...
...11) External input channel Canal de entrada externo Ch3 - Puede alternar entre el c3 y 4 manteniendo presionado [SETUP] durante 3 segundos. Follow the directions shown on your TV. (Refer to activate the STB. Appropriate Viewing Channel Configuración apropiada de el Canal de Visión ...Viewing Connection STB Cable Box DVD or VCR A (p.10) "CH3" - - D (p.12) "CH3" - External input channel Canal de entrada externo • If your TV's manual.) Encienda el TV, y seleccione el canal que quiera ver (canal 3 o uno...

User manual, English (US)
Page 14
...B], then press [OK]. EXIT AUTOSCAN 12% EXIT Channel Found • STB starts receiving available digital channels and stores them in November. 4 Select the language using the standard audio cable to connect the STB to your TV. (Connection A or D on your time zone using [ K / L], then press [OK...the connection for Daylight Saving Time (D.S.T) using [ s / B], then press [OK]. Select display mode. To cancel during scanning: Press [SETUP] or [OK]. This SETUP WIZARD will help you are using the RF cable to connect the STB to complete. mediante [K / L] y luego presione [OK]. This...
...B], then press [OK]. EXIT AUTOSCAN 12% EXIT Channel Found • STB starts receiving available digital channels and stores them in November. 4 Select the language using the standard audio cable to connect the STB to your TV. (Connection A or D on your time zone using [ K / L], then press [OK...the connection for Daylight Saving Time (D.S.T) using [ s / B], then press [OK]. Select display mode. To cancel during scanning: Press [SETUP] or [OK]. This SETUP WIZARD will help you are using the RF cable to connect the STB to complete. mediante [K / L] y luego presione [OK]. This...

User manual, English (US)
Page 18
...OUT 12% EXIT Channel Found 3 Select "ADD/ DELETE" using [ K / L], then press [OK]. See "Adding/Deleting Channels" on the TV screen: Verify the antenna connection, then scan again. When "NO SIGNAL" appears on this page for details. Adding/Deleting Channels Add or delete ... deleted unless you want to complete. CAUTION: • If autoscan is now scanning. 1 Press [SETUP]. 2 Select "CHANNEL" using [ K / L], then press [OK]. • STB starts receiving available digital channels and stores them in a channel map. CHANNEL EXIT CHANNEL TIME DETAIL INITIAL ADD/DELETE ANTENNA AUTOSCAN...
...OUT 12% EXIT Channel Found 3 Select "ADD/ DELETE" using [ K / L], then press [OK]. See "Adding/Deleting Channels" on the TV screen: Verify the antenna connection, then scan again. When "NO SIGNAL" appears on this page for details. Adding/Deleting Channels Add or delete ... deleted unless you want to complete. CAUTION: • If autoscan is now scanning. 1 Press [SETUP]. 2 Select "CHANNEL" using [ K / L], then press [OK]. • STB starts receiving available digital channels and stores them in a channel map. CHANNEL EXIT CHANNEL TIME DETAIL INITIAL ADD/DELETE ANTENNA AUTOSCAN...
User manual, English (US)
Page 19
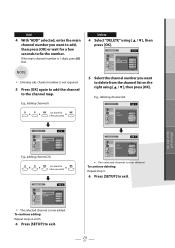
...• The selected channel is not required. 5 Press [OK] again to add the channel to exit. To continue deleting: Repeat step 5. 6 Press [SETUP] to the channel map. Advanced Operation 19 EN Delete 4 Select "DELETE" using [ K / L], then press [OK]. To continue adding: Repeat steps 4 and 5. 6...DELETE 26.1 10 20 26 58 ADD/DELETE 58.1 EXIT ADD CHANNEL 10 DELETE 20 TIME 58 DETAIL 60 INITIAL • The selected channel is 1 digit, press [0] first. E.g., deleting channel 26. If the main channel number is now deleted. Add 4 With "ADD" selected, enter the main channel...
...• The selected channel is not required. 5 Press [OK] again to add the channel to exit. To continue deleting: Repeat step 5. 6 Press [SETUP] to the channel map. Advanced Operation 19 EN Delete 4 Select "DELETE" using [ K / L], then press [OK]. To continue adding: Repeat steps 4 and 5. 6...DELETE 26.1 10 20 26 58 ADD/DELETE 58.1 EXIT ADD CHANNEL 10 DELETE 20 TIME 58 DETAIL 60 INITIAL • The selected channel is 1 digit, press [0] first. E.g., deleting channel 26. If the main channel number is now deleted. Add 4 With "ADD" selected, enter the main channel...

User manual, English (US)
Page 20
... get the best reception. Advanced Operation Adjusting Antenna Selecting Display Mode You can adjust the aspect ratio of the digital TV program to fit your 4:3 TV monitor. ANTENNA EXIT CHANNEL TIME DETAIL INITIAL WEAK NOW 10 BACK 10.1 STRONG 50 PEAK Peak indicator: Indicates ... / L], then press [OK]. * Descriptions of each channel. 1 Select a channel to the on the next page. Select display mode. Display Mode 1 Press [SETUP]. 2 Select "DETAIL" using [ K / L], then press [OK]. CHANNEL EXIT CHANNEL TIME DETAIL INITIAL ADD/DELETE ANTENNA ADD/DELETE RF OUT • STB starts...
... get the best reception. Advanced Operation Adjusting Antenna Selecting Display Mode You can adjust the aspect ratio of the digital TV program to fit your 4:3 TV monitor. ANTENNA EXIT CHANNEL TIME DETAIL INITIAL WEAK NOW 10 BACK 10.1 STRONG 50 PEAK Peak indicator: Indicates ... / L], then press [OK]. * Descriptions of each channel. 1 Select a channel to the on the next page. Select display mode. Display Mode 1 Press [SETUP]. 2 Select "DETAIL" using [ K / L], then press [OK]. CHANNEL EXIT CHANNEL TIME DETAIL INITIAL ADD/DELETE ANTENNA ADD/DELETE RF OUT • STB starts...

User manual, English (US)
Page 21
FULL 16:9 image is left in LETTER BOX mode for a long period of the EPG and the Channel banner function. 1 Press [SETUP]. 2 Select "TIME" using [ K / L ], then press [OK]. CAUTION: If the TV is squeezed into the 4:3 TV screen. TIME EXIT CHANNEL TIME TIME ZONE D.S.T DETAIL INITIAL EASTERN OFF 4 .... ATLANTIC EASTERN CENTRAL MOUNTAIN PACIFIC ALASKA HAWAII 5 Press [SETUP] to make use of time, the black bars may cause a permanent burnin effect. ZOOM Displays the 16:9 image with the top and the bottom of the TV screen. Select Time Zone. Black bars appear on Display ...
FULL 16:9 image is left in LETTER BOX mode for a long period of the EPG and the Channel banner function. 1 Press [SETUP]. 2 Select "TIME" using [ K / L ], then press [OK]. CAUTION: If the TV is squeezed into the 4:3 TV screen. TIME EXIT CHANNEL TIME TIME ZONE D.S.T DETAIL INITIAL EASTERN OFF 4 .... ATLANTIC EASTERN CENTRAL MOUNTAIN PACIFIC ALASKA HAWAII 5 Press [SETUP] to make use of time, the black bars may cause a permanent burnin effect. ZOOM Displays the 16:9 image with the top and the bottom of the TV screen. Select Time Zone. Black bars appear on Display ...
User manual, English (US)
Page 22
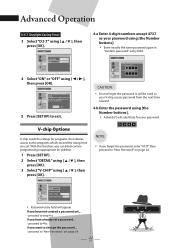
...EN V-chip Options V-chip reads the ratings for children. 1 Press [SETUP]. 2 Select "DETAIL" using [ K / L ], then press [OK]. 3 Select "V-CHIP" using [ K / L ], then press [OK]. entry field. TIME 4-a Enter 4-digit numbers except 4737 as your password. It will be used as your ... the password using [the Number buttons]. • Enter exactly the same password again in November. proceed to 4-b. DETAIL INITIAL ON OFF 5 Press [SETUP] to change the password... - EXIT CHANNEL TIME TIME ZONE D.S.T DETAIL INITIAL EASTERN ON 4 Select "ON" or "OFF" using [ K / ...
...EN V-chip Options V-chip reads the ratings for children. 1 Press [SETUP]. 2 Select "DETAIL" using [ K / L ], then press [OK]. 3 Select "V-CHIP" using [ K / L ], then press [OK]. entry field. TIME 4-a Enter 4-digit numbers except 4737 as your password. It will be used as your ... the password using [the Number buttons]. • Enter exactly the same password again in November. proceed to 4-b. DETAIL INITIAL ON OFF 5 Press [SETUP] to change the password... - EXIT CHANNEL TIME TIME ZONE D.S.T DETAIL INITIAL EASTERN ON 4 Select "ON" or "OFF" using [ K / ...

User manual, English (US)
Page 24
..., the higher ratings will turn to block specific elements of programming. Confirm password. 7 Press [SETUP] to exit. V-CHIP EXIT CHANNEL TIME DETAIL INITIAL Set TV rating. TV-MA TV-14 TV-PG TV-G TV-Y7 TV-Y None FV V S L D Sub Rating Description FV Fantasy Violence V Violence S Sexual Situation... view automatically. V-CHIP EXIT CHANNEL TIME DETAIL INITIAL MPAA RATING TV RATING CANADIAN ENGLISH RATING CANADIAN FRENCH RATING DOWNLOADABLE RATING CLEAR DOWNLOADABLE RATING NEW PASSWORD 6 Enter the new 4-digit password using [the Number buttons]. • Enter exactly the...
..., the higher ratings will turn to block specific elements of programming. Confirm password. 7 Press [SETUP] to exit. V-CHIP EXIT CHANNEL TIME DETAIL INITIAL Set TV rating. TV-MA TV-14 TV-PG TV-G TV-Y7 TV-Y None FV V S L D Sub Rating Description FV Fantasy Violence V Violence S Sexual Situation... view automatically. V-CHIP EXIT CHANNEL TIME DETAIL INITIAL MPAA RATING TV RATING CANADIAN ENGLISH RATING CANADIAN FRENCH RATING DOWNLOADABLE RATING CLEAR DOWNLOADABLE RATING NEW PASSWORD 6 Enter the new 4-digit password using [the Number buttons]. • Enter exactly the...

User manual, English (US)
Page 25
... the desired closed captions called DTV CC. CLOSED CAPTION EXIT CHANNEL TIME DETAIL DTV CC CC STYLE CC STYLE EDIT OFF AUTO INITIAL DTV CC Digital TV has its own closed caption using [ K / L ], then press [OK]. EEVVEERRYYOONNEE Edge (Edge Color and Edge Type) Font (Font Style, Font ... select the desired setting and press [OK]. the original CC style set to change the settings for DTV CC. 1 Press [SETUP]. 2 Select "DETAIL" using [ K / L ], then press [OK]. 3 Select "CLOSED CAPTION" using [ K / L ], then press [OK]. Choose "SERVICE1" under normal circumstances. Closed Caption ...
... the desired closed captions called DTV CC. CLOSED CAPTION EXIT CHANNEL TIME DETAIL DTV CC CC STYLE CC STYLE EDIT OFF AUTO INITIAL DTV CC Digital TV has its own closed caption using [ K / L ], then press [OK]. EEVVEERRYYOONNEE Edge (Edge Color and Edge Type) Font (Font Style, Font ... select the desired setting and press [OK]. the original CC style set to change the settings for DTV CC. 1 Press [SETUP]. 2 Select "DETAIL" using [ K / L ], then press [OK]. 3 Select "CLOSED CAPTION" using [ K / L ], then press [OK]. Choose "SERVICE1" under normal circumstances. Closed Caption ...
User manual, English (US)
Page 26
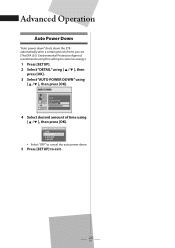
... amount of time you set. (The EPA (U.S. Advanced Operation Auto Power Down "Auto power down" shuts down . 5 Press [SETUP] to exit . 26 EN Environmental Protection Agency) recommends using this setting to conserve energy.) 1 Press [SETUP]. 2 Select "DETAIL" using [ K / L ], then press [OK]. 3 Select "AUTO POWER DOWN" using [ K / L ], then press [OK]. Select AUTO POWER...
... amount of time you set. (The EPA (U.S. Advanced Operation Auto Power Down "Auto power down" shuts down . 5 Press [SETUP] to exit . 26 EN Environmental Protection Agency) recommends using this setting to conserve energy.) 1 Press [SETUP]. 2 Select "DETAIL" using [ K / L ], then press [OK]. 3 Select "AUTO POWER DOWN" using [ K / L ], then press [OK]. Select AUTO POWER...

User manual, English (US)
Page 27
..." on your TV. Usted podrá ver TV digital en el c3 de su TV. 4 Select desired channel on your TV. EN Usted podrá ver TV analógica en su canal de TV. Viewing Analog TV Viendo TV Analógica Method 1 Método 1 You can switch "RF THROUGH" to "CH3" by switching "RF OUT" setting. Holding [SETUP] down...
..." on your TV. Usted podrá ver TV digital en el c3 de su TV. 4 Select desired channel on your TV. EN Usted podrá ver TV analógica en su canal de TV. Viewing Analog TV Viendo TV Analógica Method 1 Método 1 You can switch "RF THROUGH" to "CH3" by switching "RF OUT" setting. Holding [SETUP] down...

User manual, English (US)
Page 30
... 13.) Refer to your TV's manual for a possible cause of the start-up process and is wrong Low volume No reception When you forget the password, refer to complete autoscan in "SETUP WIZARD" or in "SETUP" menu. When autoscan is set correctly. ( Page 21.) • Sound volume differs depending .... • The selected channel does not exist at step 5 in the "Initial Setup (Setup Wizard)". ( Page 14.) • Make sure to "New Password". ( Page 24.) • Change the channel on your TV. • Turn the TV off, and then on picture No EPG or the provided information is not a malfunction...
... 13.) Refer to your TV's manual for a possible cause of the start-up process and is wrong Low volume No reception When you forget the password, refer to complete autoscan in "SETUP WIZARD" or in "SETUP" menu. When autoscan is set correctly. ( Page 21.) • Sound volume differs depending .... • The selected channel does not exist at step 5 in the "Initial Setup (Setup Wizard)". ( Page 14.) • Make sure to "New Password". ( Page 24.) • Change the channel on your TV. • Turn the TV off, and then on picture No EPG or the provided information is not a malfunction...


