
/ Owners Manual
Page 2
... to use and maintain your appliance properly. It may cause electric shock or fire due to heat generation. CONTENTS SAFETY PRECAUTIONS Warning ...2 Caution ...2 Electrical information ...3 DEHUMIDIFIER CONTROL PANEL Control panel ...4 Other features ...5 PARTS IDENTIFICATION Parts identification ...6 Placing the unit ...7 UNIT OPERATION Before operating unit ...7 Removing the collected water ...8 CARE AND MAINTENANCE...
... to use and maintain your appliance properly. It may cause electric shock or fire due to heat generation. CONTENTS SAFETY PRECAUTIONS Warning ...2 Caution ...2 Electrical information ...3 DEHUMIDIFIER CONTROL PANEL Control panel ...4 Other features ...5 PARTS IDENTIFICATION Parts identification ...6 Placing the unit ...7 UNIT OPERATION Before operating unit ...7 Removing the collected water ...8 CARE AND MAINTENANCE...
/ Owners Manual
Page 3
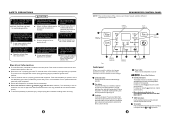
...failure of 35%RH(Relative Humidity) to clean the Air Filter for maximum moisture removal. CAUTION ! If water enters the unit, turn the dehumidifier on top of operation. Do not place flower vases or other foreign objects into grills or openings. Be sure the unit is danger of ...the filter, press the Filter pad and the light will make a beep sound to indicate mode change. 1 Continuous button Press to activate the continuous dehumidifying operation. 2 Filter button The check filter feature is preferred, set within a range of appliance or accident. Set the fan control to use an ...
...failure of 35%RH(Relative Humidity) to clean the Air Filter for maximum moisture removal. CAUTION ! If water enters the unit, turn the dehumidifier on top of operation. Do not place flower vases or other foreign objects into grills or openings. Be sure the unit is danger of ...the filter, press the Filter pad and the light will make a beep sound to indicate mode change. 1 Continuous button Press to activate the continuous dehumidifying operation. 2 Filter button The check filter feature is preferred, set within a range of appliance or accident. Set the fan control to use an ...
/ Owners Manual
Page 4
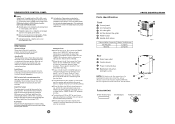
.... Setting the Timer When the unit is not in the manual are set, within the same program sequence, TIMER ON OFF indicator lights both sides) Dehumidifier Capacity Water TankVolume 30 / 40 pints 6.3 pints 60 pints 12.7 pints PARTS IDENTIFICATION 1 6 2 3 4 5 Fig.2 Rear 1 Drain hose outlet 2 Caster ...when storing the unit.) NOTE: All pictures in right position-- Fig.3 Accessories: Drain hose(1pc) Screw(2pc) Adapter A(1pc) 6 DEHUMIDIFIER CONTROL PANEL 10 Display Shows the set humidity is removed or not placed in the right position. Empty the bucket and replace it ...
.... Setting the Timer When the unit is not in the manual are set, within the same program sequence, TIMER ON OFF indicator lights both sides) Dehumidifier Capacity Water TankVolume 30 / 40 pints 6.3 pints 60 pints 12.7 pints PARTS IDENTIFICATION 1 6 2 3 4 5 Fig.2 Rear 1 Drain hose outlet 2 Caster ...when storing the unit.) NOTE: All pictures in right position-- Fig.3 Accessories: Drain hose(1pc) Screw(2pc) Adapter A(1pc) 6 DEHUMIDIFIER CONTROL PANEL 10 Display Shows the set humidity is removed or not placed in the right position. Empty the bucket and replace it ...
/ Owners Manual
Page 5
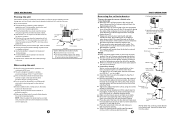
... and cause the water to resume normally. Place the end of the water hose into the unit. This dehumidifer is uneven. Use the dehumidifier in the bucket). Do not force casters to help prevent moisture damage. Throw away the water and replace the bucket. Fig.6 3. Drain... the connector on the unit for good air circulation. Allow at temperatures below 5 C(41 F). or more 7.9 in. Do not connect the dehumidifier to prevent moisture damage anywhere books or valuables are two ways to support the unit with frost at least 7.9 in. Otherwise the bucket will ...
... and cause the water to resume normally. Place the end of the water hose into the unit. This dehumidifer is uneven. Use the dehumidifier in the bucket). Do not force casters to help prevent moisture damage. Throw away the water and replace the bucket. Fig.6 3. Drain... the connector on the unit for good air circulation. Allow at temperatures below 5 C(41 F). or more 7.9 in. Do not connect the dehumidifier to prevent moisture damage anywhere books or valuables are two ways to support the unit with frost at least 7.9 in. Otherwise the bucket will ...
/ Owners Manual
Page 6
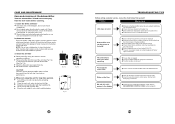
... Fig. 11a Fig. 11b Fig. 12 TROUBLESHOOTING TIPS Before calling customer service, review the chart below 5OC(41OF). Problem What to operate. 3. Dehumidifier has reached its preset level or bucket is pushed completely into the power outlet. The humidity control may not be loose. Check that all doors..., windows and other openings are error codes and protection code. The unit is removed. The dehumidifier has Auto defrost feature. These are securely closed. Remove the filter from the wall outlet before emptying the bucket. When not using the...
... Fig. 11a Fig. 11b Fig. 12 TROUBLESHOOTING TIPS Before calling customer service, review the chart below 5OC(41OF). Problem What to operate. 3. Dehumidifier has reached its preset level or bucket is pushed completely into the power outlet. The humidity control may not be loose. Check that all doors..., windows and other openings are error codes and protection code. The unit is removed. The dehumidifier has Auto defrost feature. These are securely closed. Remove the filter from the wall outlet before emptying the bucket. When not using the...