

User Manual
Page 11
...LCD products, this set contains a lamp with Mercury, please dispose of according to navigate through the Settings menu 11 Introduction 11 TV menu 12 Installation 12 Select the menu language 12 Store TV... TV 1 IMPORTANT SAFETY INSTRUCTIONS 2 Precaution 3 Contents 4 Preparation 5 Wall mounting 5 Use of the remote control 8 Buttons on the back side of the TV ...32MF337B Serial No: Care of the screen See Tips, p. 32 End of . Using products with all Local, State and Federal laws. ENERGY STAR® is a U.S. At the end of your TV before making this call the Magnavox...
...LCD products, this set contains a lamp with Mercury, please dispose of according to navigate through the Settings menu 11 Introduction 11 TV menu 12 Installation 12 Select the menu language 12 Store TV... TV 1 IMPORTANT SAFETY INSTRUCTIONS 2 Precaution 3 Contents 4 Preparation 5 Wall mounting 5 Use of the remote control 8 Buttons on the back side of the TV ...32MF337B Serial No: Care of the screen See Tips, p. 32 End of . Using products with all Local, State and Federal laws. ENERGY STAR® is a U.S. At the end of your TV before making this call the Magnavox...

User Manual
Page 13
... the OUTPUT CH switch on the cable box to CH 3 or 4 (whichever is selected. • Press the OK button to the TV if the station you are viewing broadcasts stereo sound. - Cable TV Connect the cable TV signal to the corresponding channel. Cable box with A/V outputs • Connect the incoming cable... ANTENNA 75 jack at the bottom of cable TV programs through your cable box, first press the SOURCE button on the remote control. • Press the cursor down or up buttons until the AV3 signal source is correct for the TO TV jack. The AV3 input source becomes current for...
... the OUTPUT CH switch on the cable box to CH 3 or 4 (whichever is selected. • Press the OK button to the TV if the station you are viewing broadcasts stereo sound. - Cable TV Connect the cable TV signal to the corresponding channel. Cable box with A/V outputs • Connect the incoming cable... ANTENNA 75 jack at the bottom of cable TV programs through your cable box, first press the SOURCE button on the remote control. • Press the cursor down or up buttons until the AV3 signal source is correct for the TO TV jack. The AV3 input source becomes current for...
User Manual
Page 14
...can watch pay-per-view events. 3 To connect accessory devices, see an installation introduction screen. Placing the TV on top of the same premium channels available on your home. button on the air, one analog and one digital. This means that are watching. Note: This connection will have...fire or electric shock. 5 Remote control: Insert the two supplied AAA batteries. Never place the TV on top of the header and the info on screen continuously change language.) 3 Press the OK button. 4 Follow the on -screen menus. 2 Press the cursor up . Cable box with local regulations ...
...can watch pay-per-view events. 3 To connect accessory devices, see an installation introduction screen. Placing the TV on top of the same premium channels available on your home. button on the air, one analog and one digital. This means that are watching. Note: This connection will have...fire or electric shock. 5 Remote control: Insert the two supplied AAA batteries. Never place the TV on top of the header and the info on screen continuously change language.) 3 Press the OK button. 4 Follow the on -screen menus. 2 Press the cursor up . Cable box with local regulations ...

User Manual
Page 15
... to select among the three settings; Press repeatedly to select the next item in the preferred channel list (see Cover and Connection) Sleep button Press to set the LCD TV to activate on screen menu on /off completely unless it is physically unplugged. Volume Press + or - OK - VIEW To display a list of all...
... to select among the three settings; Press repeatedly to select the next item in the preferred channel list (see Cover and Connection) Sleep button Press to set the LCD TV to activate on screen menu on /off completely unless it is physically unplugged. Volume Press + or - OK - VIEW To display a list of all...
User Manual
Page 16
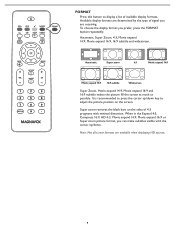
... adjust the picture position on the sides of signal you prefer, press the FORMAT button repeatedly: Automatic, Super Zoom, 4:3, Movie expand 14:9, Movie expand 16:9, 16:9 subtitle and widescreen. To choose the display format you are receiving. It is recommended ...
... adjust the picture position on the sides of signal you prefer, press the FORMAT button repeatedly: Automatic, Super Zoom, 4:3, Movie expand 14:9, Movie expand 16:9, 16:9 subtitle and widescreen. To choose the display format you are receiving. It is recommended ...

User Manual
Page 17
... the remote control. buttons to select menu items in the directions as shown; •the + VOL button to switch the TV on. MENU button can still change some of the basic settings with the buttons on the top of the TV Should your remote be used to select the TV channels or sources. ...Power 10 Buttons on the top of your selection. Use: &#...
... the remote control. buttons to select menu items in the directions as shown; •the + VOL button to switch the TV on. MENU button can still change some of the basic settings with the buttons on the top of the TV Should your remote be used to select the TV channels or sources. ...Power 10 Buttons on the top of your selection. Use: &#...

User Manual
Page 18
... 3 1 How to navigate through the Settings menus The Settings menu allows you to access and change settings and preferences settings. • Press the MENU button on the remote control to enter the right panel. This means that when the highlight is moved to the left panel and the right panel... the remote control to exit the Settings menu. The right panel shows the content of the right panel is on your TV. Press the MENU button again to perform the required action when using on the screen. Use cursor up again. - Note: In some cases, you have highlighted in the left...
... 3 1 How to navigate through the Settings menus The Settings menu allows you to access and change settings and preferences settings. • Press the MENU button on the remote control to enter the right panel. This means that when the highlight is moved to the left panel and the right panel... the remote control to exit the Settings menu. The right panel shows the content of the right panel is on your TV. Press the MENU button again to perform the required action when using on the screen. Use cursor up again. - Note: In some cases, you have highlighted in the left...
User Manual
Page 19
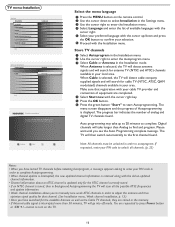
...channel is displayed. The progress bar indicates the number of Autoprogramming is tuned, then in Background Autoprogramming the TV will then switch automatically to press Power button or CH + / - Note: All channels must be unlocked in order to enter the Installation menu. ...• Once you see the Auto Programming complete message. Previous Start Select the menu language 1 Press the MENU button on the TV. 12 TV menu-Installation Settings Installation Language Autoprogram Source Clock Weak channel installation Current software info Reset AV settings Info Language English...
...channel is displayed. The progress bar indicates the number of Autoprogramming is tuned, then in Background Autoprogramming the TV will then switch automatically to press Power button or CH + / - Note: All channels must be unlocked in order to enter the Installation menu. ...• Once you see the Auto Programming complete message. Previous Start Select the menu language 1 Press the MENU button on the TV. 12 TV menu-Installation Settings Installation Language Autoprogram Source Clock Weak channel installation Current software info Reset AV settings Info Language English...

User Manual
Page 20
...forget to select and view a digital channel may vary. If the channel is not acquired, a message will appear with your TV software information. 1 Press the MENU button on the remote control. When strength is enough to receive multiple program channels under a single major channel number which can store... entry. Note: Subchannel selections The new standards employed with the message Audio only. If you use of the TV channels is not yet in the channel list by pressing red button on the remote control; Here's how: 1 In the antenna mode, select a channel from the displayed list...
...forget to select and view a digital channel may vary. If the channel is not acquired, a message will appear with your TV software information. 1 Press the MENU button on the remote control. When strength is enough to receive multiple program channels under a single major channel number which can store... entry. Note: Subchannel selections The new standards employed with the message Audio only. If you use of the TV channels is not yet in the channel list by pressing red button on the remote control; Here's how: 1 In the antenna mode, select a channel from the displayed list...

User Manual
Page 21
... Clock L VIDEO Y Pb Pr L IN -- : -- Clock This allows you to confirm. 14 Analog Audio In If your TV as a clock. 1 Press the MENU button on the remote control. 2 Use the cursor down to select Installation in the Settings menu. 3 Press the cursor right to enter the list... the Installation menu. 2 Press the cursor right to enter the list, and press up /down key to the selected input. 3 Press OK button to an external amplifier or receiver. AM Settings Installation Language Autoprogram Source Clock Weak channel installation Current software info Reset AV settings Info...
... Clock L VIDEO Y Pb Pr L IN -- : -- Clock This allows you to confirm. 14 Analog Audio In If your TV as a clock. 1 Press the MENU button on the remote control. 2 Use the cursor down to select Installation in the Settings menu. 3 Press the cursor right to enter the list... the Installation menu. 2 Press the cursor right to enter the list, and press up /down key to the selected input. 3 Press OK button to an external amplifier or receiver. AM Settings Installation Language Autoprogram Source Clock Weak channel installation Current software info Reset AV settings Info...

User Manual
Page 22
Info Settings Installation Language Autoprogram Source Clock Weak channel installation Current software info Reset AV settings Info Reset AV settings Start now Reset AV settings This function allows you to reset most of the picture and sound settings to their default factory levels. 1 Select Reset AV settings with the cursor down key. 2 Press the cursor right key. 3 Press the OK button to erase settings and reset them to their default values. 15
Info Settings Installation Language Autoprogram Source Clock Weak channel installation Current software info Reset AV settings Info Reset AV settings Start now Reset AV settings This function allows you to reset most of the picture and sound settings to their default factory levels. 1 Select Reset AV settings with the cursor down key. 2 Press the cursor right key. 3 Press the OK button to erase settings and reset them to their default values. 15

User Manual
Page 24
...This service contains captions in a secondary language, which is up to the discretion of the captions in the accompanying program audio. Press the OK button to confirm. • Size Select this option to choose a caption display font style according to your own preference. Select Default (...Info Sleeptimer 3 0 Digital caption service This allows you to configure the way you to modify how digital captions are displayed on your TV. Select Default, Mono spaced serif, Serif, Monospaced sans serif, Sans serif, Casual, Cursive or Small caps. • Text Select this ...
...This service contains captions in a secondary language, which is up to the discretion of the captions in the accompanying program audio. Press the OK button to confirm. • Size Select this option to choose a caption display font style according to your own preference. Select Default (...Info Sleeptimer 3 0 Digital caption service This allows you to configure the way you to modify how digital captions are displayed on your TV. Select Default, Mono spaced serif, Serif, Monospaced sans serif, Sans serif, Casual, Cursive or Small caps. • Text Select this ...

User Manual
Page 26
...down key. 4 Adjust the settings with the cursor left/right key or enter the list of submenu items with the cursor right key. Note: This Magnavox TV has been set at the factory to look best in bright store environments, which will likely not be as well lit as a store, we recommend... that Natural is the correct choice. 2 You can press the Smart picture button on the remote control repeatedly to select either Personal, Rich, Natural, Soft, or Power saver picture settings. As your personal preference. 19 Brightness This will...
...down key. 4 Adjust the settings with the cursor left/right key or enter the list of submenu items with the cursor right key. Note: This Magnavox TV has been set at the factory to look best in bright store environments, which will likely not be as well lit as a store, we recommend... that Natural is the correct choice. 2 You can press the Smart picture button on the remote control repeatedly to select either Personal, Rich, Natural, Soft, or Power saver picture settings. As your personal preference. 19 Brightness This will...

User Manual
Page 27
... white colors a red tint. Tint Allows you are at normal mid-range levels when the bar scale is entered. Sound menu 1 Select Sound in the TV Settings menu. 2 Press the cursor right key to select a predefined sound setting. Settings Picture Sound Features Parental Control Installation Exit Info Settings Sound... hue. Note: The moment you to the personal preference sound settings in the picture. Picture format This menu item performs the same as the FORMAT button on the remote control.
... white colors a red tint. Tint Allows you are at normal mid-range levels when the bar scale is entered. Sound menu 1 Select Sound in the TV Settings menu. 2 Press the cursor right key to select a predefined sound setting. Settings Picture Sound Features Parental Control Installation Exit Info Settings Sound... hue. Note: The moment you to the personal preference sound settings in the picture. Picture format This menu item performs the same as the FORMAT button on the remote control.

User Manual
Page 33
... menu. 2 Use the cursor right to enter the Source menu. 3 Select PC with the cursor up /down and press the OK button to confirm your selection. Auto adjust Automatically adjust to their default factory levels. 1 Select Factory reset in the Installation menu. ...ñol Info SSeettttiinnggss Installation Language Source Picture adjustment Factory reset Info Settings Installation Language Source Picture adjustment Factory reset Source TV AV1 AV2 AV3 HDMI1 HDMI2 Side PC Picture adjustment Auto adjust Manual adjust Info Settings Installation Language Source Picture adjustment Factory ...
... menu. 2 Use the cursor right to enter the Source menu. 3 Select PC with the cursor up /down and press the OK button to confirm your selection. Auto adjust Automatically adjust to their default factory levels. 1 Select Factory reset in the Installation menu. ...ñol Info SSeettttiinnggss Installation Language Source Picture adjustment Factory reset Info Settings Installation Language Source Picture adjustment Factory reset Source TV AV1 AV2 AV3 HDMI1 HDMI2 Side PC Picture adjustment Auto adjust Manual adjust Info Settings Installation Language Source Picture adjustment Factory ...

User Manual
Page 36
...devices. 2 Press the cursor up/down. 3 Press OK. 29 To select connected devices 1 Press the SOURCE button repeatedly or select Source in the Settings menu (see p. 14) to select TV, AV1, AV2, AV3, HDMI1, HDMI2, Side or PC, according to record. Record with your recorder Pr... Pb Y L R VIDEO Recorder TV Record a TV program You can record a TV program using your recorders tuner without affecting your TV. 1 Select the channel number on your recorder to where you connected your recorder. Note: Switching channel...
...devices. 2 Press the cursor up/down. 3 Press OK. 29 To select connected devices 1 Press the SOURCE button repeatedly or select Source in the Settings menu (see p. 14) to select TV, AV1, AV2, AV3, HDMI1, HDMI2, Side or PC, according to record. Record with your recorder Pr... Pb Y L R VIDEO Recorder TV Record a TV program You can record a TV program using your recorders tuner without affecting your TV. 1 Select the channel number on your recorder to where you connected your recorder. Note: Switching channel...

User Manual
Page 37
...cabinets which would limit the air flow. Good sound but poor color or no signal is wrong. Go to www.magnavox.com/usasupport to see if they are properly connected to the TV. • Possible broadcast station trouble. Using a highly directional antenna may influence the reception of other devices. Some ... video play or in poor quality only No sound • Check if the source complies with the cursor left/right or up/down buttons on the top of your TV has been shutdown in the standby mode. E.g. Replace if necessary. • Clean the remote control sensor lens on the set. &#...
...cabinets which would limit the air flow. Good sound but poor color or no signal is wrong. Go to www.magnavox.com/usasupport to see if they are properly connected to the TV. • Possible broadcast station trouble. Using a highly directional antenna may influence the reception of other devices. Some ... video play or in poor quality only No sound • Check if the source complies with the cursor left/right or up/down buttons on the top of your TV has been shutdown in the standby mode. E.g. Replace if necessary. • Clean the remote control sensor lens on the set. &#...


